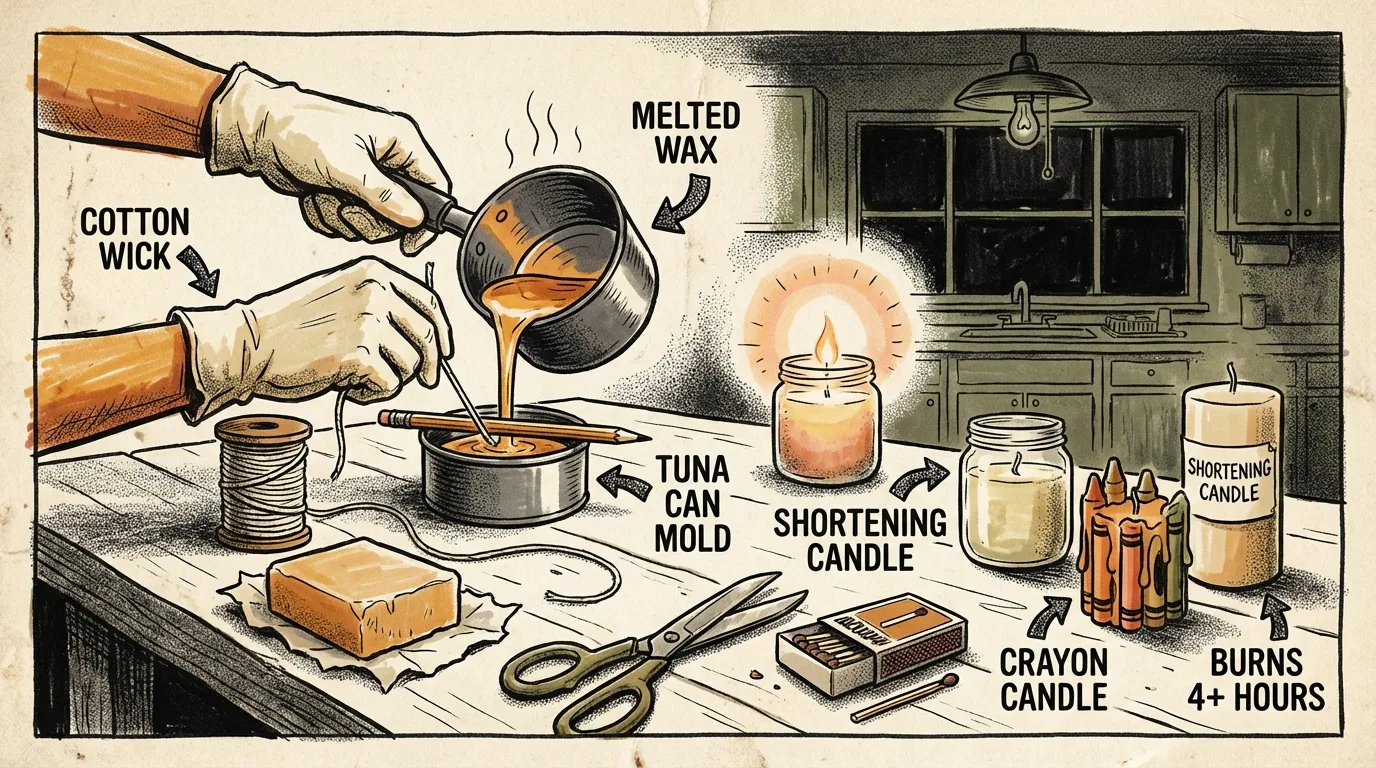
To make DIY emergency candles, use wax, a properly sized wick, and a heat-safe container, then melt the wax with a double boiler, secure the wick, pour, cool, and trim. Homemade candles can be cost-effective and effective for outages, often burning 30–50 hours, but they must be made and used with careful fire safety.
Key Takeaways
- Trim every candle wick to exactly 1/4 inch before burning to reduce soot.
- Use a double boiler and thermometer, targeting 120-160°F depending on wax type.
- Test burn one candle for one hour, weigh wax consumed, then extrapolate total runtime.
- Store certified commercial long-burn candles alongside DIY candles for immediate backup.
- Label each finished candle with wax type and date, storing in a cool dry place.
DIY Emergency Candles: Make Long-Burn Backup Lights for Power Outages
Quick facts
- Make DIY emergency candles by melting wax (paraffin, soy, or beeswax), securing a correctly sized wick in a heat-safe container, pouring melted wax, cooling, and trimming the wick to about 1/4 inch.
- Test one candle to confirm flame behavior and burn time before making a large batch.
Burn time and cost vary with container volume, wick size, wax type, and room conditions. Always run a timed test burn for any candle you plan to rely on.
Key definitions
- Container candle: melted wax poured into a heat-safe vessel with a centered wick.
- Pre-tabbed wick: cotton or cotton-core wick with a metal tab to anchor it in a container.
- Burn time: how long a candle burns before the wax pool is exhausted.
- Oil candle: a wick placed in liquid fuel (cooking or lamp oil) instead of solid wax.
Quick start: How to make DIY emergency candles
- Gather wax or oil, a correctly sized wick, and a heat-safe container. Use a thermometer if available.
- Anchor the wick in the container and center it with a pencil or wick bar.
- Melt wax using a double boiler, monitor temperature, and remove debris.
- Pour slowly, let the candle cool undisturbed, then trim the wick to about 1/4 inch.
- Do a timed test burn to verify flame size and run time.
Supplies
Essential materials
- Wax: paraffin, soy, or beeswax. You can also remelt candle stubs.
- Beeswax: burns cleaner and often lasts longer by volume, but costs more.
- Soy: cleaner than paraffin and easier to clean up with soap and hot water.
- Paraffin: inexpensive, but may produce more soot.
- Wicks: pre-tabbed cotton or cotton-core wicks sized for the container diameter.
- Containers: mason jars, metal tins, or thick glass or ceramic labeled heat-safe.
Tools
- Double boiler or a pouring pitcher set in simmering water.
- Thermometer (recommended).
- Wick stickers, hot glue, or a small dab of hardened wax to anchor wicks.
- Pencil, chopstick, or wick bar to center wicks.
- Scissors, oven mitts, and a protective surface covering.
Melting temperature (approx.)
- Paraffin: 120-160°F (49-71°C)
- Soy: 120-150°F (49-66°C)
- Beeswax: 144-147°F (62-64°C)
Optional add-ins
- Small amounts of fragrance oil. Use sparingly; some fragrances increase soot.
- Candle dye for appearance.
- Lids for storage and transport.
Budget tip: reuse jars and leftover wax. Cooking oil can work for oil candles but behaves differently from solid wax.
Step-by-step: basic container candle
- Prepare the workspace. Use a flat, protected surface in a well-ventilated area. Keep kids and pets away. Have a fire extinguisher or bucket of sand nearby.
- Secure the wick. Attach the tab to the container bottom and wrap the top around a pencil or wick bar to center it.
- Melt the wax. Use a double boiler, stir gently, monitor temperature, and skim out debris.
- Add dye or a small amount of fragrance while the wax is fully melted, if desired.
- Pour slowly and leave a small gap at the top. Re-center the wick if needed.
- Cool undisturbed at room temperature for several hours. If the surface sinks, top off with a little melted wax.
- Trim the wick to about 1/4 inch.
- Label with wax type and date. Store in a cool, dry place.
Quick troubleshooting
- Surface sink or hole: let the candle cool completely, then add a small amount of melted wax to top it off.
- Wick drifting: secure the tab better or rebatch that container.
- Excessive soot or smoke: trim to 1/4 inch, try a thinner wick, or switch wax types.
How to estimate burn time (practical)
- Weigh a finished candle and record the weight.
- Do a timed burn (for example, 1 hour) and re-weigh or measure wax consumed.
- Extrapolate total burn time from weight loss per hour. This empirical method is the most reliable for DIY emergency candles.
Simple oil candle variation
Materials
- Small heat-resistant jar or tin
- Cooking oil (olive, vegetable) or lamp oil
- Cotton wick secured with a small washer or floating holder
Method
- Position the wick so it stays upright and becomes saturated but is not fully submerged.
- Fill with oil, leaving headspace.
- Light and monitor for smoking. Burn only where ventilation is good.
Notes: cooking oils usually produce more smoke and odor than lamp oil. Use outdoors or in a well-ventilated area and test before relying on them indoors.
Safety checklist
- Use a double boiler; do not apply direct heat under wax.
- Never add water to hot wax. Water causes splattering.
- Keep a fire extinguisher or bucket of sand nearby when making or burning candles.
- Burn on a stable, non-flammable surface. Never leave candles unattended.
- Keep candles away from flammable materials, drafts, pets, and children.
- Do not use cracked or thin containers. Heat can cause breakage.
- If a candle fire spreads, smother it with a metal lid or use an appropriate extinguisher. Do not use water on an oil fire.
- Ensure ventilation to reduce indoor soot and odors.
DIY vs store-bought: tradeoffs
Pros of DIY
- Lower cost when you reuse jars and scrap wax.
- Customize size, burn time, and scent.
- Learn practical skills useful for preparedness.
Cons of DIY
- Variable performance; test each batch.
- Requires equipment and practice.
- Poorly made candles may produce more soot or present safety risks.
Pros of store-bought
- Consistent burn times and quality.
- Often labeled and tested for safety.
Keep some certified commercial long-burn candles for immediate use. Make DIY emergency candles for backup and customization. Test every candle before depending on it.
FAQ
Q: What basic materials do I need? A: Wax or oil, a correctly sized wick, and a heat-safe container. You will also need a double boiler and basic tools.
Q: Which candle type is best for beginners? A: Start with a container candle using soy or paraffin and a pre-tabbed cotton wick.
Q: How long do homemade emergency candles last? A: It varies. Large containers can claim 30-50 hours, but actual results depend on container volume, wax, and wick. Test using the weight/time method.
Q: Can I use crayons as wax? A: You can add crayons for color, but do not rely on them as the main fuel. Crayons change melting behavior and often increase soot.
Q: Are homemade candles cheaper than store-bought? A: Yes when you reuse containers and scrap wax. Initial equipment costs can make very small batches more expensive per candle.
Next steps
Make one test candle now. Record its burn time, flame size, and any soot. Adjust wick size or wax type based on the results. Combine a few reliable store-bought long-burn candles with your DIY emergency candles for redundancy. Prioritize safety and test rather than guess.
Further reading
- Becoming a Prepper: The Beginner’s Guide to Survival Readiness
- How to Build a Bug Out Bag: Essentials for a Quick Getaway
Keywords: DIY emergency candles, emergency candles, container candle, oil candle, candle safety
The Complete
Prepper's Reference.
149 articles synthesized into one comprehensive PDF — twelve chapters covering water, food, shelter, first aid, comms, and scenario-specific preparedness. Free with your email.
Unsubscribe anytime · We never share your email
You're in. Check your inbox.
Keep Reading
How to Build a Simple Solar Water Heater
Learn how to build a simple DIY solar water heater with basic tools, prepper-friendly materials, safety tips, and off-grid survival benefits.
How Solar Power Works: A Prepper's Off-Grid Guide
Learn how solar power works step by step and how to build a reliable off-grid emergency solar system. Practical sizing guide from a field-tested prepper.
How to Safely Store Fuel for Emergency Use
Learn how to store gasoline, diesel, and propane safely for emergencies with beginner-friendly tips on containers, shelf life, stabilizers, and fire safety.