Solar power is a reliable emergency energy option for preppers because it converts sunlight into electricity, can store power in batteries, and works without fuel resupply. A basic prepper solar setup includes solar panels, a battery, a charge controller, and often an inverter to run essential devices during outages.
Key Takeaways
- Size your system by calculating daily watt-hours for critical devices, then use local peak sun hours and battery depth of discharge to determine panel and battery capacity.
- Start with a portable 100W panel and a power station around $300–500 to learn the basics before committing to a permanent off-grid array.
- LiFePO4 batteries offer the best cycle life and usable capacity for emergency solar — roughly 85% depth of discharge and 3,000–5,000 cycles.
- Resistive heating loads like space heaters and electric stoves will drain most emergency solar systems in hours — plan propane or wood alternatives for heating and cooking.
- Always match component voltages across panels, charge controller, batteries, and inverter to prevent energy waste, equipment damage, or fire.
How Solar Power Works: A Prepper’s Off-Grid Guide
Understanding how solar power works is the single most important step toward building an energy system that doesn’t depend on fuel trucks, functioning gas stations, or a working grid. Portable solar setups have kept critical devices running during multi-day grid power outages, including extended ice storms — and this guide covers what actually works when the lights go out.
Here’s the thing: solar power for preppers isn’t about going green or cutting your electric bill. It’s about independence. Sunlight hits photovoltaic panels, those panels produce direct current electricity, and a handful of components turn that current into usable power for your critical devices. No engine noise to give away your position. No fuel that runs out on day three.
If you’re just starting your beginner’s guide to survival readiness, solar belongs on your short list of force multipliers — right alongside water storage and food stockpiling.
Quick Summary
- Solar panels convert sunlight into DC electricity through the photovoltaic effect — no fuel, no noise, no moving parts.
- Every off-grid solar system follows the same chain: panels → charge controller → battery bank → inverter → your devices.
- Size your system by calculating daily watt-hours for critical loads, then matching battery capacity and panel wattage to your local sun hours.
- LiFePO4 batteries are the gold standard for prepper setups, offering roughly 85% usable depth of discharge and thousands of charge cycles.
- High-wattage resistive loads (space heaters, electric stoves) will crush most emergency solar systems — plan propane or wood alternatives.
- You can start for $300–500 with a portable panel and power station, then scale up based on real-world testing.
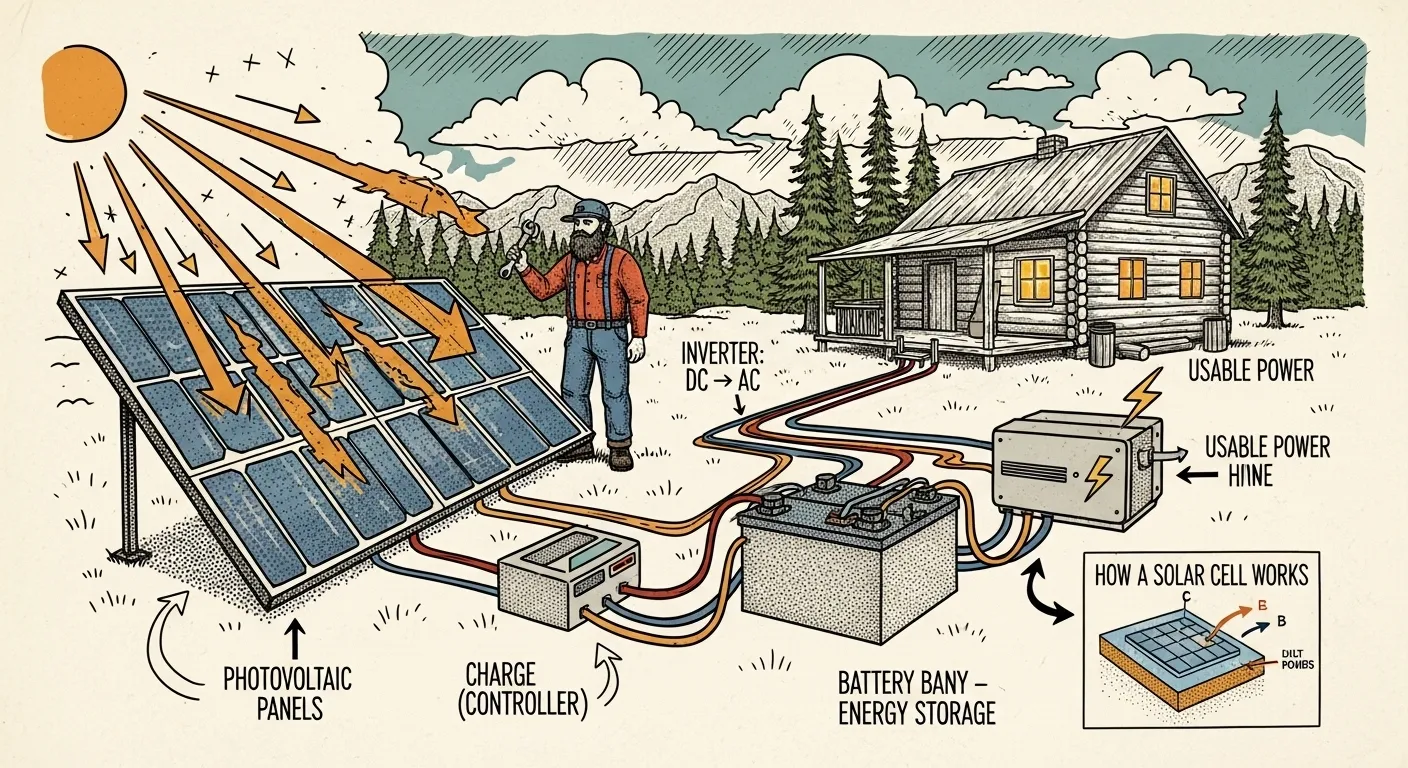
How Solar Power Works Step by Step
Solar power converts sunlight into electricity using semiconductor materials in photovoltaic cells. It’s a silent, fuel-free process called the photovoltaic effect. Here’s how it breaks down:
- Sunlight photons strike photovoltaic (PV) cells made of silicon semiconductor material, typically arranged in panels mounted on roofs or portable frames.
- Photons knock electrons free from silicon atoms, creating a flow of direct current (DC) electricity through the cell’s electrical field.
- A charge controller regulates the DC power flow, preventing overcharging and optimizing energy harvest from the panels to the batteries.
- Batteries store the DC energy for use at night, during cloudy weather, or whenever demand exceeds what panels produce in real time.
- An inverter converts stored DC into alternating current (AC), powering standard household devices, medical equipment, and communications gear.
That’s the core of how solar energy gets converted into electricity. Every off-grid solar power system — from a $200 portable kit to a $20,000 whole-home array — follows this same five-step process.
The photovoltaic effect itself is straightforward physics. Silicon cells are manufactured with two layers: one doped with phosphorus (giving it extra electrons) and one doped with boron (creating “holes” where electrons are missing). When a photon hits this junction, it kicks an electron loose, and the built-in electric field pushes it through an external circuit. That moving electron is your electricity.
Why does this matter in practical terms? Because understanding the basic science helps you troubleshoot problems in the field. When your output drops, you can systematically check each stage — panel surface, wiring, controller settings, battery state, inverter load — instead of staring at the whole system and guessing.
The Energy Flow: Sun to Socket
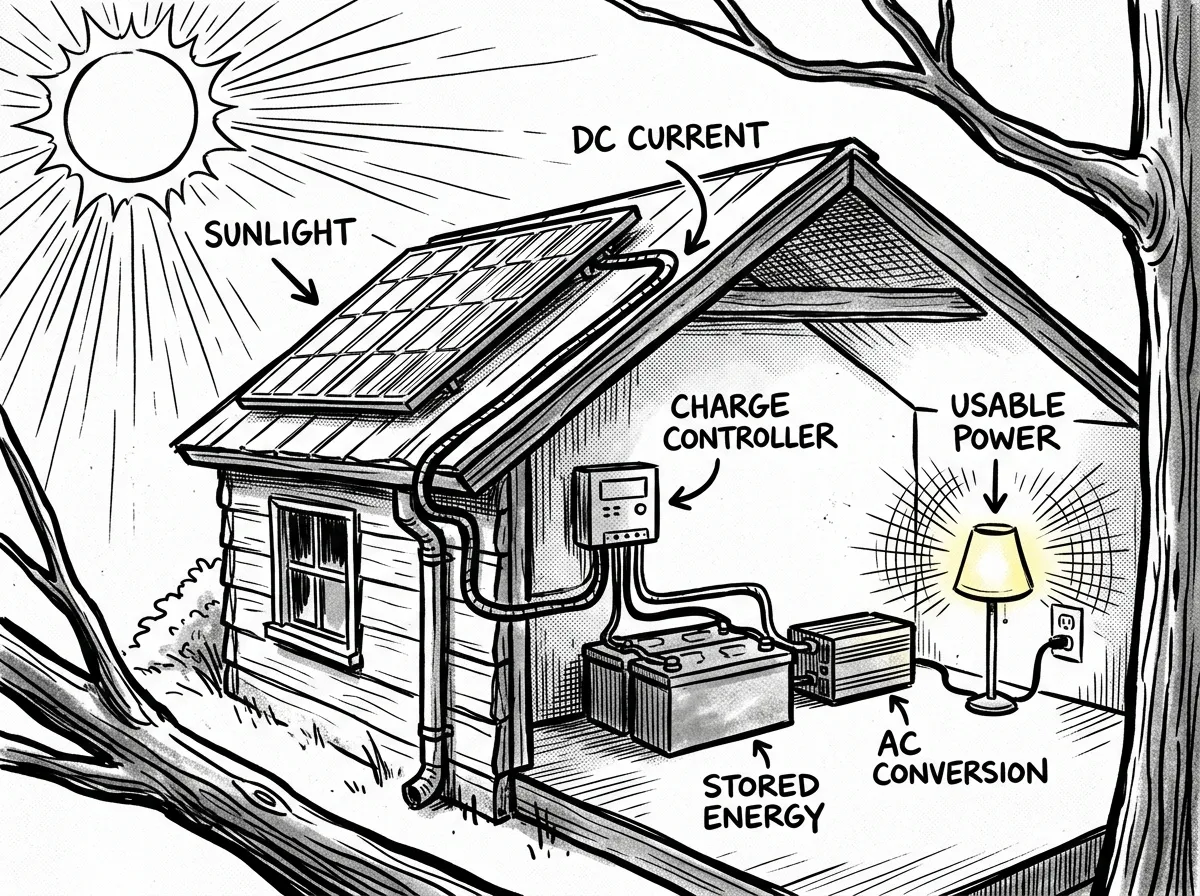 Tracing the path of sunlight from panel to powered device
Picture your off-grid solar power system as a chain with five links. Energy flows in one direction, and every link must be sized to handle what comes before it:
Sun → Solar Panels → Charge Controller → Battery Bank → Inverter → Your Devices
Here’s what happens at each node:
- Sun to panels: Photons hit the PV cells and generate DC voltage, typically 18–45V per panel depending on configuration.
- Panels to charge controller: DC flows through properly fused wiring to an MPPT or PWM controller that steps voltage down to match your battery bank.
- Charge controller to batteries: Regulated DC charges your battery bank at the correct voltage and current, with the BMS (battery management system) providing additional protection for lithium cells.
- Batteries to inverter: Stored DC feeds a pure sine wave inverter that converts it to 120V AC (or 240V for larger systems).
- Inverter to loads: Standard AC power runs your devices through a breaker panel or directly via outlets on the inverter.
Install fuses or breakers between every major component — panels to controller, controller to batteries, batteries to inverter. A short circuit in any segment can cause fires. Keeping a laminated wiring diagram taped inside the battery enclosure allows anyone in the household to safely disconnect the system.
If you’re building a permanent installation on your home, reference home fortification tips for beginners for guidance on integrating solar into your property’s infrastructure.
Solar System Components: How They Work Together
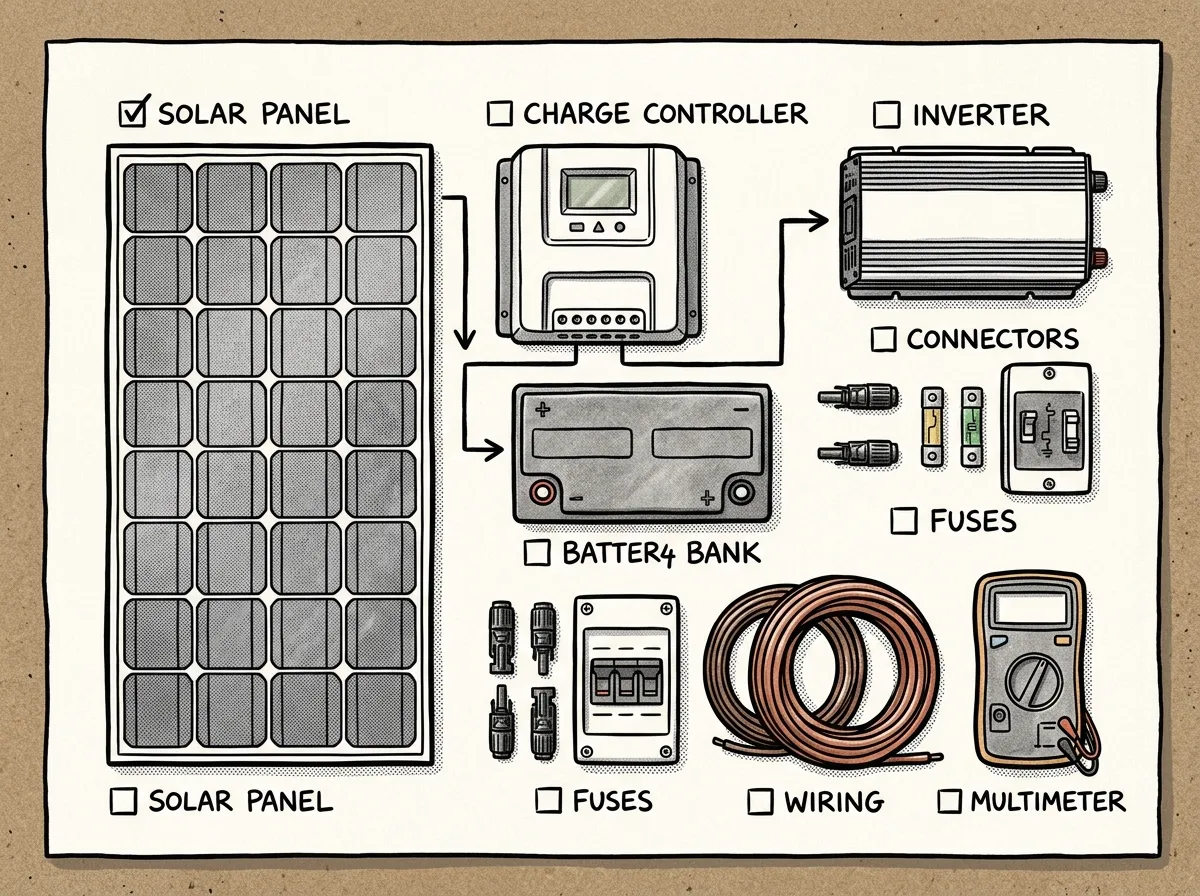 Core components of a prepper solar power system
A quick component overview isn’t enough. You need to understand how these pieces interact and why voltage matching matters across your entire system.
Solar Panels
Panels come in two main form factors: foldable portable panels for bug-out scenarios and rigid 100–400W modules for permanent arrays. Monocrystalline panels offer the best efficiency per square foot, while polycrystalline panels cost slightly less.
Real-world output is always lower than the nameplate rating. Always. Expect 15–25% losses from panel angle error, temperature, shading, dirt, and wiring resistance. A 400W array under real-world winter conditions typically produces closer to 300W at solar noon on a clear day, and output can drop to 50–80W under solid overcast.
Charge Controller: MPPT vs. PWM
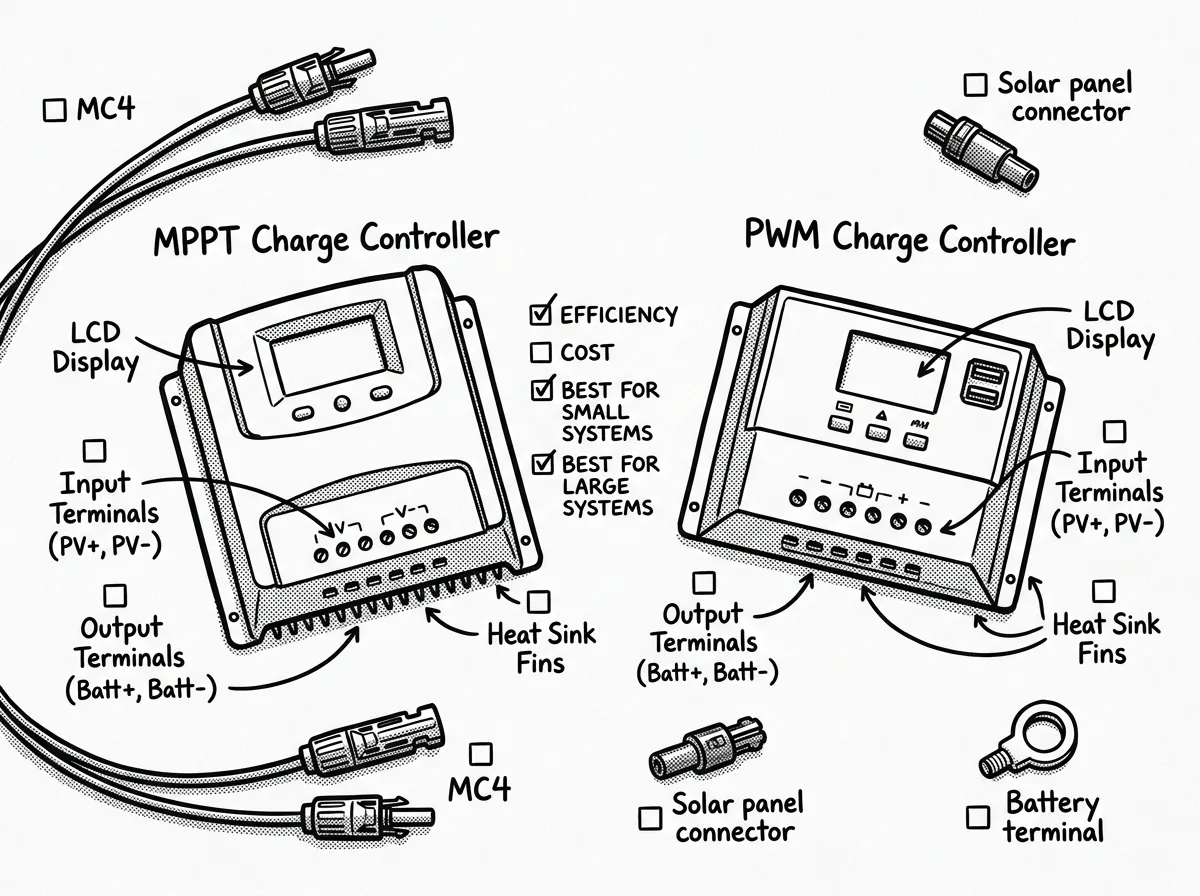 MPPT vs. PWM charge controllers compared side by side
The MPPT charge controller is generally the recommended choice for any serious emergency solar power setup. MPPT controllers work by converting excess panel voltage into additional charging current — essentially optimizing the power equation (watts = volts × amps) in real time.
MPPT controllers typically harvest 15–20% more energy than PWM units in low-angle winter sun, since they can convert excess panel voltage into additional charging current. That difference can be the margin between keeping a small refrigerator running and losing a freezer full of food during a multi-day outage. In northern latitudes or areas with significant cloud cover, this efficiency gain is worth the added cost. Victron SmartSolar MPPT controllers (around $100–200 depending on amperage) are a commonly recommended option.
Battery Bank
For prepper applications, LiFePO4 (lithium iron phosphate) batteries are the gold standard. They offer roughly 85% usable depth of discharge, 3,000–5,000 charge cycles, and they’re significantly lighter than lead-acid alternatives. AGM lead-acid batteries cost less upfront but give you fewer usable amp-hours and far fewer cycles before they need replacing.
Example system spec: 2 × 200W 24V panels → 30A MPPT controller → 24V 100Ah LiFePO4 battery bank (2,400Wh nominal, ~2,040Wh usable) → 2,000W pure sine wave inverter. This setup powers communications, LED lighting, phone charging, and a small energy-efficient refrigerator for most of the day.
Voltage matching is critical. Your panels, controller, battery bank, and inverter must all be compatible at the voltage level. Connecting a 12V battery bank to a 24V charge controller wastes energy. Feeding a 48V battery bank into a 12V inverter will destroy the inverter. Always verify voltage compatibility before connecting anything.
Inverter
A pure sine wave inverter takes the DC stored in your batteries and produces clean AC power identical to what comes from a wall outlet. Modified sine wave inverters cost less but can damage sensitive electronics, produce buzzing in audio equipment, and shorten motor life. Don’t gamble with your gear.
Match your inverter’s continuous wattage rating to your expected simultaneous loads, and make sure its surge rating handles motor startup — compressors and pumps can draw 2–4 times their running wattage for the first few seconds.
Wiring and Safety
Voltage drop over distance is a real problem with undersized cable — a 20-foot run between panels and charge controller with an undersized conductor can lose nearly 8% of power. Undersized conductors and missing fuses are the leading causes of solar system fires. Use weatherproof connectors for outdoor runs and properly rated enclosures for all connection points.
How to Size a Solar Power System for Emergencies
Solar battery bank sizing starts with your actual energy needs, not with whatever panel kit looks good online. Here’s the process:
Step 1: Calculate Daily Watt-Hours
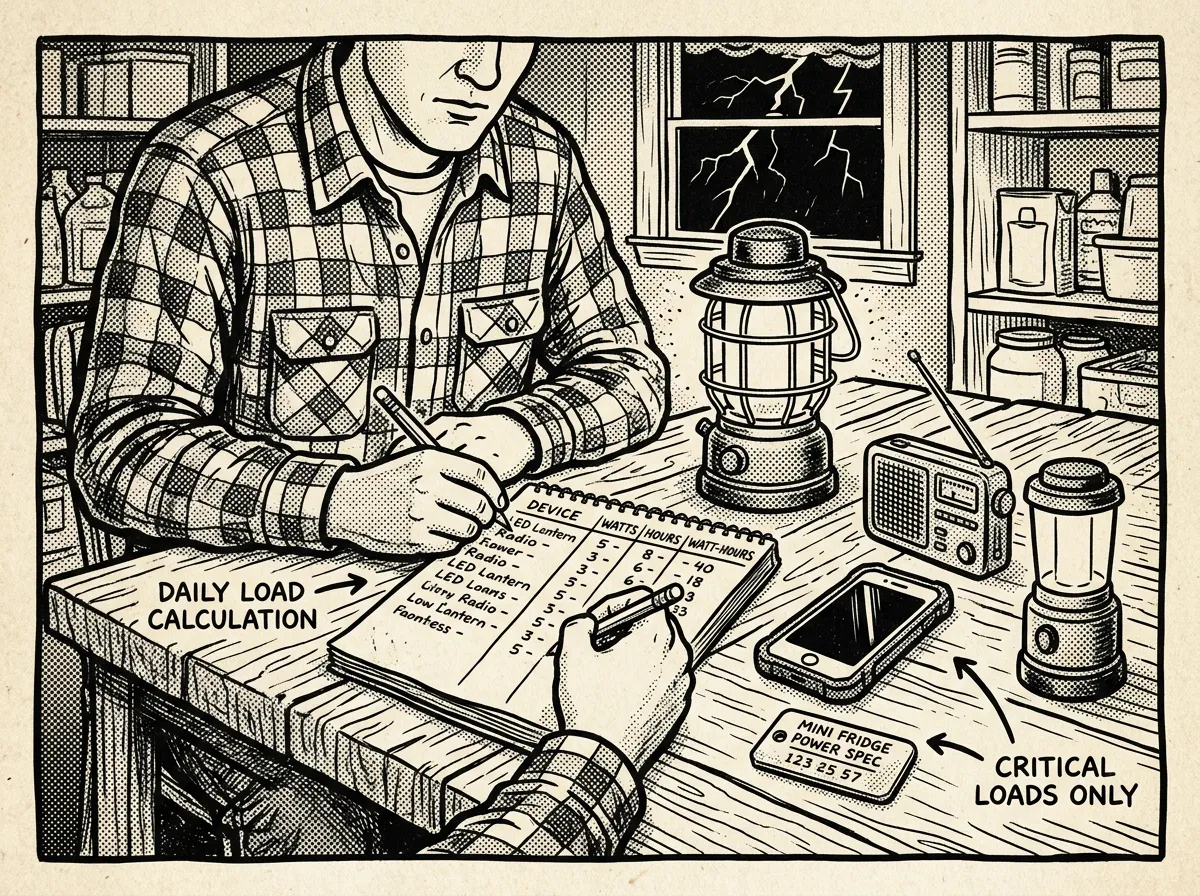 Calculating daily power needs for critical emergency devices
List every critical device with its wattage and daily usage hours:
| Device | Watts | Hours/Day | Daily Wh |
|---|---|---|---|
| Phone charging | 10W | 2h | 20 Wh |
| Two-way radio | 5W | 4h | 20 Wh |
| LED lighting | 10W | 6h | 60 Wh |
| Small refrigerator | 60W avg | 24h | 1,440 Wh |
| Total | 1,540 Wh/day |
Step 2: Size Your Battery Bank
Multiply daily consumption by your desired days of autonomy, then account for depth of discharge and system inefficiency:
- 3 days of autonomy: 1,540 × 3 = 4,620 Wh usable storage needed
- LiFePO4 at 85% DoD, 85% system efficiency: 4,620 ÷ (0.85 × 0.85) ≈ 6,400 Wh nominal battery capacity
That’s roughly 533Ah at 12V, or 267Ah at 24V. This is where you see why powering a refrigerator drives system costs up fast.
Step 3: Size Your Panel Array
Divide daily consumption by system efficiency, then divide by local peak sun hours:
- Daily panel need: 1,540 ÷ 0.85 ≈ 1,812 Wh
- At 4 peak sun hours: 1,812 ÷ 4 ≈ 453W of panels (round up to 500W)
Use NREL PVWatts or PVGIS to get accurate peak sun hours for your specific location. In the Pacific Northwest, plan around 2.5–3.5 peak hours in winter versus 5–6 in summer. If you’re in Arizona or west Texas, you might get 6–7 peak hours year-round — a completely different equation.
For context on why how to store water for emergencies matters here — if you’re running a water filtration pump, add its wattage to your calculation.
What Can’t You Practically Run on Emergency Solar?
This is a common question about emergency solar systems. The honest answer: solar can technically power anything if the system is large enough. But in practice, several categories of appliances will crush most emergency setups.
High-wattage resistive heating loads are the biggest offenders:
- Electric space heaters: 1,000–1,500W
- Hair dryers: 1,200–1,800W
- Electric stoves/ovens: 1,500–5,000W
- Electric water heaters: 3,000–4,500W
A single electric space heater running for 8 hours consumes 12,000 Wh — more than your entire daily budget in the example system above. Think about that for a second. One heater. One night.
Large motor loads present a different problem. Well pumps, central air conditioning, and large shop tools require massive startup surge current — often 3–4 times their running wattage. A 1HP well pump might run at 750W but surge to 2,200W on startup, demanding an oversized inverter.
Reserve your solar for electronics, lighting, communications, and refrigeration. Use propane or wood for heating and cooking.
Plan propane or wood alternatives for heating and cooking. A propane camping stove, a wood stove, or a rocket stove will serve you far better than trying to run electric heating elements off solar. Reserve your solar capacity for the things it does best — and keep your food stockpile cold in an energy-efficient refrigerator or freezer.
Advantages and Disadvantages of Solar Power for Preppers
I believe in giving you the full picture so you can make informed decisions. Not sales pitches.
Advantages
- No fuel dependency: Once installed, solar produces power from sunlight alone. No gas lines, no propane deliveries, no fuel storage headaches.
- Silent operation: Zero noise signature. In a grid-down scenario, a generator announces your location to everyone within earshot. Solar panels are invisible from an auditory standpoint.
- Scalable: Start with a $150–300 portable 100W panel and a small power station. Scale up as budget allows.
- Low maintenance: No oil changes, no spark plugs, no moving parts. Clean panels occasionally, check connections, monitor battery health.
- Long lifespan: Quality solar panels maintain 80%+ output for 25–30 years. LiFePO4 batteries last 3,000–5,000 cycles.
- Quiet resupply: In a prolonged emergency, sunlight keeps coming. You don’t need to make risky fuel runs.
Disadvantages
- Upfront cost: A meaningful off-grid system runs $1,500–3,000 for a 1kW setup. Whole-home systems with substantial battery banks can exceed $15,000–25,000.
- Weather and seasonal variability: Under heavy overcast conditions, a 400W array can produce as little as 65W of real output. That’s enough for comms and LED lighting, but nowhere near enough for the refrigerator. Plan for worst-case insolation.
- Battery replacement costs: Even LiFePO4 batteries eventually degrade. Budget for replacement every 8–15 years depending on cycle depth and frequency.
- Limited high-draw capability: Heating, cooking, and large motors are impractical for most emergency solar setups.
- Theft and visibility risk: In a prolonged grid-down scenario, visible panels on a roof or in a yard advertise that you have power. Consider panel placement, security, and whether portable or concealed installations make more sense for your threat model.
- Learning curve: Voltage matching, wire sizing, and charge programming require study. Mistakes can damage equipment or start fires.
Solar Power vs Generator: Which Is Better for Emergencies?
Solar and generators solve different problems. The answer isn’t either/or.
| Criteria | Solar | Generator |
|---|---|---|
| Fuel dependency | None — runs on sunlight | Requires gasoline, propane, or diesel |
| Noise | Silent | 50–80 dB depending on model |
| Maintenance | Minimal — clean panels, check connections | Oil changes, fuel stabilizer, carburetor cleaning |
| Runtime | Unlimited with sun; limited by battery at night | Limited by fuel supply |
| Cost over time | Higher upfront, near-zero ongoing | Lower upfront, ongoing fuel costs |
| Surge capacity | Limited by inverter and battery | Excellent — handles large motor loads easily |
Solar can run communications and lighting silently for days during an outage. But high-surge loads like a 1HP sump pump can push a solar inverter right to its limit, even if it could handle the running wattage — while a generator handles that surge without issue. Building solar as the primary system for daily critical loads, with a small, well-maintained generator as backup for high-surge or worst-case scenarios, is a practical hybrid approach.
Common Misconceptions About How Solar Power Works
“Solar panels don’t work in cloudy weather.” They absolutely do — just at reduced output. Photovoltaic panels respond to photons, not direct sunshine. Expect roughly 10–25% of rated output under heavy overcast. In practice, consistent overcast in northern climates still provides enough power for communications and lighting, but requires larger battery banks to bridge multi-day storms. If you’re in a humid Gulf Coast climate, summer thunderstorms can drop output to near zero for hours at a time, but you’ll make up for it with strong sun the rest of the day.
“Solar is too expensive for beginners.” A portable 100W panel and a 500Wh portable solar generator power station costs $300–500 total. The Jackery Explorer 500 — around $400–500 — is a solid entry point. The EcoFlow River 2, in a similar price range, offers faster charging and app monitoring according to manufacturer specifications. Either one covers phone charging, LED lighting, and radio operation for days. You don’t need a whole-home system to start.
“Solar can power everything forever.” Only if you size for it — and even then, not practically. Trying to run a 4,500W electric water heater on a 2kW solar system is like trying to fill a swimming pool with a garden hose. Do the math before you buy.
“Batteries are optional.” No. Without batteries, your solar system only works while the sun is shining. Batteries are the backbone of any emergency solar power setup. Period.
Safety, Legal, and Operational Considerations
Solar installations involve real electrical hazards. Even 12V DC systems can arc and ignite if wiring is undersized or connections corrode.
Electrical codes: NEC Article 690 governs solar PV installations in the United States. Rooftop systems require rapid shutdown capability so firefighters can safely work on your roof. If you’re doing a permanent installation, get a permit and have it inspected.
Lithium battery safety: Store LiFePO4 batteries between 32–113°F (0–45°C). Never charge lithium cells below freezing without a heated BMS — charging below 32°F causes lithium plating that permanently damages cells and creates fire risk. Keep a Class D fire extinguisher nearby for any battery installation.
Grid-tied considerations: Systems connected to the utility grid must prevent backfeeding during outages using anti-islanding inverters and proper transfer switches. This isn’t optional — backfed power can kill utility workers repairing lines.
Insurance implications: Many homeowner insurance policies require notification for DIY solar installations. Some won’t cover fire damage from unpermitted electrical work. Check your policy before installing.
- Clean panels every 1–3 months (more often in dusty or pollen-heavy environments)
- Check all connections for corrosion quarterly
- Monitor battery voltage, temperature, and cycle count monthly
- Replace any frayed or damaged wiring immediately
- Test inverter under load every 6 months
Frequently Asked Questions
What appliances cannot be used with solar power?
Solar can technically power any appliance if the system is large enough, but high-wattage resistive heating loads — electric stoves (1,500–5,000W), space heaters (1,000–1,500W), hair dryers (1,200–1,800W), and electric water heaters (3,000–4,500W) — are impractical for most portable or small off-grid setups. Large motor loads like well pumps and central AC require oversized inverters to handle startup surge, which is typically 2–4 times the running wattage. Plan propane or wood alternatives for heating and cooking in any prepper solar system.
How is solar energy converted into electricity?
Through the photovoltaic effect. When sunlight photons strike silicon semiconductor cells in a solar panel, they knock electrons free from their atoms. The cell’s built-in electric field pushes those electrons through an external circuit, creating direct current (DC) electricity. A charge controller regulates this DC power into batteries for storage, and an inverter converts it to alternating current (AC) for standard household devices.
How do solar panels work on a house?
It depends on whether you’re grid-tied or off-grid. In both cases, rooftop panels convert sunlight to DC electricity. Grid-tied systems feed power through an inverter to your home’s breaker panel and sell excess back to the utility through net metering. Off-grid systems route power through a charge controller to a battery bank, then through an inverter to your loads — with no utility connection at all.
How do you size a solar power system for emergencies?
List every critical device with its wattage and daily hours of use, then multiply to get daily watt-hours. Multiply by your desired days of autonomy to get required battery storage, adjusting for depth of discharge and system efficiency. Divide daily watt-hours by system efficiency and local peak sun hours to determine panel wattage. Use NREL PVWatts or PVGIS for accurate sun hour data at your location.
Your Next Steps
Don’t let this stay theoretical. Here’s your action plan:
- Make a 72-hour device list with watts and daily hours. Compute total watt-hours using the sizing method above.
- Look up your local peak sun hours at NREL PVWatts (US) or PVGIS (global). Use winter numbers for worst-case planning.
- Start small: Buy a portable solar generator and a 100W panel. Practice using them during a weekend “grid-down drill.”
- Learn your system’s real behavior — how it performs in morning shade, afternoon sun, overcast, and cold. Log actual output versus nameplate ratings.
- Scale up based on data, not guesses. Add panels, expand your battery bank, and upgrade your inverter as your needs and budget grow.
The best solar system is the one you’ve already practiced with before you need it. Don’t wait for the next storm, wildfire, or infrastructure failure to figure out whether your battery bank can actually run your refrigerator overnight. Start with a simple, testable setup that covers your most critical devices. Learn how the equipment behaves in your specific environment.
The sun rises every day — even behind clouds. Make sure you’re ready to use it.
The Complete
Prepper's Reference.
149 articles synthesized into one comprehensive PDF — twelve chapters covering water, food, shelter, first aid, comms, and scenario-specific preparedness. Free with your email.
Unsubscribe anytime · We never share your email
You're in. Check your inbox.
Keep Reading

How to Make Your Own Emergency Candles
Learn how to make DIY emergency candles with simple supplies, safety tips, and cost comparisons so you’re ready when the lights go out.
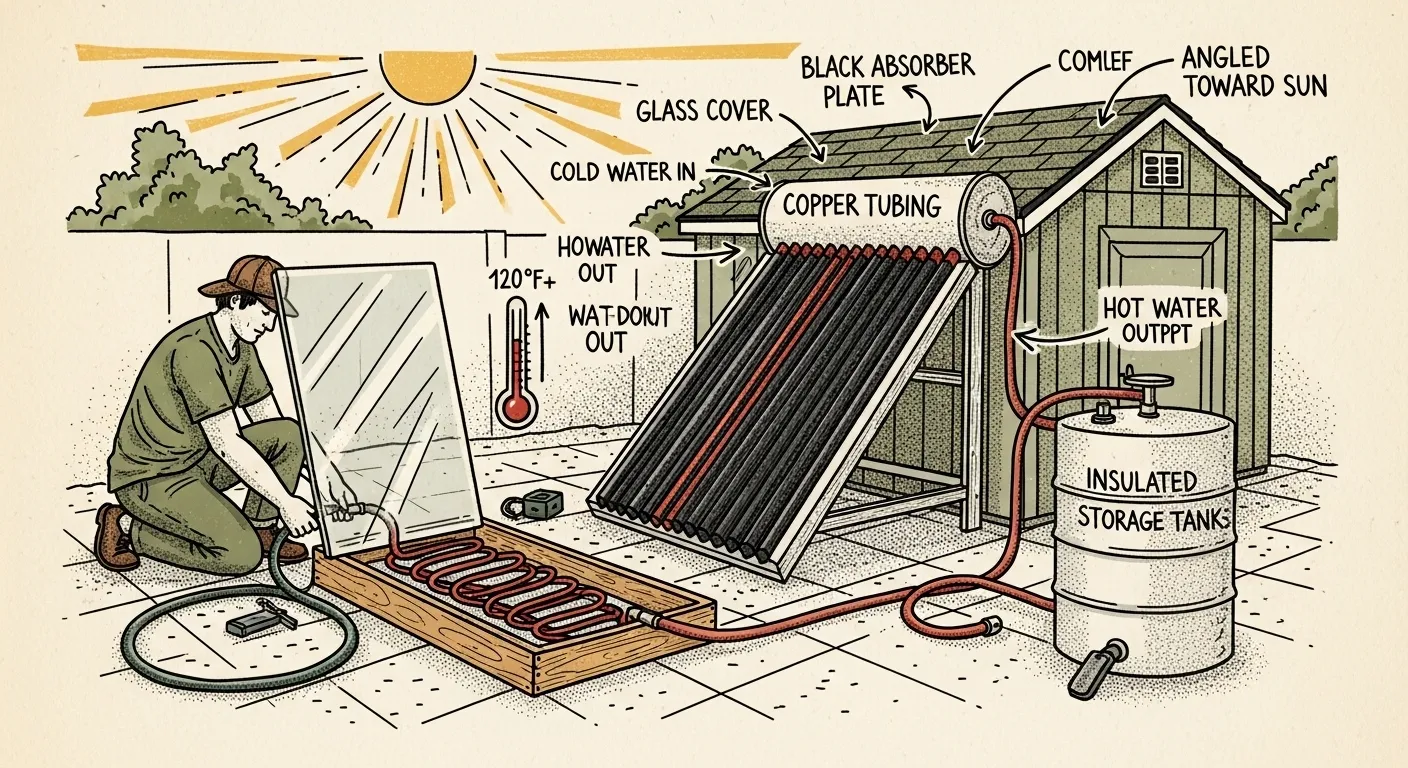
How to Build a Simple Solar Water Heater
Learn how to build a simple DIY solar water heater with basic tools, prepper-friendly materials, safety tips, and off-grid survival benefits.
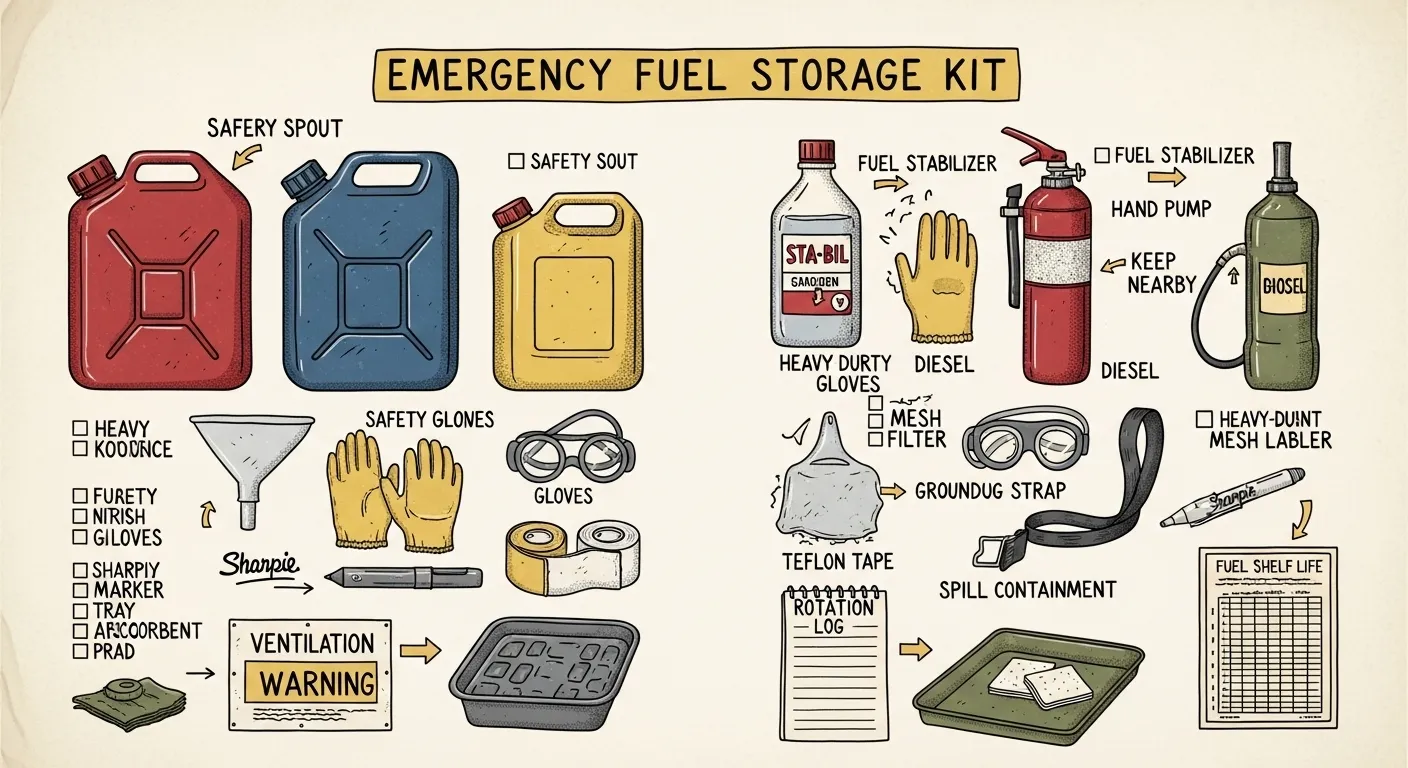
How to Safely Store Fuel for Emergency Use
Learn how to store gasoline, diesel, and propane safely for emergencies with beginner-friendly tips on containers, shelf life, stabilizers, and fire safety.