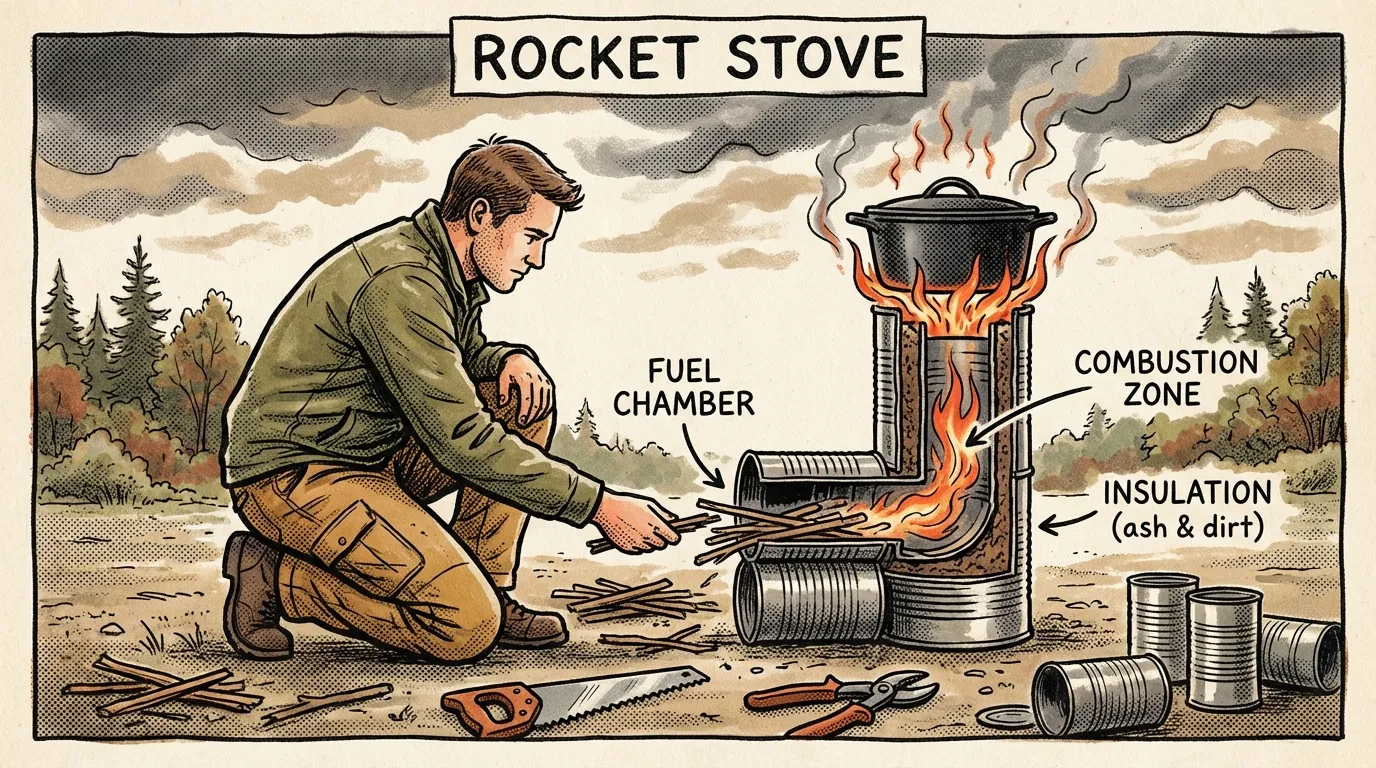
A DIY rocket stove is a compact, efficient outdoor cooking stove that burns small sticks and biomass in an insulated L-shaped chamber. Beginners can build one from metal cans, pipe, and insulation to create high heat with less fuel and less smoke than an open fire.
Key Takeaways
- Build and test a can-style rocket stove outdoors before relying on it for emergencies.
- Pack the riser with dry perlite or vermiculite insulation to maintain heat and clean combustion.
- Feed pencil-thin, dry sticks steadily instead of stuffing large logs into the feed tube.
- Never operate a DIY rocket stove indoors due to carbon monoxide risk; always use outside.
- Avoid painted, galvanized, or chemically treated metals in hot zones to prevent toxic fume release.
DIY rocket stove: Beginner’s guide for efficient, portable cooking
Quick facts
- A DIY rocket stove is a compact, high-efficiency wood-burning cooker that channels air and hot gases through an insulated riser for concentrated heat.
- It runs on small, dry biomass such as twigs and wood chips, and is often built from cans or stovepipe with loose insulation.
- Use outdoors only. Follow safety rules and test the stove before relying on it for emergencies.
What it is and how it works
A rocket stove forces air and combustion gases through an L- or J-shaped feed and an insulated vertical riser. The riser stays hot and creates a strong draft, which concentrates heat under a pot and produces a cleaner burn than an open fire. Small. Efficient. Portable.
Key components and their functions
| Component | Purpose |
|---|---|
| Feed tube (horizontal) | Insert and feed small-diameter fuel into the burn chamber |
| Combustion chamber | Where initial burning happens before gases rise |
| Heat riser (insulated vertical chimney) | Keeps gases hot, increases draft and combustion completeness |
| Insulation (perlite, vermiculite, dry ash) | Keeps the riser hot so combustion stays clean and strong |
| Pot support / grill | Holds cookware above the riser while allowing exhaust to escape |
Materials for a can-style build
- Outer body: large metal can or small steel bucket. Remove any plastic liners and avoid thin plastics.
- Inner chamber: a smaller can or short length of stovepipe sized to make a right-angle feed and riser.
- Insulation: perlite or vermiculite packed around the riser. Dry ash or sand can work in a pinch.
- Pot support: three bolts, a short grill, or bent metal tabs placed so they do not block exhaust.
- Tools: tin snips, hammer and punch or drill, marker, pliers.
- Safety gear: work gloves, eye protection, heat-resistant gloves for handling hot cookware.
Fuel
- Use dry, small-diameter biomass such as pencil-thin sticks, twig bundles, wood chips, or dried corn stalk pieces.
- Avoid plastics, painted or treated wood, and wet fuel. These increase smoke and can release toxic fumes.
- Do not use galvanized or painted metal where it will be heated directly. Heat can release harmful coatings.
Performance notes
Expect focused heat under a pot when the riser reaches operating temperature. Visible smoke drops once the riser is hot and draft is established. Performance depends on riser insulation, the fit of the inner chamber, and fuel dryness. Adjust technique and fuel size to control heat.
Build a simple can-style DIY rocket stove
Note: use these steps as a practical starting point. Exact dimensions depend on the cans or pipe you have. Test outdoors.
- Prepare the outer body
- Clean the large can and remove liners or residue.
- Mark and cut an opening near the lower side for the feed. Start with a punch, cut with tin snips, and file or bend sharp edges smooth.
- Create the L- or J-shaped burn chamber
- Fit a smaller can or a short stovepipe section horizontally into the feed opening, then attach a vertical piece for the riser.
- Keep the feed close to a right angle to the riser and center the riser for even insulation.
- Insert the chamber and add insulation
- Slide the inner chamber into the outer body and align it.
- Pack dry insulation such as perlite or vermiculite around the riser. Pack firmly but do not deform the inner chamber or block the feed.
- Add pot supports and top clearance
- Install a stable support that holds cookware above the riser while leaving a gap for exhaust gases.
- Keep the chimney opening clear so draft can form.
- First test burn (outdoors)
- Place the stove on a nonflammable surface.
- Start with tinder and very small twigs. Light the tinder and steadily feed small sticks. Expect initial smoke until the riser heats and draft establishes.
- Troubleshooting
- Excess smoke: fuel may be wet or airflow and insulation may be inadequate.
- Weak draft: clear obstructions, avoid overfilling the feed tube, and check riser height.
- Flames extinguish: use smaller, drier kindling to restart and re-establish draft.
Practical operation and cooking tips
- Feed steady, small sticks rather than stuffing large logs into the feed tube.
- Use fuel of similar size for consistent heat output.
- Flat-bottom cookware sized to the stove improves heat transfer. Very large pots can smother the chimney.
- Pre-stage water, ingredients, and tools. Rocket stoves heat quickly and require attention.
- Remove ash occasionally to maintain airflow.
Safety
- Use outdoors only. Never operate a DIY rocket stove inside a building, shelter, or enclosed space because of carbon monoxide risk.
- Set the stove on a nonflammable surface and clear a safety zone free of fuels and combustibles.
- Keep a fire extinguisher, water, or sand nearby. Never leave the stove unattended while it is hot.
- Do not operate during burn bans, high wind, or other high-fire-risk conditions.
- When cutting metal, wear gloves and eye protection and smooth any sharp edges.
- Do not place painted, galvanized, or chemically treated metals in direct combustion zones.
FAQ
Q: Is a rocket stove better than an open fire for cooking? A: Yes for small-scale outdoor cooking. A properly built rocket stove concentrates heat under cookware and typically produces less visible smoke than an open fire.
Q: How portable is a DIY rocket stove? A: Can-style builds are lightweight and easy to carry. Larger steel or masonry versions are heavier but more durable.
Q: Can I safely use treated metal parts? A: No. Avoid painted, galvanized, or chemically treated metals in hot zones. They can emit harmful fumes when heated.
Prepper checklist
- Build and test a can-style rocket stove now. Practice boiling water and cooking simple meals.
- Store dry, small-diameter fuel and practice preparing it in advance.
- Pack fire-starting tools and a compact cook kit to match the stove.
Notes and caveats
Expect variation in fuel savings, smoke reduction, and boil times. Results change with design, fuel moisture, and user technique. Can-style units are generally accessible for beginners, but skill and attention to safety improve outcomes.
Further reading
Search university extension services, maker communities, and stove-testing protocols for measured performance and comparison data.
A well-built DIY rocket stove makes a reliable, low-cost cooker for emergency use and backcountry trips. Practice before relying on it.
The Complete
Prepper's Reference.
149 articles synthesized into one comprehensive PDF — twelve chapters covering water, food, shelter, first aid, comms, and scenario-specific preparedness. Free with your email.
Unsubscribe anytime · We never share your email
You're in. Check your inbox.
Keep Reading
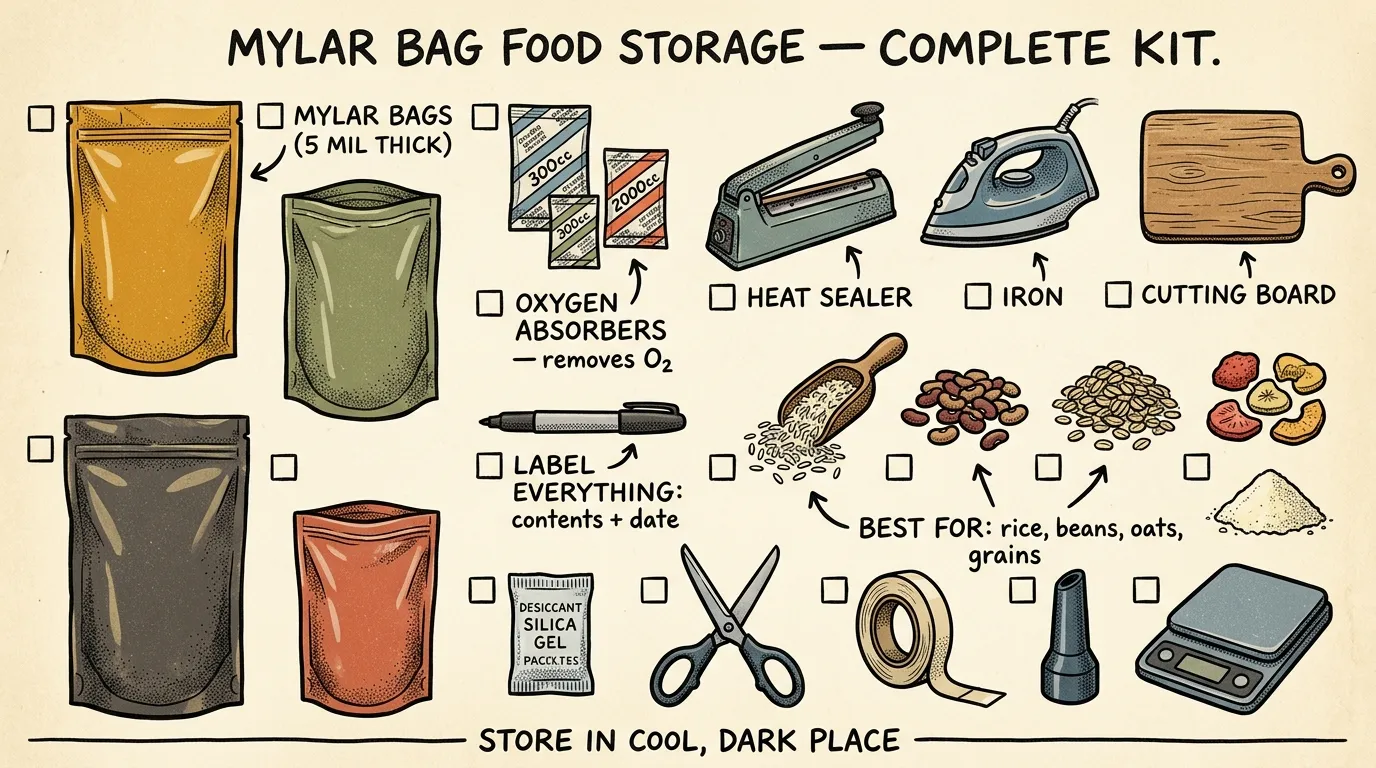
Mylar Bags for Food Storage: Complete Guide (2026)
Learn how to use mylar bags for food storage to preserve dry goods 25+ years. Expert guide covers thickness, sealing, oxygen absorbers & mistakes to avoid.
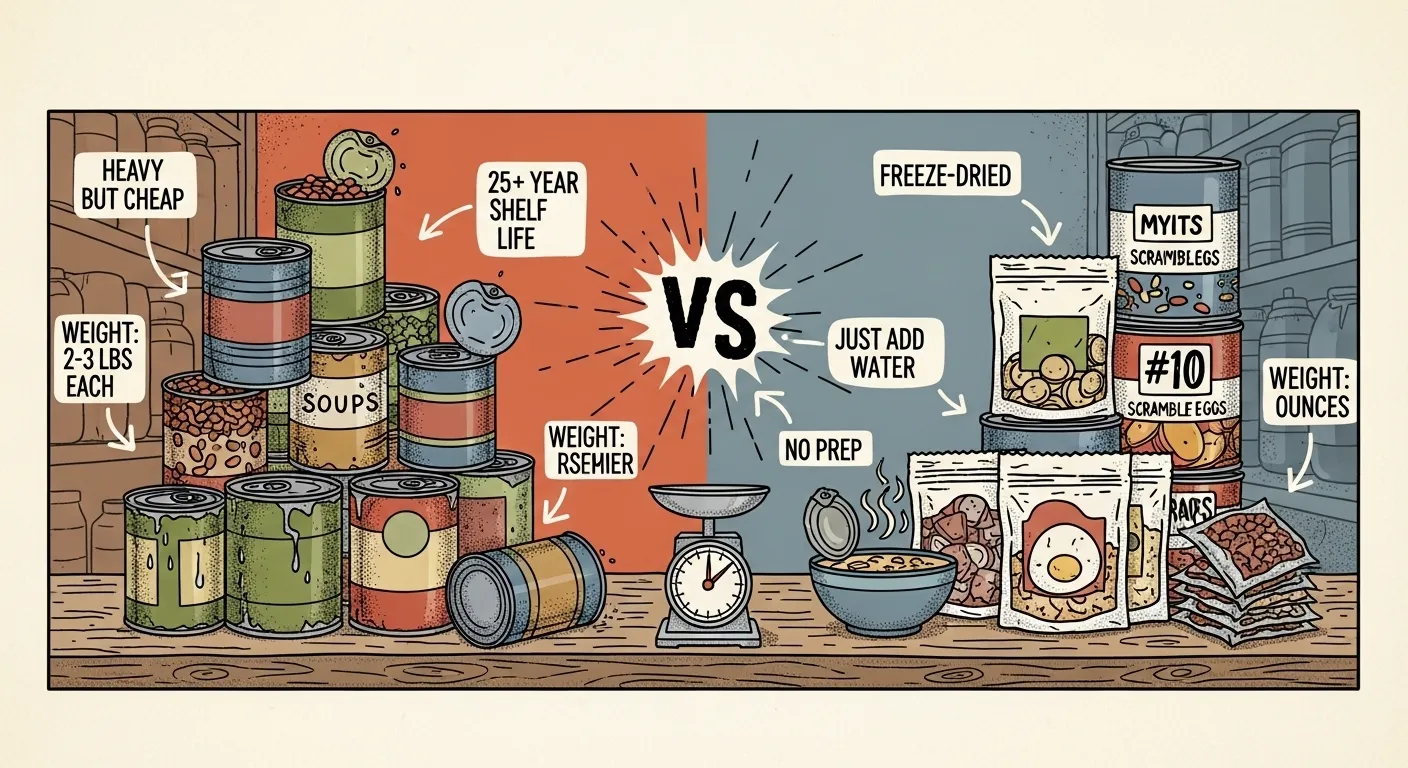
Canned vs. Freeze-Dried: The Ultimate Prepper Showdown
Canned vs. freeze-dried food: compare shelf life, cost, nutrition, storage, and convenience so beginner preppers can build smarter emergency supplies.
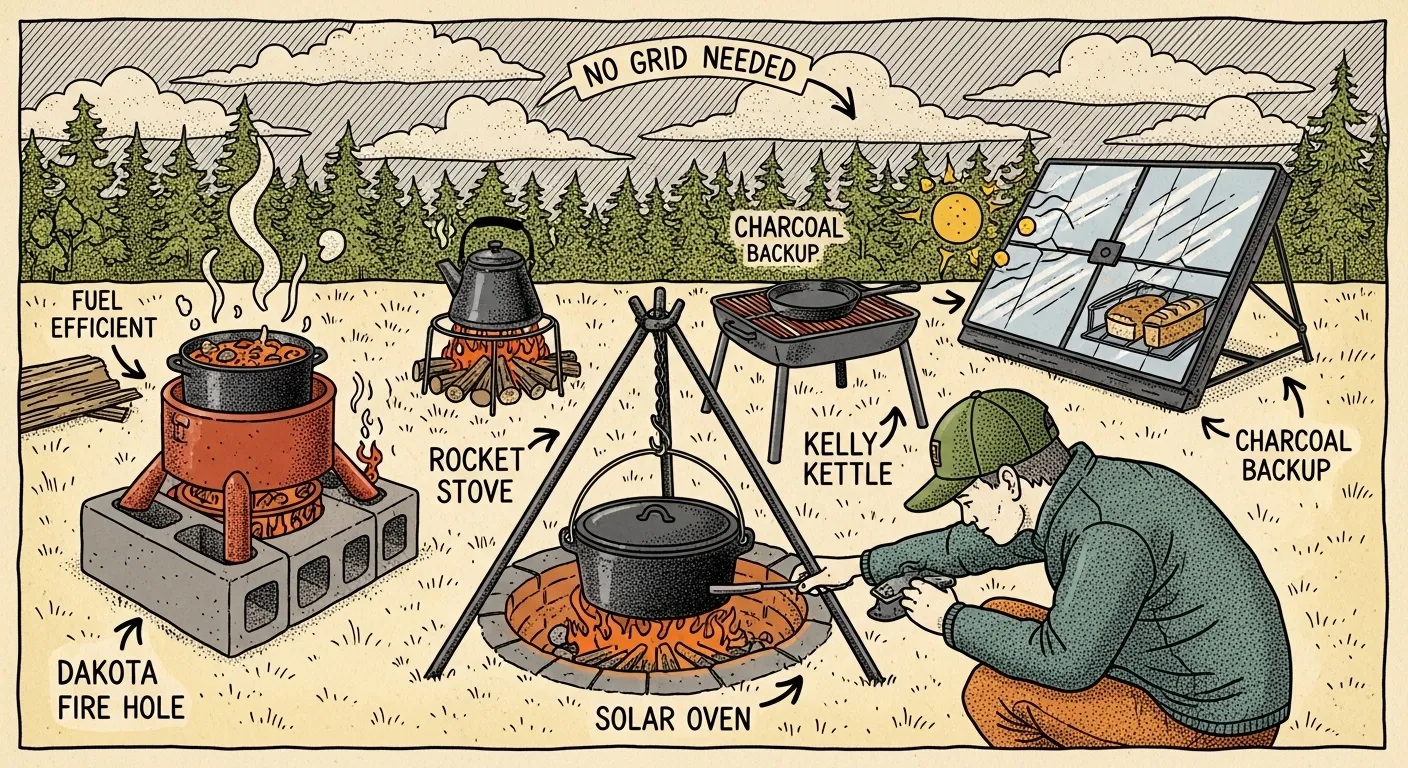
Alternative Cooking Methods for Preppers
Learn practical off-grid cooking methods for beginners, including solar ovens, rocket stoves, Dutch ovens, campfires, and alcohol stoves.