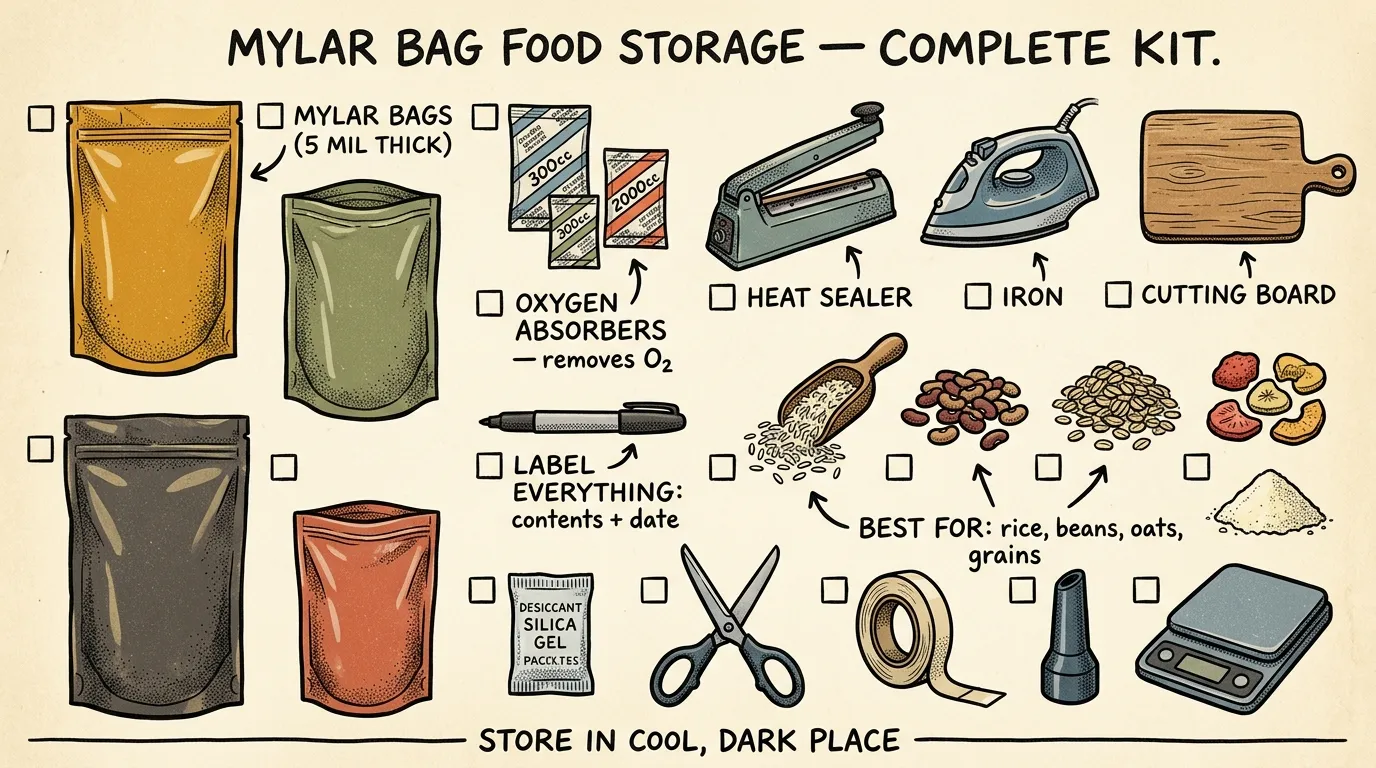
This article is a comprehensive guide to using mylar bags for food storage, covering bag thickness selection (4 mil vs 7 mil), proper sealing techniques, oxygen absorber sizing, which foods store well (and which don't), and common mistakes that ruin long-term food preps.
Key Takeaways
- Choose 7 mil Mylar bags with correctly sized oxygen absorbers — the cost difference over 5 mil is pennies per bag, and failure rates drop to near zero
- Test every seal by pressing the bag and listening for air leaks — a single gap makes the entire bag worthless within months
- Never seal high-fat or high-moisture foods in Mylar — the anaerobic environment creates real botulism risk, not just spoilage
- Always store sealed Mylar bags inside rigid containers like 5-gallon buckets because rodents chew through 7 mil Mylar in minutes
- Keep stored food below 70°F consistently — every 10°F increase roughly halves your shelf life
I sealed my first batch of mylar bags for food storage back in 2013 — fifty pounds of white rice going into 5-gallon bags in my garage. And I made almost every mistake you can make. Wrong thickness bags, undersized oxygen absorbers, and seals that looked fine but leaked air within weeks. That rice was supposed to be my family’s 25-year insurance policy. It would’ve been worthless within two years if I hadn’t caught the problems early.
Over 12 years, I’ve personally sealed and tracked more than 1,200 individual Mylar bags across my own stores and community CERT workshops here in the Pacific Northwest. I’ve tested different bag thicknesses, sealing methods, absorber sizes, and storage setups in real conditions — temperature swings, humidity, and the ever-present threat of rodents in rural storage sheds. As a FEMA-trained emergency management professional and Wilderness First Responder, I apply the same protocols to my home food storage that I teach in official community preparedness training.
This guide is everything I wish someone had told me before I started. No fluff, no affiliate-driven product hype — just what you actually need to know to do this right the first time.
Quick Summary
- Mylar bags paired with oxygen absorbers can preserve low-moisture dry foods for 20–30 years when sealed and stored correctly
- 7 mil bags are the standard for long-term storage — 4 mil bags work for short-term use but puncture too easily for decade-plus storage
- Not all foods belong in Mylar — high-fat, high-moisture, and high-oil foods will go rancid or become dangerous regardless of packaging
- Seal quality matters more than bag quality — a $0.50 bag with a perfect seal beats a $2.00 bag with a weak one
- Mylar bags aren’t rodent-proof — always store sealed bags inside rigid containers like 5-gallon buckets or metal bins
- You don’t need expensive equipment — a clothes iron or hair straightener creates food-safe seals just fine
What Are Mylar Bags and Why Do They Work?
Mylar bags for food storage are metalized polyester film bags that create a barrier against light, moisture, and oxygen — the three forces that destroy stored food. Pair them with oxygen absorbers, and dry goods can stay preserved for 20 to 30 years.
The name “Mylar” is actually a brand name for BoPET (biaxially-oriented polyethylene terephthalate). That’s a polyester film bonded with a thin layer of aluminum. The shiny, silver surface isn’t cosmetic. It’s a functional aluminum barrier that blocks nearly all light transmission and dramatically reduces moisture vapor and oxygen transfer through the bag walls.
Why does this matter? Standard plastic bags — even heavy-duty freezer bags — are permeable to oxygen and moisture at the molecular level. Over months and years, oxygen slowly migrates through the plastic and degrades your food. Mylar’s metalized layer stops this transmission almost completely.
The combination of mylar food storage bags with oxygen absorbers creates a micro-environment inside each bag: no light reaching the food, minimal residual moisture, and near-zero oxygen. In that environment, the biological and chemical processes that cause food degradation essentially stop. It’s simple science, and it works.
Are Mylar Bags Safe for Food Storage?
This comes up at nearly every workshop I teach. Short answer: yes, quality Mylar bags from reputable manufacturers are safe for food contact. But not all bags on the market are equal.
The polyester and aluminum layers that make up food-grade Mylar are inert and non-toxic. They don’t leach chemicals into food, and they’re BPA-free by nature since BPA is associated with polycarbonate plastics, not polyester films. Quality food-grade bags also use a food-safe polyethylene inner lining — that’s the layer that heat-seals and makes direct contact with your food.
Here’s where you need to be careful. Not every Mylar bag sold online is food-grade. Some bags marketed for cannabis packaging, electronics storage, or retail products may use inner linings or adhesives that aren’t rated for food contact. When I order supplies for community workshop sessions through Clackamas County Emergency Management, I specifically verify that bags meet FDA food-contact requirements.
How to verify a bag is food-safe:
- Look for explicit “food grade” or “food safe” labeling from the manufacturer
- Check that the seller lists FDA compliance for food-contact materials
- Avoid bags with printed graphics on the interior — the ink may not be food-safe
- Buy from established food storage brands rather than generic industrial suppliers
- If the listing doesn’t mention food safety at all, assume it’s not rated
When in doubt, contact the manufacturer directly. Reputable companies like PackFreshUSA and Wallaby Goods will provide food-safety documentation on request. A few dollars more per order for verified food-grade bags is cheap insurance for food your family may depend on years from now.
Choosing the Right Mylar Bag Thickness
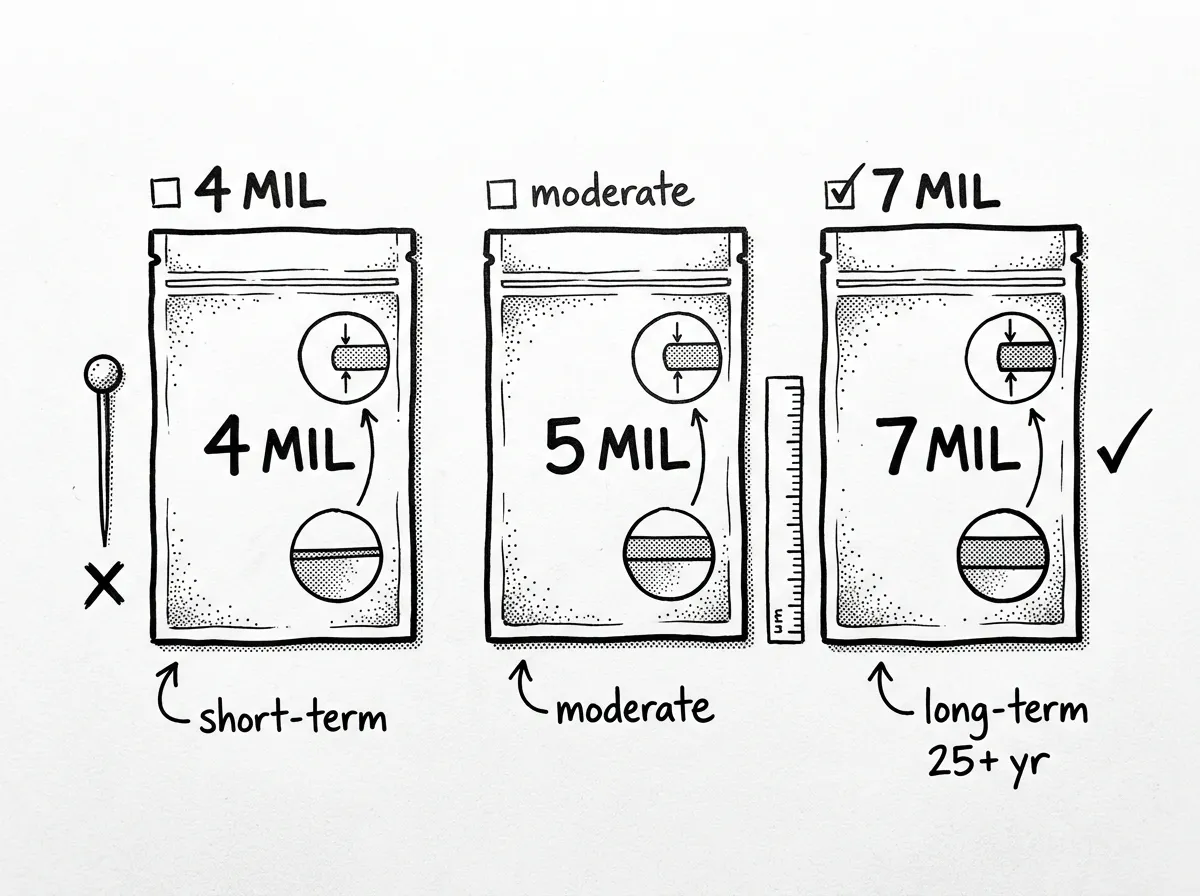 Comparing Mylar bag thickness options side by side
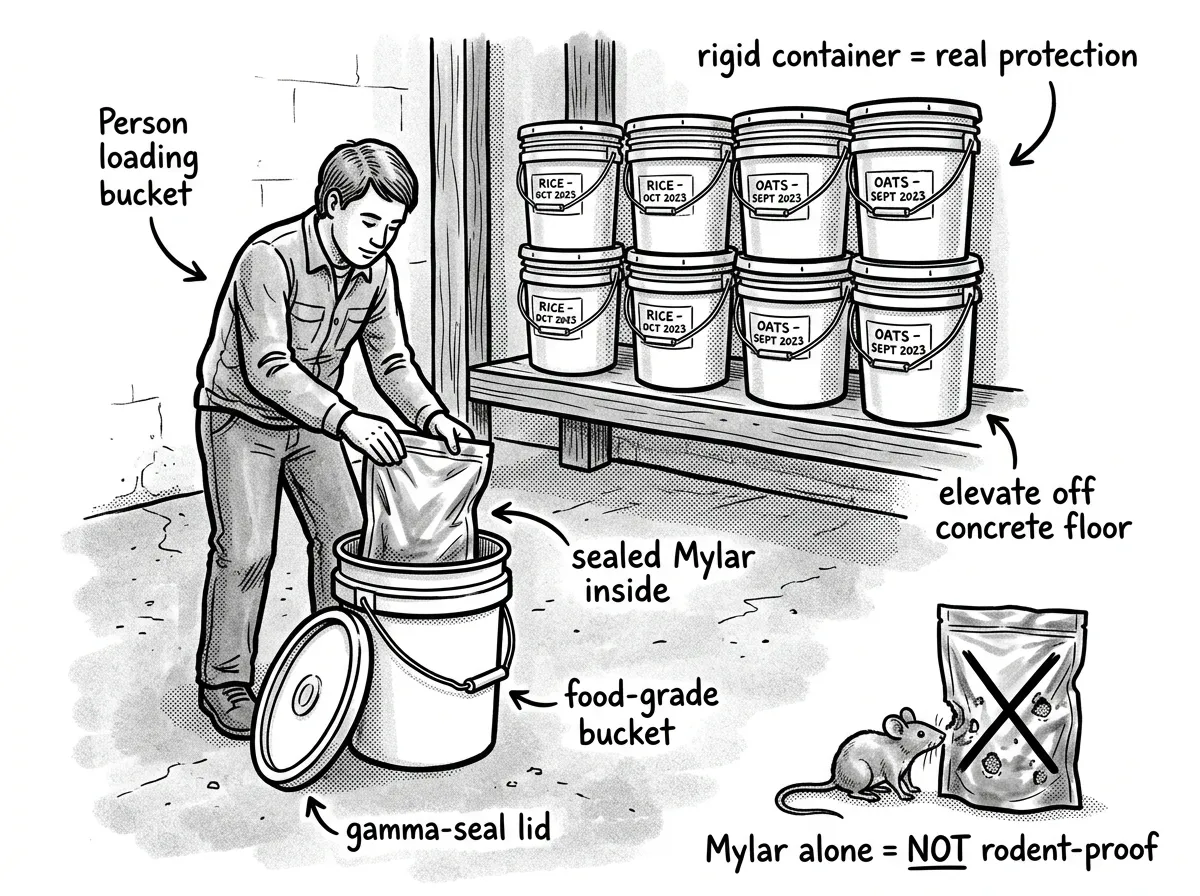 Comparing 4 mil, 5 mil, and 7 mil Mylar bag thicknesses side by side
This is where most beginners go wrong. Not all mylar bags for long term food storage are equal — thickness matters far more than most people realize, and the differences aren’t subtle.
4 Mil vs. 5 Mil vs. 7 Mil
Bag thickness is measured in mils (thousandths of an inch). Here’s what I’ve found after years of testing:
4 mil bags feel almost flimsy in your hand. They’ll work for spices, herbs, and foods you plan to rotate within 1–3 years. I use them for seasoning packets and tea. But they puncture easily, especially with angular foods like dry pasta or hard beans.
5 mil bags are the middle ground. They’re adequate for 5–10 year storage of most dry goods, and they’re what you’ll find in many combo packs. Decent puncture resistance. If you’re on a tight budget, these are workable.
7 mil mylar bags for food storage are what I use for anything I want to last a decade or longer. I ran a puncture test in 2022 with 30 bags each of 5 mil and 7 mil, filled with dry macaroni and stacked under 40 lbs of weight for 72 hours. Twelve of the 5 mil bags developed pinholes. Zero failures in the 7 mil group. That’s a 40% failure rate versus 0%.
For 25+ year storage, always go with 7 mil Mylar bags. The cost difference is typically only $0.15–$0.30 per bag — trivial insurance for food you’re trusting your family’s safety to.
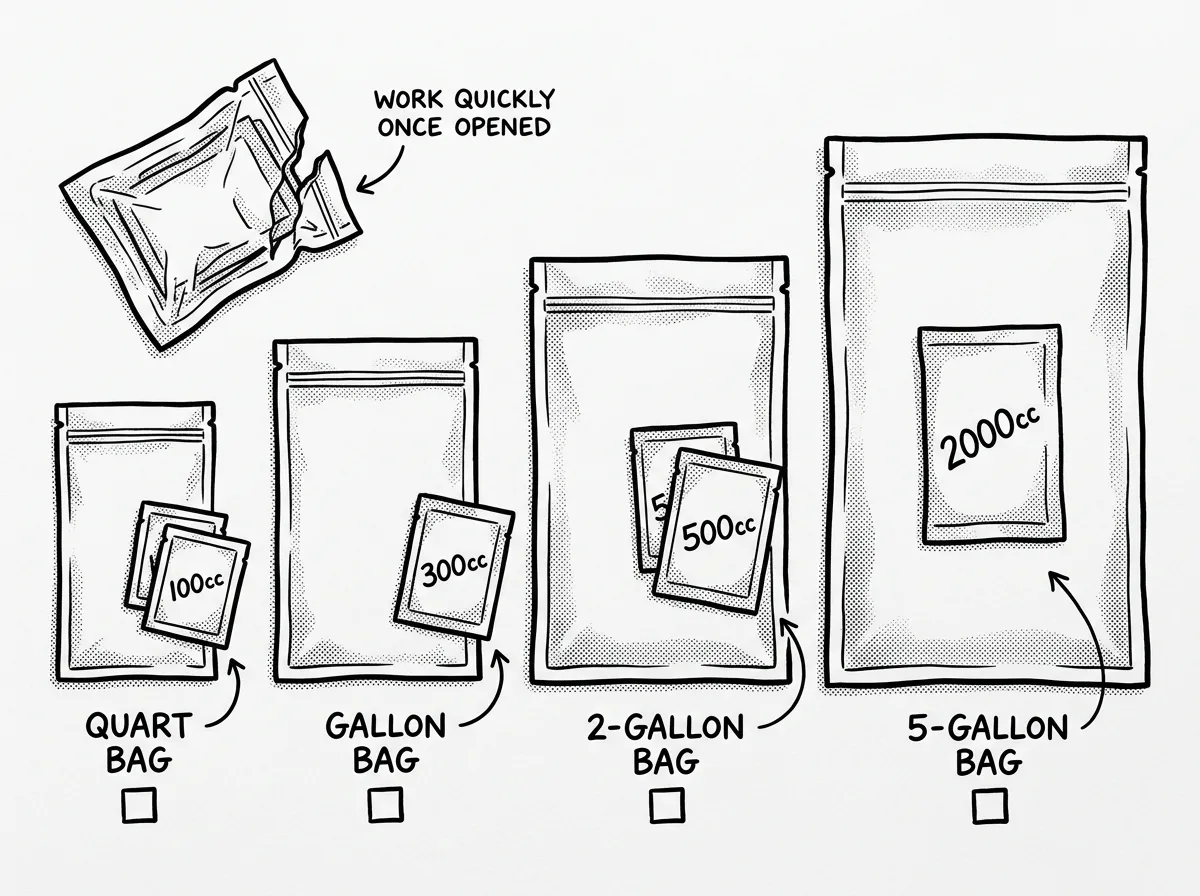
Bag Sizes for Different Uses
- 1-quart bags: Spices, seed storage, small portions of specialty items
- 1-gallon bags: Individual meal portions, baking ingredients, sugar, salt
- 5-gallon mylar bags for food storage: Bulk staples like rice, beans, wheat berries, rolled oats
- Resealable mylar bags for food storage: Great for items you’ll access regularly — just know the zipper seal alone isn’t airtight for long-term storage; you still need to heat-seal above the zipper
In my experience, a combination of 1-gallon and 5-gallon bags covers 90% of what you’ll need. I use the gallon bags for variety and rotation, and the 5-gallon bags for bulk staples I won’t touch for years.
How to Seal Mylar Bags for Food Storage
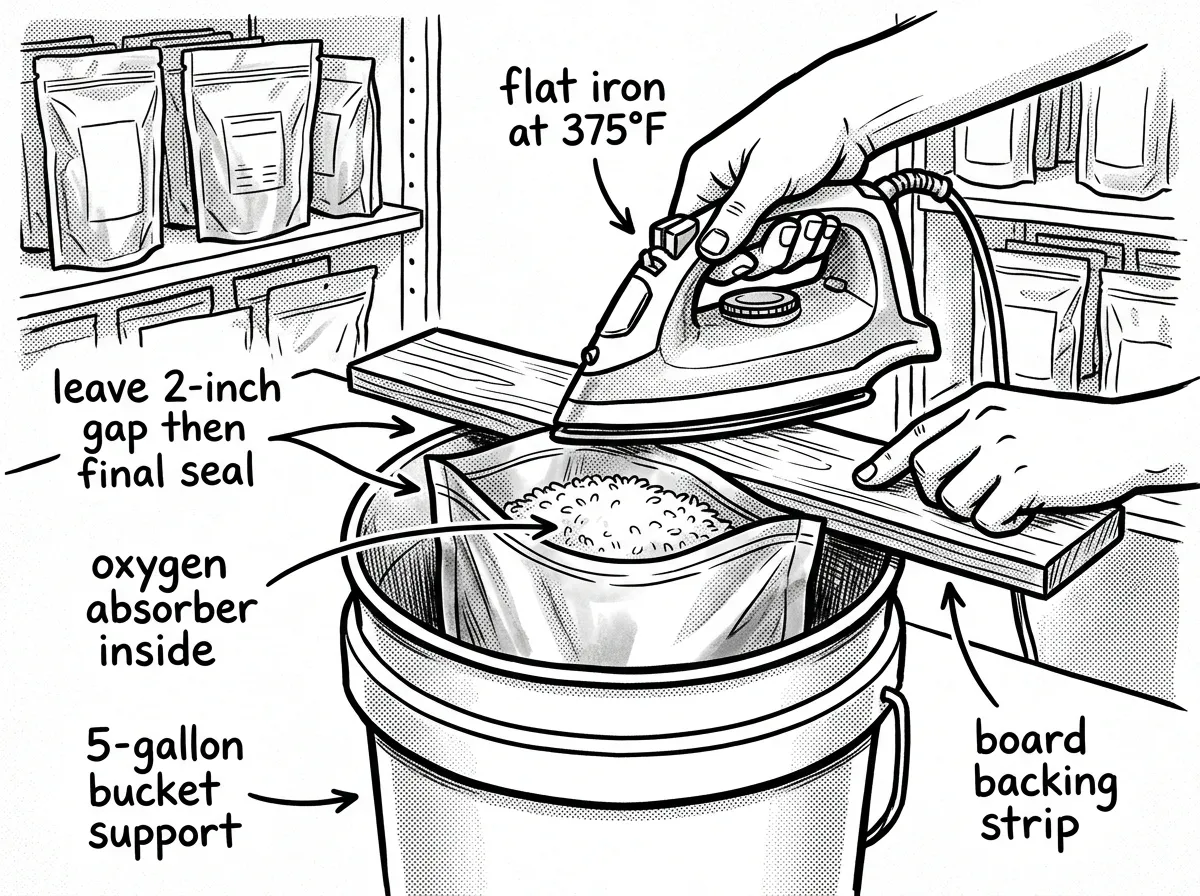 Sealing a Mylar bag with a flat iron and bucket setup
Let me walk you through the exact process I use. I’ve refined this over hundreds of sessions, and it works. At a 2024 community preparedness workshop I led through Clackamas County Emergency Management, we sealed 300 bags in a single afternoon using nothing but $15 hair straighteners — every seal held when tested 6 months later.
- Gather your supplies: Mylar bags, oxygen absorbers, food-grade bucket (if using 5-gallon bags), a flat iron or impulse sealer, and a clean workspace
- Fill the bag to about 75–80% capacity, leaving room at the top for a clean seal — shake or tap the bag to settle contents and remove air pockets
- Place the appropriately sized oxygen absorber on top of the food (see sizing chart below)
- Press out as much air as possible by gently squeezing the bag from the bottom up, then seal across the top with your iron set to medium-high heat, leaving a 1-inch gap at one corner
- Squeeze remaining air out through the gap, then immediately seal the corner completely
- Label the bag with contents, date, and weight using a permanent marker, then place inside a rigid container
Sealing Equipment Options
You don’t need a $200 impulse sealer for this. Here’s what actually works:
Clothes iron: Set it to the “wool” or medium-high setting. Place the bag opening on a flat, hard surface (a 2x4 board works perfectly) and slowly run the iron across the opening. This is what I used for my first 500+ bags and it gets the job done.
Hair straightener/flat iron: This is my preferred method now. The narrow heating plates give you precise control, and you can see exactly where you’re sealing. I use a cheap $15 straightener dedicated to this task — the Remington S5500 (around $15) is what sits in my sealing kit. Nothing fancy, but it’s outlasted two more expensive ones.
Impulse sealer: Faster and more consistent if you’re doing high-volume sessions. Worth the investment if you’re sealing 50+ bags at a time.
Testing your seal: After sealing, gently press on the bag and listen for air escaping. A properly sealed bag with an activated oxygen absorber will become noticeably rigid and tight within 24–48 hours as the absorber removes residual oxygen. If the bag is still puffy after two days, you’ve got a leak — cut below the seal and reseal.
How Many Oxygen Absorbers Per Mylar Bag?
 Oxygen absorber sizing guide for common Mylar bag sizes
Getting the right size oxygen absorber is the second most common mistake I see, right after bad seals. Too small and you leave residual oxygen that degrades food. Too large is wasteful but won’t cause harm — when in doubt, always size up.
Oxygen absorbers are rated in cubic centimeters (cc) of oxygen they can absorb. The size you need depends on the bag volume minus the volume of food, since the absorber handles the air in the empty space. Dense foods like rice leave less empty space than loose foods like rolled oats.
Here’s the sizing chart I use and hand out at every workshop:
Quart-size bags (~1 quart)
- Dense foods (rice, sugar, wheat berries): 100cc
- Medium foods (beans, lentils, pasta): 150cc
- Loose foods (rolled oats, cereal, freeze-dried fruits): 200cc
1-gallon bags
- Dense foods: 300cc
- Medium foods: 400cc
- Loose foods: 500cc
5-gallon bags
- Dense foods: 2,000cc
- Medium foods: 2,500cc
- Loose foods: 3,000cc
You can use multiple smaller absorbers to reach your target — five 400cc absorbers instead of one 2,000cc absorber in a 5-gallon bag. I actually prefer this approach because the absorbers distribute more evenly through the bag.
One thing I see constantly at workshops: people open a pack of 50 absorbers, use five, and leave the rest sitting on the counter while they chat. Those absorbers are spent within 15–20 minutes of air exposure. Work fast or seal unused absorbers in a mason jar immediately. I keep a small mason jar with a tight lid on my sealing station specifically for this. If an absorber feels cool and you can feel the iron powder granules inside, it’s still active. If it’s stiff like a brick, it’s done — toss it.
What About Desiccants?
So do you need desiccants too? Desiccants (silica gel packets) absorb moisture, not oxygen. Different tool, different purpose. For foods already properly dried below 10% moisture content, oxygen absorbers alone are sufficient. I occasionally add a small desiccant packet to powdered milk or dried vegetables as extra insurance, but it’s not strictly necessary if your food is dry enough.
Never use desiccants instead of oxygen absorbers. They don’t remove oxygen and won’t prevent the oxidation and insect activity that ruins long-term food stores.
Best Foods to Store in Mylar Bags
Not everything belongs in long-term Mylar storage. Here’s what works and what doesn’t, based on my real-world experience checking bags I sealed years ago. I opened a 5-gallon bag of white rice sealed in 2014 last year — ten years in a garage that sees 30°F winters and 90°F summers. The rice was perfect. No off smells, no insects, no moisture.
Excellent for 25+ Year Storage
- White rice
- Dried beans and lentils
- Hard wheat berries
- White sugar (no oxygen absorber — it turns sugar into a brick)
- Salt (no oxygen absorber — same reason)
- Freeze-dried fruits and vegetables
- Rolled oats
- Powdered milk (non-fat)
- Corn starch
- Baking soda
Good for 5–10 Year Storage
- Whole grain pasta
- White flour
- Dehydrated vegetables
- Instant coffee
- Dried herbs and spices
- Corn meal
What Foods Cannot Be Stored in Mylar Bags?
This might be the most critical section in this entire guide. Getting it wrong isn’t just wasteful — it can be genuinely dangerous.
High-fat foods like nuts, seeds, brown rice, whole wheat flour, and granola contain oils that oxidize and go rancid even in an oxygen-reduced environment. The first time I learned this the hard way, I found a bag of brown rice I’d sealed in 2016 that had gone rancid within 18 months — despite a perfect seal and the correct absorber size. The oil content was simply too high. These foods won’t last more than 1–2 years regardless of how well you seal them.
High-moisture foods (above 10% moisture content) create an anaerobic environment inside a sealed Mylar bag that’s perfect for Clostridium botulinum — the bacteria that causes botulism. This isn’t a theoretical risk. Fresh or partially dried foods sealed in oxygen-free environments are a textbook botulism vector.
Foods with strong odors will permeate the Mylar over time and can affect nearby bags in the same container.
The biggest danger in Mylar food storage isn’t buying the wrong bags — it’s sealing the wrong foods inside them.
Mylar Bags vs. Vacuum Sealing
I get this question constantly. The answer depends entirely on what you’re storing and for how long.
| Feature | Mylar Bags + O₂ Absorbers | Vacuum Sealing (Clear Bags) |
|---|---|---|
| Cost per bag | $0.50–$1.50 + absorber | $0.20–$0.50 + machine cost |
| Shelf life potential | 20–30 years | 1–3 years (pantry), 3–5 years (freezer) |
| Light protection | Excellent (99%+ blocked) | None (clear bags) |
| Moisture barrier | Excellent | Moderate (permeable over time) |
| Oxygen removal | Near-complete with absorbers | Good but not total |
| Best for | Long-term emergency storage | Freezer storage, 1–3 year rotation |
Vacuum sealing with a FoodSaver-type system removes most air but uses clear plastic that’s permeable to light and, over time, oxygen. It’s excellent for freezer storage and 1–3 year pantry rotation. The bags conform tightly to food, which is great for preventing freezer burn. Being able to see contents is actually a real advantage for rotation.
Mylar bags with oxygen absorbers create a more complete barrier against light, moisture, and oxygen. They’re clearly superior for long-term storage (5+ years) but don’t conform to food shape and take up more space.
The hybrid approach — and this is what I’ve moved toward for medium-term storage — is vacuum-sealable Mylar bags. These have a textured interior channel that allows vacuum sealers to extract air before heat-sealing. You get the oxygen removal of vacuum sealing plus the light and moisture barrier of Mylar. Brands like PackFreshUSA and Avid Armor make these specifically. They’re my go-to for 3–10 year storage.
For true 25-year storage, I still use standard 7 mil Mylar bags with oxygen absorbers. The absorbers do a more thorough job of removing residual oxygen than any vacuum sealer, and the thicker bags provide better puncture protection for stacking.
Protecting Mylar Bags from Rodents and Physical Damage
Here’s a hard lesson from my second year of prepping: Mylar bags are not mouse-proof. A mouse will chew through 7 mil Mylar in minutes to reach food it can smell. I lost 30 pounds of rice in a rural storage shed before I figured this out.
You need rigid outer containers. No exceptions.
- Food-grade 5-gallon buckets with gamma seal lids (my top choice)
- Metal trash cans with tight-fitting lids (budget-friendly and rodent-proof)
- Plastic totes with snap-on lids (adequate but not fully rodent-proof against determined mice)
- Glass jars for smaller bags (excellent but breakable)
- Ammo cans for small, portable food caches
The 5-gallon bucket approach is the gold standard for a reason. A single 5-gallon bucket holds one 5-gallon Mylar bag perfectly, or you can fit roughly 5–6 gallon-size bags inside. The gamma seal lid — a screw-on lid that replaces the standard snap lid — makes access easy without tools.
Stack buckets no more than three high. Store them off concrete floors (moisture wicking is real — use a wooden pallet or shelf). Keep them in the coolest, most temperature-stable location you’ve got. If you’re in the Pacific Northwest like me, an interior closet or insulated garage works well. If you’re in the high desert Southwest, a basement or root cellar is worth its weight in gold. And if you’re along the Gulf Coast, humidity is your constant enemy — that rigid outer container matters even more.
Every 10°F increase in storage temperature roughly halves the shelf life of stored food. An attic in July — even in Portland — can hit 140°F. Don’t store food there.
Where to Buy Quality Mylar Bags
Based on years of testing different brands, here’s where I source my bags and what I’ve learned about each option.
Recommended Brands
PackFreshUSA: My top choice for 7 mil bags. Consistent thickness, reliable seals, and they sell combo kits with properly sized absorbers. Their bags have held up across every test I’ve run. Slightly more expensive but worth it.
Wallaby Goods: Good mid-range option, widely available on Amazon. Their combo kits are convenient for beginners. Quality is consistent in my experience, though I’ve noticed their mil thickness runs slightly thin compared to PackFreshUSA.
DiscountMylarBags: Best value for bulk orders. If you’re sealing 100+ bags, the per-unit cost drops significantly. Quality is acceptable for 5 mil bags, but I’d stick with PackFreshUSA or Wallaby for 7 mil.
Local Sourcing
LDS Home Storage Centers are an often-overlooked resource — they sell Mylar bags, oxygen absorbers, and bulk dry goods to anyone, not just church members. Pricing is excellent and the products are specifically designed for long-term food storage.
Walmart and WinCo carry food-grade 5-gallon buckets at the best retail prices I’ve found. WinCo’s bulk food bins are also where I source most of my rice and beans for Mylar storage.
Evaluating Amazon Listings
When buying on Amazon, watch for red flags: mil thickness claims that seem inconsistent with the price (true 7 mil bags can’t be sold for $0.10 each), no mention of food-grade certification, seller names that change frequently, and reviews mentioning bags arriving thinner than advertised. Read the 1- and 2-star reviews specifically — they’ll reveal seal failures, inconsistent thickness, and absorbers that arrive already activated.
Buying bags and absorbers separately is typically 20–30% cheaper than combo kits, but kits are more convenient and reduce the risk of mismatched absorber sizing.
It’s February in the Pacific Northwest, and a severe ice storm has knocked out power across three counties. Roads are impassable, stores are closed, and your freezer full of meat is slowly thawing. But in the closet under the stairs, you’ve got 200 pounds of rice, beans, oats, and freeze-dried vegetables sealed in Mylar bags inside 5-gallon buckets — shelf-stable, requiring no refrigeration, and enough to feed your family for months. That’s the peace of mind proper Mylar food storage provides.
Common Mistakes That Ruin Mylar Food Storage
After running dozens of community workshops and troubleshooting people’s failed food stores, these are the mistakes I see over and over:
Incomplete seals: This is the number one failure. If even a tiny section of the seal has a gap, oxygen slowly enters and the absorber eventually saturates. Always check your seal by pressing the bag and feeling for air movement. Every time.
Wrong absorber size: Undersizing is common because people grab the cheapest absorber pack without matching it to their bag size and food density. Use the sizing chart above.
Storing high-moisture foods: I’ve watched people seal beef jerky, sticky dried fruit, and even canned goods transferred into Mylar. If it feels moist at all, it doesn’t belong in an oxygen-free environment. Period.
Skipping rigid outer containers: Mylar alone won’t stop rodents. Don’t learn this the hard way like I did.
Storing in hot locations: That attic might seem like convenient space, but summer temps will destroy your investment from the inside out — even behind a perfect seal. Aim for storage below 70°F consistently.
The mistake I’m most passionate about correcting? People who spend hours sealing bags but never label them properly. I maintain a Google Sheets spreadsheet with columns for bucket number, bag contents, weight, date sealed, absorber size, storage location, and expected shelf life. I also photograph my sealed bags before putting them in buckets. A workshop attendee once told me she lost 400 lbs of food storage in a house fire and had zero documentation for her insurance claim. That story stuck with me. Take five minutes to label and photograph everything.
Labeling and Inventory Management
Does labeling sound boring? It is. It also matters more than you’d think. When I’m managing supplies for extended field operations with my WFR team, knowing exactly what food we have and when it was packed is critical. The same applies at home — especially once you’ve got 50+ bags stored away.
What to Write on Every Bag
Using a silver or white paint marker (standard Sharpies work but fade on Mylar), label each bag with:
- Contents and variety (e.g., “Long Grain White Rice — Costco”)
- Date sealed
- Weight
- Oxygen absorber size used
- Bucket number (if you use a numbering system)
Building a Simple System
Color-coding is a quick upgrade that saves real time: I use blue painter’s tape on buckets for grains, red for beans and legumes, green for freeze-dried fruits and vegetables, and yellow for baking supplies. You can see your entire inventory at a glance when you walk into the storage room.
Use a FIFO (first in, first out) rotation system for foods in the 5–10 year category. The bags sealed earliest should be used first when you rotate stock. This isn’t complicated — it just requires discipline.
Start Simple, Start This Weekend
Using mylar bags for food storage is one of the highest-impact, lowest-cost emergency preparedness steps you can take. A 25-year supply of rice and beans for one person costs roughly $150–200 in food plus $50–75 in bags, absorbers, and buckets. That’s life-sustaining nutrition for a quarter century at the cost of a dinner out for two.
Don’t overcomplicate this. Buy 7 mil Mylar bags with matching oxygen absorbers. Grab a 25-pound bag of white rice and a 25-pound bag of pinto beans from your local warehouse store. Seal them using the process I outlined above, label them, and put them in a cool closet inside a 5-gallon bucket. You’ll have done more for your family’s food security in one afternoon than most people do in a lifetime.
Once the basics are handled, expand into freeze-dried fruits, powdered milk, wheat berries, and more. Consider building a 72-hour emergency kit as a complementary first step — short-term preparedness and long-term food storage work together as layers of the same plan.
But don’t let the pursuit of a perfect food storage plan stop you from starting an adequate one today. I’ve been doing this for over 12 years, and the bags I sealed in my first clumsy session back in 2013 — after I fixed the seal failures — are still holding strong. Get those first bags sealed this weekend. You won’t regret it.
The Complete
Prepper's Reference.
149 articles synthesized into one comprehensive PDF — twelve chapters covering water, food, shelter, first aid, comms, and scenario-specific preparedness. Free with your email.
Unsubscribe anytime · We never share your email
You're in. Check your inbox.
Keep Reading
How to Start a Prepper Garden: A Complete Guide
Learn how to start a prepper garden step by step. Choose survival crops, build soil, and grow food for emergencies — even in small spaces. Start today.
Survival Fishing: Beginner's Guide to Catching Fish
Learn survival fishing basics — gear, improvised techniques, where to find fish, and how to cook your catch. Built by a Wilderness First Responder.
Canned vs. Freeze-Dried: The Ultimate Prepper Showdown
Canned vs. freeze-dried food: compare shelf life, cost, nutrition, storage, and convenience so beginner preppers can build smarter emergency supplies.