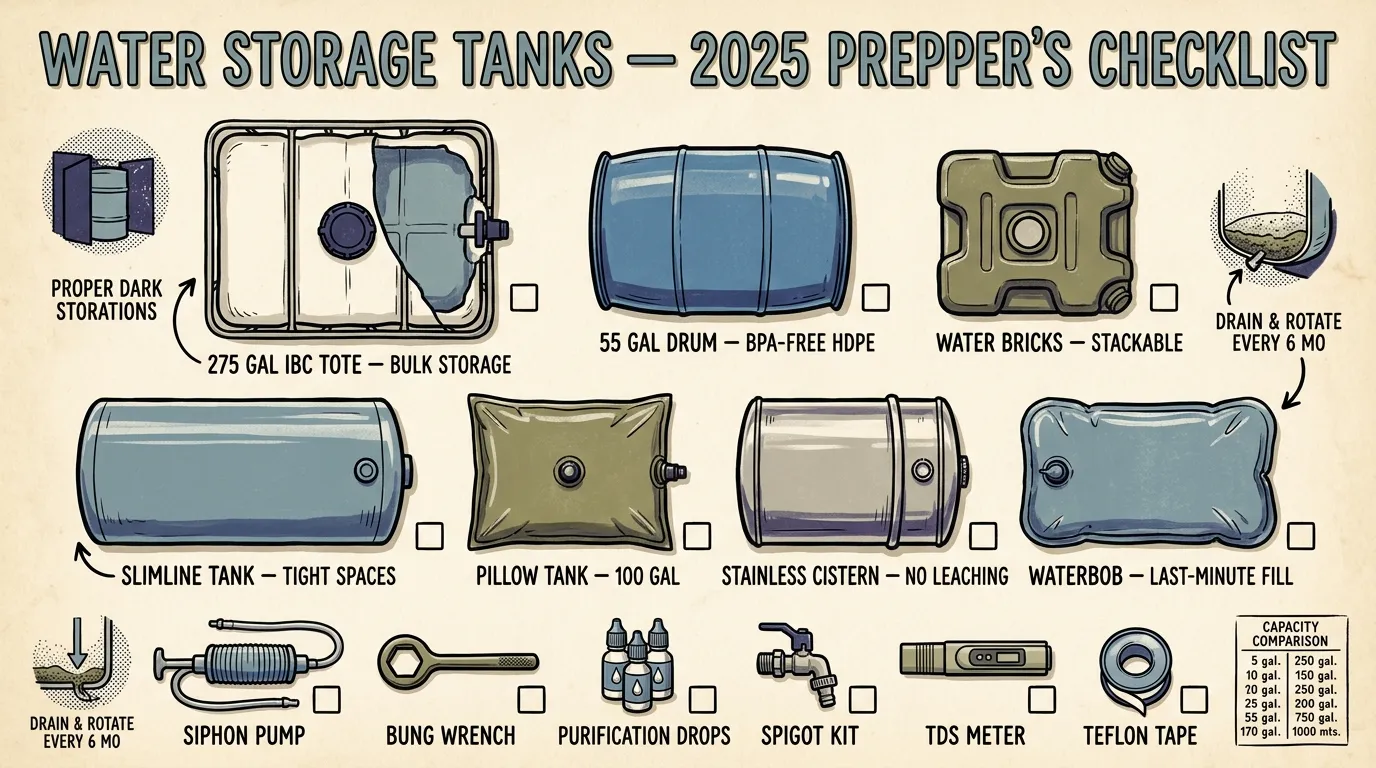
The best water storage tanks for new preppers are usually food-grade polyethylene tanks in the 50- to 250-gallon range because they are affordable, durable, and easy to manage. Beginners should compare tanks by capacity, material, available space, and total cost, while prioritizing potable-water-safe construction and simple maintenance.
Key Takeaways
- A 55-gallon food-grade HDPE barrel ($60–$120) is the most practical starting point — it gives a family of four roughly a week of water at realistic consumption.
- Plan for 1.5–2 gallons per person per day, not FEMA's bare-minimum 1 gallon, to realistically cover drinking, cooking, and basic hygiene.
- Always verify NSF/ANSI 61 certification before buying any tank for drinking water — skip this step and you risk chemical leaching.
- Treat water with a commercial preservative at fill time to extend safe storage to 5 years; otherwise rotate every 6–12 months.
- Budget for the full system — pump, fittings, food-safe hose, stable base, and treatment supplies — not just the tank itself.
Best Water Storage Tanks for Preppers (2025 Guide)
Here are the best water storage tanks for preppers, ranked by use case:
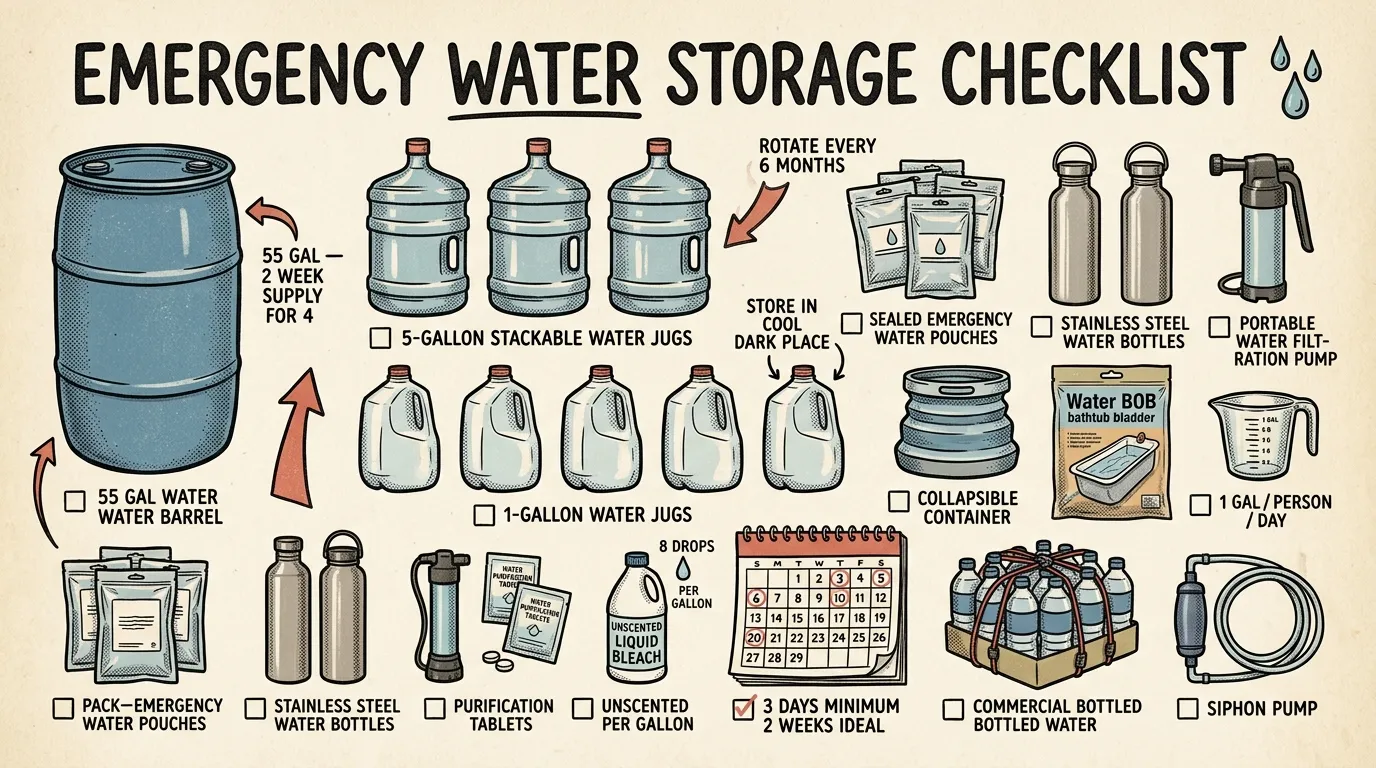
- 55-Gallon Food-Grade HDPE Barrel (55 gal) — The go-to starter for new preppers. Affordable, portable with a hand cart, and widely available from preparedness retailers.
- Stackable Water Containers (5–7 gal each) — Perfect for apartments and bug-out scenarios. Modular design lets you scale storage without dedicated floor space.
- Vertical Polyethylene Tank (100–250 gal) — Best mid-size option for garages or covered patios. Slim footprint with serious capacity.
- IBC Tote (275 gal) — The most cost-effective large water storage solution. Popular on homesteads and in prepper communities for good reason.
- Large Polyethylene Tank (300–550 gal) — Whole-household multi-day backup. Requires a solid foundation and a pump but delivers genuine resilience.
- Stainless Steel Tank (500+ gal) — Premium long-term option for farms and permanent installations. Maximum durability at a higher price point.
After 12 years of field work in Pacific Northwest emergency response — wildfire evacuations, ice storms, extended power outages — I’ve filled, drained, cleaned, and maintained more water tanks than I can count. Here’s what I’ve learned: the best water storage tanks for preppers aren’t the most expensive or the biggest. They’re the ones that actually get filled, maintained, and ready when you need them.
If you’re just getting started with emergency preparedness for beginners, water storage is the single most important step you can take. You can survive weeks without food. Without water, you’ve got days.
Quick Summary
- Start simple: A single 55-gallon food-grade HDPE barrel gives a family of four about a week of drinking water and costs $60–$120.
- Plan realistically: Budget 1.5–2 gallons per person per day — not FEMA’s bare-minimum 1 gallon — to cover drinking, cooking, and basic hygiene.
- Verify certification: Only buy tanks with NSF/ANSI 61 certification for potable water storage. No exceptions.
- Layer your approach: Combine a large primary tank with smaller portable containers and treatment/replenishment supplies.
- Match tank to space: Stackable containers for apartments, vertical poly tanks for garages, IBC totes for homesteads.
- Budget the full system: Tank, pump, fittings, food-safe hose, stable base, treatment chemicals, and test strips all factor into real cost.
How Do Preppers Store Water Long Term?
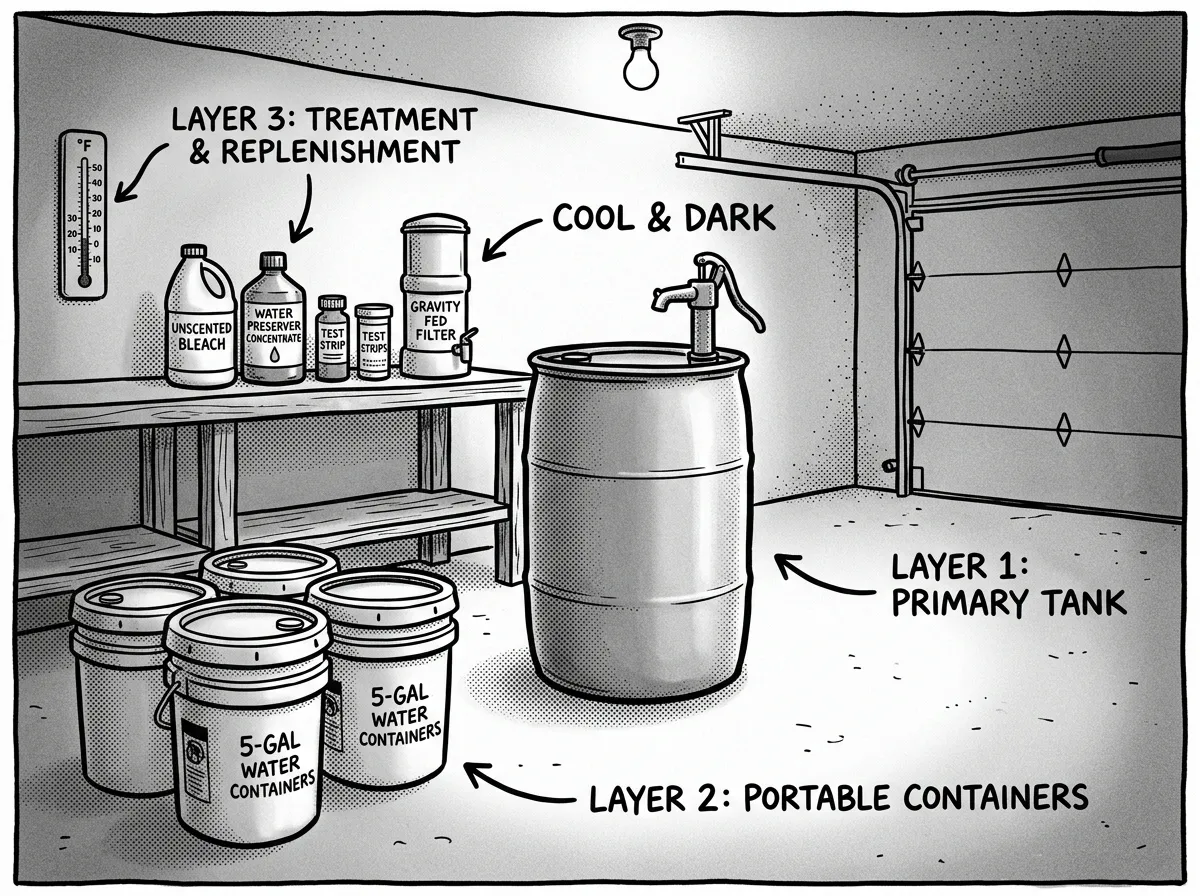 A layered water storage setup in a home garage
Most experienced preppers use a layered approach to long-term water storage — and I do the same thing at my home outside Portland.
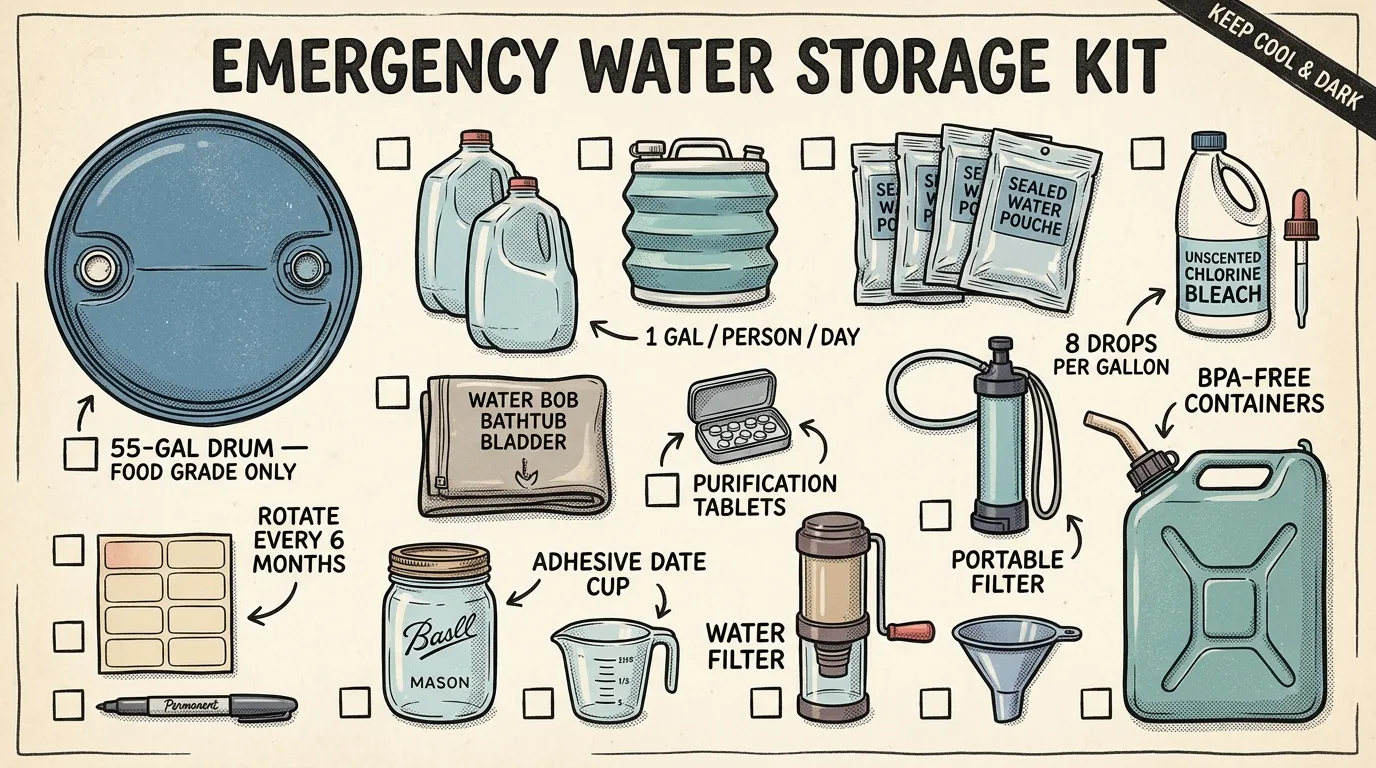
Layer 1: Primary large tank. This is your anchor. A 55-gallon barrel at minimum, ideally a 250–500 gallon polyethylene tank or IBC tote. It sits in your garage, basement, or on a pad outside. It’s your first source during a grid-down event or municipal water failure.
Layer 2: Smaller portable containers. Stackable 5–7 gallon food-grade containers you can carry to another room, load into a vehicle, or share with neighbors. These become critical if you need to evacuate or redistribute water within your home.
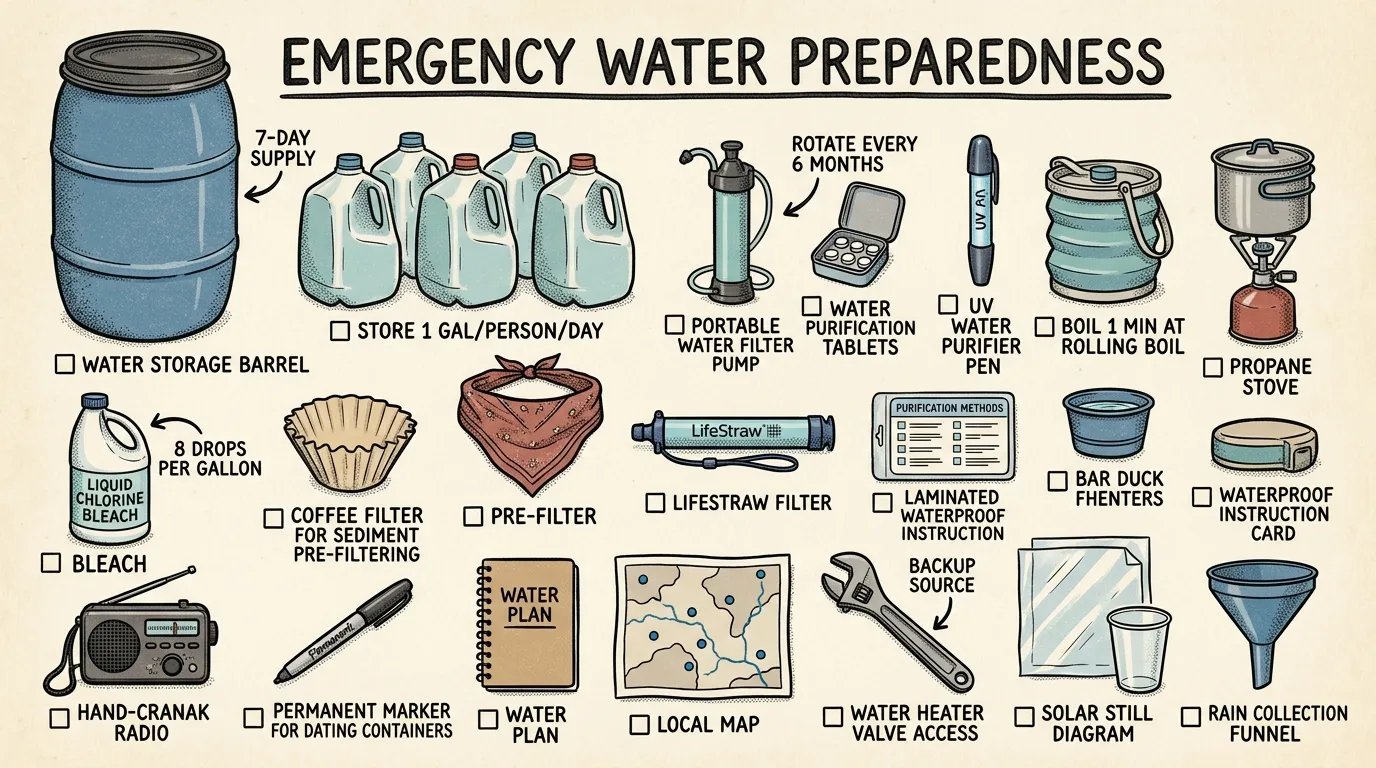
Layer 3: Treatment and replenishment supplies. Even the best emergency water storage goes stale eventually. You need the ability to treat and replenish — that means water treatment chemicals (unscented household bleach at 8 drops per gallon per EPA guidance, or commercial preservatives like Water Preserver Concentrate), a quality filtration system, and ideally a rainwater harvesting for preppers setup to collect new water.
For treatment, I keep both unscented bleach and a gravity-fed filter in my kit. The bleach handles biological contaminants in stored water, and the filter’s there for source water I don’t fully trust.
Keep tanks in cool, dark locations whenever possible. Heat and UV light accelerate plastic degradation and promote algal growth. A shaded garage that stays below 70°F is ideal. If you’re storing outdoors, make sure the tank is UV-stabilized and consider building a simple shade structure.
How Long Does Stored Water Last?
This is really two separate questions: how long does the water stay safe, and how long will your supply actually sustain your household?
Shelf Life of Stored Water
Commercially sealed water (like emergency pouches from Datrex or SOS) can last 5+ years. Water you store yourself in a clean, food-grade, sealed container from a treated municipal source is generally considered safe for 6–12 months before rotation’s recommended. The water itself doesn’t “expire” — but without adequate treatment and sealing, bacteria and algae can slowly colonize the container.
If you add a commercial water preservative at fill time, you can extend the safe storage window to 5 years without rotation. I use Water Preserver Concentrate in my large tanks because, honestly, I’d rather treat once than commit to a rotation schedule I know I’ll forget.
Consumption Duration
Here’s the math that matters. FEMA recommends 1 gallon per person per day as a minimum. But as a Wilderness First Responder who’s managed hydration in real emergencies, I can tell you that 1 gallon covers drinking only. Once you add cooking, basic hygiene, and pet needs, you’re looking at 1.5–2 gallons per person per day for realistic comfort.
How long will 500 gallons of water last for one person? At 1 gallon/day (bare minimum), that’s 500 days. At the more realistic 2 gallons/day, it’s 250 days. For a family of four at 2 gallons per person per day, 500 gallons lasts about 62 days.
Quick reference:
| Gallons Stored | 1 Person (2 gal/day) | 2 People | 4 People |
|---|---|---|---|
| 55 | 27 days | 14 days | 7 days |
| 100 | 50 days | 25 days | 12 days |
| 275 | 137 days | 69 days | 34 days |
| 500 | 250 days | 125 days | 62 days |
The formula’s simple: gallons stored ÷ (number of people × gallons per day) = days of supply. Print this out and tape it to your tank.
Best Water Storage Tanks by Use Case
Beginners: 55-Gallon Food-Grade HDPE Barrel ($60–$120)
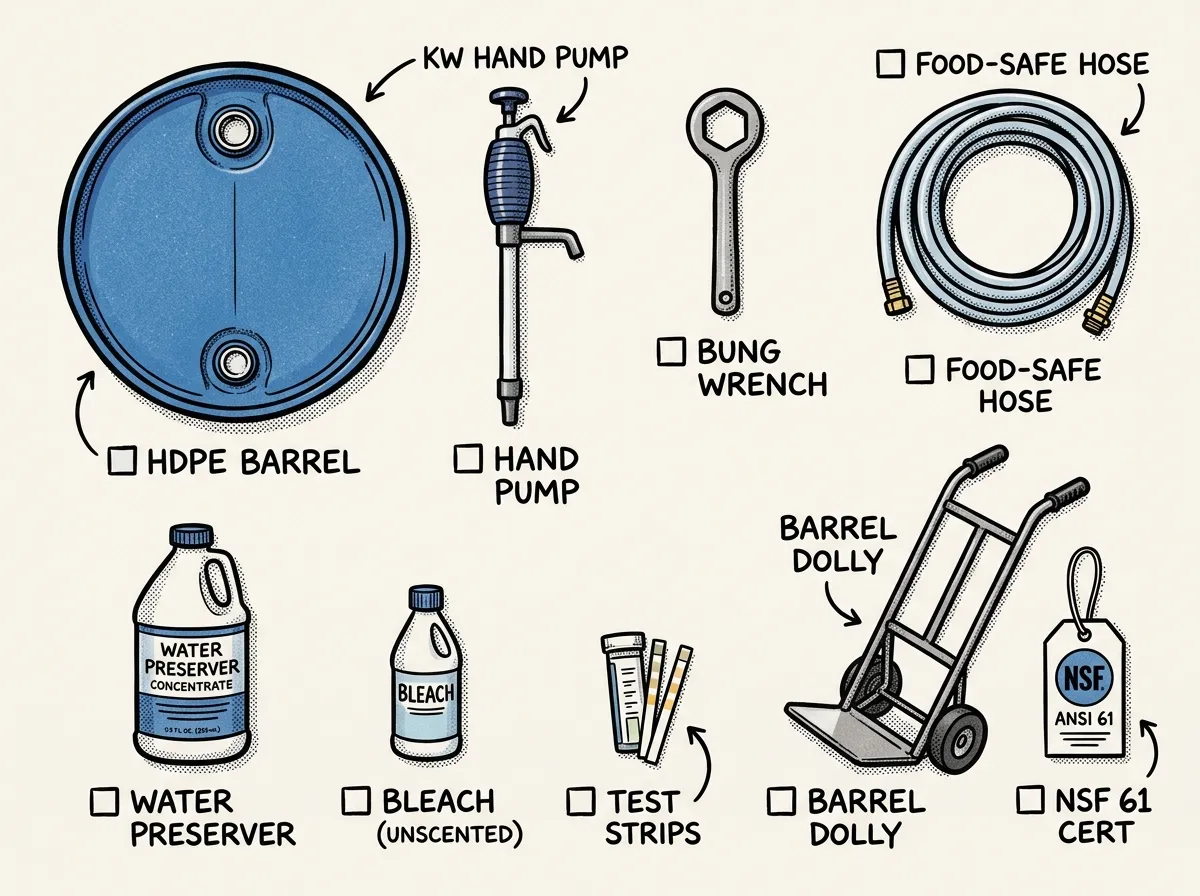 Everything you need for a 55-gallon barrel starter kit
This is where everyone should start. The WaterPrepared 55-gallon barrel and the Augason Farms 55-gallon water drum are both solid NSF 61 certified options. I’ve used variations of these for years.
Setup is straightforward. Buy from a preparedness retailer (not a used drum dealer — you don’t know what was in it). Get a bung wrench to open it, sanitize with a bleach solution, fill from your garden hose with a food-safe drinking water hose, add treatment, and seal it. Pair it with a hand siphon pump — the Toribio or Cary Company models work well and cost under $15. Tuck it in your garage corner and you’ve got a week of water for a family of four.
Small Spaces: Stackable 5–7 Gallon Containers ($15–$25 each)
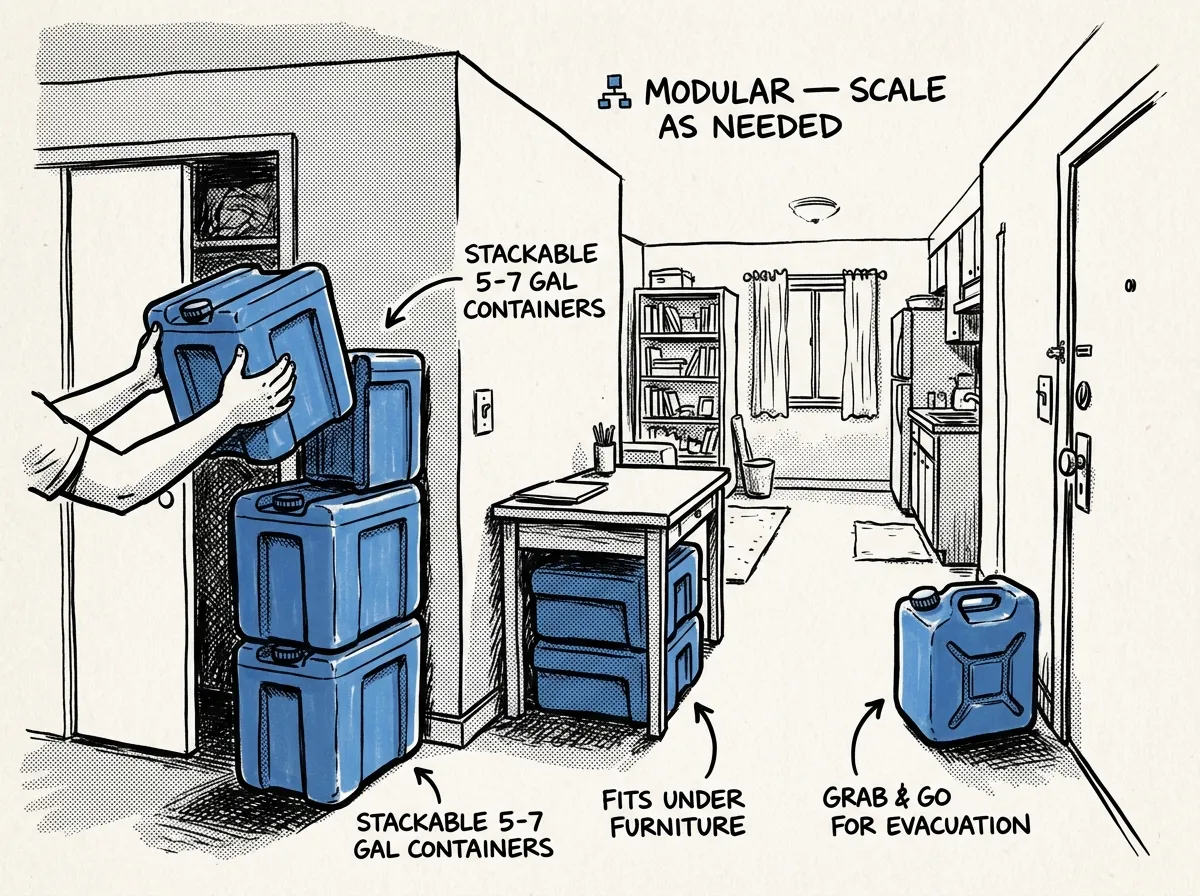 Stackable water containers maximizing storage in a small apartment
The Reliance Aqua-Tainer — around $20 for the 7-gallon version — is what I reach for every time for portable, stackable storage. I keep four in my closet as a grab-and-go backup. They’re ideal for apartment preppers because they’re individually manageable — a full 7-gallon container weighs about 58 pounds, which most adults can carry. WaterBricks at 3.5 gallons are lighter but cost more per gallon of capacity. For pure portability, the Aqua-Tainer wins.
Don’t stack more than three high. The bottom container needs to handle the weight, and these aren’t engineered like industrial shelving. Run them along a wall for stability.
Mid-Size: 100–250 Gallon Vertical Polyethylene Tank ($150–$400)
Norwesco and Chem-Tainer both make excellent vertical poly tanks in this range. These are my recommendation for anyone with a garage or covered area who wants real household capacity without a massive footprint. A 200-gallon Norwesco vertical takes up about 2 feet of floor diameter and provides a family of four roughly 25 days of water at realistic consumption.
Why do I like vertical tanks? Gravity works in your favor. Add a brass spigot at the bottom, elevate the tank even 12 inches on cinder blocks, and you can fill buckets without a pump. Simple and reliable.
I’ve watched people make the mistake of buying a big horizontal tank thinking it’ll be easier to manage. It won’t. Horizontal tanks eat floor space, they’re harder to drain completely, and getting a spigot at the right height is a headache. Vertical tanks with a bottom-mounted spigot on a small riser are the way to go for garage setups. I’ve had my Norwesco set up this way for years and it’s never given me a problem.
Household Multi-Day: 300–550 Gallon Polyethylene Tank ($300–$700)
At this size, you’re looking at tanks from Norwesco, Snyder Industries, or Ace Roto-Mold. These are serious potable water storage solutions that can cover a family of four for a month or more. But they’re also serious in weight — a full 500-gallon tank weighs over 4,100 pounds. You need a concrete pad or engineered base. No exceptions.
I installed a 300-gallon Norwesco in my garage on a reinforced concrete slab. It takes up a parking spot’s worth of floor space, but it gives my family real peace of mind during our annual winter storms.
Premium Long-Term: Stainless Steel Tanks ($1,200+)
Stainless steel doesn’t leach, doesn’t degrade in UV, and can last decades with minimal maintenance. Companies like Glacier Tanks and Keg Outlet sell potable-rated stainless tanks in the 500+ gallon range. The trade-off is cost — you’re paying 3–5x more per gallon of capacity compared to polyethylene. For permanent homestead installations, farms, and anyone who wants a truly set-and-forget solution, stainless is worth considering.
Portable Backup: Collapsible Water Bladders ($30–$80)
So what about last-minute options? The WaterBOB fits in your bathtub, holds 100 gallons, and deploys fast when you see a storm coming. I keep one in my emergency kit. During the February 2021 ice storm here in Oregon, a neighbor used one and was glad they had it when pipes froze for three days. For transport, HydroBlue collapsible bladders pack down small. Think of bladders as “emergency surge capacity” rather than permanent storage.
Water Storage Tank Materials Compared
Choosing the right material for your food-grade water storage is one of the most consequential decisions you’ll make. Here’s what I’ve learned after testing all of these in Pacific Northwest conditions — heavy rain, freeze-thaw cycles, and periodic UV exposure.
HDPE / Polyethylene
- Cost per gallon: $0.50–$1.50
- UV resistance: Good when UV-stabilized; degrades without treatment
- Chemical leaching: None when food-grade and NSF 61 certified
- Longevity: 10–20 years depending on conditions
- Best for: Indoor storage, garages, covered outdoor areas
This is what I recommend for 90% of you. It’s affordable, easy to move when empty, and widely available. The key is verifying that NSF/ANSI 61 certification — without it, you don’t know what plasticizers might leach into your water.
Stainless Steel
- Cost per gallon: $2.00–$5.00+
- UV resistance: Excellent
- Chemical leaching: None
- Longevity: 30+ years
- Best for: Permanent outdoor installations, homesteads, farms
If budget isn’t your primary concern and you want a tank that’ll outlast you, stainless is the answer. I’ve seen 30-year-old stainless tanks on PNW farms that look nearly new inside.
Galvanized Steel
- Cost per gallon: $1.50–$3.00
- UV resistance: Good
- Chemical leaching: Zinc coating can degrade over time; interior liner recommended
- Longevity: 15–25 years with maintenance
- Best for: Outdoor agricultural use
Be cautious here. Galvanized tanks without an interior liner can introduce zinc and other metals into your water. For potable storage, always use a food-safe liner or opt for stainless instead.
Fiberglass
- Cost per gallon: $1.50–$3.50
- UV resistance: Good
- Chemical leaching: Low when properly manufactured
- Longevity: 20–30 years
- Best for: Underground cisterns, large outdoor installations
Fiberglass is excellent for below-grade installations where you’re burying a cistern. It resists soil corrosion and holds up well. It’s less common for above-ground prepper use simply because poly tanks are cheaper and easier to source.
Flexible Bladders
- Cost per gallon: $0.30–$0.80
- UV resistance: Poor — indoor use only
- Longevity: 1–5 years
- Best for: Temporary storage, bathtub bladders, transport
Not a primary long-term solution, but invaluable as a supplement.
IBC Totes for Water Storage: Pros and Cons
Spend any time on prepper forums and you’ll see IBC (Intermediate Bulk Container) totes recommended constantly — and for good reason. These 275-gallon cage-and-bladder units are arguably the most cost-effective way to store large water volumes at home.
What Are IBC Totes?
IBC totes are industrial shipping containers — a food-grade HDPE bladder inside a steel cage on a pallet base. The standard size holds 275 gallons (about 1,040 liters). New ones run $200–$400. Used ones can be found for $50–$150, but this is where you need to be extremely careful.
Critical Buying Rules
Only buy NEW or verified food-grade IBC totes for drinking water. I can’t stress this enough. Used totes may have stored industrial chemicals, soaps, or agricultural products. Even “cleaned” totes can retain chemical residues in the plastic. If you can’t verify the full chain of custody, don’t use it for potable water. Period.
When I set up IBC totes for community emergency caches through my FEMA training work, we only sourced new, food-grade certified units. The price difference between a new tote and a used one is $100–$200. That’s not worth the risk of chemical contamination — not even close. I’ve cracked open used totes that smelled fine and still had residue you could feel on the interior walls. Don’t gamble with your drinking water.
Practical Considerations
- Weight: A full 275-gallon IBC tote weighs about 2,290 pounds. Place it where you want it before filling.
- Footprint: Approximately 48” × 40” — about the size of a standard pallet.
- UV degradation: The HDPE bladder degrades in sunlight. Store indoors or build an opaque cover. I’ve seen outdoor IBC totes crack within 2 years without UV protection.
- Dispensing: Most come with a 2-inch ball valve at the bottom. The pallet base elevates the valve enough to fit a bucket underneath.
- Stackability: They’re designed to stack two high when full, but I don’t recommend this for home use without an engineered support system.
For homesteaders, an IBC tote is often the sweet spot — more capacity than a 55-gallon barrel, less complex than a full tank installation, and portable enough to reposition with a pallet jack.
Where to Place Your Water Storage Tank
Where you put your tank matters almost as much as which tank you buy. Water weighs 8.34 pounds per gallon. A full 55-gallon barrel weighs about 460 pounds. A 300-gallon tank? Over 2,500 pounds. You need to think about this before you fill anything.
Garage Floor
This is where most preppers end up, and it’s a solid choice. Concrete garage floors can typically handle 300+ pounds per square foot. A 55-gallon barrel’s no problem. For tanks over 250 gallons, check your slab thickness — standard 4-inch residential slabs can usually handle up to about 500 gallons, but I’d recommend checking with a structural engineer for anything larger.
My setup: I keep a 300-gallon vertical poly tank against my garage’s back wall, plus four 55-gallon barrels. The poly tank sits on a 2-inch rubber mat to prevent abrasion and distribute weight. Total capacity: about 520 gallons for a family of three.
Basement
Basements offer ideal temperature stability — consistently cool and dark, which is perfect for long-term drinking water storage. But getting a large tank down there can be a real challenge. Many preppers use multiple 55-gallon barrels carried down individually, which is far more practical than wrestling a 250-gallon tank down stairs.
Weight warning: Verify your basement floor’s load rating. Most basement slabs handle water barrel weight easily, but older homes with thin slabs or stone foundations may need assessment.
Outdoor Ground-Level
UV-stabilized tanks rated for outdoor placement work well here. Use a level, compacted gravel pad or poured concrete base. If you’re in the Pacific Northwest like me, I’d also recommend elevating the base at least 2–4 inches to prevent the tank from sitting in pooled rainwater. If you’re in a high desert climate, UV is your bigger enemy — shade structures become essential. For freeze protection in cold regions, insulate with foam blankets or a wooden enclosure if you get sustained temperatures below 25°F.
Apartment or Condo
You’re working with limited space and weight restrictions. Stackable water storage containers are your best bet — WaterBricks on a closet shelf, Aqua-Tainers in a utility closet, or a WaterBOB tucked under the bed for deployment when needed. Aim for 30–50 gallons across multiple smaller containers. A balcony can work for a single 5–7 gallon container, but check your HOA rules and consider freeze risk.
Realistic Planning Rules for Emergency Water Storage
Let’s move beyond the bare minimum. FEMA’s 1 gallon per person per day is a survival baseline. Here’s what realistic planning looks like based on my experience managing water supply during actual emergencies.
| Need | Daily Amount Per Person |
|---|---|
| Drinking | 0.5–1 gallon |
| Cooking | 0.5 gallon |
| Basic hygiene (hand/face washing) | 0.5 gallon |
| Realistic daily total | 1.5–2 gallons |
Add 0.5 gallons per day per large dog, 0.25 gallons per cat. If anyone in your household has medical needs requiring water (dialysis, wound care, medication mixing), add accordingly.
Quick capacity calculator:
| Household Size | 7-Day Supply (2 gal/day) | 14-Day Supply | 30-Day Supply |
|---|---|---|---|
| 1 person | 14 gal | 28 gal | 60 gal |
| 2 people | 28 gal | 56 gal | 120 gal |
| 4 people | 56 gal | 112 gal | 240 gal |
| 6 people | 84 gal | 168 gal | 360 gal |
The formula’s simple: gallons stored ÷ (number of people × gallons per day) = days of supply. Print it out and tape it to your tank.
For short-term preparedness, pairing even 14 gallons of water with building a 72-hour emergency kit puts you ahead of 90% of households. For longer-term resilience, your water storage should scale alongside your food storage basics for preppers.
Comparison Snapshot
| Tank Type | Typical Sizes | Material | Price Range | Best For | Pros | Cons |
|---|---|---|---|---|---|---|
| Water barrel | 55 gal | HDPE | $60–$120 | Beginners, 1-2 week supply | Low cost, portable, easy setup | Limited capacity |
| Stackable containers | 3.5–7 gal | Food-grade plastic | $15–$25 each | Apartments, bug-out | Modular, portable, fits anywhere | More handling, many caps to manage |
| Vertical poly tank | 100–250 gal | HDPE/poly | $150–$400 | Garage, mid-size household | Good capacity-to-footprint ratio | Requires pump/spigot and stable base |
| IBC tote | 275 gal | HDPE in steel cage | $200–$400 (new) | Homesteads, budget large storage | Best cost per gallon at volume | Heavy, needs UV protection |
| Large household tank | 300–550 gal | Polyethylene | $300–$700 | Multi-day family backup | Serious capacity | Needs foundation and pump |
| Stainless steel tank | 500+ gal | Stainless steel | $1,200+ | Farms, permanent installations | Decades of lifespan, no leaching | Expensive, heavy, harder to source |
| Water bladder | 100 gal (WaterBOB) | Flexible polymer | $30–$80 | Temporary, last-minute prep | Foldable, cheap, fast deployment | Short lifespan, not for long-term |
Prices fluctuate based on retailer and region. Check current pricing before purchasing.
Maintenance: What Keeps Your Water Actually Drinkable
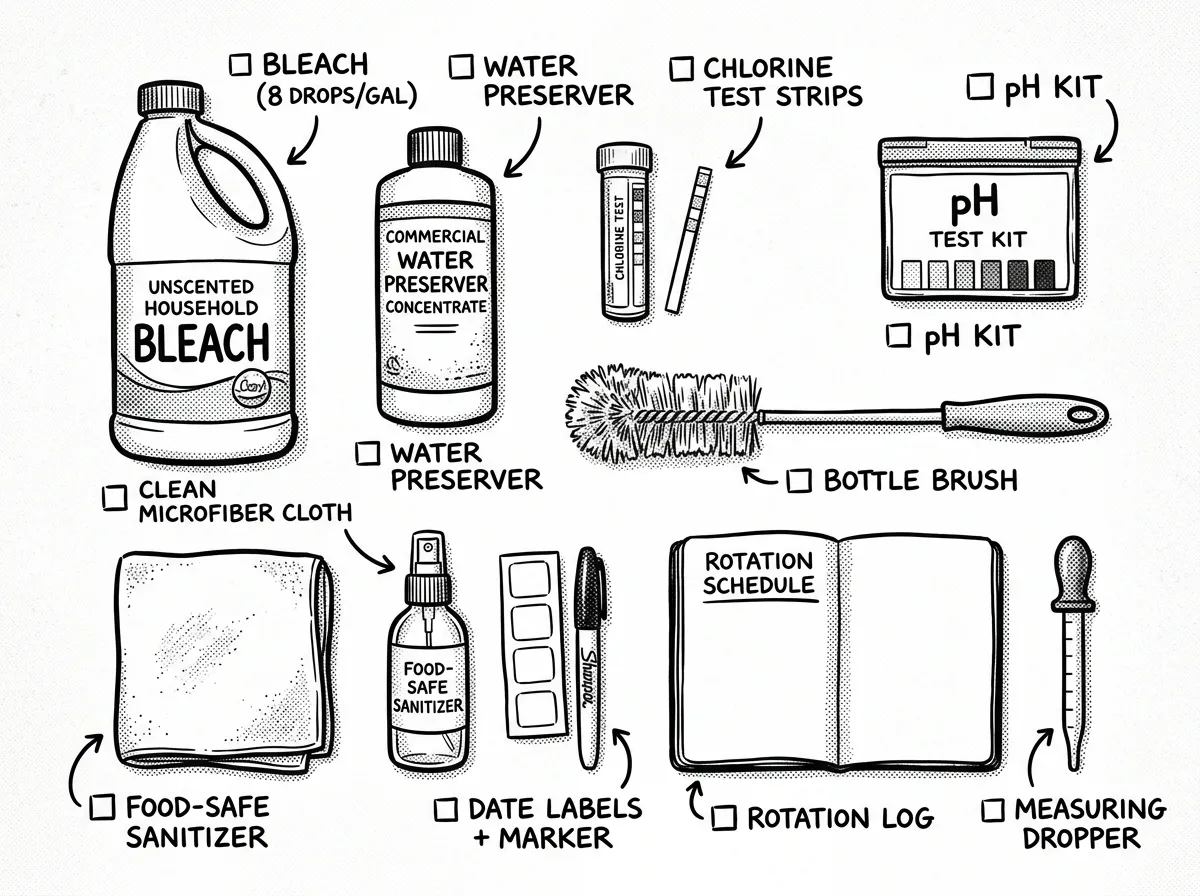 Water maintenance supplies for keeping stored water safe
Good maintenance is what separates stored water you can actually drink from a breeding ground for bacteria. Here’s exactly what I do — and what I teach in my emergency preparedness workshops.
Before First Fill
- Mix 1 teaspoon unscented household bleach per gallon of water, pour into the tank, seal, and slosh to coat all interior surfaces. Let sit 30 minutes, then drain and rinse with clean water.
- Inspect all seals and fittings — bung caps, spigots, threaded connections. Replace anything cracked or questionable before filling.
- Fill using a food-safe hose only. Standard garden hoses contain lead and other chemicals. A white or blue drinking water-safe hose like the Camco — around $15 — is what you want.
The first time I filled a barrel, I used a regular garden hose and didn’t think twice about it. That was a mistake. I could taste the difference. Now I won’t fill anything with water I plan to drink unless it’s through a food-safe hose.
Ongoing Maintenance
- Rotation schedule: Every 6–12 months for untreated municipal water. If you used a commercial preservative like Water Preserver Concentrate, you can extend to 5 years.
- Inspect for biofilm: Open the tank annually and look for a slimy coating on interior walls. Biofilm appears as a slippery, sometimes greenish film. If you find it, drain completely, scrub with a long-handled brush, sanitize with the bleach solution above, and refill.
- Test your water: Keep a pack of water quality test strips (Varify or Health Metric brands both work well) and test for bacteria, pH, and chlorine levels before drinking stored water. They cost about $15 for 100 strips.
- Check structural integrity: Look for bulging, cracking, or UV discoloration on plastic tanks every 6 months. Inspect metal tanks for rust spots or compromised welds.
Finding the Best Water Storage Tanks for Your Situation
After more than a decade of emergency response work, here’s what I keep coming back to: the best water storage tanks for preppers are the ones that match your actual living situation, budget, and commitment to maintenance. A 275-gallon IBC tote in the barn does you zero good if it’s empty or contaminated. A single 55-gallon barrel in the garage that’s been properly sanitized, filled, and treated? That’s 7+ days of real water security for a family.
If you’re brand new: Get one 55-gallon food-grade HDPE barrel this week. Sanitize it, fill it, treat it, and forget about it for 6 months. You’ll have already surpassed most American households in water preparedness.
If you’re scaling up: Add a 250-gallon vertical poly tank or an IBC tote. Pair your storage with a gravity-fed filter and a rainwater collection system. Build redundancy — multiple smaller containers plus one large tank gives you both capacity and flexibility.
If you’re going all-in: Look at stainless steel for your permanent installation, supplement with IBC totes, and keep stackable containers ready for distribution or evacuation. At this level, you should also have water purification methods dialed in as a backup to storage.
- Calculate capacity: people × days × 2 gallons = minimum gallons needed
- Choose material: HDPE for most uses, stainless for permanent installs, bladders for portability
- Verify NSF/ANSI 61 certification for any tank storing drinking water
- Measure your space — check dimensions AND weight capacity
- Plan the foundation: concrete pad, compacted gravel, or engineered stand
- Budget the full system: tank + pump + spigot + fittings + food-safe hose + treatment + test strips
- Set a rotation reminder: calendar alert every 6 months to inspect and test
Whatever your level, verify that certification, sanitize before first fill, and commit to a rotation or treatment schedule. Water is the foundation of every other preparedness plan you build. Get this right first, and everything else gets easier.
Start storing today. Your future self will thank you.
Frequently Asked Questions
How do Doomsday preppers store water?
Most serious preppers use a tiered system: a primary large tank (55–500 gallons) as the home base supply, smaller stackable containers (5–7 gallons each) for portability and flexibility, and water treatment supplies for ongoing purification. Many also integrate rainwater harvesting and gravity-fed filtration as replenishment strategies. The key isn’t any single container — it’s having multiple layers so no single failure leaves you without water. In my experience working with preparedness communities across the Pacific Northwest, the preppers who do best keep it simple: HDPE tanks, consistent rotation, and a reliable way to filter and treat incoming water.
How long will 500 gallons of water last for one person?
At FEMA’s bare minimum of 1 gallon per day, 500 gallons lasts one person about 500 days. At the more realistic rate of 2 gallons per day (covering drinking, cooking, and basic hygiene), it lasts about 250 days. For a family of four at 2 gallons per person per day, 500 gallons lasts roughly 62 days. Use this formula: gallons stored ÷ (people × daily gallons) = days of supply.
What is the best water storage tank for new preppers?
Start with a 55-gallon food-grade HDPE barrel. It costs $60–$120, fits in any garage corner, and gives a family of four about a week of water at realistic consumption rates. Pair it with a hand siphon pump and a bung wrench. It’s the most practical and affordable entry point — you can always add more tanks later as your preparedness plan grows.
Are HDPE water tanks safe for drinking water?
Yes — when they’re manufactured as food-grade and carry NSF/ANSI 61 certification. This certification confirms the material won’t leach harmful chemicals into stored water. Always verify this before purchasing any HDPE tank for potable water storage. Avoid repurposed industrial containers or tanks without clear food-grade labeling.
Can I store water in my garage?
Absolutely. Garages are one of the most common and practical locations for emergency water storage. Keep the tank out of direct sunlight, on a stable flat surface, and elevated slightly off bare concrete if possible (a rubber mat works well). Standard residential concrete garage floors can support 55-gallon barrels with no issues and most tanks up to 500 gallons — but check your slab thickness for anything over 250 gallons.
How often should I rotate stored water?
For untreated municipal water in a clean sealed container, every 6–12 months is the standard recommendation. If you treated water with commercial preservatives at fill time, you can safely extend the interval to 5 years. Regardless of treatment, test your water with quality strips before consuming it after extended storage.
The Complete
Prepper's Reference.
149 articles synthesized into one comprehensive PDF — twelve chapters covering water, food, shelter, first aid, comms, and scenario-specific preparedness. Free with your email.
Unsubscribe anytime · We never share your email
You're in. Check your inbox.
Keep Reading
Emergency Water Preparedness: Store, Purify & Plan
Build your emergency water preparedness plan with proven strategies for storage, purification, and rationing from a FEMA-trained WFR. Start your water plan today.
How Much Emergency Water to Store: Complete Guide
Learn exactly how much emergency water to store per person per day. FEMA-based calculations, container tips, and rotation schedules to keep your family safe.
How to Store Water for Emergencies: Complete Guide
Learn how to store water for emergencies — the right containers, purification methods, rotation tips, and a budget plan. Start your supply today.