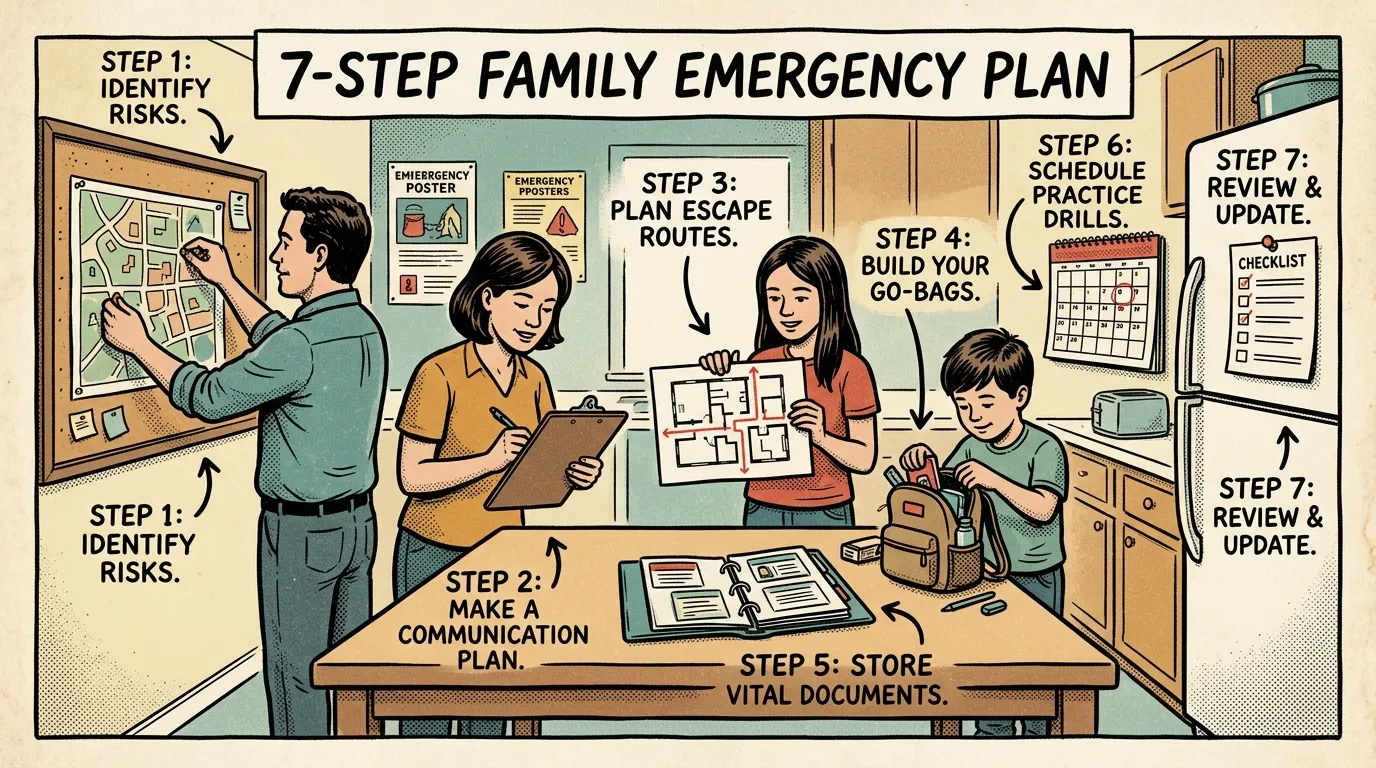
This article walks readers through building a comprehensive written emergency preparedness plan step by step, covering hazard assessment, evacuation routes, meeting points, role assignments, supply inventory, critical document organization, and ongoing plan maintenance — with practical templates and field-tested advice from a FEMA-trained emergency management professional.
Key Takeaways
- Block two hours this weekend to write your emergency preparedness plan — a rough plan on paper beats a perfect plan stuck in your head
- Start with a zip-code-specific hazard assessment, then build evacuation routes, meeting points, and role assignments around your top three threats
- Assign every household member one clear role during an emergency — specific tasks eliminate the freeze response under stress
- Organize critical documents in a grab-and-go binder with insurance policies, IDs, and medical records — this single step can accelerate recovery by weeks
- Drill your plan twice a year on daylight saving time changes and update immediately after any major life change
In the fall of 2017, I was deployed to Santa Rosa, California, supporting community damage assessments after the Tubbs Fire tore through entire neighborhoods in a matter of hours. I stood in a parking lot watching families sift through the remains of homes that had been standing twelve hours earlier. Many residents had less than 15 minutes to evacuate. Some had a plan. Most didn’t. The difference in outcomes was staggering — and it’s the reason I’ve spent the last decade helping people build a real, written emergency preparedness plan before disaster forces improvisation.
I’m not talking about a vague idea floating in the back of your head. I mean a physical document — pages you can grab off a shelf at 2 a.m. when the power’s out and adrenaline is hijacking your ability to think clearly. After 12 years of FEMA-trained emergency management work and Wilderness First Responder deployments across the Pacific Northwest, I’ve seen exactly what separates families who recover quickly from those who struggle for months. It almost always comes down to whether they had a plan written down before the event hit.
This guide walks you through building that plan from scratch. Not a gear list — we cover that in our essential prepper checklist. Not just communication strategies — that’s in our family communication plan guide. This is the full planning process: hazard assessment, evacuation routes, meeting points, supply inventory, insurance documents, role assignments, and a maintenance schedule to keep everything current.
Quick Summary
- A written plan beats a mental plan every time — stress, noise, and chaos degrade your decision-making, and paper doesn’t forget
- Start with a hazard assessment specific to your location — earthquakes in the Pacific Northwest demand different planning than hurricanes along the Gulf Coast
- Define two meeting points minimum — one immediately outside your home and one outside your neighborhood in case you can’t return
- Assign roles to every capable household member — who grabs the go-bags, who secures the pets, who accounts for the kids
- Organize critical documents in a single grab-and-go binder — insurance policies, IDs, medical records, and financial account info
- Drill twice a year and update after every major life change — a plan you’ve never practiced is just a document
What Is an Emergency Preparedness Plan?
An emergency preparedness plan is a written document that identifies local hazards, establishes evacuation routes and meeting points, assigns roles to household members, inventories emergency supplies, and organizes critical documents — all designed to guide your decisions during a crisis when stress makes clear thinking nearly impossible.
Here are the core components every plan needs:
- Hazard assessment — the specific threats relevant to where you live
- Evacuation routes — primary, alternate, and on-foot routes away from danger
- Meeting points — predetermined locations where your household regroups
- Role assignments — specific tasks for each person
- Supply inventory — what you have, where it’s stored, when it expires
- Document organization — critical paperwork consolidated for rapid retrieval
- Maintenance schedule — regular drills and updates to keep everything current
Why does the “written” part matter so much? I’ve run dozens of community preparedness workshops, and I always start with the same exercise: I ask everyone to close their eyes and mentally walk through their evacuation plan. Then I ask them to write it down step by step. The gap between what people think they know and what they can actually put on paper is enormous. Under real disaster stress — adrenaline flooding your system, kids crying, zero visibility — that gap becomes dangerous.
A plan you can’t articulate on paper is a plan you won’t execute under stress.
FEMA, the Red Cross, and OSHA all recommend written plans for homes, families, and workplaces. Not because bureaucracies love paperwork, but because decades of disaster response data show the same thing I’ve witnessed in the field: written plans outperform mental plans every single time.
Why Most Households Don’t Have a Plan
The 2023 FEMA National Household Survey found that only about 48% of American households have developed an emergency plan. Even fewer have it written down in a format the whole family can access. You probably know you should have one. You just haven’t gotten around to it. I get it — it feels like a big, abstract project with no immediate deadline.
But here’s what I’ve learned from deployments: the families who recover fastest aren’t the ones with the most supplies. They’re the ones who had a plan that everyone in the household understood. During the Tubbs Fire response, I worked with two neighboring families who’d lost their homes. One family had a written plan with insurance documentation, an out-of-area contact, and a predetermined meeting point. They filed their insurance claim within five days and were in temporary housing within two weeks. The family next door — similar home, similar coverage — spent eight weeks trying to reconstruct policy numbers, locate account information, and coordinate with scattered family members. Same disaster. Radically different recovery.
The 80-20 rule applies here powerfully. That initial 20% of effort — sitting down for two hours to write a basic plan — delivers 80% of the preparedness benefit. You don’t need a 50-page binder to start. You need a clear, actionable document that answers the critical questions before the crisis asks them.
Step 1: Assess Your Hazards
Every disaster preparedness plan starts with understanding what you’re actually planning for. This isn’t generic. It’s specific to where you live, where you work, and the routes between them.
Identify Your Local Threats
Pull up your area’s hazard map. FEMA’s Community Resilience Estimates tool measures a community’s ability to bounce back from a disaster, and it’s a solid starting point. Your county emergency management office will have specific risk assessments too.
In my experience living and working in the Pacific Northwest, my top hazards are:
- Cascadia Subduction Zone earthquake (catastrophic, low frequency) — our earthquake preparedness guide covers this in depth
- Wildfire and smoke events (seasonal, increasing frequency)
- Flooding and landslides (winter storms)
- Extended power outages (ice storms, wind events)
- Volcanic ashfall (low probability, high impact)
Your list will look different. If you’re in Oklahoma, tornadoes jump to the top. Coastal Florida means hurricanes and storm surge. An urban apartment dweller needs to think about building fires and infrastructure failures.
Rank by Likelihood and Impact
Don’t give equal weight to every threat. I use a simple 2x2 matrix:
- High likelihood, high impact — plan for these first (e.g., wildfire in fire-prone areas)
- High likelihood, low impact — build resilience (e.g., short power outages)
- Low likelihood, high impact — have a basic plan (e.g., major earthquake)
- Low likelihood, low impact — acknowledge but don’t obsess
Write down your top three to five hazards. These drive every decision that follows.
Tailor Your Plan to Your Top Threat
Let me show you what hazard-specific planning actually looks like. If wildfire is your top threat — as it is for much of the western U.S. — your plan adjustments include: maintaining a pre-packed vehicle during fire season, monitoring fire weather watches daily, setting up CAL FIRE or local alert notifications, creating defensible space around your home, and planning evacuation triggers based on fire proximity rather than waiting for an official order. Our wildfire evacuation checklist breaks this down further. The point is that your hazard assessment doesn’t just inform what you plan for — it changes how you plan.
Step 2: Map Your Evacuation Routes
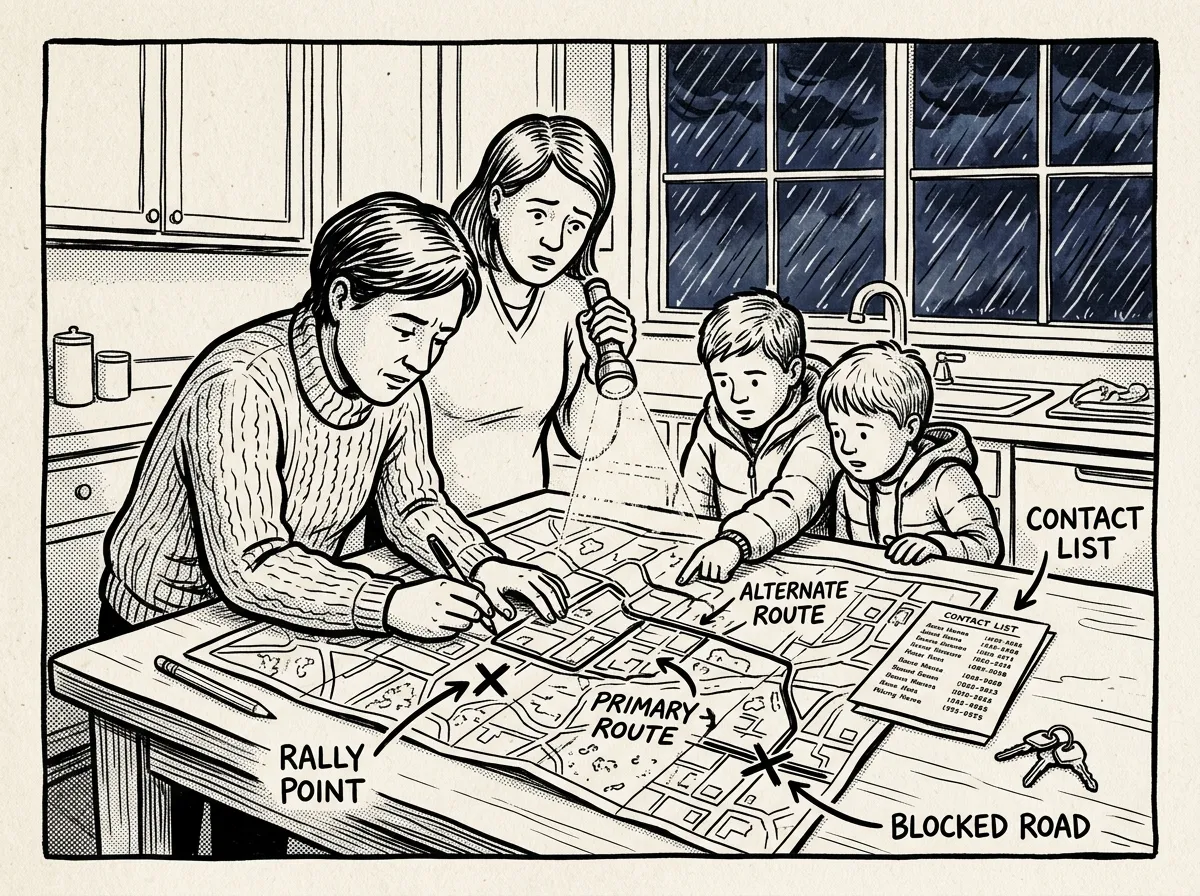 Family reviewing primary and alternate evacuation routes on a kitchen table map
This is where most emergency response plans fall apart. People assume they’ll “figure it out” when the time comes.
I’ve watched this assumption fail in real time. During a community preparedness workshop I ran in Clackamas County, I had 40 participants try to write alternate evacuation routes from memory. Only 15 could complete it. In a real disaster, cell networks are often the first thing to go — you can’t rely on GPS to improvise your way out.
Primary and Alternate Routes
For each major hazard scenario, identify:
- Primary evacuation route — the fastest, most direct path away from danger
- Alternate route — a completely different direction, in case Route A is blocked
- Walking route — assume roads are impassable and you’re on foot
Drive these routes. Then drive them again during rush hour. Note potential chokepoints: bridges, tunnels, narrow roads, areas prone to flooding or landslides. When I mapped my own evacuation routes, I discovered my primary route crossed a bridge that would likely fail in a major earthquake. That single realization changed my entire plan.
Plan for Separated Families
Most emergencies won’t happen conveniently when everyone’s home together. Your plan needs to address what happens when family members are scattered across work, school, and errands:
- Who picks up children from school or daycare — designate a primary and a backup person
- What each person does independently if they can’t reach the rest of the family
- A reunification timeline — how long each person waits at each meeting point before moving to the next
- Alternate pickup routes for schools that avoid the same bottlenecks as your home evacuation
If one parent works 30 miles away and roads are compromised, they need their own route plan and a clear understanding that the other parent handles child pickup. Don’t leave this to a panicked phone call.
Households Without Vehicles
Not everyone can jump in an SUV and drive. If your household doesn’t have reliable vehicle access, your plan should include: identifying public transit evacuation routes, pre-arranging rides with neighbors through a mutual aid agreement, and registering with your local emergency management office for evacuation assistance if any member has mobility limitations. Many counties maintain registries specifically for this purpose — contact yours before you need it.
Document the Details
In your written plan, include:
- Street-by-street turn directions (don’t rely on GPS)
- Estimated travel times under normal and congested conditions
- Gas station locations along each route (keep your tank above half)
- Predetermined stopping points if you need to rest or regroup
Print physical maps. I keep a laminated county map in each vehicle with routes highlighted in different colors for different scenarios.
Step 3: Establish Meeting Points
FEMA and the Red Cross both recommend at least two meeting places. I’d add a third.
Three-Tier Meeting Point System
Tier 1 — Immediate (outside your home): For sudden events like a house fire. Pick a specific spot — the mailbox, the big oak tree, the neighbor’s driveway. Every household member must know this location without being told.
Tier 2 — Neighborhood (within walking distance): Use this when you can’t return home or need to regroup after scattered evacuation. A school, church, park, or community center works well. Choose somewhere easily identifiable, even in the dark.
Tier 3 — Out of area (a trusted contact’s home): If your entire area is affected, you need somewhere to converge outside the disaster zone. In my plan, this is my brother-in-law’s house 90 miles south. We’ve confirmed he’s willing and able to serve as our rally point.
For each meeting point, specify:
- Exact address and physical description
- How long to wait before moving to the next tier
- What to do if no one shows up within the designated window
Communication Plan Essentials
Your meeting points work best paired with a solid communication plan. Include these directly in your written document:
- Designate an out-of-area contact — someone 200+ miles away who can serve as a central relay, since long-distance calls often connect when local lines are jammed
- Text before you call — texts require less bandwidth and get through when voice calls can’t
- Program ICE (In Case of Emergency) contacts into every family member’s phone
- Agree on a social media check-in method as a backup
- Keep a written contact card in every go-bag with key phone numbers — your phone may be dead
Our full family communication plan guide covers this in greater depth, but these five elements should be embedded directly in your emergency preparedness plan.
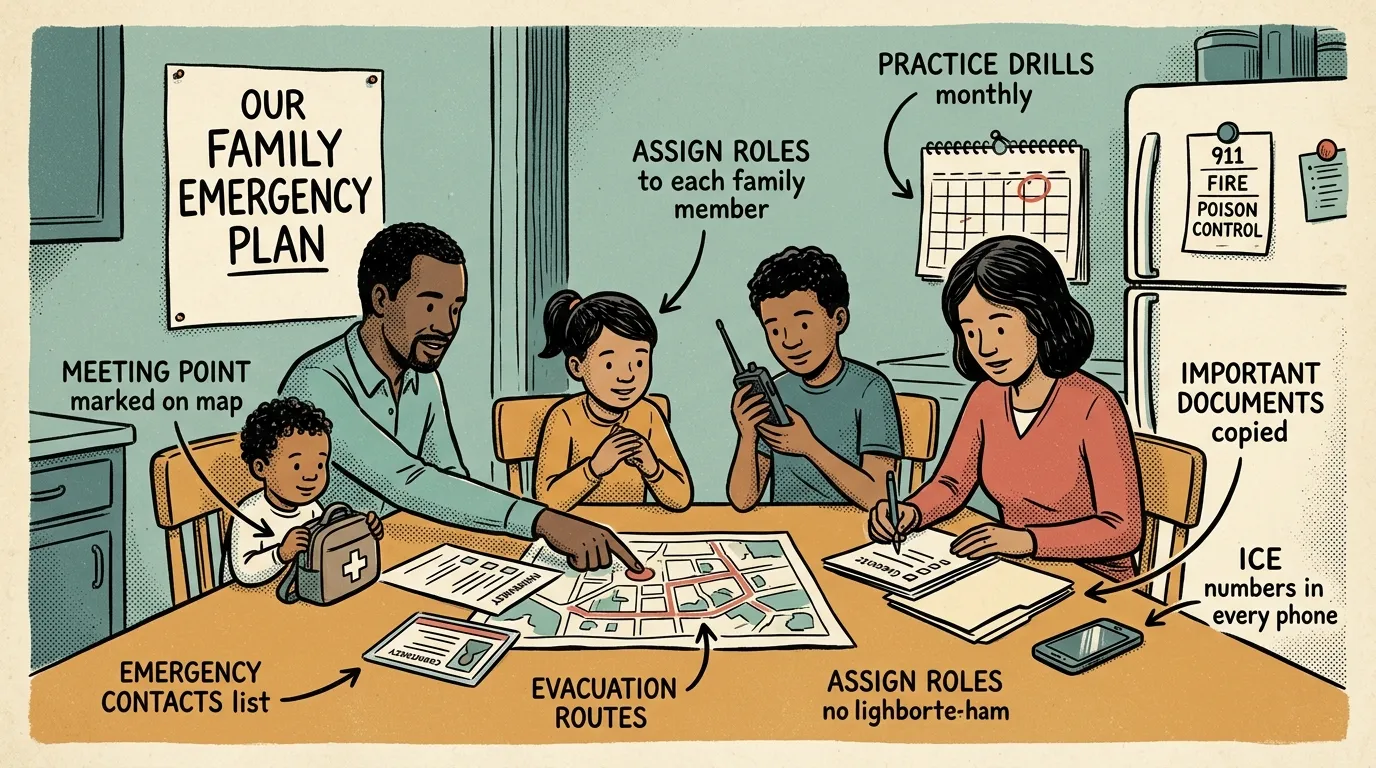
Step 4: Assign Roles to Every Household Member
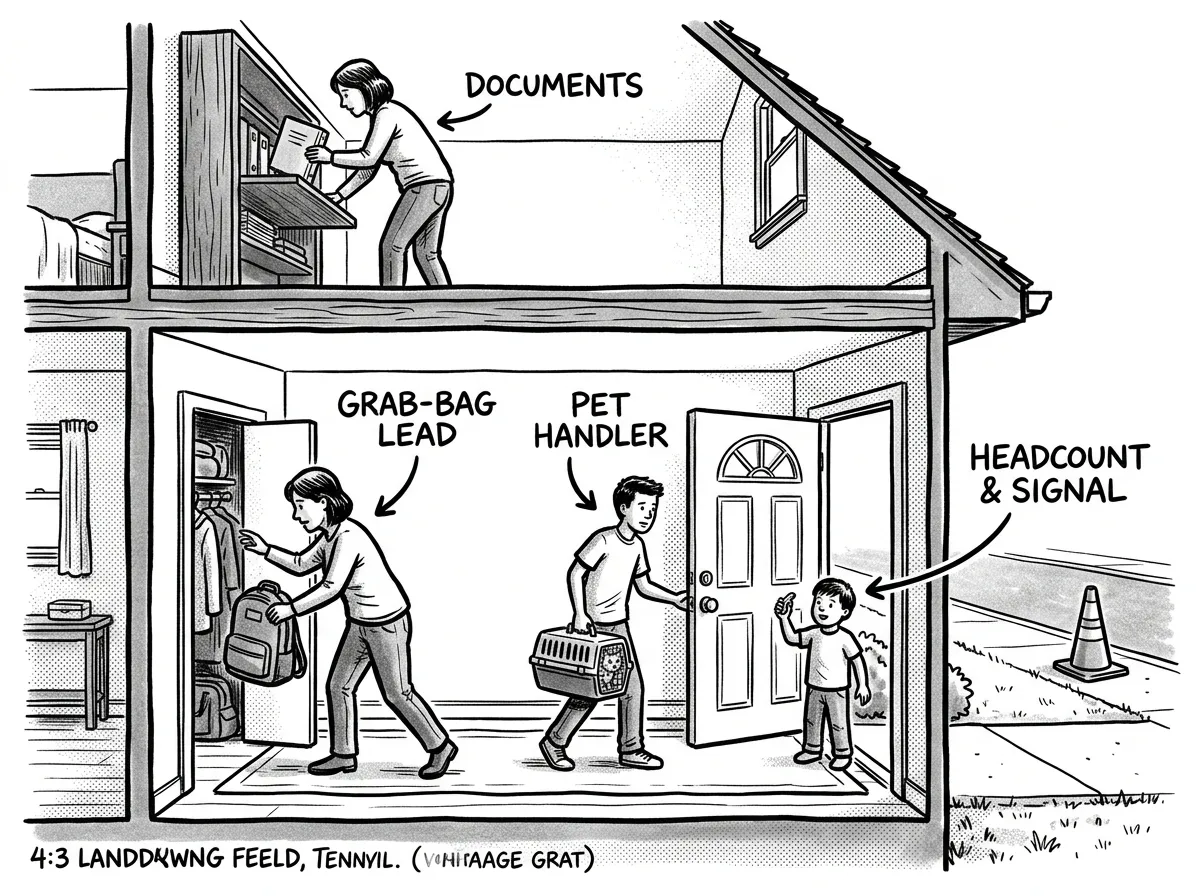 Each household member executing their assigned emergency role during a drill
This step transforms a plan from a document into an action system. When I’ve run family preparedness workshops, the single biggest improvement comes from role assignments. You perform dramatically better under stress when you’ve got one clear job rather than a vague sense of shared responsibility.
I’ve seen this play out with my own family. My then-seven-year-old’s job during drills was to put on shoes, grab her coat, and go directly to the mailbox. During our next family drill, she completed her task in under 90 seconds — faster than any adult in the house. Having that single clear task eliminated the “what do I do?” spiral and gave her a sense of agency instead of fear. Kids as young as six can handle age-appropriate roles, and it makes a real difference.
Sample Role Assignments
Lead Coordinator (you or your partner):
- Makes the go/no-go evacuation decision
- Confirms headcount at meeting points
- Carries the emergency binder and primary communication device
Supply Manager:
- Grabs go-bags from their designated location
- Loads critical supplies into the vehicle
- Responsible for water containers
Dependent Care:
- Secures children, elderly family members, or anyone with mobility challenges
- Grabs specialty items (medications, mobility aids, comfort items for kids)
Pet and Property:
- Leashes and crates pets
- Shuts off gas/water if directed
- Locks doors (if time allows)
Members with Disabilities or Medical Needs
If anyone in your household uses a wheelchair, walker, oxygen concentrator, or other medical device, your plan needs specific accommodations: identify wheelchair-accessible evacuation paths, keep backup batteries or manual alternatives for powered devices, maintain a written list of equipment serial numbers and suppliers, and pre-identify accessible shelters in your area. Don’t assume general shelter facilities will meet specialized needs.
Adjust roles based on your household. A single person assigns priorities rather than delegates. A family with teenagers can distribute more responsibility. The critical point: write it down and practice it.
Step 5: Build Your Supply Inventory
 Complete emergency supply inventory laid out for inspection
I won’t turn this into a full gear list — our essential prepper checklist handles that. But your emergency preparedness plan needs a supply inventory section that answers three questions:
- What do we have and where is it stored?
- What’s the rotation schedule for perishable items?
- Who is responsible for maintenance?
Start with building a 72-hour kit as your foundation, then scale up. A solid baseline is 10 days of food per person, 10 days of drinking water (one gallon per day — our guide on how to store water for emergencies covers this), an emergency weather radio for receiving alerts when the power’s out, flashlights with fresh batteries, a first aid kit, and any critical medications with at least a 30-day supply.
The Midland ER310 — around $35-40 — is what I keep in my kitchen cabinet. It’s got hand-crank charging, solar, and a flashlight built in. I’ve tested half a dozen emergency radios over the years, and the ER310 hits the sweet spot between durability and features. The cheaper models tend to have battery doors that crack within a year, and I’ve had two fail on me during actual extended outages. Spend the extra ten bucks.
As part of my Wilderness First Responder recertification, I audit my personal medical kit annually — I apply that same discipline to my household supply inventory. Your plan document should include a table listing every supply category, the quantity on hand, its storage location, and its expiration date. I review mine quarterly. Takes about 20 minutes and has saved me from discovering expired water purification tablets when I actually needed them.
Food Consumption Priority
If a disaster hits and you’re sheltering in place, eat your fresh food first — breads, fruits, vegetables, and food from the refrigerator while it’s still cold. Next, move to frozen food. Your shelf-stable emergency supplies are the last line. Write this consumption order into your plan so nobody opens the freeze-dried meals on day one while fresh food spoils in the fridge.
Step 6: Organize Critical Documents
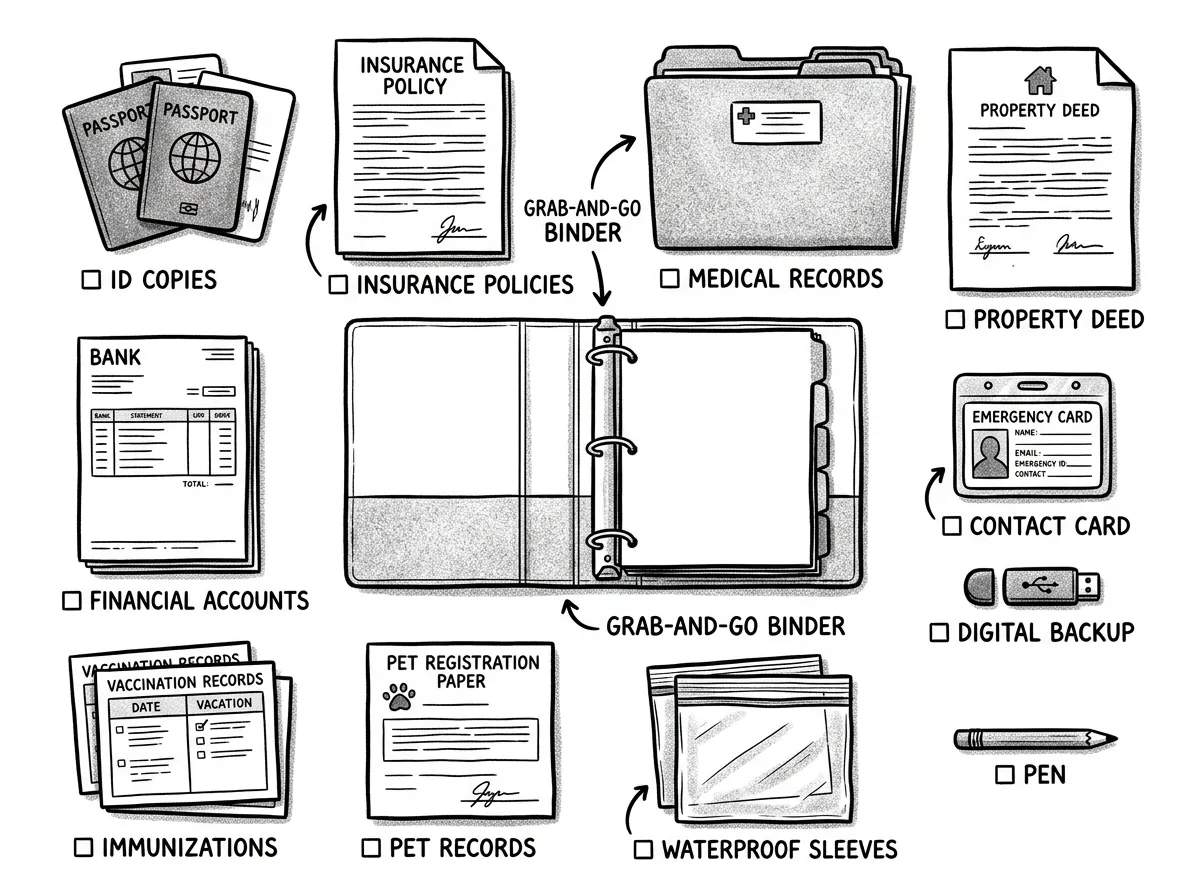 Emergency document binder contents spread out for grab-and-go readiness
After a disaster, your physical possessions may be gone. Your ability to recover financially depends almost entirely on documentation. I’ve watched families struggle for months with insurance claims because they couldn’t prove what they owned.
The Emergency Document Binder
Create a single binder (and a digital backup on an encrypted USB drive) containing:
- Insurance policies — homeowners/renters, auto, health, life, flood (with agent contact info)
- Identification — copies of driver’s licenses, passports, birth certificates, Social Security cards
- Medical records — current medications, allergies, immunization records, doctor contacts
- Financial accounts — bank account numbers, credit card companies, investment accounts
- Property documentation — home inventory with photos/video, vehicle titles, mortgage info
- Emergency contacts — local and out-of-area, including your family communication plan contacts
- Legal documents — wills, powers of attorney, guardianship designations
Store the physical binder in a fireproof safe or a location you can grab quickly during evacuation. Keep the USB drive somewhere separate — I keep mine in my everyday carry bag.
Take a full video walkthrough of your home once a year, narrating the contents of each room as you go. Store it on your encrypted USB drive. This single step can dramatically speed up an insurance claim.
Update this binder whenever you change insurance, add a family member, move, or make a major purchase.
Step 7: Practice, Drill, and Update
A plan you’ve never practiced is just paperwork. The gap between “knowing the plan” and “executing the plan under stress” is enormous. Practice closes that gap.
- Run a full evacuation drill twice a year — time it, execute role assignments, debrief afterward on what worked and what confused people
- Review your supply inventory quarterly — check expiration dates, rotate stock, update your inventory table
- Do a complete plan review annually — account for life changes, new hazard info, changes in household composition
- After any significant event — a near-miss, a local disaster, even a friend’s emergency — use it as a prompt to review
Tie your biannual drills to daylight saving time changes. You’re already adjusting clocks and checking smoke detector batteries — add a 30-minute evacuation drill and it becomes routine.
The 5 Steps as a Continuous Cycle
People often ask about “the five steps” of emergency preparedness. Here’s how I frame them based on field experience rather than a textbook:
- Identify and assess — Know your hazards (Step 1 above)
- Plan and document — Write the plan with routes, roles, and resources (Steps 2–6)
- Equip and supply — Build your inventory to support the plan
- Train and practice — Drill until execution is automatic
- Review and improve — Update continuously based on new information
These aren’t a one-time checklist. They’re a cycle. Each drill teaches you something that improves the plan, which changes your supply needs, which drives the next drill.
The 4 Pillars of Disaster Risk Reduction
If you’re building a truly robust plan, it helps to understand the broader framework. The four pillars of disaster risk reduction (DRR) are:
- Prevention and mitigation — Reducing risk before disaster strikes (clearing brush, reinforcing structures, buying flood insurance)
- Preparedness — Building capability to respond (your plan, supplies, training)
- Response — Immediate actions during and after the event (evacuation, first aid, shelter)
- Recovery — Returning to normalcy (insurance claims, rebuilding, emotional support)
Your written plan should address all four. Most people focus entirely on response — what to do when it happens. But I’ve found that prevention (like maintaining defensible space around your home) and recovery planning (like having organized insurance documentation) are where you avoid the most suffering.
Planning for Renters and Apartment Dwellers
Most emergency planning advice is written for homeowners with houses, garages, and yards. If you rent — especially in an apartment or high-rise — your challenges are fundamentally different.
Know Your Building
Walk your building’s fire escape routes and stairwell locations before you need them. Count the doors between your unit and the nearest stairwell so you can navigate in total darkness or heavy smoke. Elevators are unusable during fires and earthquakes — never include them in your plan. If you live above the sixth floor, understand that fire department ladder trucks may not reach your level, making early self-evacuation critical.
Ask your building manager these questions: Does the building have a written emergency plan? Where are gas and water shutoffs? Are fire suppression systems inspected regularly? Is there a building-wide notification system? Many renters skip planning because they assume the landlord handles everything — but personal evacuation, supply planning, and document organization are still entirely on you.
Apartment-Specific Adjustments
- Go-bags live near the front door, not in a garage you don’t have — a hall closet or a hook right by the entry works
- Supplies are smaller and more portable — you may not have space for 20 gallons of water, so focus on water purification options and a smaller stored water rotation
- Renters insurance belongs in your document binder — it’s affordable, often required by the lease, and covers your belongings when the building owner’s policy doesn’t
- Shared egress means shared risk — know your neighbors, at least enough to knock on a door during an evacuation to confirm they’re aware and mobile
- Shelter-in-place may be your primary option for some hazards like chemical spills, so keep plastic sheeting and duct tape available to seal windows and doors
You’ve got every bit as much reason to plan as homeowners — arguably more, since you’ve got less control over the structure you live in.
Free Templates and PDF Downloads
So where do you actually start writing? Here’s both a quick-reference version and links to the best official resources.
One-Page Quick-Reference Plan
I keep a simplified version of my plan taped inside a kitchen cabinet where every family member can find it. Copy this structure onto a single sheet:
| Category | Details |
|---|---|
| Top 3 Hazards | (List your ranked hazards) |
| Evacuation Route A | (Street-by-street directions) |
| Evacuation Route B | (Alternate directions) |
| Meeting Point — Tier 1 | (Address/landmark near home) |
| Meeting Point — Tier 2 | (Address within walking distance) |
| Meeting Point — Tier 3 | (Out-of-area contact name, address, phone) |
| Out-of-Area Contact | (Name, phone, relationship) |
| Roles | (Name → assigned task for each person) |
| Go-Bag Location | (Exactly where each bag is stored) |
| Utility Shutoffs | (Gas valve location, water main, electrical panel) |
| Insurance Agent | (Name, phone, policy number) |
| Medical Needs | (Medications, allergies, equipment for each person) |
| Pet Plan | (Carrier location, vet contact, pet-friendly shelter) |
This isn’t your full plan — it’s the cheat sheet you grab when there’s no time to flip through a binder.
Official Templates Worth Downloading
- Ready.gov Family Emergency Plan PDF — The most widely used template, printable and straightforward
- FEMA CPG 101 — Comprehensive Preparedness Guide for developing emergency operations plans (geared toward planners but excellent for understanding the framework)
- Red Cross Emergency Preparedness Plan worksheets — Available at redcross.org, with versions for families, seniors, and people with disabilities
Download any of these as a starting point, then customize using the 7 steps above. A generic template becomes powerful when you fill it with your hazards, your routes, and your family’s roles.
Workplace and School Coordination
Workplace Plans
If you’re responsible for a workplace emergency preparedness plan, the structure mirrors a family plan but requires additional rigor. OSHA’s Emergency Action Plan standard (29 CFR 1910.38) mandates that most employers have a written plan covering evacuation procedures, reporting procedures, and employee alarm systems. Beyond compliance, a strong workplace plan includes:
- Designated floor wardens on every level, responsible for sweeping their zone and confirming evacuation
- A muster point outside the building with a headcount system — I’ve seen companies use simple clipboard rosters and others use badge-scan systems
- ADA-compliant evacuation procedures including evacuation chairs for stairwells
- A communication tree for after-hours emergencies
- Shelter-in-place protocols for hazards where evacuation increases risk
- Annual drills with documented lessons learned
If your workplace doesn’t have a plan, raise it with management. If they do, make sure you’ve read it and know your role.
Daycare and School Coordination
If your children attend daycare or school, their facility’s emergency plan directly affects yours. Most states require licensed daycares to maintain written emergency procedures, but the quality varies enormously. Ask these questions:
- Does the facility have shelter-in-place and lockdown plans?
- Where’s the off-site evacuation location if the building can’t be occupied?
- How will parents be notified — text, email, phone tree, app?
- What’s the policy if a parent can’t reach the facility during an emergency?
- Who are the authorized pickup persons, and how is identity verified during chaotic reunification?
Make sure the facility has your current emergency contacts and that your plan accounts for picking up children during different scenarios — including when roads are compromised. Designate a backup pickup person who lives closer to the school than you do.
Your Plan Starts This Weekend
Here’s my challenge to you: block two hours this weekend. Sit down with everyone in your household. Work through these seven steps and produce a written document — even if it’s rough. A basic emergency preparedness plan written on notebook paper beats a perfect plan you never get around to creating.
Start with your hazard assessment and evacuation routes. Add meeting points and role assignments. Build out the supply inventory and document binder over the following weeks. Then drill it. Twice a year, minimum.
The families I’ve seen recover best from wildfires, earthquakes, floods, and extended power outages all have one thing in common: they did this work before the event. Not because they were paranoid — because they understood that preparation turns a disaster into a disruption instead of a catastrophe.
Download a Family Emergency Plan PDF from Ready.gov as your starting template, then customize it using the steps in this guide. Print your one-page quick-reference version and tape it inside a kitchen cabinet. Put the full plan somewhere accessible. And then go live your life with the confidence that comes from having a real, tested family emergency preparedness plan ready when it matters most.
Sources and Further Reading
- FEMA Emergency Planning Resources — Comprehensive preparedness guides and community planning tools
- Ready.gov Make a Plan — Federal family emergency plan templates and preparedness materials
- American Red Cross Emergency Preparedness — Disaster-specific planning guides and downloadable worksheets
- OSHA Emergency Action Plan Standard (29 CFR 1910.38) — Workplace emergency plan requirements
The Complete
Prepper's Reference.
149 articles synthesized into one comprehensive PDF — twelve chapters covering water, food, shelter, first aid, comms, and scenario-specific preparedness. Free with your email.
Unsubscribe anytime · We never share your email
You're in. Check your inbox.
Keep Reading
Family Emergency Plan: A Practical Step-by-Step Guide
Build a practical family emergency plan with step-by-step communication, supply kit, and drill guidance from a FEMA-trained responder. Start today.
Zombie Apocalypse Survival Preparedness: FEMA Pro's Guide
Zombie apocalypse survival preparedness teaches real disaster skills. A FEMA-trained Wilderness First Responder breaks down the exact steps. Start today.

Alien Invasion Preparedness: A Practical Survival Guide
Alien invasion preparedness uses proven survival skills that work for any disaster. Build your kit, plan your routes, and get ready for anything.