A prepper's escape plan is a written and practiced evacuation strategy that tells you when to leave, where to go, which routes to use, what supplies to bring, and how to communicate during an emergency. To create one, assess local risks, choose multiple destinations and routes, prepare 72-hour supplies, assign household roles, and test the plan regularly with drills.
Key Takeaways
- Write your escape plan on paper first — a complete plan with cheap gear beats expensive gear with no plan every single time.
- Map at least three evacuation routes including a walking option, then physically drive each one before you ever need them.
- Set objective, measurable evacuation triggers now so you're moving early instead of debating under stress.
- Run timed 10-minute evacuation drills at least twice a year — including at night — and debrief every single time.
- Expand beyond 72 hours to a 14-day plan, because most major disasters displace people far longer than three days.
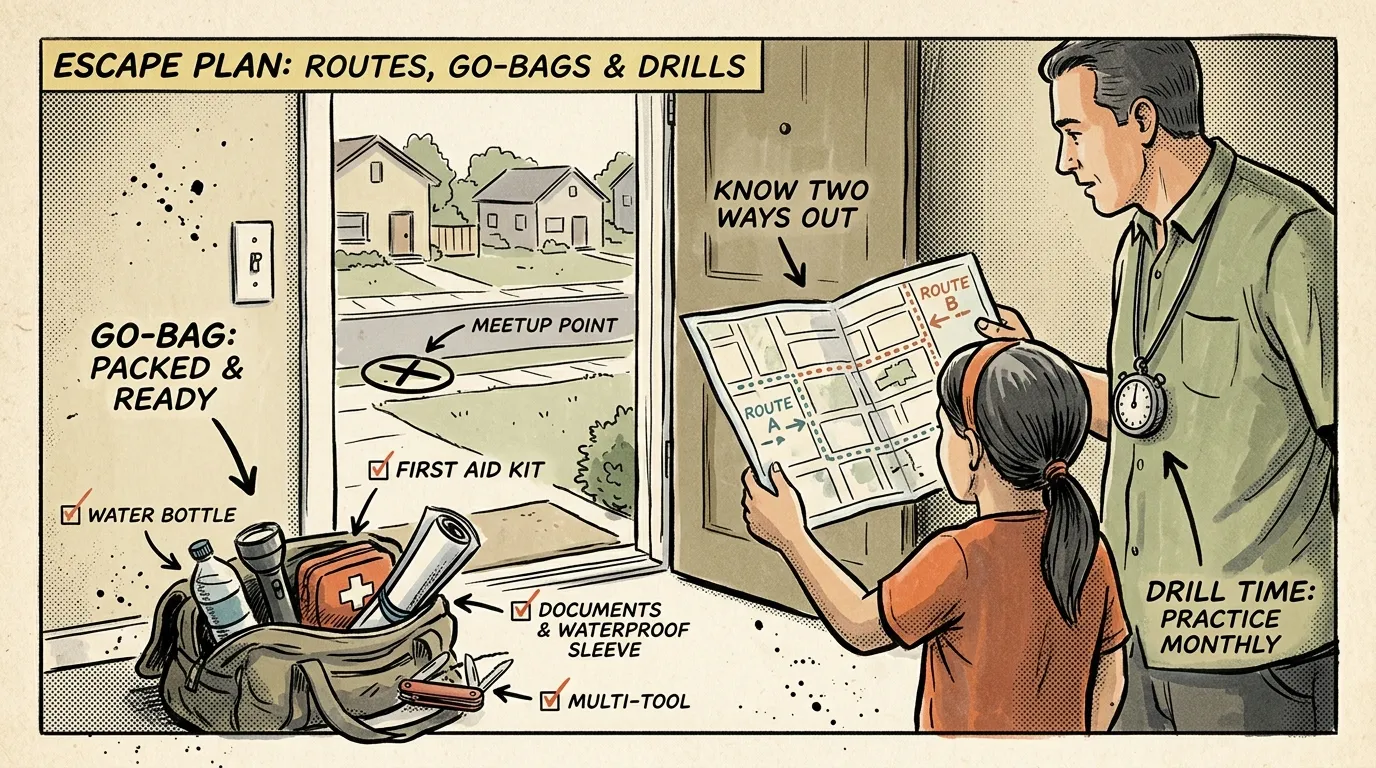
Prepper Escape Plan: Build Routes, Go-Bags & Drills That Actually Work
I’ve built and tested prepper escape plans across the Pacific Northwest for over 12 years — from wildfire corridors in central Oregon to lahar zones near Mount Rainier. The framework here comes from plans I’ve actually executed under real conditions, not hypotheticals pulled from a textbook. A solid prepper escape plan is the single most important thing standing between your household and chaos when disaster hits.
Let’s build yours from scratch.
Quick Summary
- A prepper escape plan is a written, practiced evacuation strategy that covers triggers, destinations, routes, supplies, roles, and communication — all designed to get you moving fast when every minute counts.
- You need at least three evacuation routes to each destination, including a walking option, and you’ve got to physically drive every one before you need it.
- Set measurable evacuation triggers now — not vague feelings, but specific conditions that mean “go” — so you’re not debating while the situation deteriorates.
- 72-hour go-bags for every household member are the minimum, but you should expand to a 14-day plan because most disasters displace people far longer than three days.
- Practice with timed drills at least twice a year, including at night, and debrief every time to close the gaps you discover.
- A complete plan with cheap gear beats expensive gear with no plan — spend your first dollar on thinking, not things.
What a Prepper Escape Plan Actually Is
A prepper escape plan is a written, practiced evacuation strategy that defines your triggers for leaving, safe destinations, multiple routes, 72-hour supply requirements, assigned household roles, and backup communication methods. It’s built to get you moving fast when every minute counts.
How’s it different from the generic fire escape plan taped to the back of a hotel door? A prepper escape plan accounts for grid-down scenarios, multi-day displacement, and self-reliance. FEMA recommends every household have a written evacuation plan, but a true prepper evacuation strategy goes further by building in route redundancy, comms backup, and extended supply planning.
Here are the core components:
- Risk assessment for your specific location
- Three confirmed safe destinations
- At least three evacuation routes including a walking option
- A communication plan with backup methods
- 72-hour go-bags for every household member
- Vehicle readiness and fuel management
- Assigned roles and responsibilities
- Pre-decided evacuation triggers
- Regular drills and plan updates
Every component feeds the others. A go-bag without a route plan is just a heavy backpack. A route plan without triggers means you’re still debating while the road fills with traffic.
A go-bag without a route plan is just a heavy backpack.
Understanding the 5 P’s of Evacuation
The 5 P’s are a simple framework for remembering what to grab when time is short. They originated from wildfire evacuation guidance and have been widely adopted by emergency management agencies:
- People — Account for every household member, including those with mobility needs, infants, and elderly family. This ties directly to your roles and special considerations planning.
- Prescriptions — Medications, medical devices, eyeglasses, and copies of prescriptions. This is the single most commonly forgotten category and the hardest to replace quickly.
- Papers — IDs, insurance policies, birth certificates, property deeds, financial records. Store copies in your prepper’s emergency binder and on an encrypted USB drive.
- Personal Needs — Clothing, hygiene items, phone chargers, cash, pet supplies, infant formula, and anything specific to your household’s daily function.
- Priceless Items — Irreplaceable photos, family heirlooms, hard drives with personal data. If it can’t be replaced and it fits in a bag, it goes on the list.
The 5 P’s aren’t your whole plan — they’re a mental checklist for those final minutes before you walk out the door. Write them on a card and tape it next to your exit.
Key Components of a Solid Prepper Escape Plan
Risk Assessment
Identify the realistic hazards near you: wildfire, flood, hurricane, earthquake, volcanic activity, industrial accident, civil unrest. Don’t plan for zombie apocalypses — plan for the thing that’s actually happened in your county in the last 50 years.
Check your local emergency management website, FEMA’s risk mapping tools, and NOAA for seasonal patterns. If you’re in the Pacific Northwest like me, that means wildfire smoke from July through October, atmospheric rivers from November through March, and the Cascadia subduction zone sitting quietly under everything, all the time. Your risk profile shapes every other decision in your emergency evacuation plan.
Register for local alert systems. Most counties offer Reverse 911, IPAWS alerts, or a dedicated emergency notification app. They’re free, and they buy you the early warning minutes that separate a calm departure from a panicked scramble.
Safe Destinations — Pick and Confirm Three
- Nearby: A trusted neighbor, friend, or community shelter. Know the exact address and have a key or code if possible.
- Regional backup: A relative or hotel in another county, 50–100 miles away. Confirm arrival instructions ahead of time.
- Distant fallback: An out-of-area location for widespread events. This might be 200+ miles away.
Call these contacts. Confirm the arrangement. A destination you haven’t verified is just a hope, and hope isn’t a plan.
Designate two meeting points as well: one immediately outside your home (a mailbox, a specific tree) and one outside your neighborhood (a gas station, a school parking lot). If your household gets separated, everyone knows where to regroup.
Communications
Designate an out-of-area contact and write their phone number on paper for every household member. During a regional disaster, local cell towers overload, but a text to someone three states away often gets through.
Use a simple check-in format: Name, Location, Destination, OK or Need Help. Practice it until it’s automatic.
Your backup communication layers should include a battery or hand-crank radio for receiving NOAA weather alerts, and FRS/GMRS radios for short-range household communication if cell service fails. For a deeper dive on staying connected when infrastructure collapses, check out my guide on building an emergency communication plan for grid-down scenarios.
Essential Supplies for 72 Hours
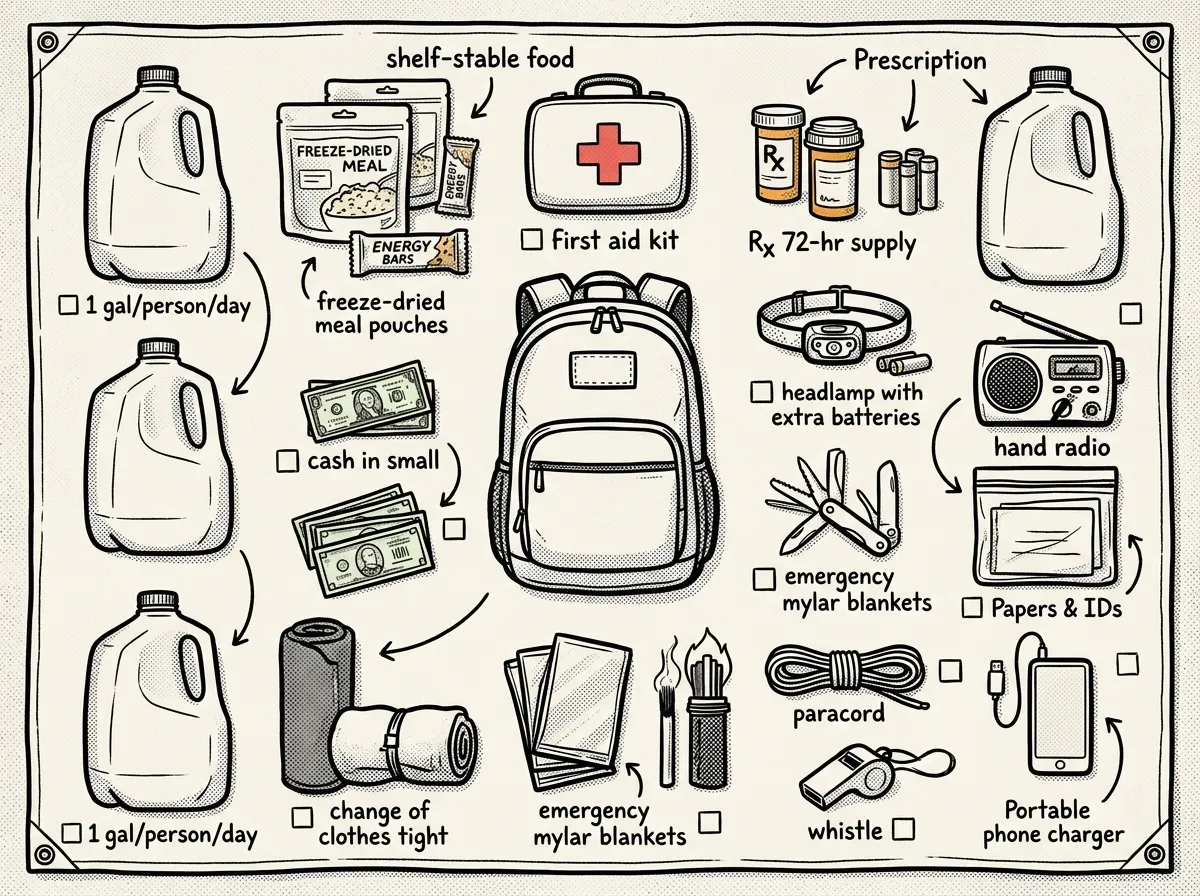 72-hour go-bag essentials laid out and ready to pack
Build a go-bag for every person in your household. Here are the non-negotiables:
- Water: 1 gallon per person per day for three days
- Food: shelf-stable meals and snacks you can eat cold
- Medications: at least a 72-hour supply plus prescription copies
- First aid kit with any personal medical supplies
- Document copies: IDs, insurance papers, critical records — paper and encrypted digital (keep organized in a prepper’s emergency binder)
- Cash in small bills ($1s, $5s, $10s) — ATMs die when power does
- Flashlight, spare batteries, and a power bank
- Clothing appropriate to your climate and season
- Pet supplies, infant formula, or medical equipment as needed
- Printed copy of your entire escape plan
Put a printed copy of your plan in each go-bag, each vehicle, and your home binder. When stress hits, you read the paper — you don’t try to remember.
Vehicle Readiness
 Vehicle readiness kit: everything your car needs before evacuation day
Keep your fuel tank above half at all times. Know exactly how far you can drive on a tank. Keep tires and maintenance current.
Vehicle kit essentials: jumper cables, basic tools, a tow strap, tire plug kit, spare phone charger, water, and a reflective triangle or vest.
Living in the Pacific Northwest, I’ve dealt with volcanic ashfall advisories, severe ice storms, and situations where my only detour was a logging road I’d scouted months earlier. That experience shaped my vehicle kit — I always carry traction boards, a full-size spare, and a paper map of forest service roads. Your region has its own version of these problems. Build your vehicle kit for the conditions you’ll actually face.
Roles and Responsibilities
Assign who does what: one person grabs documents and the binder, one loads go-bags into the vehicle, one secures pets, one does a final sweep and shuts off utilities (gas, water, electric — know where your shutoffs are and keep a wrench nearby).
If you live alone, write a short grab-and-go checklist and tape it next to your door. Under stress, your memory will fail you. The list won’t.
Utility Shut-Off Procedures
Before you leave, shut off what could become a hazard. Know the location of your gas meter shutoff, your main water valve, and your electrical panel. A gas leak after an earthquake or a burst pipe during a freeze can turn a survivable situation into a destroyed home.
Keep a gas shutoff wrench attached to or stored beside your meter. Practice the shutoff so it takes seconds, not minutes. Add “shut off utilities” explicitly to your roles checklist — if it’s not assigned to someone, it won’t happen.
How to Establish Evacuation Routes Step by Step
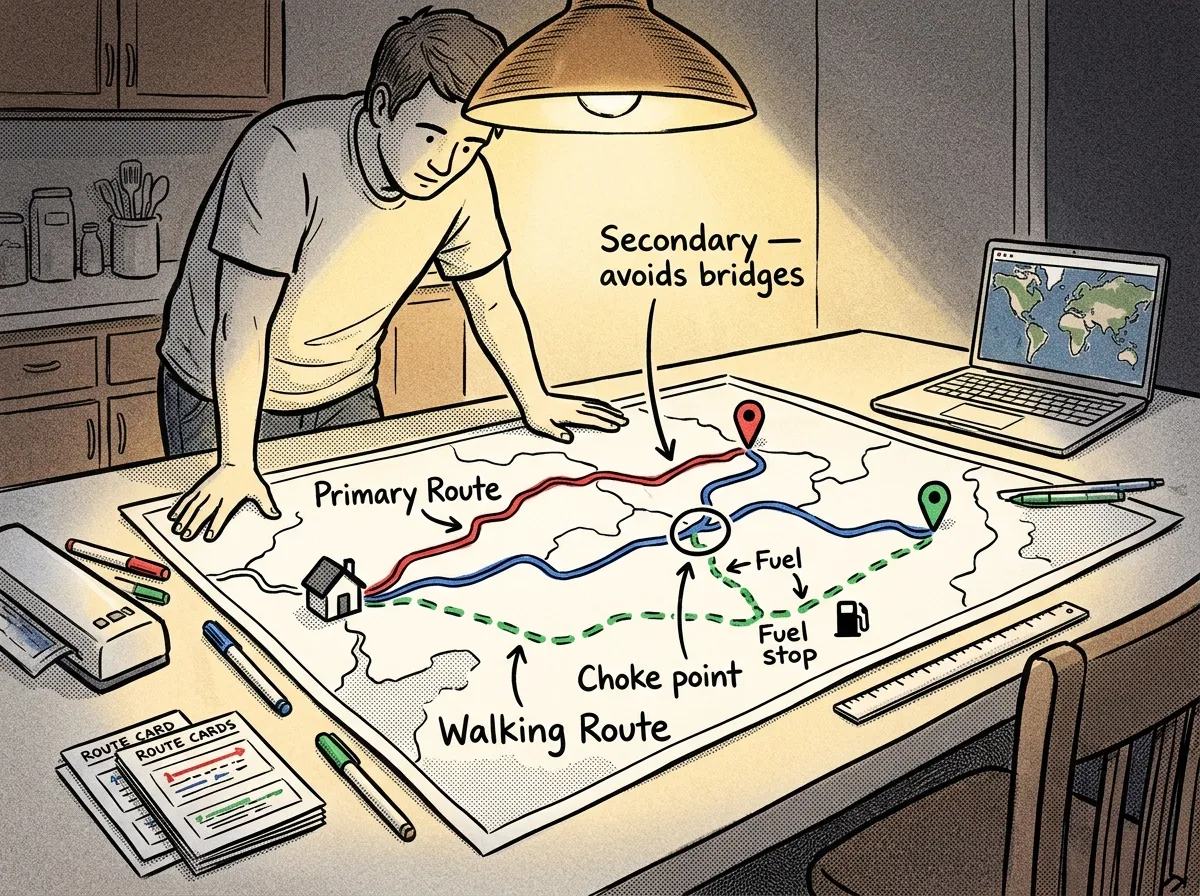 Mapping primary, secondary, and walking evacuation routes on a laminated paper map
This is where most bug out plans fall apart. I’ve watched people pick one route, never drive it, and assume it’ll work when it matters. Here’s the process I use, informed by my Wilderness First Responder training and years of backcountry navigation:
- Identify all road options using Google Maps and CalTopo — highways, county roads, farm roads, forest service roads. Don’t filter yet, just map everything.
- Physically drive each route. Note total distance, actual drive time, fuel stops, choke points (bridges, tunnels, railroad crossings), cell coverage gaps, and terrain hazards.
- Evaluate seasonal factors — mountain passes ice over, river crossings flood in spring, construction narrows highways. Check your state DOT and county road pages.
- Mark routes on a laminated paper map with colored markers: green for primary, blue for secondary, red for walking. Store copies in each vehicle, each go-bag, and your home binder.
- Include a walking or biking option using rail corridors, utility easements, greenways, and trails. Note water sources along walking routes.
- Maintain route intelligence — check state DOT and county road status during active events. Your route plan is a living document.
I keep a small notebook in my truck with route notes — things like “bridge on County Road 14 floods at 8 ft river gauge” and “cell coverage drops completely between mile markers 47 and 63.” These details are invisible until you need them, and then they’re everything.
Driving your routes isn’t optional — it’s the whole point. I’ve found discrepancies between Google Maps and reality on almost every route I’ve scouted. Google doesn’t know that the shortcut through Forest Road 2209 has a locked gate from November to May, or that the “highway” through a small town drops to one lane at a construction zone that’s been there for two years. You’ve got to put tires on these roads before you’re counting on them.
Evacuation Triggers: When to Execute Your Plan
The hardest part of any emergency evacuation plan isn’t packing — it’s deciding to leave. I’ve watched people lose critical hours because they were debating whether it was “bad enough” while conditions deteriorated around them.
The fix is simple: decide your triggers now, when you’re calm, and write them down. When a trigger is met, you go. No discussion, no committee meeting, no “let’s wait and see.”
Concrete trigger examples by scenario:
- Wildfire: Smoke visible from your property, fire reported within 15 miles upwind, or any official evacuation warning (not just mandatory order) for your zone. If you’re in wildfire evacuation preparedness territory, leave at the warning level — the upgrade to mandatory can happen faster than you can pack.
- Flood: River gauge at your nearest monitoring station reaches a pre-identified stage (check NOAA’s Advanced Hydrologic Prediction Service for historical flood stages in your area). Water visible on roads you normally use.
- Hurricane: When a Category 2+ storm is forecast to make landfall within 100 miles of your location within 48 hours. Don’t wait for the mandatory order — by then, the roads are already packed.
- Earthquake: Any event that causes visible structural damage to your home or neighborhood infrastructure. A significant aftershock pattern following an initial large quake.
- Sustained power outage: Grid down for 48+ hours with no restoration estimate and you rely on electricity for medical equipment, heating/cooling in extreme temperatures, or water well pumps.
- Civil unrest: Active incidents within a defined radius of your home (you set the distance based on your comfort — I use 2 miles for urban, 5 miles for suburban).
Write your triggers on your printed plan. Make them specific and measurable. “When things get bad” isn’t a trigger. “Wildfire smoke visible from my south-facing window” is a trigger.
The golden rule: if you’re wondering whether it’s time to leave, it’s time to leave. Early evacuation has zero downside. Late evacuation can be fatal.
One-Page Printable Prepper Escape Plan Checklist
- Evacuation triggers: _______________________
- Out-of-area contact: Name / Phone / Text: _______________________
- Meeting point (near home): _______________________
- Meeting point (outside neighborhood): _______________________
- Primary destination and address: _______________________
- Secondary destination and address: _______________________
- Tertiary/distant fallback: _______________________
- Primary route: _______________________
- Secondary route: _______________________
- Tertiary route or walking option: _______________________
- Go-bags located (where): _______________________
- Vehicle fuel target (e.g., always above 1/2 tank): _______________________
- Utility shutoff locations: Gas _____ Water _____ Electric _____
- Assigned roles: _______________________
- Date of last drill: _______________________
Print this checklist and place copies where everyone can reach them — on the fridge, in each go-bag, in the glove box.
Drills and Testing: How to Practice Your Escape Plan
A plan that hasn’t been practiced is a plan that will fail. FEMA recommends practicing evacuation plans at least twice per year, and the Red Cross specifically advises driving your planned routes before you need them. In my experience, the gap between “I have a plan” and “I’ve practiced the plan” is the gap between organized departure and total chaos.
The 10-Minute Evacuation Drill
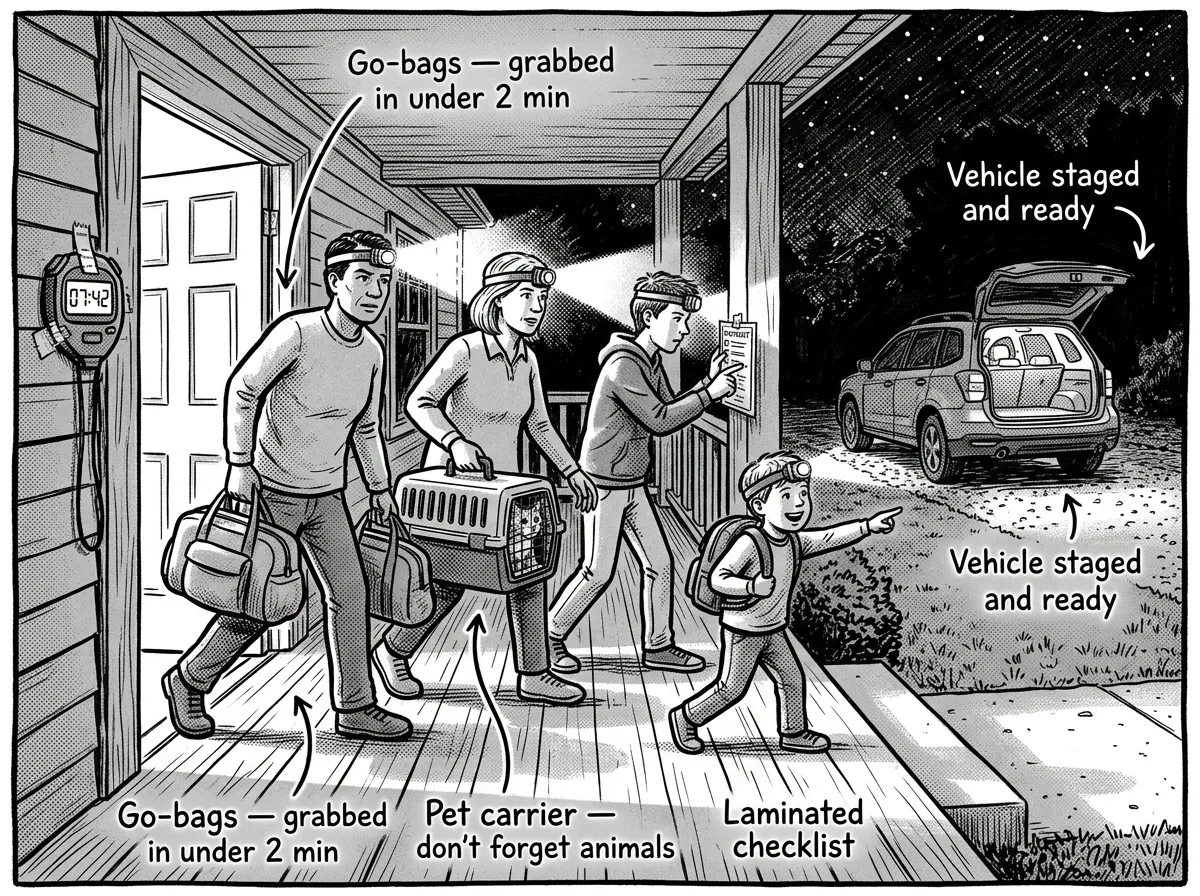 Family executing a timed 10-minute evacuation drill at night
Set a timer. Everyone in the household gets out the door with their go-bag, documents, and assigned items in 10 minutes. Load the vehicle. Account for all people and pets. Record the time.
Use a simple drill scorecard:
- Time from alarm to vehicle loaded: ___ minutes
- Items forgotten: _______________
- Communication check (out-of-area contact reached): Yes / No
- Route navigation without GPS (paper map only): Success / Failure
- Pets secured and loaded: Yes / No
- Utility shutoffs completed: Yes / No
Run Drills in Realistic Conditions
The first time I ran a night drill with my household, we discovered our go-bags were stored behind seasonal camping gear we couldn’t move in the dark. That single drill exposed a storage problem that would’ve cost us 15 minutes in a real evacuation — 15 minutes that can mean the difference between clear roads and gridlock. We moved the bags to a dedicated shelf by the garage door the next morning.
Route Test Drives
Drive your primary and secondary routes at least once a year. Note changes — new construction, closed businesses where you planned fuel stops, road surface degradation. Drive them in different weather if you can.
The No-Phone Drill
Leave smartphones inside. Navigate with paper maps. Use your prearranged meeting points. Communicate with FRS radios or simply show up at the designated location and wait. This drill reveals how dependent your plan is on technology that may not be available.
Debrief after every drill. Sit down for 10 minutes and ask: What slowed us down? What did we forget? What assumption turned out to be wrong? Update the plan immediately. The drill isn’t the point — the improvement afterward is.
Urban vs. Rural: How Location Changes Everything
Your zip code fundamentally shapes your evacuation strategy. A bug out plan built for a third-floor apartment in Houston looks nothing like one designed for a homestead on 40 acres in Montana.
Urban Realities
- Traffic is the enemy. In a large-scale evacuation, highways gridlock fast. Hurricane Rita in 2005 turned a normal 4-hour drive from Houston to Dallas into a 24-hour crawl. Your plan needs aggressive early-departure triggers.
- Limited storage means smarter go-bags. Focus on compact, high-calorie food, a quality water filter, and knowing where public water sources exist along your route.
- Walking routes matter more. Map pedestrian and bicycle paths that avoid highway on-ramps, tunnels, and bridge bottlenecks. Rail corridors and greenways often provide through-routes out of metro areas.
- Vehicle access can fail. Parking garages lose power, gates lock. Have a non-vehicle backup — a bicycle, a neighbor with a truck, or a pre-arranged rideshare.
- Shelter-in-place may come first. For chemical spills or short-duration events, bugging in may beat fighting congested streets. Have supplies for both.
Rural Realities
- Fewer route options. One downed tree or washed-out bridge can eliminate your primary route. Scout every alternative including seasonal dirt roads and forest service roads.
- Longer distances to safety. Your nearest well-supplied town might be 60+ miles away. Keep your tank above half and consider storing 10–15 gallons of stabilized fuel on your property.
- Communication gaps are real. Cell coverage vanishes on back roads. If you’re in the high desert of eastern Oregon or deep in the Appalachian hollows, a GMRS radio with repeater access bridges that gap.
- You may be your own first responder. Emergency services could be 30–45 minutes away. Build in more robust first aid capability and vehicle self-recovery gear.
- Bugging in is often the stronger play. With land, water access, and stored supplies, rural preppers may only need to evacuate for wildfires, dam failures, or direct property threats. But you still need the plan — you don’t get to choose which emergency shows up.
Bottom line: Urban plans need speed and flexibility. Rural plans need self-sufficiency and redundancy. Build yours for your actual terrain.
Budget-First Priorities: When Money Is Tight
Prepping content loves recommending $400 backpacks and $1,200 solar generators. Here’s the priority order I’d follow starting from zero with limited cash.
Tier 1: $0–$50 (do this week)
- Write the plan. Paper, pen, one focused hour. This single step puts you ahead of 90% of households.
- Gather documents. Photograph IDs, insurance cards, prescriptions. Store on encrypted cloud and a USB drive that costs about $5.
- Assemble water. Fill clean 2-liter soda bottles with tap water. Six per person gives you three days. Free.
- Raid your pantry. Granola bars, peanut butter, canned goods with pull tabs. Incremental cost: around $10–$20.
- Cash reserve. Pull $50–$100 in small bills and seal it in your go-bag.
Tier 2: $50–$150 (next 30 days)
- A sturdy backpack or thrift store duffel: $5–$15
- First aid kit (Adventure Medical Kits or Surviveware): around $25–$40
- Reliable headlamp (Black Diamond Astro or similar): around $20–$30
- 10,000mAh power bank: around $15–$25
- Laminated road atlas: around $8–$15
- Start assembling your bug out bag essentials checklist
Tier 3: $150–$400 (next 60–90 days)
- Water filtration (Sawyer Squeeze): around $20–$35
- Hand-crank NOAA radio: around $30–$60
- Vehicle kit upgrades: around $50–$80
- Freeze-dried meal pouches: around $8–$12 each, buy a few per paycheck
Tier 4: $400+ (ongoing)
- GMRS or ham radio setup
- Upgraded packs with frame support
- Solar charging panels
- Dedicated trauma medical kits
You’ve got $12 in your checking account until Friday and you just saw a wildfire warning for a county over. You can still write your plan tonight, fill water bottles from the tap, grab canned food from your pantry, photograph your documents with your phone, and identify three routes on a free map app. That puts you ahead of most households who own $500 in gear but have zero plan.
Extending Beyond 72 Hours: Planning for 1–2 Weeks
The 72-hour window is a starting point, not a ceiling. Hurricane Katrina displaced residents for weeks or months. The 2018 Camp Fire left thousands homeless indefinitely. If your disaster evacuation plan only covers three days, you’ve planned for the easy part.
Phase Planning
- Days 1–3: Execute evacuation. Reach destination. Live from go-bags.
- Days 4–7: Establish stability. Secure longer-term shelter. Resupply food, water, medications. File insurance claims.
- Days 8–14: Adapt to displacement. Access FEMA or Red Cross assistance. Assess return timeline.
What 1–2 Week Preparedness Requires
- Medications for 14+ days. Talk to your doctor about a 30-day emergency supply. Some insurance plans allow a “vacation override.”
- Financial access. $200–$500 cash covers the gap until digital banking works. Document account numbers separately.
- Clothing beyond one change. Two weeks in one outfit is a hygiene and health issue.
- Mental health and morale. A deck of cards, a paperback, a journal, coloring books for kids — these weigh nothing and keep people functional.
- Shelter costs. Hotels near disaster zones fill instantly. Have contacts or reservations 100+ miles from your risk zone.
Food and Water at Extended Scale
| Duration | Water (per person) | Food (calories/day) | Approximate Weight |
|---|---|---|---|
| 3 days | 3 gallons | 1,500–2,000 | ~30 lbs |
| 7 days | 7 gallons | 1,500–2,000 | ~70 lbs |
| 14 days | 14 gallons | 1,500–2,000 | ~140 lbs |
You’re not carrying 14 gallons on your back. At the extended level, water purification methods replace water hauling. Know where potable water exists along your routes and at your destinations.
Pre-position supplies. If your secondary destination is a family member’s house 150 miles away, ask if you can store a tote there with two weeks of food, extra clothing, a spare charger, and document copies. This one move transforms your plan from “survive and hope” to “arrive and stabilize.”
A 72-hour plan gets you out. A 14-day plan gets you through.
What to Skip: Gear That Sounds Great but Fails
Part of having a solid prepper escape plan is knowing what not to buy. I’ve field-tested enough gear over 12 years as a FEMA-trained emergency manager and WFR to have strong opinions, and I’m going to share them.
Cheap multi-tools with 27 “functions.” The $12 multi-tool that claims to be a knife, saw, pliers, screwdriver, and compass. I’ve tested three different brands in the field — the blade won’t hold an edge past cardboard, the pliers flex under any real load, and the “compass” is decorative at best. Buy instead: A Leatherman Wave+ or Gerber Suspension NXT — around $40–$100. Fewer functions that actually work.
“Survival” food buckets from unknown brands. I opened a 30-day bucket from a brand I won’t name and actually tried to eat the meals for a weekend. The calorie counts were inflated by counting servings as half-cups of watery soup. Sodium was astronomical — over 1,500mg per “meal” that delivered barely 200 usable calories. My household refused to eat it by meal three, which means in a real emergency it becomes dead weight. Buy instead: Mountain House or Peak Refuel pouches. Taste-test them on a camping trip first. If your family won’t eat it in a campground, they won’t eat it in a crisis.
Mylar “emergency blankets” as your sole shelter plan. These are fine as a backup layer inside a sleeping bag or for signaling. As your primary warmth strategy? Dangerously inadequate. They tear in wind, don’t insulate when wet, and provide zero rain protection. I’ve watched one shred in a 25 mph gust on a ridge in the Oregon Cascades. Buy instead: A quality emergency bivy — the SOL Escape Bivvy runs around $35 — or a compact sleeping bag rated for your region’s lowest expected temps.
All-in-one “survival kits” in sardine-can tins. You’ve seen these — a tin the size of your palm containing a whistle, a tiny compass, fishing line, a birthday candle, and a razor blade. I’ve never met anyone who caught a fish with the line from one of these kits or started a meaningful fire with the birthday candle. They’re novelty items marketed as preparedness.
The pattern I see constantly: anything marketed with the word “survival” at a suspiciously low price point is probably optimized for Amazon conversions, not for keeping you alive. The Sawyer Squeeze — around $30 — is what I reach for every time over the LifeStraw, because it filters more volume, adapts to bottles and bladders, and backflushes to extend its life. Spend a little more on fewer items you’ve actually tested yourself. That’s always been my rule, and it hasn’t steered me wrong yet.
Build Your Prepper Escape Plan This Week
Everything here comes down to one truth I’ve proven to myself over and over in the field: the plan matters more than the gear, and practice matters more than the plan. A written evacuation strategy that you’ve drilled twice beats a $2,000 bug out bag sitting in a closet you haven’t opened since you bought it.
Start today. Not next weekend, not when you “have time.” Today.
- Identify your top local risks using your county emergency management site and NOAA.
- Choose and confirm three safe destinations — call those contacts now.
- Map at least three evacuation routes and physically drive each one.
- Set your objective evacuation triggers in writing.
- Pack go-bags with 72-hour supplies and place them near your exit.
- Assign roles, shut-off responsibilities, and meeting points.
- Run your first 10-minute drill this week.
- Expand to a 14-day plan within six months.
Print the checklist above. Put copies in every go-bag, every vehicle, and your home binder. Your prepper escape plan doesn’t need to be perfect — it needs to exist, and it needs to be practiced. The people who leave early, leave organized, and leave with a plan are the ones who make it through. Be one of them.
Frequently Asked Questions
What are the 5 P’s of evacuation?
The 5 P’s are People, Prescriptions, Papers, Personal Needs, and Priceless Items. They’re a quick mental checklist for those final minutes before you walk out the door. People includes every household member and pets. Prescriptions covers medications and medical devices. Papers means IDs, insurance, and financial documents. Personal Needs includes clothing, cash, chargers, and daily essentials. Priceless Items are irreplaceable photos, heirlooms, and data backups.
How many escape routes should you plan?
Plan at least three evacuation routes to each destination, plus a walking or biking option in case roads are completely impassable. Your primary route should be the fastest under normal conditions. Your secondary and tertiary routes should avoid the same bridges, highways, and choke points as your primary. One route is a single point of failure — three gives you real redundancy.
How do you establish evacuation routes?
Start with Google Maps and CalTopo to identify every road option between your home and your destinations. Then physically drive each route, noting distance, time, fuel stops, bridge dependencies, choke points, cell coverage gaps, and seasonal closures. Mark routes on a laminated paper map with colored markers. Check state DOT and county road status pages during active events to get real-time updates on closures and conditions.
What should a prepper escape plan include?
A complete prepper escape plan includes evacuation triggers, three confirmed destinations with addresses, at least three routes (including walking), assigned household roles, a 72-hour go-bag for each person, a communication plan with an out-of-area contact, vehicle readiness requirements, utility shutoff procedures, and a drill schedule.
How often should you practice your evacuation escape plan?
Practice timed evacuation drills at least twice per year, and immediately after any major life change like moving, adding a household member, or changing vehicles. Run drills at night and in bad weather to expose weaknesses you’ll never find during a sunny Saturday afternoon. Drive your planned routes at least once a year to catch changes.
How much water and food should you pack in a 72-hour go-bag?
Plan for 1 gallon of water per person per day for three days. Pack shelf-stable meals and snacks that can be eaten without heating — at least 1,500 calories per person per day. Include a 72-hour supply of all necessary medications and copies of prescriptions.
The Complete
Prepper's Reference.
149 articles synthesized into one comprehensive PDF — twelve chapters covering water, food, shelter, first aid, comms, and scenario-specific preparedness. Free with your email.
Unsubscribe anytime · We never share your email
You're in. Check your inbox.
Keep Reading

Alien Invasion Preparedness: A Practical Survival Guide
Alien invasion preparedness uses proven survival skills that work for any disaster. Build your kit, plan your routes, and get ready for anything.
DIY Home Security System: Budget Prepper Guide
Build a DIY home security system on a budget with cameras, sensors, backup power, and prepper-ready redundancy. Step-by-step setup guide — no pro install needed.

Prepper Emergency Binder: Build Your Grab-and-Go Kit
Build a prepper emergency binder with this step-by-step checklist. Organize essential documents, create digital backups, and stay ready for any emergency.