A budget DIY home security system for preppers should include reinforced doors and windows, motion-sensing lights, entry sensors, cameras, alarms, and backup power. Most beginners can install these themselves and save 30–50% compared to professional systems while improving both everyday safety and emergency preparedness.
Key Takeaways
- Replace strike plate screws with 3-inch screws and upgrade to ANSI-rated deadbolts — it costs under $30 and delivers the single highest security ROI of anything you'll do.
- Build your DIY home security system in layers: physical barriers first, then lighting, sensors, cameras, alarms, and backup power.
- Always choose local recording over cloud-only cameras so your footage survives internet and power outages.
- A UPS for your hub and router plus a cellular LTE communicator keeps alerts flowing when the grid fails — test this by pulling the plug.
- You can build a fully functional DIY security system for $150–$500 with zero monthly monitoring fees.
DIY Home Security System: Budget Prepper Guide
During the February 2021 Pacific Northwest ice storm, I watched three straight days of power outages expose just how many home security systems fail silently. Neighbors with expensive professionally monitored setups had dead cameras, offline hubs, and zero alerts. Meanwhile, the handful of us running a DIY home security system with battery backups and local recording never lost coverage. Not for a single hour. That experience fundamentally shaped how I design and recommend security setups today.
If you’re new to preparedness, start with our beginner’s guide to prepping and survival readiness. And if you’re ready to lock down your home without handing control to a third party — or bleeding $30–$50 a month in monitoring fees — this guide walks you through everything I’ve learned in 12+ years of field work and FEMA emergency management training.
Quick Summary
- Physical hardening comes first. Swapping strike plate screws for 3-inch screws and upgrading deadbolts costs under $30 and delivers the highest security ROI available.
- Build in layers. Physical barriers, then lighting, then sensors, cameras, alarms, and backup power — in that order.
- Record locally. Cameras with SD card or NVR storage keep working when your internet doesn’t.
- Plan for grid failure. A UPS for your hub and router plus a cellular LTE communicator means your system doesn’t die with the power.
- Budget range: $150–$500 gets you a solid mid-range system with zero monthly fees.
- Test under real conditions. Kill the power, reboot the router, and verify every component still functions.
Why a DIY Home Security System Fits the Prepper Mindset
Here’s something most folks don’t think about until it’s too late: according to Department of Justice data, the average police response time to a burglary call is 7–10 minutes. During a widespread emergency — a major storm, civil unrest, a grid failure — that number climbs dramatically or disappears entirely. Early detection isn’t a luxury. It’s your primary advantage.
I’ve seen extended outages across the Pacific Northwest turn otherwise safe neighborhoods into targets. When power goes down for 72+ hours, supply caches — food, water, fuel, medical gear — become high-value items. Your prepper garden, your pantry, your generator: all of it needs protection.
A self-installed system supports self-reliance, flexibility, and cost control. Here’s why it aligns with preparedness thinking:
- Grid independence. Battery-operated sensors, local recording on SD cards or an NVR, and a UPS for your router mean your system doesn’t die when the power does.
- No third-party dependency. Professional monitoring centers can be overwhelmed or offline during widespread emergencies. Local alerts put you in control.
- Cost control. No monthly monitoring subscription means your security budget goes to hardware, not recurring fees.
- Situational awareness. Cameras and sensors don’t just catch burglars — they give you real-time awareness during storms, flooding, or neighborhood disruptions.
If you’ve spent months building supplies, it makes no sense to leave the front door as your weakest link.
How to Build a DIY Home Security System
- Assess your property — walk the perimeter day and night, mapping every entry point, blind spot, and dark approach path
- Reinforce physical barriers — install 3-inch screws in strike plates, upgrade to ANSI-rated deadbolts, add window locks or security film
- Install motion-sensor security lights — mount weatherproof lights high on exterior walls covering all approach paths
- Place entry sensors — attach magnetic contact sensors to front and back doors, sliding doors, and ground-floor windows
- Position cameras strategically — mount one at the front door for face capture, one at the driveway for vehicle identification, with local recording enabled
- Configure alarms and notifications — set Home, Away, and Night modes, tie sirens to sensor triggers, enable push alerts
- Add backup power — connect a UPS to your hub, router, and NVR, and add a cellular LTE communicator for alert fallback
- Document and maintain — record device locations, battery schedules, login credentials, and test procedures in a printed reference sheet
Don’t let eight steps overwhelm you. Most people spread this across 2–4 weekends. The first two steps take an afternoon and deliver the biggest impact.
How Much Does a DIY Home Security System Cost?
One of the biggest advantages of going DIY is cost transparency. I’ve built systems at every budget level, and here’s what each tier looks like in practice.
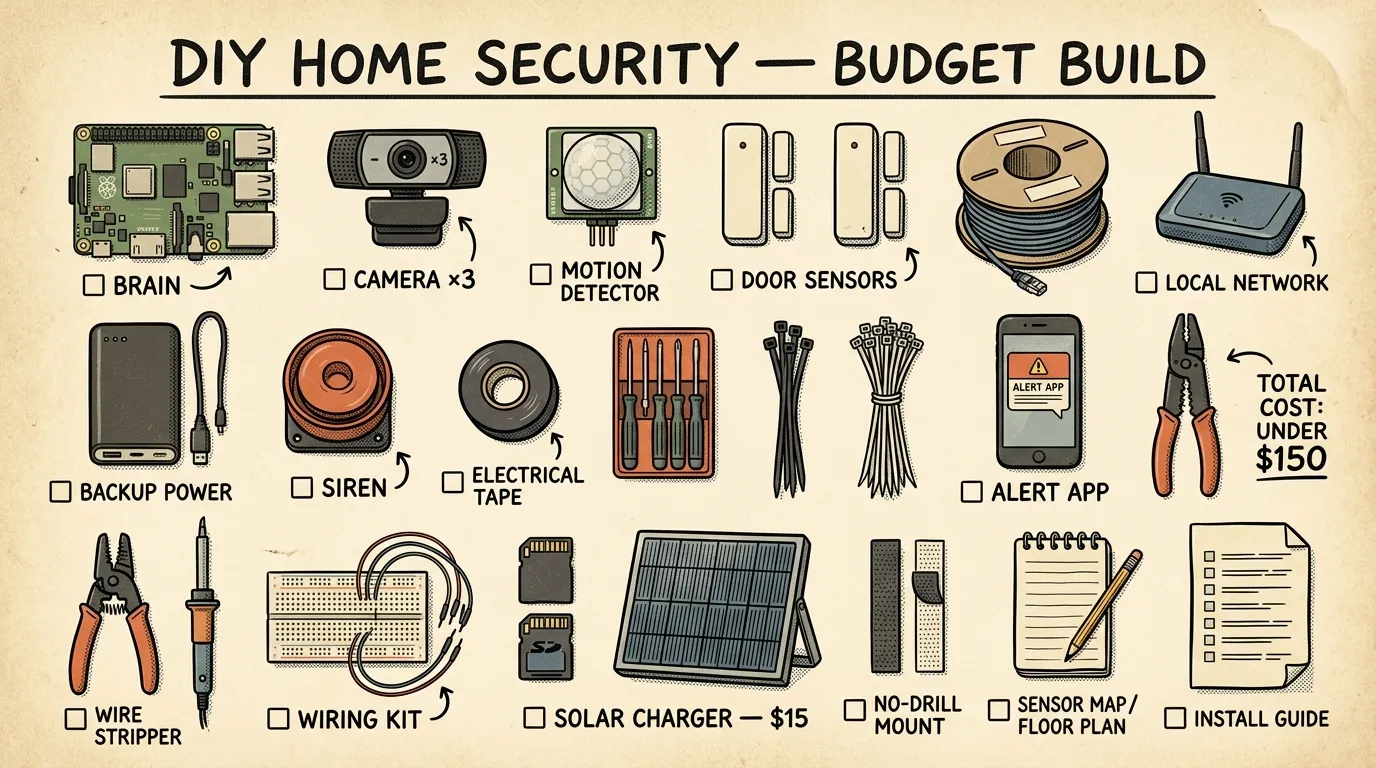
Starter Tier: $50–$150
This covers the essentials that deliver the highest return per dollar:
- Door reinforcement kit with 3-inch screws and upgraded strike plates (~$15–$30)
- One or two solar-powered motion lights (~$20–$40)
- Standalone battery-powered door/window alarms (~$15–$30)
- Window locks or security film for ground-floor glass (~$10–$30)
You won’t get cameras or smart alerts at this tier. But you’ll meaningfully harden your home against opportunistic break-ins for the cost of a nice dinner out.
Mid-Range Tier: $200–$500
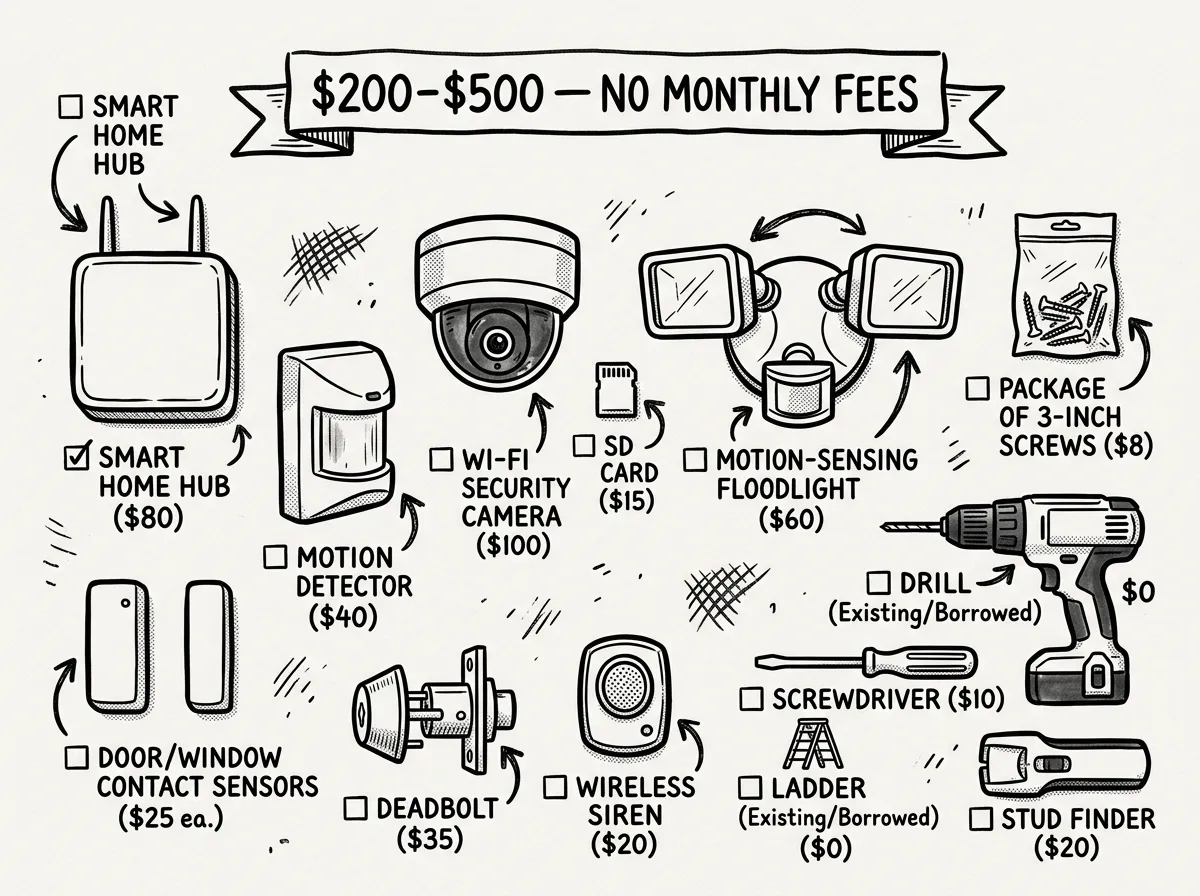 Mid-range DIY security kit: cameras, sensors, hub, and tools for under $500
This is where I tell most people to aim. You get detection, deterrence, and documentation:
- Everything from the starter tier
- A hub or smart home controller — Home Assistant on a Raspberry Pi runs around $60–$80
- 2–4 Z-Wave or Zigbee door/window sensors (~$15–$20 each)
- One outdoor camera with local recording and night vision (~$40–$80)
- A basic indoor siren (~$25–$35)
- A small UPS for hub and router (~$50–$80)
Comprehensive Tier: $500–$1,000+
For full coverage with outage resilience:
- Everything from the mid-range tier
- 3–5 cameras with NVR-based local recording (~$150–$300 for a 4-camera kit)
- Cellular LTE communicator (~$50–$100 plus a low-cost data plan)
- Portable power station or solar charger (~$100–$200)
- Glass-break sensors, vibration sensors, and smart plugs for occupancy simulation
For comparison: A professionally installed system typically runs $300–$1,500 upfront plus $20–$50 per month in monitoring fees. Over three years, that’s $720–$1,800 in subscriptions alone. A budget home security system without monthly fees pays for itself fast.
DIY Home Security vs. Professional Systems
So is DIY actually better, or am I just biased? Honestly, the answer depends on your situation. Here’s how I break it down:
| Factor | DIY System | Professional System |
|---|---|---|
| Upfront cost | $150–$1,000 | $300–$1,500+ |
| Monthly fees | $0 | $20–$50/month |
| Customization | Full control over devices, placement, and automation | Limited to vendor ecosystem |
| Outage resilience | Excellent with UPS, battery devices, and cellular backup | Varies — many rely on cloud and internet |
| Privacy/data control | Local recording, no third-party servers | Footage often stored on vendor cloud |
I’ve talked to people after major PNW storms who received zero alerts from their professionally monitored systems because the monitoring center was buried under thousands of simultaneous alarms. One neighbor had a broken basement window for two full days before he even knew about it — his system was “monitored” the whole time. That’s not security. That’s a subscription to false confidence.
When does professional monitoring make sense? If you travel frequently and want 24/7 dispatch capability, or if you’re genuinely not comfortable with any technical setup, a hybrid approach works. Use a DIY-installed system with optional professional monitoring you can activate when needed. Several platforms now offer this flexibility.
Best Components and Platforms for 2026
Hub-Based Platforms (Most Flexible)
If you want maximum control and zero recurring costs, a hub-based platform is the way to go:
- Home Assistant — Free, open-source, runs on a Raspberry Pi or mini PC. Supports Z-Wave, Zigbee, Wi-Fi, and hundreds of device brands. Steep initial learning curve, but unmatched flexibility. This is what I run at home.
- Hubitat — Similar local-control philosophy with a friendlier interface. Around $100–$150 for the hub.
Look for Z-Wave or Zigbee compatibility across sensors and devices. These protocols create a mesh network that’s more reliable than Wi-Fi-only setups, especially in larger homes or if you’re in the Pacific Northwest where thick timber-frame construction can eat Wi-Fi signals for breakfast.
All-in-One DIY Kits
Want something closer to plug-and-play? Look for kits that include a hub, sensors, a keypad, and a siren in one box. Key criteria: local recording camera compatibility, no mandatory subscription for core features like alerts and arming, battery backup in the hub, and room to expand with additional sensors and cameras.
Modular Component Builds
This is my preferred approach — buy the best individual component in each category and tie them together through your hub.
The Reolink RLC-810A — around $50–$60 — is the camera I keep recommending to people on a budget. 4K resolution, RTSP support for local streaming, PoE powered, and solid night vision out to about 100 feet. I’ve run four of them for over two years now with zero failures. The Wyze Cam is cheaper, sure, but it pushes you toward cloud storage and the app gets clunkier every update cycle.
For sensors, Zigbee door/window sensors with CR2032 batteries that last 1–2 years are the sweet spot. For lighting, solar-powered motion sensors with adjustable PIR sensitivity and a wide detection arc (120°+) cover most situations. And for storage, an NVR with at least 1TB capacity or cameras with microSD slots supporting 128GB+ cards keeps everything local.
For broader gear recommendations, check out our guide to tech tools for the modern prepper.
Essential Layers: Priority Order
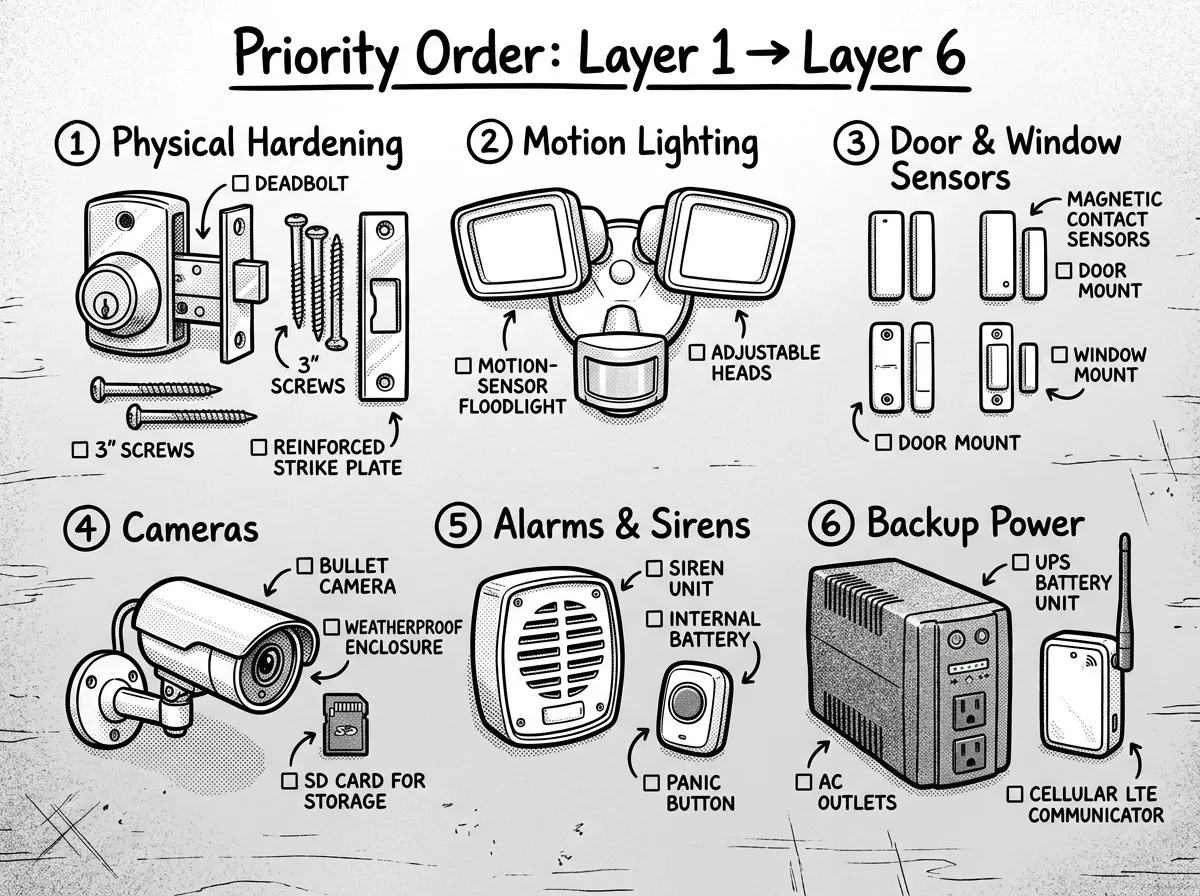 The six layers of a prepper-ready DIY home security system
The strongest home security without monitoring works because of layered defense. Each layer buys you time and information. Here’s the order I recommend.
Security isn’t one thing you buy — it’s a stack of overlapping systems where each layer covers the gaps in the one before it.
Layer 1: Physical Hardening
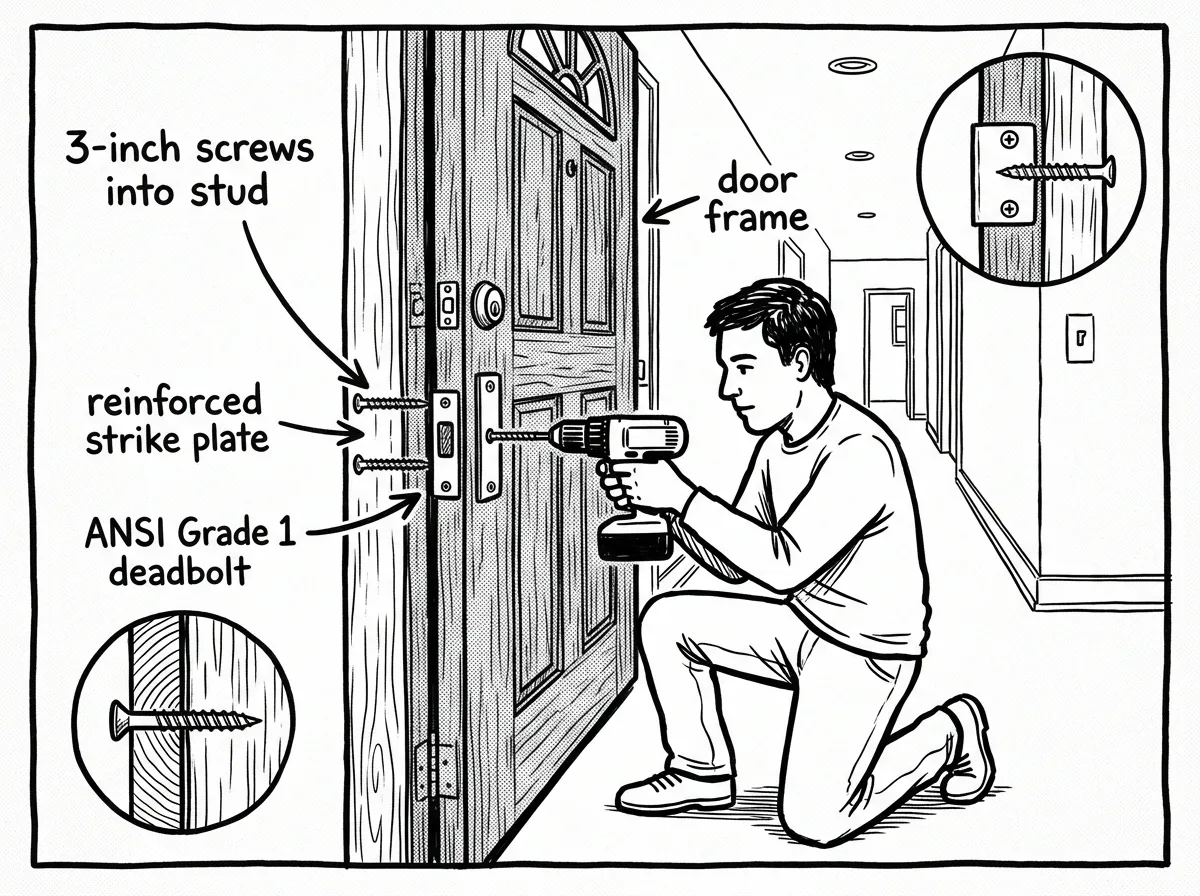 Reinforcing a door frame with 3-inch screws and an upgraded deadbolt
Physical barriers stop or slow entry and deliver the best return for the money — period. For under $30, you can dramatically improve your front door’s resistance.
- Install 3-inch screws in strike plates and hinge screws (replacing the standard 3/4-inch screws most homes ship with)
- Fit ANSI Grade 1 or 2 deadbolts
- Use solid-core or metal exterior doors
- Add window locks or security film to ground-floor glass
- Use door jammers or security bars on sliding doors
- Plant thorny shrubs beneath vulnerable windows
The first time I demonstrated this to a friend, I had him try to kick in his own back door before and after replacing the screws. Before: two solid kicks and the frame splintered. After: he gave up after six. Same door, same frame — just longer screws anchored into the studs.
For a deep dive on physical hardening techniques, read our home fortification tips for beginners.
Layer 2: Motion-Sensing Exterior Lighting
Lighting is the single most underrated deterrent. A bright light snapping on when someone approaches a dark side yard is often enough to send them elsewhere. I’ve watched it happen on my own cameras more than once — a figure walks up the driveway, the floods kick on, and they immediately reverse course.
Choose models with adjustable PIR sensors, pet-immunity settings, wide coverage angles, weatherproof housings, and solar or battery power for remote spots. Mount them high enough that they can’t be easily knocked down or unscrewed.
Layer 3: Door and Window Sensors
Magnetic contact sensors give you immediate alerts the moment an entry point opens. Prioritize these placements: front door, back door, sliding doors, garage entry, and ground-floor windows.
Label every sensor clearly in your control app — “Kitchen Window Left” is far more useful than “Sensor 7” when an alert wakes you at 2 AM.
Adhesive mounts work fine for renters. Test every sensor during installation by opening and closing the door or window and confirming the alert hits your phone.
Layer 4: Security Cameras
Cameras provide evidence and real-time situational awareness. When I tested various DIY security cameras over the years, the biggest differentiator wasn’t resolution — it was whether the camera could record locally without depending on someone else’s server.
Prioritize these placements: front door for face capture, driveway for vehicle identification, supply storage areas, and garage access points. Enable local recording on SD cards or an NVR. Cloud backup is fine as a secondary option, but never rely on it as your only storage.
Layer 5: Alarms, Sirens, and Panic Options
A loud siren wakes occupants and draws neighbor attention. Tie sirens to sensor triggers through your hub’s automation rules. Keep a wireless panic button in the bedroom and one near the main entry. Simple, but it matters.
Layer 6: Backup Power and Resilient Communications
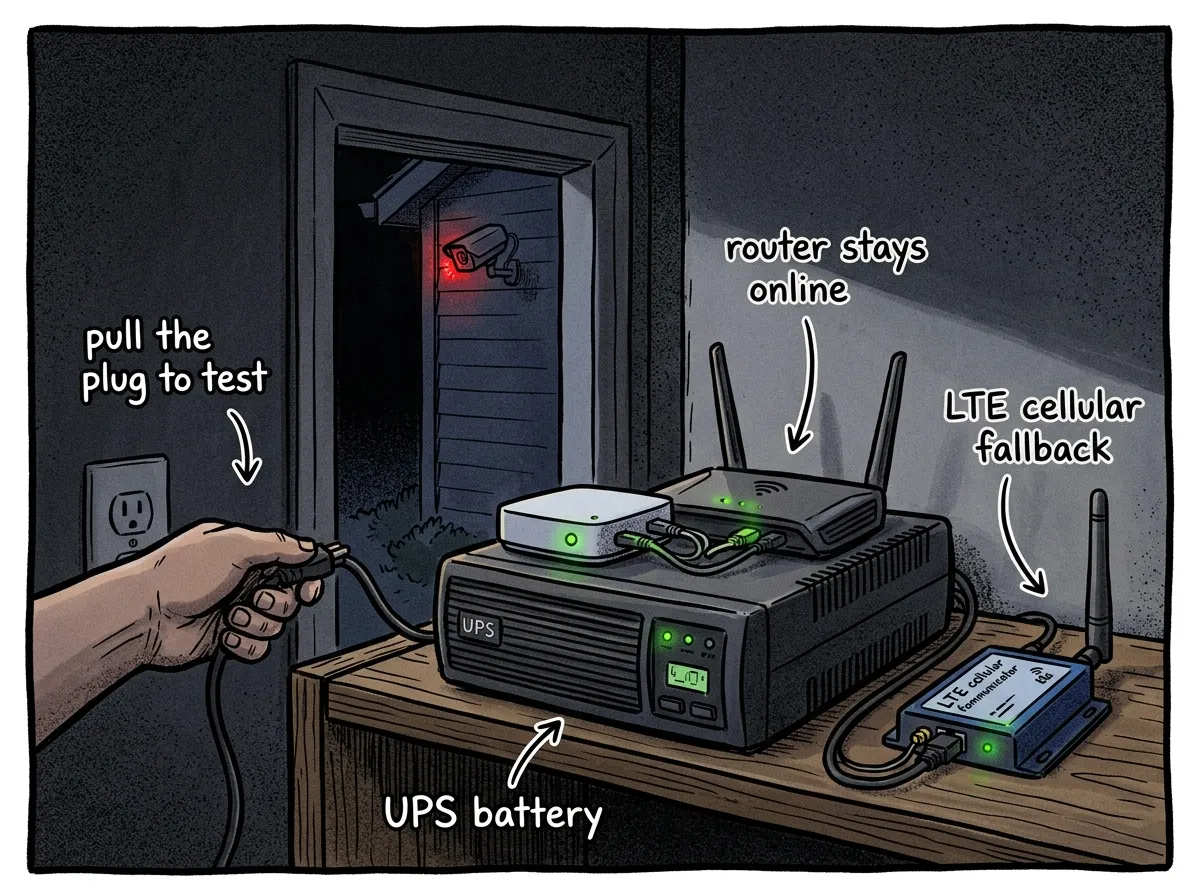 Keeping your security system alive when the grid goes down
This is where prepper home security truly separates itself. Systems that die with the grid aren’t resilient — they’re decorations.
My setup: a 1500VA UPS powers my hub, router, and NVR for about 4 hours. A portable power station extends that to 12+. Battery-powered sensors and cameras keep working independently. A cellular LTE communicator ensures alerts still reach my phone when the internet goes down.
For detailed backup power planning, see our guide on prepping for power outages.
Detailed Setup Walkthrough
Tools you’ll need: drill, Phillips and flathead screwdrivers, ladder, stud finder, smartphone, tape measure, pencil. A helper is useful for camera mounting.
Total time: The full system can be built incrementally over 2–4 weekends.
Property Assessment (1–2 hours) — Walk the entire perimeter as if you were trying to break in. Do it once during the day and once at night. Map every door, window, dark zone, and approach path. Draw a simple diagram and mark your priorities.
Physical Hardening (30–60 minutes per door) — Grab your drill and a screwdriver. Replace every strike plate screw and hinge screw on exterior doors with 3-inch screws — they’ll anchor into the wall studs instead of just the door frame. Upgrade to quality deadbolts. Add window locks. This single step is the highest-impact upgrade in home security for preppers.
Motion Lighting (20–30 minutes per light) — Mount lights above head height using a ladder. Aim them to cover approach paths, side yards, and back doors. Adjust PIR sensitivity so passing animals don’t trigger constant alerts. If you’re in the humid Gulf Coast climate, make sure you’re buying lights rated for moisture exposure — cheap solar units corrode fast down there.
Entry Sensors (10–15 minutes per sensor) — Peel-and-stick magnetic sensors on door frames and window sills. Pair each one with your hub and name it clearly. Test every sensor by opening and closing the door or window.
Camera Placement (30–45 minutes per camera) — Use a stud finder to locate solid mounting points. Position front-door cameras at face height (roughly 7 feet). Angle driveway cameras to capture license plates. Enable local recording and verify night vision works after dark.
Alarm and Automation Configuration (1–2 hours) — Set up Home, Away, and Night modes in your hub. Create automation rules: when a sensor trips in Away mode, activate the siren and send a push notification. Test every rule by triggering sensors in each mode.
Backup Power Installation (30–60 minutes) — Plug your hub, router, and NVR into the UPS. Verify they switch to battery seamlessly by unplugging the UPS from the wall. Install or activate your cellular LTE communicator and confirm it sends a test alert.
Documentation and Maintenance (1 hour initial, 15 minutes monthly) — Create a printed reference sheet with device locations, battery replacement dates, Wi-Fi credentials, hub login info, and emergency contacts. Store it with your emergency binder. Test the full system monthly.
One thing I see constantly: people install everything, feel good about it, and then never test under failure conditions. Pull the plug on your UPS. Reboot your router mid-test. Let the batteries in a sensor die deliberately and see if you get an alert about it. My rule is simple — if you haven’t tested it broken, you don’t know if it works.
Integrating Security Into Your Broader Prep Plan
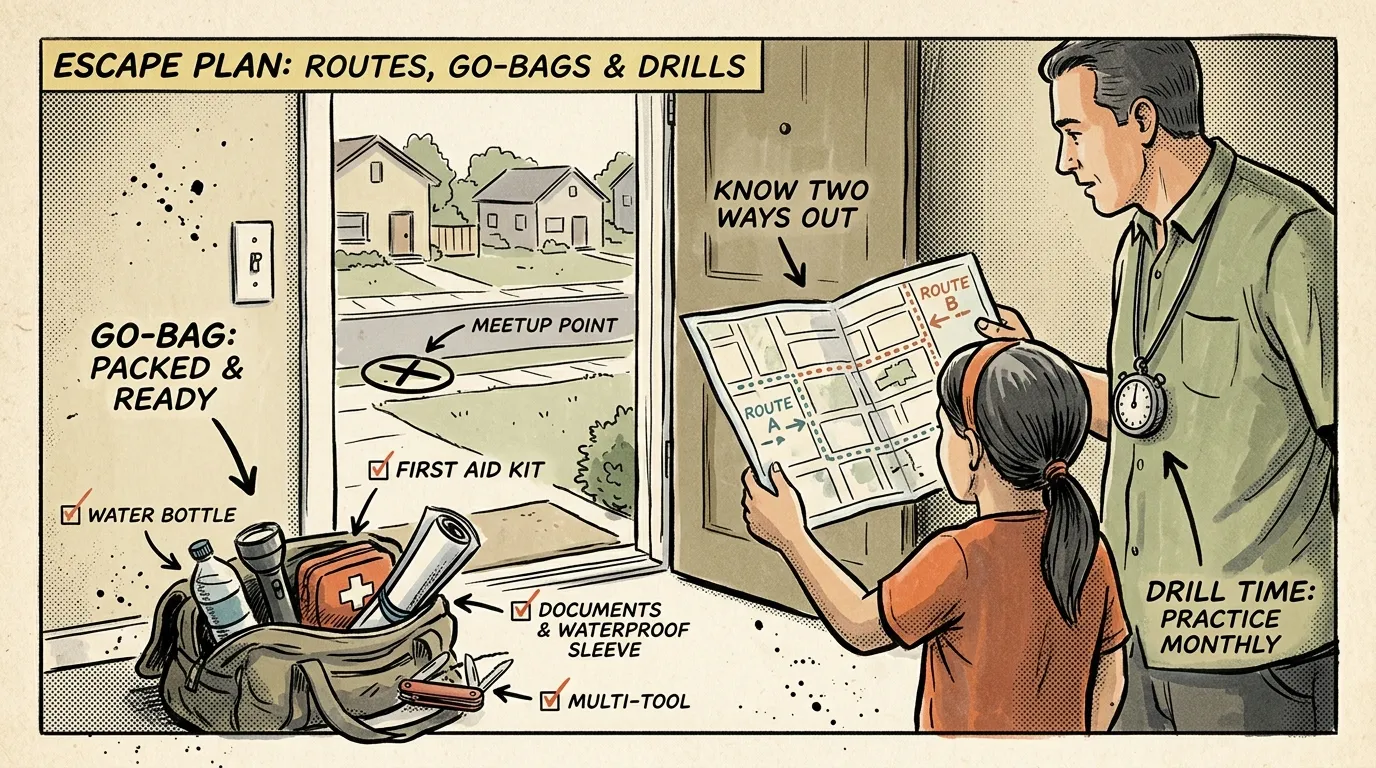
Security is one layer of a complete preparedness strategy. Physical hardening delays intruders. Cameras document events. Lights expose movement. Alarms announce intrusions. But your family’s response plan is what ties everything together.
Define human procedures: who checks alerts, who calls authorities, who secures children, and where does everyone assemble if evacuation is needed. Rehearse these. A system full of sensors is useless if nobody knows what to do when they trigger.
Protect your highest-value preparedness assets — food stores, water reserves, medical supplies, fuel, and communications gear. If you’ve invested time starting a prepper garden or stockpiling supplies, your security system is what protects that investment.
Plan for extended outages: prioritize UPS for networking gear, local recording for evidence, and cellular fallback for alerts. In my FEMA training, 72 hours without grid power is the baseline scenario — your security system should meet or exceed that.
Frequently Asked Questions
What are the essential components of a DIY home security system for preppers?
A prepper-focused system should include reinforced doors and strong locks, motion-activated exterior lighting, door and window contact sensors, at least one camera with local recording, a loud alarm or siren with a panic option, and backup power such as a UPS or solar with a cellular communications fallback.
How much does a DIY home security system cost?
A starter system runs $50–$150, covering physical hardening and motion lighting. A mid-range setup with cameras, sensors, and a hub costs $200–$500. A comprehensive system with full backup power and cellular fallback runs $500–$1,000+. All tiers avoid monthly monitoring fees, saving you $240–$600 per year compared to professional subscriptions.
What is the best DIY home security system without a monthly fee?
A hub-based platform like Home Assistant or Hubitat paired with Z-Wave or Zigbee sensors and cameras that support local recording on SD cards or an NVR. You’ll get alerts, automation, and video recording with zero subscription fees. I’ve run this exact setup for years and it’s never let me down.
Can I install a home security system myself?
Absolutely. Modern wireless components use adhesive mounts, wireless connections, and smartphone apps designed for self-installation. You’ll need basic tools — a drill, screwdriver, ladder, and stud finder. The full system can be built over 2–4 weekends at your own pace.
Are DIY systems reliable during emergencies?
They are if you design for failure. Battery-powered sensors, a UPS for critical equipment, local recording, and cellular LTE fallback keep your system operational when the grid and internet go down. I’ve tested my setup through multiple PNW storms and multi-day outages — it’s never gone offline.
Can I install cameras if I rent my home?
Yes. Adhesive-mount and magnetic-mount cameras don’t require drilling. Battery-powered models with Wi-Fi connectivity can be placed on shelves, window sills, or temporary mounts. Just check your lease for any restrictions on exterior modifications and be mindful of local recording laws regarding shared spaces.
Legal and Practical Notes
- Cost estimates are illustrative and vary by region, equipment, and retailer. Treat them as guidance, not guarantees.
- Check local laws on video and audio recording, camera placement angles (especially toward public areas or neighbors’ property), and alarm noise ordinances before installing. Regulations differ by jurisdiction.
- Physical hardening typically delivers the highest impact per dollar, but your local crime patterns and specific property layout may shift priorities.
Start With One Door
You don’t need to build a fortress this weekend. The best security system is the one you actually install, test, and maintain. Start with one door — swap those flimsy 3/4-inch strike plate screws for 3-inch screws today. It takes 10 minutes, costs under $5, and immediately makes your home harder to breach.
Add a motion light this week. Install one sensor and one camera with local recording within the month. Build out backup power and cellular communications over the next few weekends. Then test everything under realistic failure conditions — kill the power, reboot the router, simulate the worst case.
I’ve been building, testing, and refining DIY home security systems across the Pacific Northwest for over a decade, through ice storms, windstorms, and extended outages that pushed professional systems past their breaking point. The system I run at my own home follows exactly the blueprint in this guide — layered, locally controlled, backup-powered, and tested regularly.
Your home security shouldn’t depend on someone else’s server, someone else’s call center, or someone else’s power grid. Build it yourself. Control it yourself. Test it yourself. That’s the prepper way.
The Complete
Prepper's Reference.
149 articles synthesized into one comprehensive PDF — twelve chapters covering water, food, shelter, first aid, comms, and scenario-specific preparedness. Free with your email.
Unsubscribe anytime · We never share your email
You're in. Check your inbox.
Keep Reading

Prepper Emergency Binder: Build Your Grab-and-Go Kit
Build a prepper emergency binder with this step-by-step checklist. Organize essential documents, create digital backups, and stay ready for any emergency.
Prepper Escape Plan: Build Routes, Go-Bags & Drills
Build a prepper escape plan with multiple routes, 72-hour go-bags, communication steps, and tested drills. Step-by-step guide from a Wilderness First Responder.
National Emergency Preparedness Month: 30-Day Plan
Use this 30-day National Emergency Preparedness Month challenge to go from unprepared to fully ready. One simple 15-minute task per day. Start now.