Beginners should store at least 1 gallon of water per person per day and aim for a two-week emergency supply. The best method is to use food-grade potable-water containers, keep them in a cool dark place, rotate every 6 months, and keep purification tablets or filters as backup.
Key Takeaways
- Store at least 1 gallon per person per day and build toward a 14-day supply — the 72-hour minimum won't cover most real disruptions.
- Use food-grade HDPE containers, label every fill date, and rotate home-filled water every 6–12 months.
- Layer your storage with portable jugs for evacuation and larger barrels for sheltering in place — never put everything in one format.
- Keep at least one backup purification method on hand: boiling gear, a gravity filter, or chlorine dioxide tablets.
- Start this week with two 5-gallon jugs and a case of bottled water — that's a 3-day supply for under $30.
How Much Emergency Water to Store: Complete Guide
Figuring out how much emergency water to store is the single most important step in any preparedness plan — and it’s where most people either overthink it or drastically underestimate. I’ve spent 12+ years in emergency management across the Pacific Northwest, and water has been the resource that separates calm households from desperate ones every single time. Not food. Not power. Water.
This guide gives you the exact numbers, the right containers, a rotation schedule that actually works, and backup purification methods so your family stays safe when the tap stops flowing.
Quick Summary
- Store at least 1 gallon per person per day — aim for a 14-day supply, not just 72 hours.
- Use food-grade HDPE containers (recycling symbol #2), label every fill date, and rotate home-filled water every 6–12 months.
- Layer your storage: portable jugs for evacuation, larger barrels for sheltering in place.
- Keep at least one backup purification method — boiling, a gravity filter, or chlorine dioxide tablets.
- Budget extra water for pets, hot climates, medical needs, and cooking — the 1-gallon minimum covers only drinking and basic sanitation.
- Start this week: two 5-gallon jugs and a case of bottled water gets you to a 3-day supply for under $30.
Why Stored Water Matters More Than You Think
This isn’t hypothetical. In 2022, Jackson, Mississippi lost safe drinking water for weeks after its treatment plant failed during flooding. Pacific Northwest ice storms routinely knock out municipal water for 5 to 10 days. Hurricane Maria left parts of Puerto Rico without clean water for months.
I’ve responded to ice storms and landslide events where municipal water went offline for over a week. The families who had stored water? Calm. The ones who hadn’t were desperate within 48 hours — and by then, every store shelf was stripped bare.
Stored water buys you time. Time to think, time to plan, and time to set up longer-term purification if the disruption drags on.
FEMA data consistently shows that water infrastructure failures are among the most common post-disaster issues, and they hit urban and rural communities equally hard. Your stored supply eliminates the panic of hunting for bottled water and gives you immediate access to safe drinking water while you figure out what comes next.
How Much Emergency Water to Store
Store at least 1 gallon of water per person per day.
That covers drinking and basic sanitation — nothing more. Here’s how the numbers break down:
- Minimum: 3-day supply per person
- Recommended: 14-day supply per person
- Pets: 0.5–1 gallon per pet per day
- Hot climates or physical exertion: double to 2 gallons per person per day
- Special needs: extra for infants, nursing mothers, elderly, and medical conditions
So how long will 5 gallons last a family of four? Roughly one day. Five gallons gives you about 1.25 gallons per person — enough for drinking and minimal sanitation for about 24 hours. That’s it. It underscores why a 14-day target matters so much more than grabbing a jug and calling it done.
| Household Size | 3-Day Supply | 14-Day Supply |
|---|---|---|
| 1 person | 3 gallons | 14 gallons |
| 2 people | 6 gallons | 28 gallons |
| 4 people | 12 gallons | 56 gallons |
| 4 people + 2 pets | 15 gallons | 70 gallons |
If you’re in a hot Gulf Coast or desert Southwest climate, or you expect physical labor during an emergency — clearing debris, walking to resources — plan for 2 gallons per person per day. That pushes a family of four from 56 gallons to 112 gallons for two weeks.
Space or budget limited? Start small. A 3-day supply is genuinely useful. Add more over time.
Emergency Water Calculator: Sizing Your Supply
The base formula is straightforward. The adjustments are where most people get it wrong.
Base formula: (Number of people × 1 gallon × number of days) + (Number of pets × 0.5–1 gallon × number of days) = Base supply
Then adjust for:
- Hot climate or summer months: multiply personal amounts by 1.5–2×
- Medical needs (dialysis, medications requiring water): add 1+ gallon per day
- Infants requiring formula: add 0.5 gallon per day
- Cooking with dehydrated or freeze-dried food: add 0.5 gallon per person per day
Worked example — family of 4 with 2 medium dogs in a hot climate, targeting 14 days:
| Category | Calculation | Total |
|---|---|---|
| 4 people (base) | 4 × 1 gal × 14 days | 56 gallons |
| Hot climate adjustment | 56 × 0.5 (50% increase) | +28 gallons |
| 2 dogs | 2 × 0.5 gal × 14 days | +14 gallons |
| Cooking adjustment | 4 × 0.25 gal × 14 days | +14 gallons |
| Total | 112 gallons |
That’s roughly two 55-gallon barrels. Sounds like a lot until you realize it’s the difference between self-sufficiency for two weeks and running dry after five days. Even if you can’t hit your full number right away, knowing the target lets you build toward it instead of guessing.
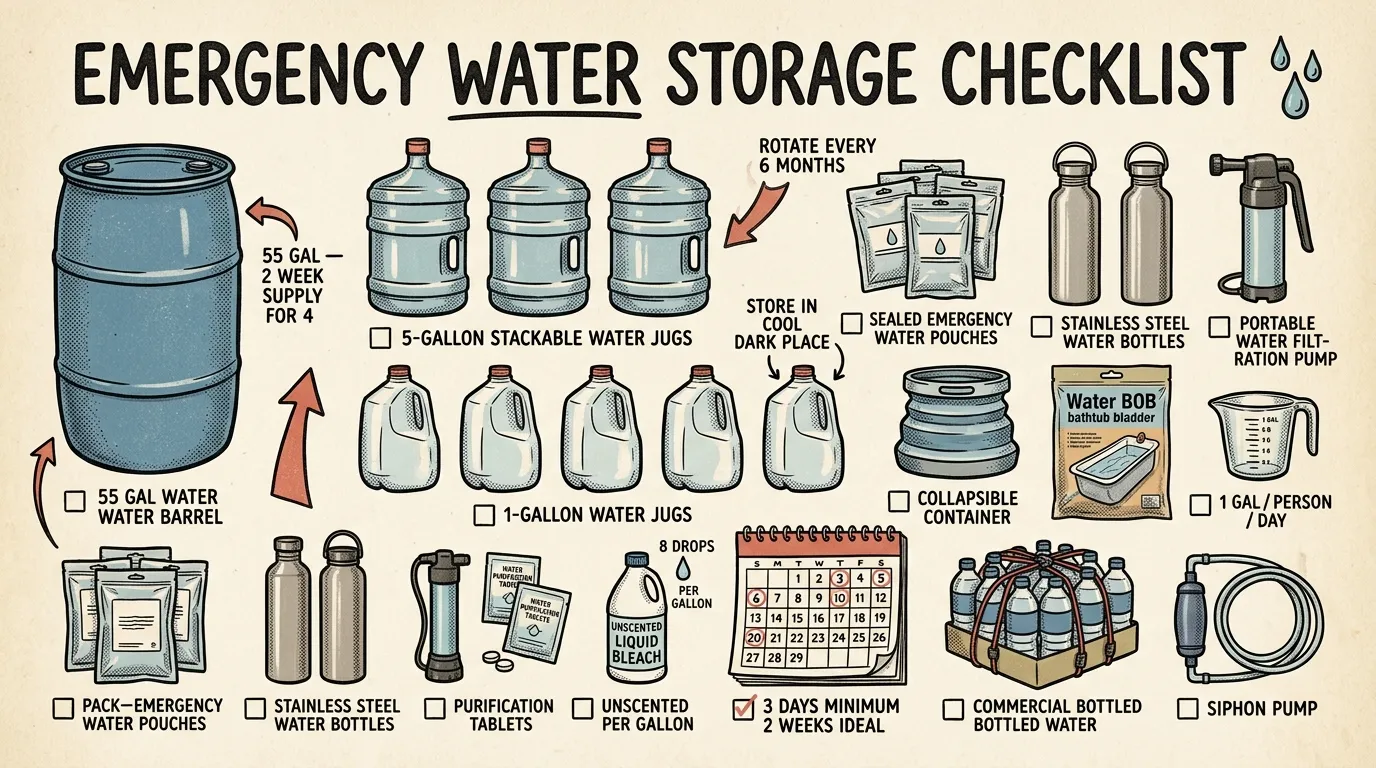
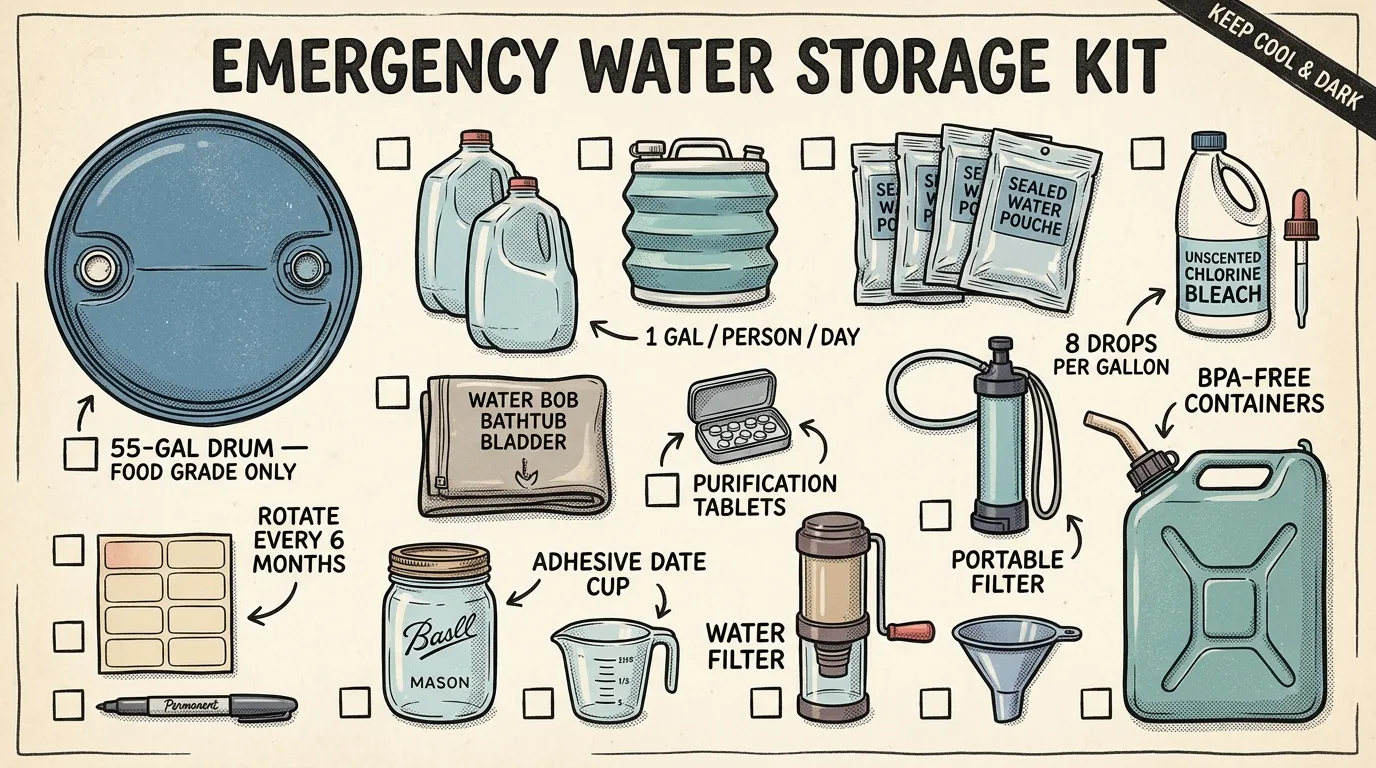
Choosing Safe Water Storage Containers
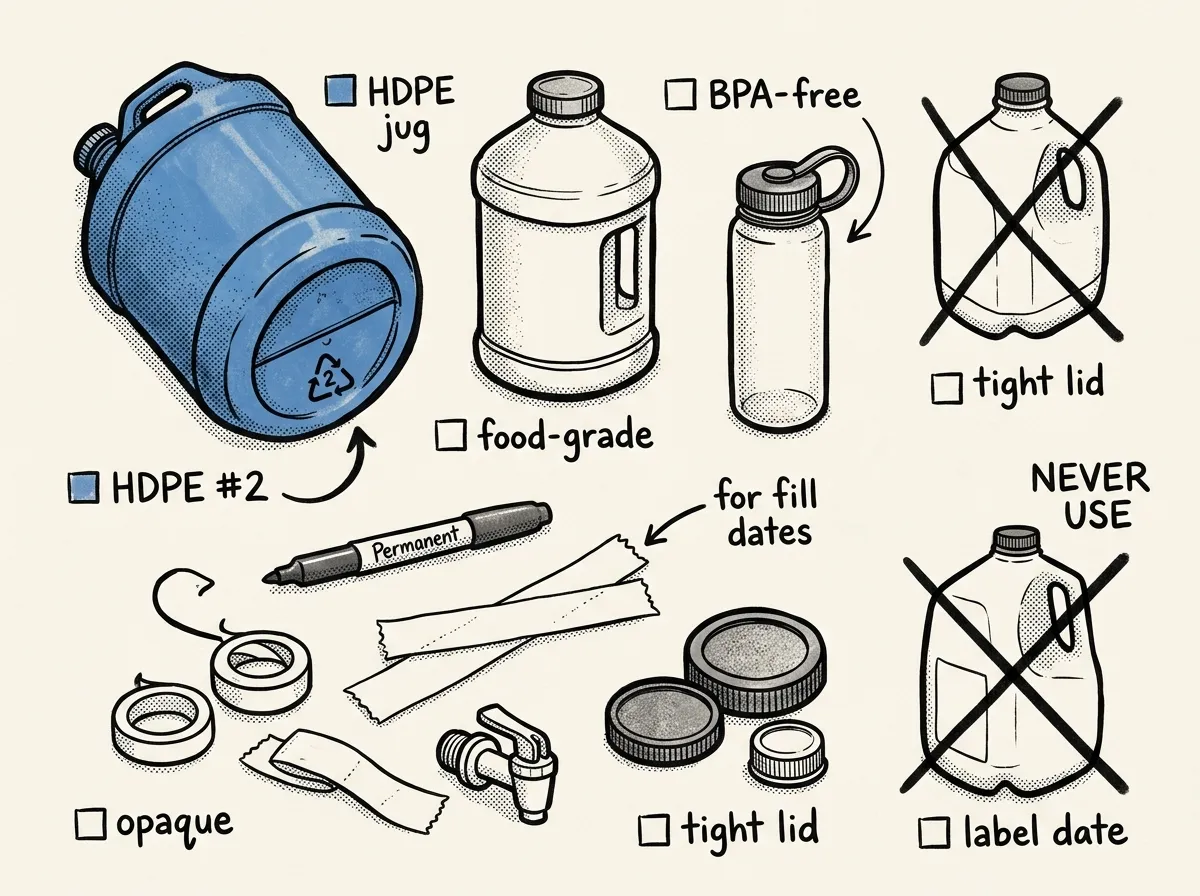 Food-grade water storage containers and labeling supplies
Not all containers are created equal. Before you buy anything, confirm these things:
- Food-grade material. HDPE plastic is the most common and affordable. Look for recycling symbol #2.
- Labels that say “food-grade” or “potable water.” BPA-free is preferred.
- Tight-fitting lids or spigots to reduce contamination risk.
- Opaque or dark containers to limit light exposure and slow algae growth.
Container Types and What to Expect
- Factory-sealed bottled water (16 oz to 1 gal): Ready to use, highly portable. Takes a lot of space for larger reserves.
- Emergency water pouches (4 oz to 8 oz, 5–10 year shelf life): Brands like Datrex, SOS, and Mainstay carry Coast Guard approval. Compact and nearly indestructible. Higher cost per gallon, but ideal for go-bags and vehicle kits.
- Reusable food-grade jugs (1 to 7 gallons): Easy to refill and store. Sanitize and rotate regularly.
- Stackable water bricks / modular containers (about 3.5 to 5.5 gallons): Stackable and easy to move, but cost per gallon is higher.
- 55-gallon food-grade barrels: Lowest cost per gallon by far. Heavy when full. You’ll need a pump or spigot to dispense.
I’ve stored water in everything from repurposed soda bottles to 55-gallon barrels over the past decade. The cheap collapsible containers you see on Amazon for $8 consistently fail — pinhole leaks, terrible plastic taste, unreliable seams. The Reliance Aqua-Tainer — around $15–$20 for 7 gallons — is what I grab every time. It’s rugged, the spigot actually works, and I’ve had some in service for five years without a single leak. Spend the few extra dollars.
Containers to avoid: Anything that previously held milk, juice, chemicals, fuel, or other non-food products. You can’t fully remove sugar residues and milk proteins, and bacteria will colonize no matter how many times you rinse.
Municipal Water vs. Well Water
If you’re filling from a treated municipal source, your water already contains residual chlorine and is ready for storage. If you’re filling from a private well or untreated source, you’ll need to treat the water before sealing — either by boiling or adding household bleach at the ratios I cover in the purification section below.
Storage Conditions and Rotation Schedule
- Clean and sanitize containers before first use
- Fill from a treated municipal source or treat untreated water before sealing
- Seal tightly and label with the fill date using permanent marker
- Store in a cool, dark, dry place away from sunlight, heat, gasoline, pesticides, and chemicals
- Set calendar reminders to rotate home-filled containers every 6–12 months
- Inspect containers periodically — replace or treat if you spot leaks, bulging, cloudiness, or odd smells
I tie my rotation to daylight saving time. When the clocks change, I check my water. Same day every time, so it becomes automatic. You don’t have to use my system — just pick something consistent. The first time I tried to “just remember,” I found 18-month-old water in my garage that tasted like a garden hose.
How Long Can You Store Bottled Water?
This is one of the most common questions I get, and the answer is better than most people expect. According to FDA guidelines, commercially sealed bottled water has no true expiration date. It’s considered safe to drink indefinitely as long as the seal stays intact.
Manufacturers typically stamp a 1 to 2 year “best by” date, but that’s about taste quality — not safety. Over time, especially in warm storage conditions, chemicals from the plastic can leach into the water and give it an off taste. The water itself doesn’t “go bad” in a microbiological sense if the seal holds.
What degrades stored bottled water:
- Heat: A hot garage, space near a furnace, or direct sunlight accelerates plastic breakdown and off-flavors.
- Sunlight: UV exposure promotes algae growth in clear containers and degrades plastic.
- Chemical proximity: Storing water near gasoline, pesticides, or cleaning chemicals allows vapors to permeate thin plastic over time.
Home-filled containers are different. Without commercial sealing processes and quality controls, home-filled water should be rotated every 6 to 12 months. Container type, water source, and storage conditions all affect how long it stays fresh.
Even “expired” sealed commercial water is generally safe if stored properly. But rotation keeps you engaged with your supply and lets you catch container failures early.
Long-Term Storage Methods (Years, Not Months)
Standard advice says rotate every 6 to 12 months, and that’s solid for home-filled containers. But if you want storage you can set and largely forget for years, you’ve got options.
Water Preserver Concentrate
These sodium hypochlorite-based additives — Water Preserver Concentrate by Aquamira is around $15 — extend storage life to 5 years in food-grade containers. I use this in my 55-gallon barrels. You treat the water once, seal the barrel, and check it annually. It’s the simplest path to long-term storage for most households.
Commercially Sealed Emergency Pouches
Products from Datrex, Mainstay, and SOS are factory-sealed in durable Mylar-type pouches rated for 5 to 10 years. Compact, nearly puncture-proof, zero maintenance. The tradeoff is cost — you’ll pay significantly more per gallon than filling your own containers. But for vehicle kits, go-bags, and deep reserves you don’t want to think about, they’re excellent.
55-Gallon Barrels with Proper Treatment
Fill a new food-grade barrel from a treated municipal source, add water preserver or household bleach at the correct ratio, seal with a bung wrench, and store in a cool, dark location. With proper treatment, these can reliably hold drinkable water for 3 to 5 years. I still recommend annual visual inspections.
The bleach ratio for long-term storage: Use 1/8 teaspoon (8 drops) of 6% unscented household bleach per gallon of clear water. For 8.25% concentration, use 6 drops per gallon. For a full 55-gallon barrel, that’s approximately 1 teaspoon of 6% bleach. Keep a laminated card with these ratios taped to your storage barrel — in a real emergency, you won’t want to look this up on a dead phone.
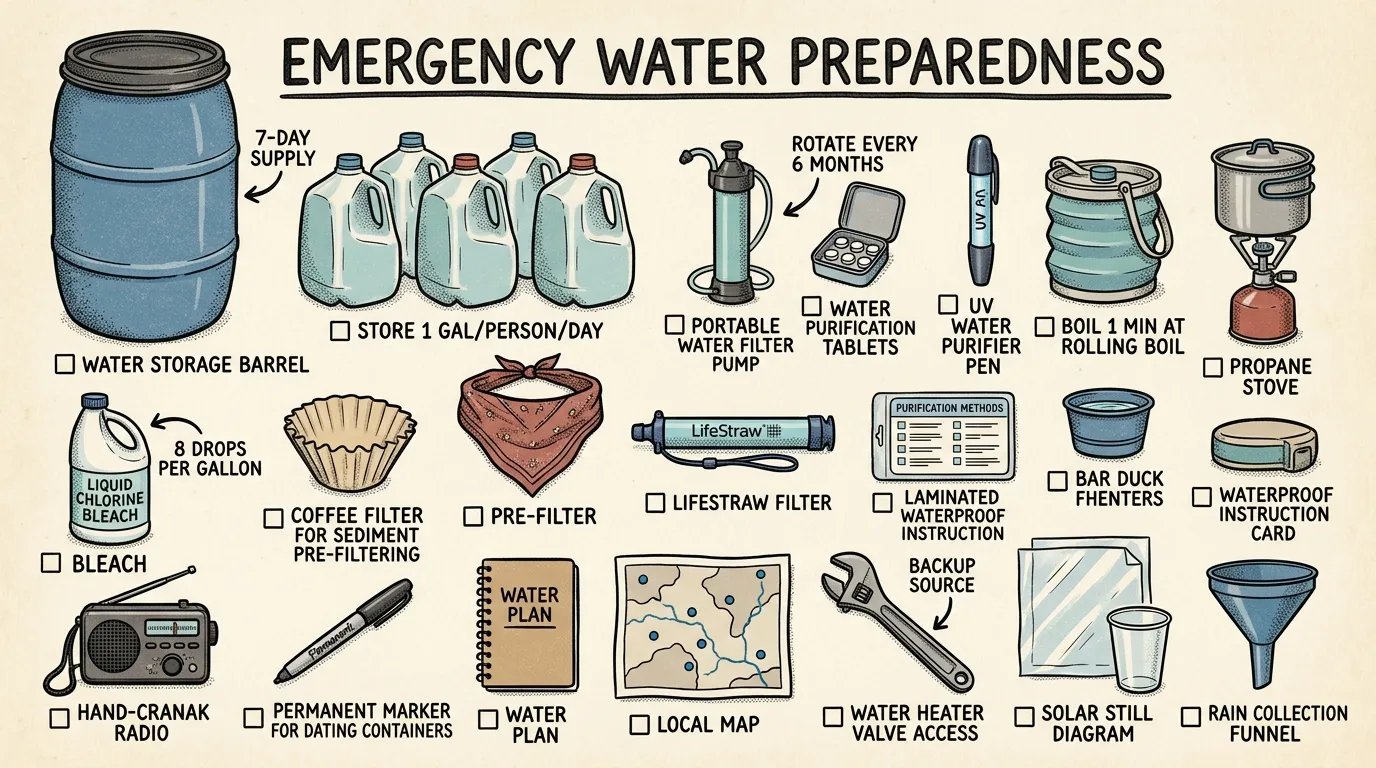
Backup Water Purification Methods
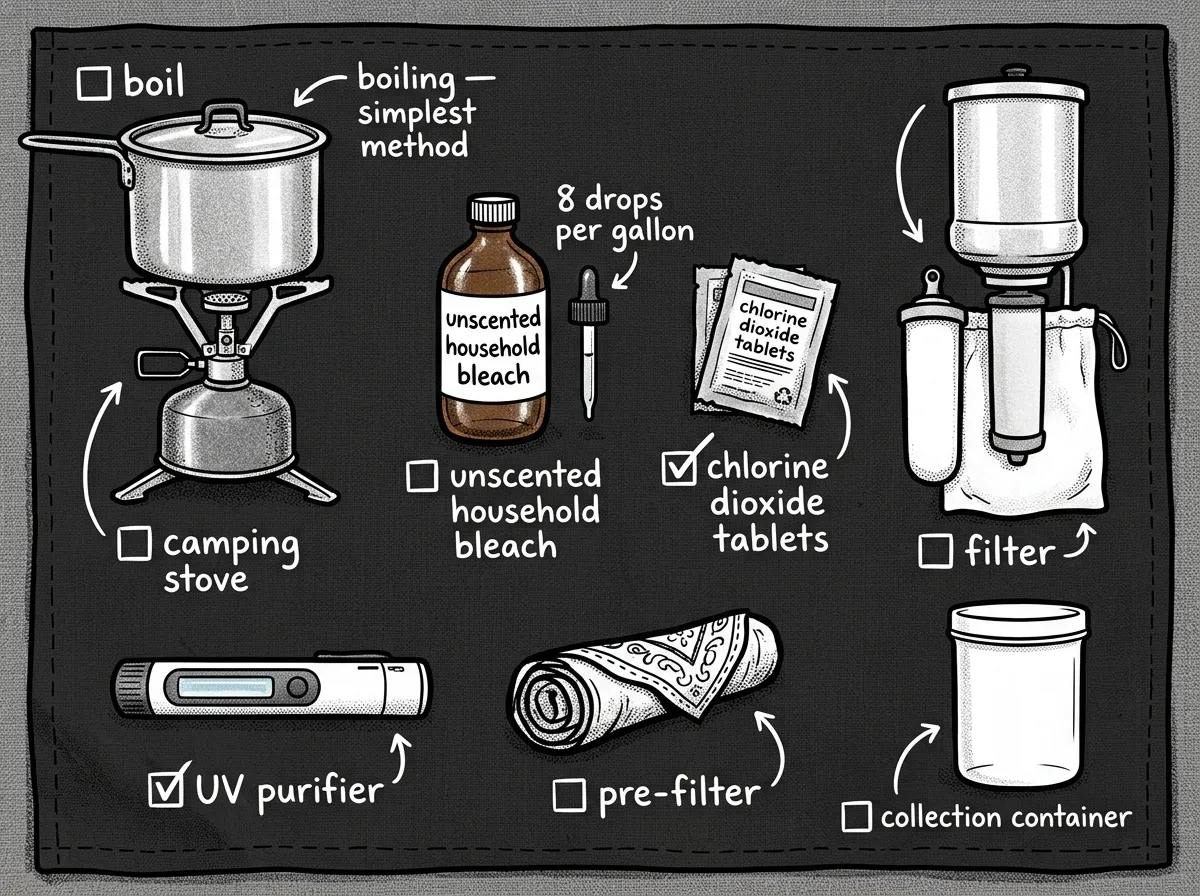 Essential backup water purification gear
Stored water is your first line of defense, but you also need ways to treat additional or uncertain water sources. As part of my Wilderness First Responder training, we drill on field water treatment because contaminated water is one of the fastest paths to a medical emergency in a disaster.
Boiling
Bring water to a rolling boil for 1 minute. At elevations above about 6,500 feet, boil for 3 minutes. This is the most reliable single method and kills all categories of pathogens. Simple. Effective. No gear to fail.
Chemical Disinfection with Household Bleach
Use 8 drops (1/8 teaspoon) of 6% unscented household bleach per gallon of clear water. For 8.25% concentration, use 6 drops per gallon. Stir and let stand 30 minutes. The water should have a slight chlorine smell — if it doesn’t, repeat the dose and wait another 15 minutes. If the water’s cloudy, filter or settle it first, then double the bleach dose.
Chlorine Dioxide Tablets
Products like Aquamira or Katadyn Micropur are lightweight, have a long shelf life, and work against bacteria, viruses, and protozoa including Cryptosporidium. Follow the dosage on the package.
Mechanical Filtration
Use filters rated for bacteria and protozoa (0.2 micron or smaller). Gravity-fed systems like the Platypus GravityWorks work well for household volumes. Pump filters are better for on-the-go. If viruses are a concern, add a chemical disinfection step after filtering. See top water filtration systems for new preppers for tested options that scale beyond personal sipping.
UV Devices
Portable UV purifiers work well on clear water but need batteries or a power source. Not ideal as your only backup.
The treatment order matters: Filter or let particulates settle first, then disinfect by boiling, chemicals, or UV. Always clarify, then kill.
I’ve watched people make this mistake more times than I can count: they buy a LifeStraw, toss it in a drawer, and think they’re covered. A LifeStraw is fine for personal sipping, but you can’t fill pots for cooking or give water to a toddler through one. The Sawyer Squeeze — around $30 — is what I reach for every time. It filters more volume per squeeze, attaches to standard bottles, and you can rig it as a gravity system in a pinch. Pair it with a bottle of unscented bleach and you’ve got real redundancy.
How to Choose the Right Storage Setup
Staring at a wall of water containers online is where most people stall out. Here’s how to actually decide.
Start with three criteria, in this order:
- Available space. Measure it before you shop. A 55-gallon barrel has a footprint of about 23 inches in diameter and stands 35 inches tall. If you’re working with a coat closet, that’s not your container.
- Household mobility needs. If your emergency plan includes evacuation, heavy barrels are a liability. Stackable water bricks or 5-gallon jugs you can actually carry make more sense.
- Your gallon number. Multiply people (including pets) by your target duration, then work backward to find containers that fit your space and budget.
A simple decision tree:
- Under 15 gallons needed? Go with a mix of factory-sealed cases and a couple of reusable 5-gallon jugs. Simple, portable, minimal fuss.
- 15–56 gallons? Consider the best water storage tanks for preppers in the 15- to 30-gallon range, supplemented with smaller jugs for grab-and-go flexibility.
- Over 56 gallons? A 55-gallon barrel (or two) becomes cost-effective. Pair it with a hand pump or siphon and keep a few portable containers filled for the first 24 hours.
Never put all your water in one format. A layered approach — some portable, some stationary — gives you options no matter how the emergency unfolds.
One thing people overlook: weight. Water weighs 8.34 pounds per gallon. A full 55-gallon barrel tops 450 pounds. Place it before you fill it, and make sure your floor can handle it.
Urban vs. Rural Storage Strategies
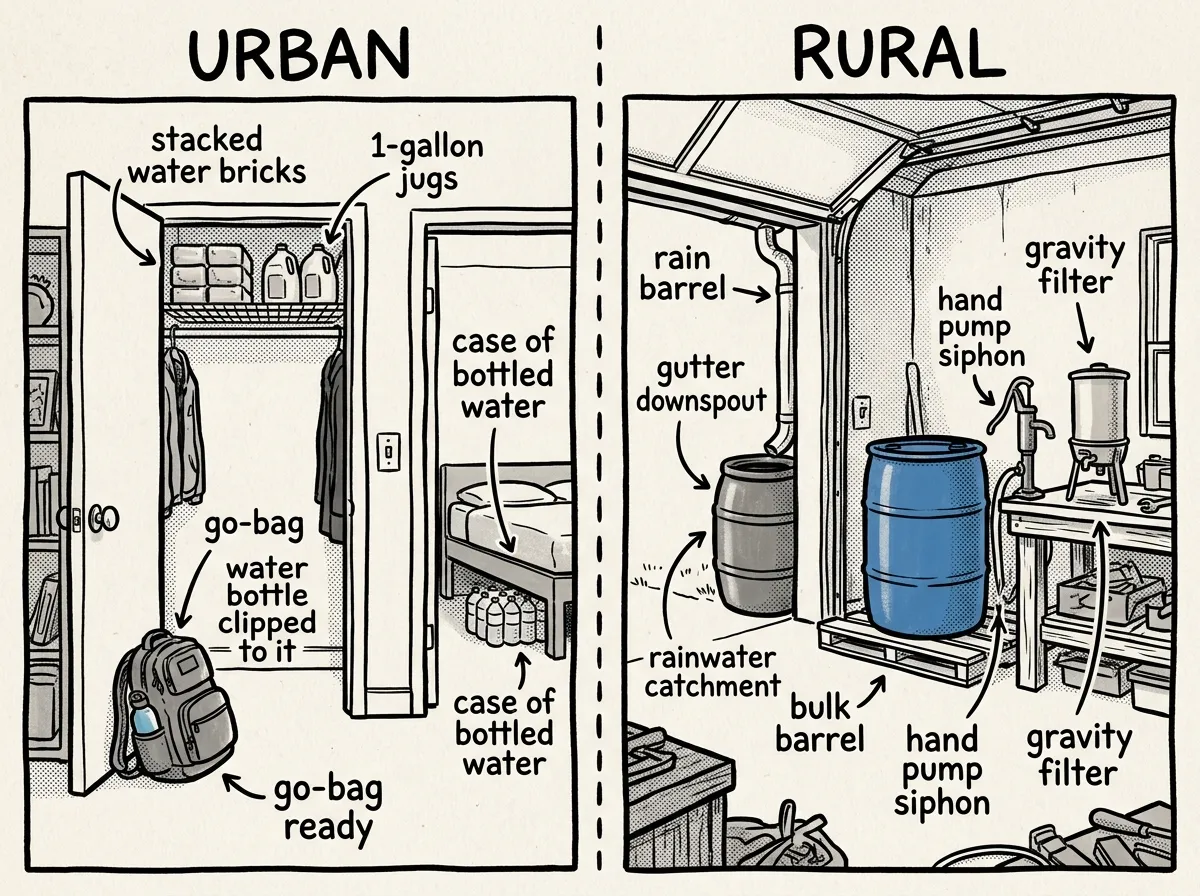 Two contrasting emergency water storage setups — apartment and rural homestead
Your strategy looks meaningfully different depending on where you live. The fundamentals don’t change, but the execution does.
Urban Considerations
- Space is the primary constraint. Focus on stackable water bricks, flat-profile containers under beds, and cases of bottled water in closets.
- Evacuation is more likely. Keep at least 3 days of water in portable containers you can load into a vehicle or carry on foot.
- Supplement from secondary sources. A quality portable filter lets you treat questionable tap or public water. The best portable water filters can bridge the gap between stored supply and resupply.
- Apartment-friendly buffer: Fill your bathtub immediately when you hear a warning. A WaterBOB — a food-grade bladder that holds about 100 gallons for around $35 — turns your tub into a reservoir.
Rural Considerations
- Take advantage of space. Two 55-gallon barrels give a family of four roughly a month of drinking water.
- Well water dependency is a vulnerability. If your well pump runs on electricity, a power outage means no water unless you’ve got a generator or hand pump.
- Natural sources need treatment. That creek on your property is an asset only with proper purification. Knowing how to identify safe drinking water in the wild is a genuine skill worth developing.
- Rainwater harvesting becomes practical. Check local regulations first — some jurisdictions restrict collection. If you’re in the Pacific Northwest, you won’t lack for rainfall, but high desert regions like eastern Oregon or the Intermountain West need to plan collection more carefully.
What NOT to Buy
Part of responsible guidance on how much emergency water to store is steering you away from gear that wastes money or gives false confidence.
Skip these:
- Cheap collapsible containers from no-name brands. Pinhole leaks, terrible taste, unreliable seams. I’ve thrown away more of these than I can count.
- Former juice or milk containers. You cannot remove sugar residues and milk proteins. Bacteria will colonize.
- “Survival” water pouches with no manufacturer info or expiration date. Legitimate brands (Datrex, SOS, Mainstay) have Coast Guard approval and clear dating. Knockoffs don’t.
- LifeStraw as your only purification backup. Fine for a go-bag. Useless for cooking, filling bottles for kids, or household-volume treatment.
- Oversized containers without spigots or pumps. A 55-gallon barrel with no way to get water out is a very heavy decoration. Budget $15–$20 for a hand pump at the time of purchase.
My general rule: if the marketing uses more exclamation points than specifications, walk away.
Beyond 72 Hours: Planning for 1–2 Week Disruptions
The standard advice says prepare for 3 days. That’s also how long it took some Houston neighborhoods to get clean water back after Hurricane Harvey. Others waited two weeks.
A 72-hour supply is a starting point, not a finish line.
A Category 3 hurricane knocks out power to your county. Municipal water pressure drops to zero within 36 hours because the treatment plant can’t run pumps. Stores are closed or stripped bare. Emergency distribution points don’t open for 4 days. Your family of four burns through a 3-day supply by Tuesday evening, and it’s only Wednesday.
Phased Approach to Building a 14-Day Supply
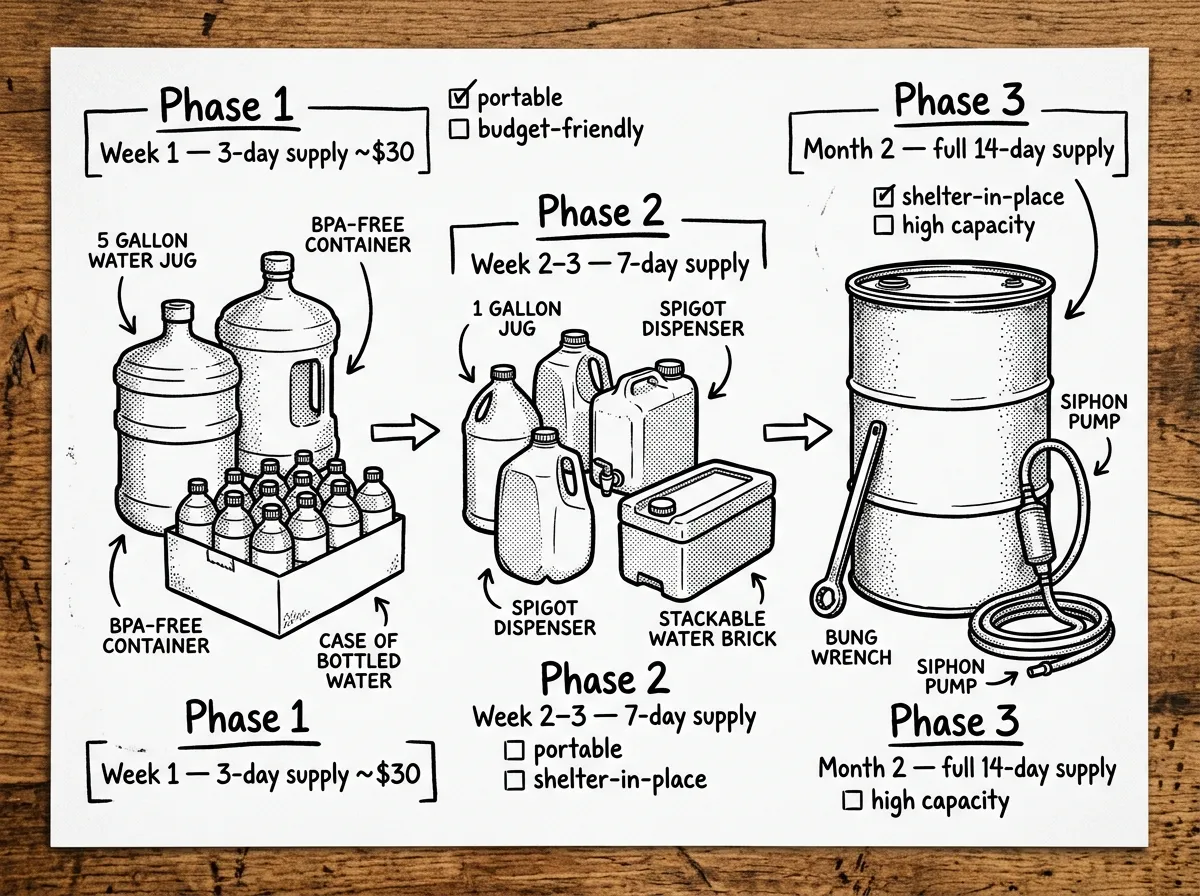 A phased 14-day water supply broken into weekly milestones
- Week one: Buy two cases of commercial bottled water and two 5-gallon food-grade jugs. Fill the jugs from your tap. Total cost: roughly $20–$30. You now have about 12–14 gallons.
- Month two: Add another two 5-gallon jugs or a set of stackable water bricks. You’re approaching 25–30 gallons.
- Month three: If space allows, add a 55-gallon barrel. You’re now at 80+ gallons — comfortably past 14 days for two adults.
- Month four and beyond: Add purification depth. A gravity-fed filter system lets you extend your effective supply by treating secondary sources. Learn how to make a DIY water filter as a fallback skill.
What Changes After Day 3
- Rationing becomes real. Separate your “drinking only” supply from your “utility” supply in clearly labeled containers.
- Hygiene water matters more. Without proper sanitation after a few days, illness risk spikes — which increases your need for even more clean drinking water.
- Mental fatigue sets in. Having adequate water removes one of the most primal stressors. A 14-day reserve buys you calm, and calm buys you better decisions.
- Resupply becomes part of the plan. At the two-week mark, you should be sourcing and treating additional water, not just drawing down stored supply.
Common Beginner Mistakes (and How to Fix Them)
- Storing too little. Fix: run the calculator above and start with drinking water, then add volume for cooking and cleaning.
- Using unsafe containers. Fix: use only food-grade containers with verified labeling.
- Forgetting to rotate. Fix: label every container and set calendar reminders every 6–12 months.
- Storing in hot or sunny areas. Fix: move containers to a cool, dark location. That garage in Phoenix? Not the spot.
- Relying only on bottled water. Fix: add reusable containers and a treatment plan.
- Skipping backup purification. Fix: keep bleach ratio cards, tablets, a filter, or the gear to boil water.
- No way to dispense from large containers. Fix: buy a hand pump or spigot with every barrel purchase.
- Calculate household needs at 1 gallon per person per day
- Start with a 3-day supply and expand toward 14 days
- Choose food-grade containers that fit your space
- Fill, seal, and label containers with fill dates
- Store in a cool, dark, chemical-free area
- Set rotation reminders for every 6–12 months
- Stock at least one purification method (boiling supplies, filter, or tablets)
- Include water for pets and special medical needs
- Keep a laminated bleach-ratio card near your storage
Your Emergency Water Supply Action Plan
Understanding how much emergency water to store is the easy part. Actually doing it separates prepared households from the ones that mean to get around to it.
Here’s the good news: you don’t need to go from zero to 56 gallons this weekend. Two 5-gallon jugs and a case of bottled water gets you to a 3-day supply for under $30. You can do that today.
Fill the jugs from your tap. Write the date on them with a permanent marker. Set a reminder on your phone for six months out. Grab a $10 pack of chlorine dioxide tablets and toss them in a drawer near your storage. That’s it — you’ve started.
Next month, add more. The month after that, add a purification system. Build the habit, build the supply, and build the confidence that comes from knowing your household can handle what’s coming. In my experience — across dozens of real-world events responding as a FEMA-trained emergency management professional — the families who do this, even imperfectly, even slowly, never regret it. The ones who keep planning to start tomorrow are the ones I worry about.
The Complete
Prepper's Reference.
149 articles synthesized into one comprehensive PDF — twelve chapters covering water, food, shelter, first aid, comms, and scenario-specific preparedness. Free with your email.
Unsubscribe anytime · We never share your email
You're in. Check your inbox.
Keep Reading
How to Store Water for Emergencies: Complete Guide
Learn how to store water for emergencies — the right containers, purification methods, rotation tips, and a budget plan. Start your supply today.
Emergency Water Preparedness: Store, Purify & Plan
Build your emergency water preparedness plan with proven strategies for storage, purification, and rationing from a FEMA-trained WFR. Start your water plan today.
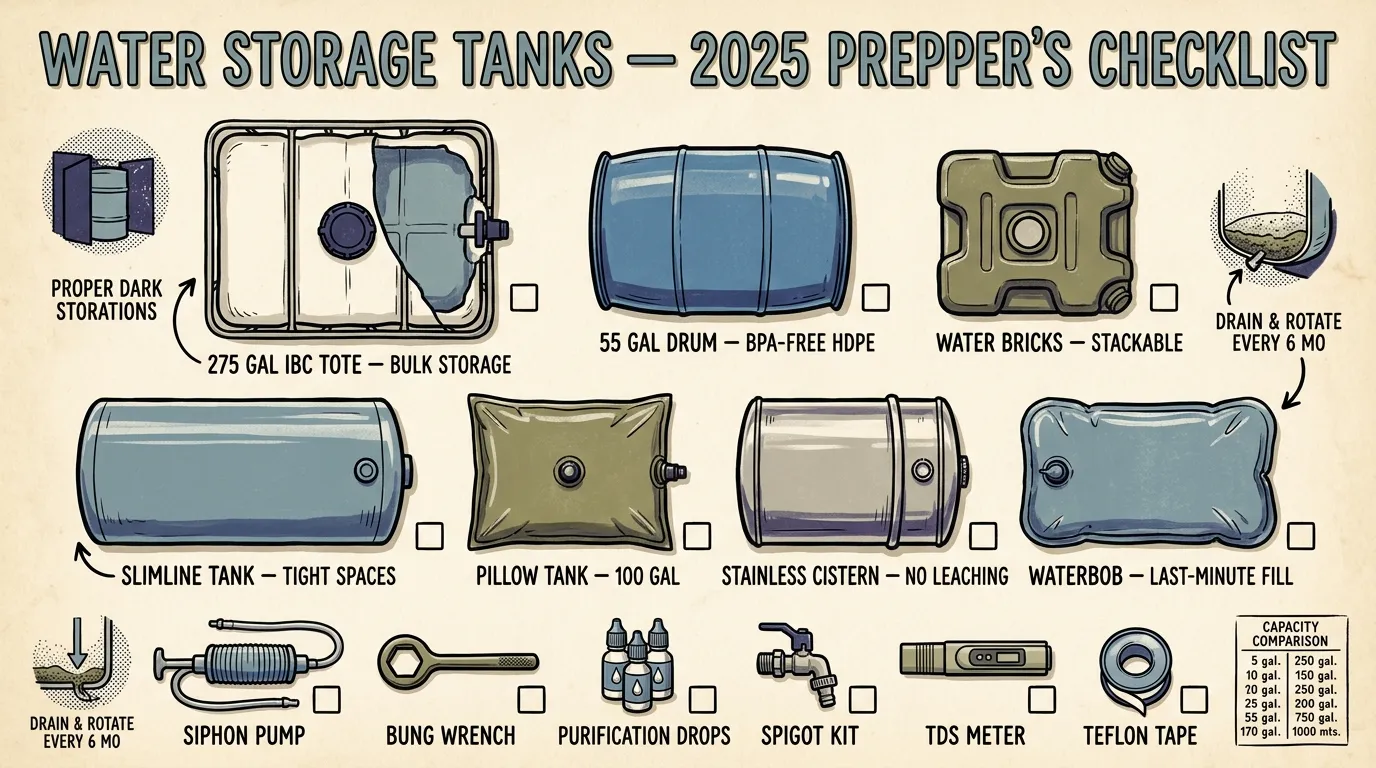
Best Water Storage Tanks for Preppers (2025 Guide)
Find the best water storage tanks for preppers — beginner picks, sizing guide, and maintenance tips from a Wilderness First Responder. Start storing today.