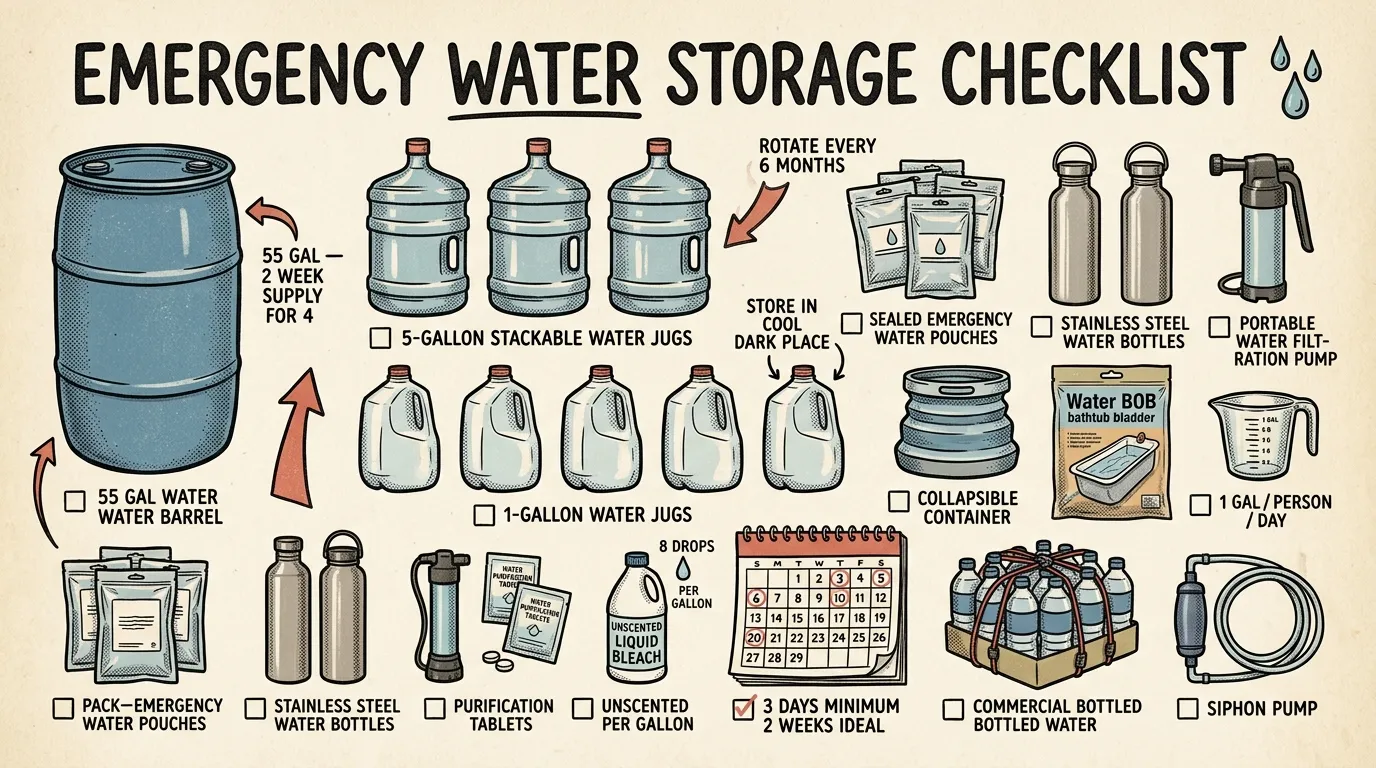
For emergency water storage, keep at least 1 gallon of water per person per day and aim for 3 days minimum, with 2 weeks being a better target. Use food-grade water containers or commercially bottled water, store them in a cool dark place, purify questionable water before storage, and rotate supplies every 6 to 12 months.
Key Takeaways
- Store 1 gallon per person per day and build toward a 14-day supply — 72 hours isn't enough for most realistic disaster scenarios.
- Only use food-grade BPA-free HDPE #2 containers, sanitize with 1 tsp bleach per quart before filling, and store between 50–70°F in darkness.
- Layer your water plan: bottled water for grab-and-go, reusable containers at home, a 55-gallon drum for bulk, plus a backup filter and chemical purification.
- Rotate stored water every 6–12 months on a spring/fall schedule, and don't overlook your water heater's 40–80 gallons of emergency reserve.
- You can build a legitimate two-week supply for under $200 — start with two cases of bottled water and a $12 food-grade jug this week.
How to Store Water for Emergencies: Complete Guide
During the 2020 Oregon wildfire evacuations, I watched families scramble for water at grocery stores that’d been stripped bare in hours. The folks who’d stored even 10 gallons at home? They were calm. They had time to think, plan their route, and load the car without panic. That image stuck with me — and it shaped how I teach emergency water storage today.
As a FEMA-trained Wilderness First Responder who’s worked emergency water distribution in three major Pacific Northwest disasters, I’ve learned that learning how to store water for emergencies is the single most impactful step in any preparedness plan. You can survive weeks without food. Without water, you’ve got about three days. Here in the Pacific Northwest, the Cascadia Subduction Zone earthquake could knock out water infrastructure for weeks or months — that’s why I recommend a two-week minimum supply, not the standard 72 hours that gets thrown around everywhere.
Quick Summary
- Store at least 1 gallon per person per day. Three days is the bare minimum; 14 days is where you should actually be aiming.
- Use only food-grade, BPA-free HDPE #2 containers — never milk jugs, never anything that previously held chemicals.
- Sanitize, fill, label, and store in a cool dark place between 50–70°F, away from chemicals and sunlight.
- Rotate every 6–12 months on a spring/fall schedule, and re-treat with bleach if you’re extending storage.
- Layer your plan: bottled water for grab-and-go, reusable containers at home, bulk drums, plus backup filtration and chemical purification.
- Your water heater holds 40–80 gallons of drinkable emergency water right now — learn to access it before you need it.
The Seven-Step Framework
Here’s the framework I use and teach. Seven steps, nothing complicated.
- Choose food-grade, BPA-free HDPE #2 containers — check for the recycling symbol on the bottom
- Sanitize each container with 1 tsp unscented bleach per quart of water, swish, wait 30 seconds, rinse
- Fill with treated municipal tap water, leaving about one inch of headspace
- Label every container with fill date, water source, and any treatment applied
- Store in a cool dark location between 50–70°F, away from chemicals, fuels, and sunlight
- Rotate your supply every 6–12 months and inspect for damage or odor
- Keep backup purification ready — a quality filter, purification tablets, and the ability to boil
That’s the skeleton. The rest of this guide explains the why behind each step and helps you scale from a basic three-day supply to genuine two-week resilience.
How Much Water You Actually Need
FEMA and the CDC recommend at least 1 gallon per person per day for drinking and basic sanitation. Here’s how I break that down for real-world planning:
- Baseline: 1 gallon per person per day.
- Starter goal: 3 days per person (the bare minimum).
- Better goal: 14 days per person (my strong recommendation).
- Store more if you live in a hot climate, perform heavy physical work, are pregnant or nursing, have infants, care for elderly family members, have medical needs, or keep pets.
Don’t forget your animals. The CDC recommends 1 quart to 1 gallon per pet per day depending on size. A 60-pound dog needs about half a gallon daily in moderate weather — more when it’s hot.
Quick math: a family of four aiming for 14 days needs 56 gallons just for drinking. Add cooking, basic hygiene, and a dog, and you’re realistically looking at 70–80 gallons. Portland’s emergency management office frames 14 gallons per person as the baseline two-week target, and given our regional infrastructure vulnerability, I agree completely.
So How Long Will 5 Gallons Last?
This is one of the most common questions I get. At 1 gallon per person per day, 5 gallons lasts one person about 5 days. In a strict rationing scenario — drinking only, minimal activity, cool climate — you might stretch it to 7–8 days at roughly half a gallon per day. But I don’t recommend planning around that. You risk dehydration, impaired decision-making, and reduced physical capability at exactly the time you need all three.
| People | Standard Rate (1 gal/day) | Rationed Rate (~0.5 gal/day) |
|---|---|---|
| 1 person | 5 days | 7–8 days |
| 2 people | 2.5 days | 4 days |
| 4 people | 1.25 days | 2 days |
The takeaway: a single 5-gallon container is a solid start, but it’s not a complete plan. Five gallons buys you time. Purification capability buys you weeks.
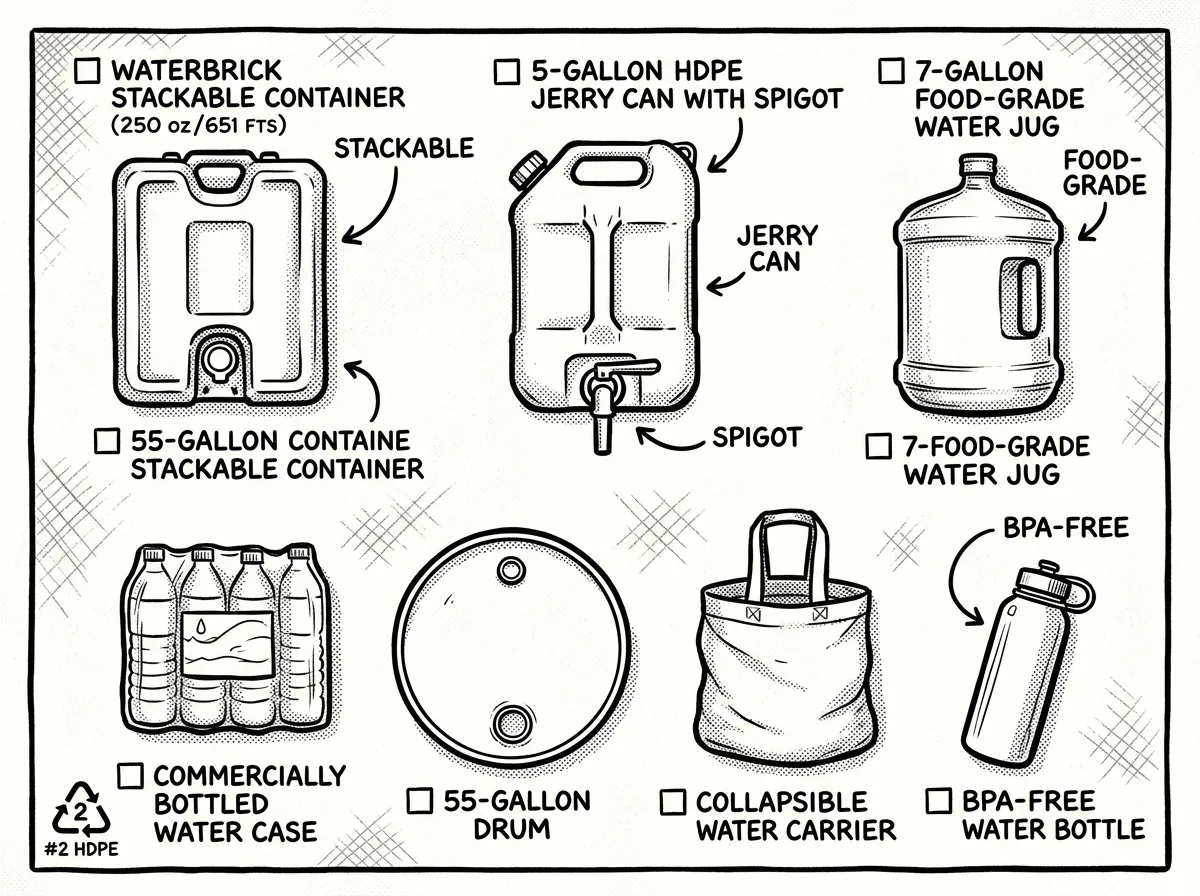
Choosing the Right Containers
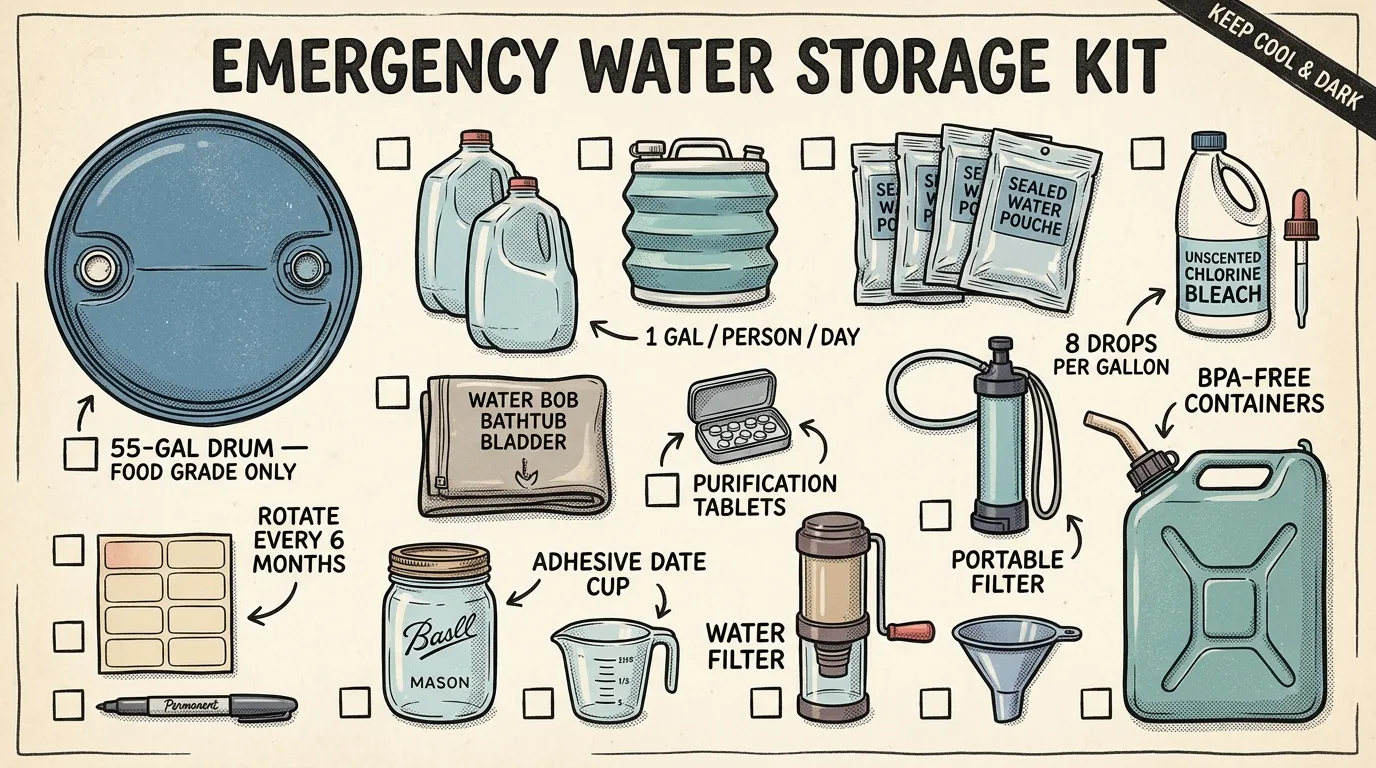
 Emergency water storage containers at a glance
This is where most beginners get stuck. Here’s what works, what doesn’t, and why the difference matters.
| Container Type | Capacity | Approx. Cost | Pros | Cons | Best Use |
|---|---|---|---|---|---|
| Food-grade jugs/WaterBricks | 3–7 gal | $12–25 each | Portable, stackable, widely available | Heavy when full, limited volume | Apartments, closets, grab-and-go |
| 55-gallon HDPE drum | 55 gal | $60–90 new | High volume, durable, low cost per gallon | 460 lbs full, needs pump, immobile once filled | Garage/basement bulk storage |
| IBC tote | 275 gal | $50–100 used | Massive volume, pallet-ready, affordable | Must verify food-grade history, bulky, UV-sensitive | Large-scale home or property storage |
| Bathtub bladder (WaterBOB) | ~100 gal | $25–35 | Huge volume from existing space | Requires advance notice, single-use | Supplemental last-minute fill |
| Commercial bottled water | 16 oz–1 gal | $5–10/case | Pre-sealed, no prep needed, grab-and-go | Thin plastic, single-use waste | Immediate readiness, vehicle kits |
| Glass or stainless steel | 1–5 gal | $15–50+ | Non-reactive, no leaching | Heavy, breakable (glass), expensive | Small quantities, sensitive storage |
Food-Grade Plastic (HDPE #2)
This includes WaterBricks, jerry cans, and 5–7 gallon jugs with spigots. Look for the #2 HDPE recycling symbol and a “food-grade” or “NSF” label. Containers certified to NSF/ANSI 61 are the gold standard for potable water contact — they’ve been independently tested for safety with drinking water.
55-Gallon HDPE Drums
These are the workhorse of serious emergency water storage. I’ve tested water from two-year-old drums stored in my garage — no off-taste, no cloudiness. They run around $60–90 new, and you’ll also want a bung wrench, hand siphon pump, and possibly a drum stand for gravity flow. One critical detail: a full drum weighs approximately 460 pounds. Always fill it in its final location.
IBC Totes (275 Gallons)
These industrial containers sit on a standard pallet and offer massive volume at a low cost — typically $50–100 used. But verification is critical. Some used IBC totes previously held industrial chemicals and aren’t safe for drinking water regardless of how well you clean them. Always confirm the tote is food-grade certified and check the previous contents label. When in doubt, buy new or from a verified food-grade supplier.
For larger-scale options, I cover dedicated choices in my guide to the best water storage tanks for preppers.
Bathtub Bladders and Bottled Water
A WaterBOB-style bathtub bladder holds up to 100 gallons from your existing tub when you’ve got advance warning of a disruption. It’s not a substitute for pre-stored water, but it’s a fantastic supplement when storms or shutoffs are forecast.
Commercially bottled water has an indefinite shelf life per FDA guidance if stored properly and the seal stays intact. Those “best by” dates (typically 1–2 years) are manufacturer recommendations for optimal taste, not safety deadlines.
What to Avoid
Never use containers that previously held chemicals or non-food substances. Milk jugs are thin, degrade quickly, and residual milk proteins breed bacteria. Skip anything that isn’t clearly rated food-grade.
I once cracked open a repurposed juice container after six months and poured it straight down the drain. The plastic had absorbed flavors, and the water tasted like fermented oranges. Container choice matters way more than you’d think.
Filling, Sanitizing, and Storing Your Water
This is the most critical hands-on step, so I’m giving you exact numbers — not vague guidelines.
Clean each container with dish soap and warm water, then rinse until no soap residue remains. Sanitize by mixing 1 teaspoon of unscented liquid household chlorine bleach (regular 6% or 8.25% sodium hypochlorite) per quart of water, pouring it in, swishing to coat all interior surfaces and the cap, waiting 30 seconds, then rinsing with clean water. Some containers like new WaterBricks come pre-sanitized — check manufacturer instructions.
Fill with potable municipal treated tap water to within about one inch of the top. That headspace matters — it allows for slight thermal expansion without stressing the seal. Seal and label — mark each container with the fill date, water source, and any treatment applied using a permanent marker or waterproof label. Store in a cool, dark location (50–70°F) away from fuels, pesticides, solvents, and strong odors. Never store water containers directly on a concrete floor that gets hot — use a wooden pallet or shelf.
If you’re in a humid Gulf Coast climate or the desert Southwest, temperature control matters even more. A garage that hits 110°F in summer will degrade plastic containers fast — find an interior closet or insulated space instead.
How Long Can Water Be Stored in Plastic?
Here’s the key distinction: water itself doesn’t expire, but the container degrades over time.
Properly stored municipal tap water in food-grade HDPE #2 containers stays safe for 6–12 months before rotation is recommended. The concern isn’t biological — it’s that plastic can leach trace compounds, develop micro-cracks allowing contamination, or lose its residual chlorine, leaving water more vulnerable to microbial growth.
What speeds up degradation? Several things:
- Temperature: Heat accelerates plastic breakdown and chemical leaching. Storage above 70°F shortens usable life.
- UV exposure: Direct sunlight breaks down plastic at the molecular level. Always store in darkness.
- Container quality: Thicker, food-grade HDPE holds up far longer than thin single-use bottles.
- Chlorine degradation: Residual chlorine from municipal treatment gradually dissipates. That’s why the CDC recommends re-treating with 8 drops of bleach per gallon at rotation time if you’re extending storage rather than dumping and refilling.
Commercially bottled water with an intact factory seal can last 1–2 years at optimal taste and indefinitely for safety, per FDA guidance. For containers you fill yourself, stick with the 6–12 month rotation cycle. It’s the simplest way to guarantee quality.
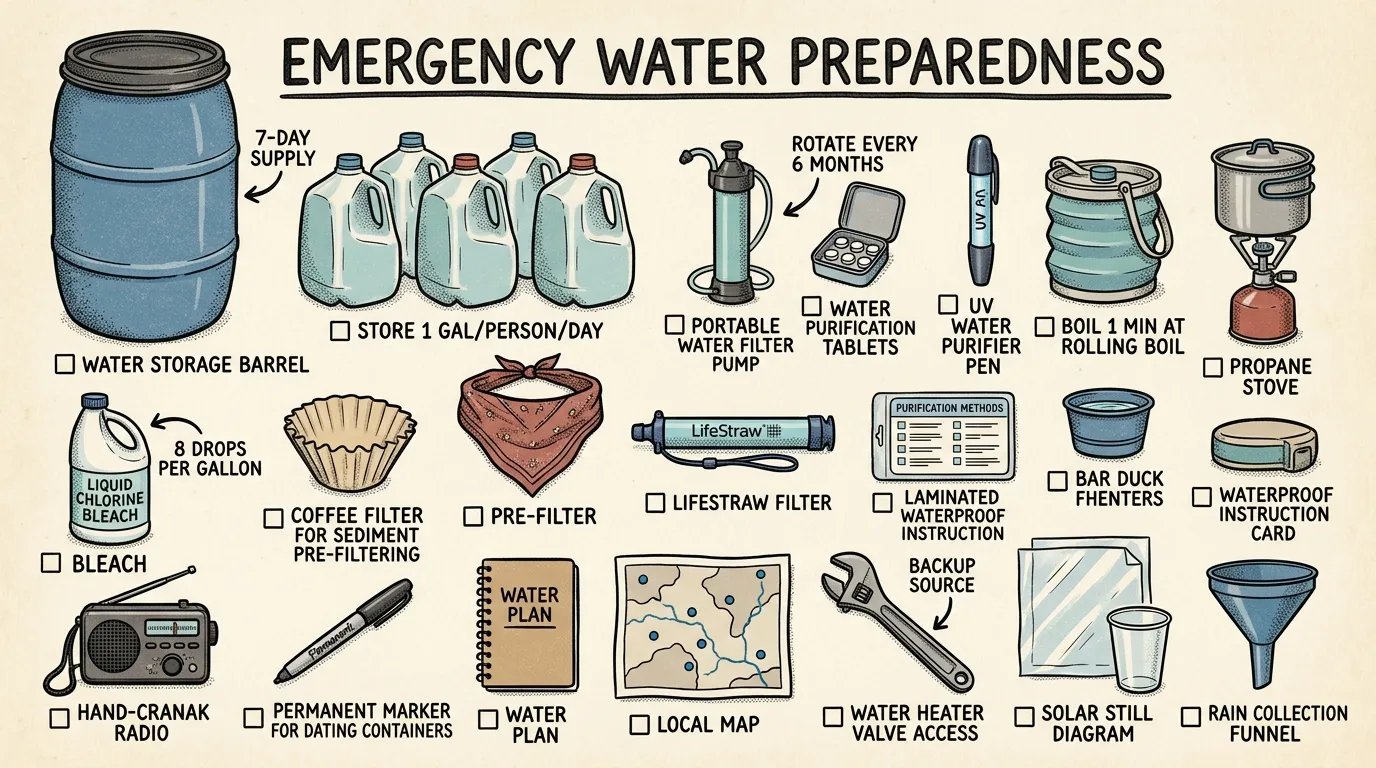
Purification Methods and Their Limits
In my Wilderness First Responder training, we drilled water treatment protocols in the field — boiling, chemical, and filtration. I’ve personally tested all four primary methods side-by-side during training exercises. The principle at home is the same: no single method covers every threat.
Pre-Filter Turbid Water First
Before you apply any purification method, address turbidity — that’s cloudy water with visible suspended particles. This step gets skipped constantly, and it matters a lot. Suspended particles shield pathogens from bleach and UV light, reducing treatment effectiveness significantly.
Filter turbid water through a clean cloth, coffee filter, or layered bandana. You can also let the water settle undisturbed for 30 minutes, then carefully pour or siphon the clearer water off the top. During wildfire deployments in central Oregon, I’ve filtered silty creek water through a bandana before running it through a Sawyer — the pre-filter step doubled the filter’s effective lifespan in the field.
Boiling
Bring water to a full rolling boil for 1 minute at sea level. Above 6,500 feet, boil for 3 minutes. Boiling kills bacteria, viruses, and protozoa effectively but doesn’t remove chemicals, heavy metals, or sediment. Let water cool before storing.
Chemical Disinfection (Bleach)
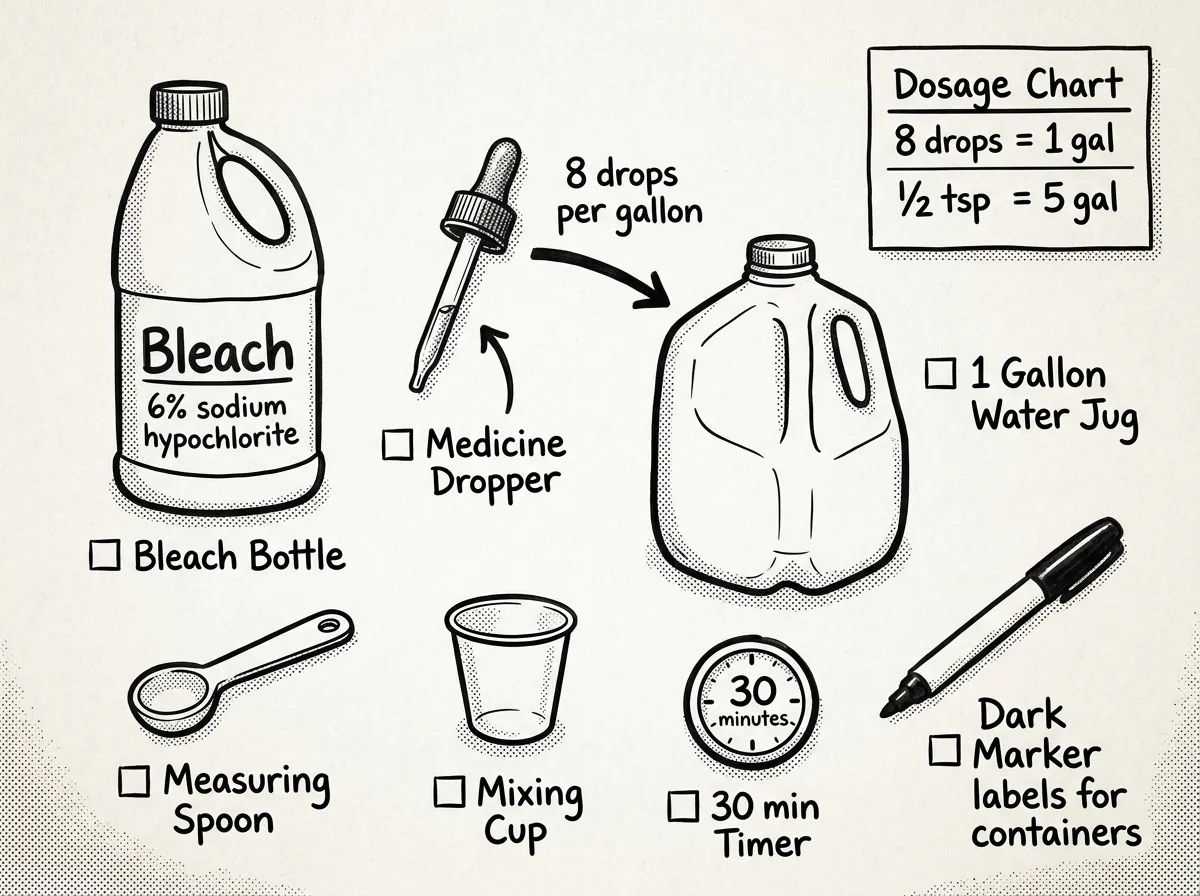 Bleach disinfection supplies and measurements
Use regular unscented liquid household chlorine bleach (6% sodium hypochlorite):
- Clear water: 8 drops (1/8 teaspoon) per gallon.
- Cloudy water: 16 drops (1/4 teaspoon) per gallon.
Stir and let stand for 30 minutes. The water should have a slight chlorine smell afterward. If it doesn’t, repeat the dose and wait another 15 minutes. Purification tablets (Katadyn Micropur, Potable Aqua) work similarly — follow package directions.
Filtration
Quality filters remove sediment, protozoa, and most bacteria depending on pore size. Not all filters remove viruses or chemicals — you’ve got to check specifications carefully. For specific recommendations, see my list of top water filtration systems for new preppers. As a last resort, you can also build a DIY water filter from household items.
The Sawyer Squeeze — around $35 — is what I reach for every single time. It filters down to 0.1 microns, handles most biological threats, and back-flushes easily for extended field life. The LifeStraw is fine for day hikes, but the Squeeze filters more volume per use and works with standard water bottles. I’ve run hundreds of gallons through mine over the years with zero issues. If you’re buying one filter, make it this one.
UV Purification
Devices like the SteriPEN use ultraviolet light to inactivate bacteria, viruses, and protozoa. They work on clear water only — turbid water blocks UV penetration. They also require batteries or USB charging, which makes them grid-dependent. I carry one as a backup, not a primary.
| Method | Kills Bacteria | Kills Viruses | Kills Protozoa | Removes Sediment | Limitations |
|---|---|---|---|---|---|
| Boiling | Yes | Yes | Yes | No | Fuel-dependent, no chemical removal |
| Bleach/Tablets | Yes | Yes | Partial | No | Exact dosing required, taste |
| Filtration (0.1μm) | Yes | Some models | Yes | Yes | Not all remove viruses |
| UV (SteriPEN) | Yes | Yes | Yes | No | Clear water only, needs power |
Layer at least two purification methods. Redundancy isn’t paranoia — it’s how you stay hydrated when plan A fails.
Your Water Heater: A Hidden Emergency Reserve
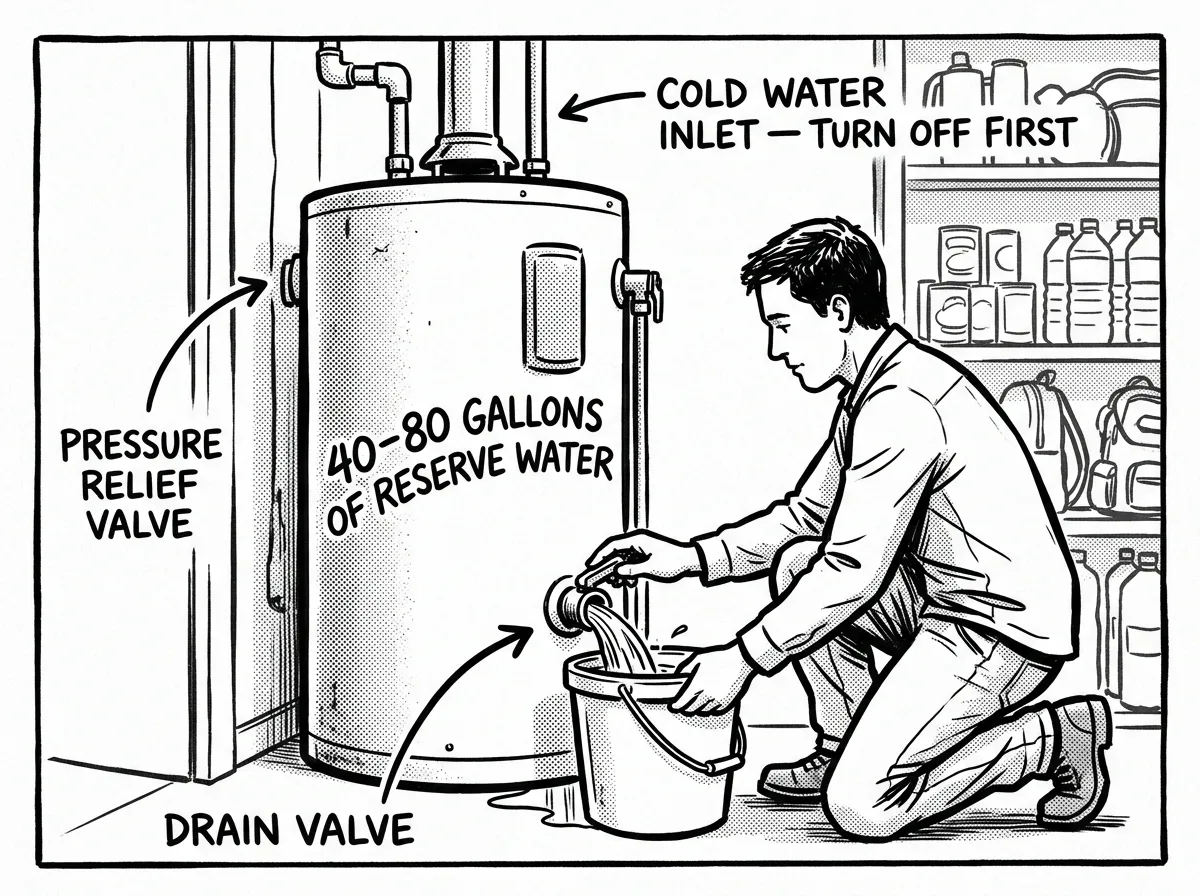 Draining your water heater in an emergency
Most homes have 40–80 gallons of potable water sitting in the water heater right now. That’s a massive emergency reserve most people never consider. Here’s exactly how to access it safely:
- Turn off the power. Electric heater? Flip the breaker. Gas? Turn the gas valve to “off” or “pilot.”
- Turn off the cold water inlet valve at the top of the heater to prevent contaminated water from entering the tank.
- Open a hot water faucet at the highest point in the house to break the vacuum.
- Place a container beneath the drain valve at the bottom, or attach a garden hose to direct flow.
- Open the drain valve slowly. The first flow may contain sediment — let it run until it clears, or strain through a clean cloth.
- Collect, cool, and store in clean containers. Label as usual.
The water may be very hot — let it cool before drinking. Sediment at the bottom is normal but strain it out. Water heaters older than 8–10 years may have significant sediment buildup requiring extra straining and potentially treatment.
I drain my own water heater every October during our fall prep audit. The first time I did it, the sediment clogged the valve — now I know to open it slowly and have a backup bucket ready. Don’t wait for an emergency to figure out how your drain valve works.
Tankless or on-demand heaters do NOT store water. This only applies to traditional tank-style units.
Other hidden sources in your home: toilet tanks (not bowls) hold clean water if no chemical cleaners have been added, ice maker reservoirs provide small but immediate amounts, and you can drain trapped water from household pipes by opening the lowest faucet after shutting off the main valve.
Storage, Rotation, and Inspection
How often should you actually check on your supply? Here’s the system I use:
- Rotate stored water every 6–12 months. At rotation time, consider re-treating with 8 drops of unscented bleach per gallon if you’re extending rather than replacing — this compensates for chlorine that’s degraded during storage.
- Store containers in a cool, dark, dry location away from direct sunlight, heat sources, and strong odors. Never store next to fuels, pesticides, or cleaning chemicals.
- Inspect regularly for cracks, bulges, leaks, cloudiness, or broken seals. If water looks or smells off, don’t drink it — treat or replace.
Set calendar reminders for spring and fall. Use rotated water for watering plants, cleaning, or other non-potable tasks, then refill and relabel. For a deeper walkthrough on organizing your supply, I’ve written a separate guide on keeping your water supply accessible and organized.
Storing Water for 10 Years or Longer
Standard tap-filled containers work great for 6–12 month cycles, but what if you want to truly set it and forget it? The core insight stays the same: water doesn’t expire — the container is the variable.
Over time, plastic degrades, leaches trace chemicals, or develops micro-cracks. That’s why ultra-long-term storage requires purpose-built products:
- Commercially sealed emergency water pouches (Datrex, SOS, Mainstay): Rated for 5–10 years. Tough foil-lined packaging, compact, easy to distribute. I keep a box of these in my vehicle kit.
- Canned water (Blue Can, Puravai): Aluminum-lined cans rated for 30–50 years. The gold standard for decades-long storage.
- Glass containers in climate-controlled environments: Water stored in glass at a stable temperature below 70°F with zero sunlight can last essentially indefinitely.
I cracked open a 5-year-old Datrex pouch from my truck kit last summer — the water tasted flat but was perfectly clear and safe. Those pouches earn their price for vehicle and long-term kits. They’re around $20–30 for a case of 64 pouches, and they handle temperature swings far better than plastic bottles that split in a hot trunk. I’ve watched people pull bloated, cracked plastic bottles from their car kits in August. Pouches solve that problem completely.
Even with products rated for decades, I recommend a visual inspection every 1–2 years. Check for packaging damage, corrosion on cans, or any signs of compromise. The cost of a quick look is zero. The cost of relying on a compromised supply in an emergency is everything.
How Serious Preppers Scale Up
Reality TV makes it look complicated. It isn’t. Experienced preppers follow the same core principles as beginners — food-grade containers, cool dark placement, rotation — they just operate at larger scale with more redundancy.
Common methods include multiple 55-gallon HDPE drums (three to six provides 165–330 gallons), IBC totes on pallets, underground cisterns holding 500–5,000+ gallons, rainwater harvesting with multi-stage filtration, and well systems with backup hand pumps like the Simple Pump or Bison. Check out my guide to rainwater harvesting for beginners if that interests you.
Here’s the thing: every one of these folks started with a few cases of bottled water and a couple of jerry cans. They scaled up over months and years. The fundamentals don’t change at any level — the volume just gets bigger.
A Layered Water Plan for Any Budget
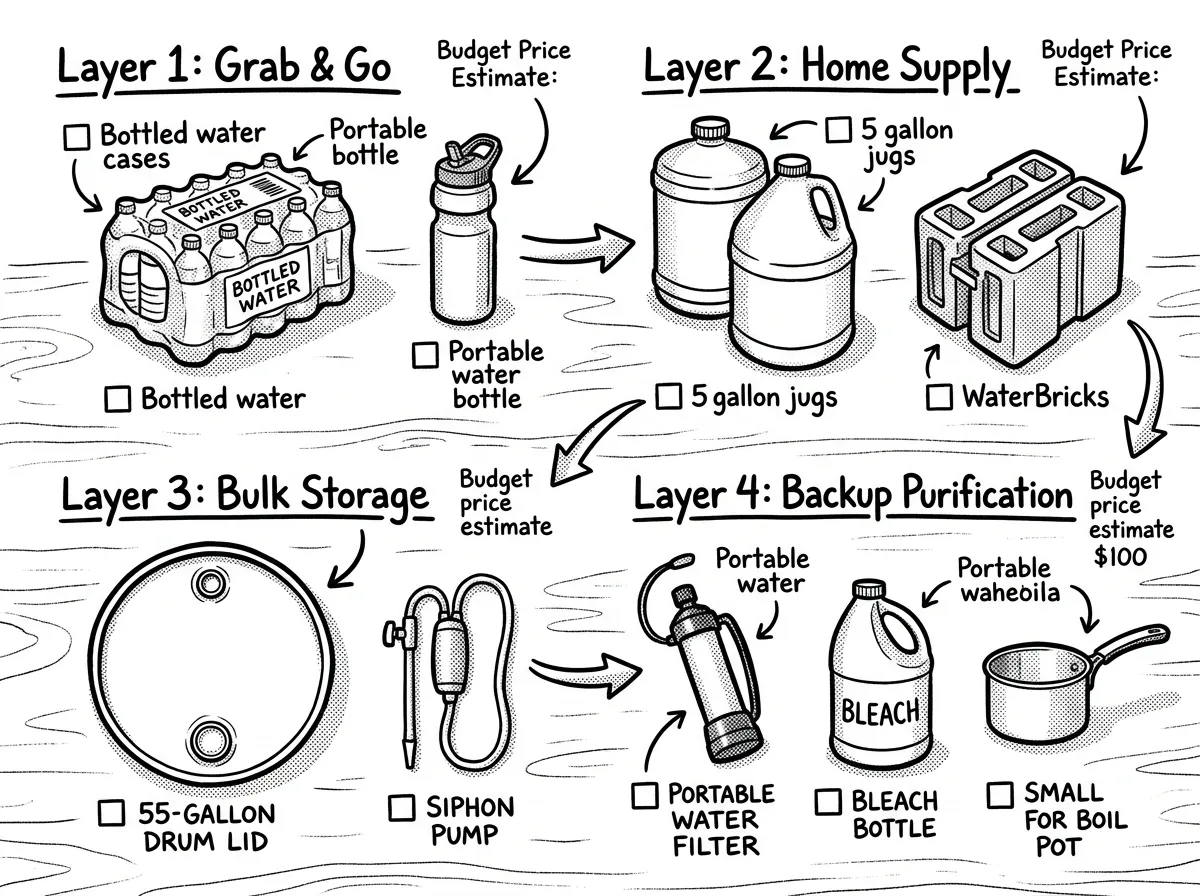 A complete layered water plan from grab-and-go to bulk storage
The best emergency water supply isn’t one container or one method. It’s layers.
- 1–2 cases of commercially bottled water for grab-and-go
- 2–4 reusable food-grade containers (5–7 gallons each) for home supply
- A 55-gallon drum for bulk shelter-in-place storage when space allows
- A portable water filter rated for protozoa and bacteria
- Purification tablets and the knowledge and equipment to boil water
Each layer backs up the one above it. If your bottled water runs out, you tap the containers. If containers run dry, you filter from secondary sources. This kind of redundancy separates people who weather a two-week outage from people who don’t. For portable filter options, here’s my rundown of the best portable water filters for emergencies.
Budget Breakdown: Priority Order When Money Is Tight
You don’t need to spend hundreds of dollars to start. Here’s a tiered plan:
Under $25 — start today:
- Two cases of bottled water (~$10): instant three-day supply for one person.
- One 5-gallon food-grade jug (~$12): fill from your tap, label, store.
- Unscented household bleach (~$4): backup purification you probably already own.
$25–75 — solid foundation:
- Two to four 7-gallon rigid containers (~$15–20 each).
- Water purification tablets (~$10).
- A basic siphon pump or spigot (~$8).
$75–200 — two-week resilience:
- 55-gallon drum with bung wrench and hand pump (~$90 total).
- A quality water filter like the Sawyer Squeeze (~$35).
- A WaterBOB bathtub bladder (~$30).
$200+ — extended and redundant:
- Multiple drums, dedicated storage tanks, or a rainwater harvesting setup.
- High-capacity gravity filtration system.
- Well backup hand pump for rural properties.
That first $25 puts you ahead of most households in your neighborhood. The pattern is simple: start with store-bought water and basic containers, then add volume and purification capability as your budget allows.
Common Pitfalls and How to Fix Them
I’ve watched people make these mistakes over and over across 12+ years in the field:
- Storing too little. Three days is a start, not a finish. Build toward 14.
- Wrong containers. If it’s not clearly food-grade, don’t use it. Period.
- Bad storage location. Heat, sunlight, and chemical proximity ruin drinking water. If you’re in the high desert Southwest, a garage that bakes all summer won’t cut it — find an interior space.
- Ignoring weight. Water weighs 8.34 pounds per gallon. A full 55-gallon drum is 460 pounds. Fill it where it’s going to live.
- Not labeling. Always mark fill date, source, and treatment. Future you will thank present you.
- Single point of failure. Don’t rely on one container type or one purification method. Layer everything.
- Skipping re-treatment. Chlorine degrades over time. If you’re extending storage past 12 months without full rotation, re-treat with bleach.
Your Homework Starts This Week
Knowing how to store water for emergencies means nothing if you don’t actually do it. Water is the foundation of every preparedness plan — before food, before gear, before everything else. If you’re also building a 72-hour emergency kit, water should be the first item on your list.
Here’s your assignment: this week, buy two cases of bottled water and one 5-gallon food-grade container. Fill the container from your tap, label it with today’s date, and tuck it in a cool closet. That puts you ahead of the vast majority of households in America.
Then set a reminder for next month to add another container. And the month after that. In six months, you’ll have a legitimate two-week supply without ever feeling the financial pinch.
It’s not dramatic gear or expensive systems that separate prepared families from unprepared ones in a crisis. It’s simple, consistent action — starting with water. You’ve got the knowledge now. Go fill a container.
This guide is based on CDC, FEMA, and EPA guidelines cross-referenced with my field experience across multiple Pacific Northwest disaster responses.
The Complete
Prepper's Reference.
149 articles synthesized into one comprehensive PDF — twelve chapters covering water, food, shelter, first aid, comms, and scenario-specific preparedness. Free with your email.
Unsubscribe anytime · We never share your email
You're in. Check your inbox.
Keep Reading
How Much Emergency Water to Store: Complete Guide
Learn exactly how much emergency water to store per person per day. FEMA-based calculations, container tips, and rotation schedules to keep your family safe.
Emergency Water Preparedness: Store, Purify & Plan
Build your emergency water preparedness plan with proven strategies for storage, purification, and rationing from a FEMA-trained WFR. Start your water plan today.
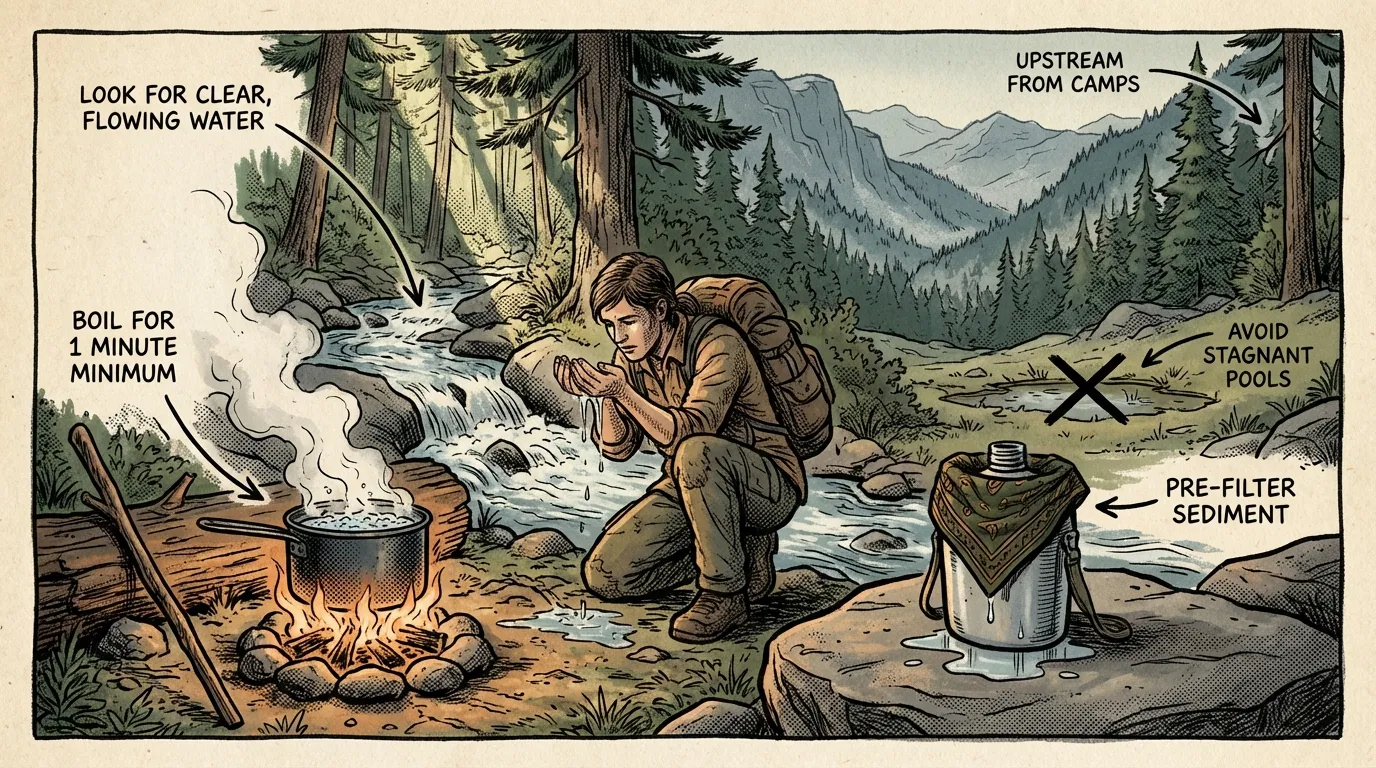
How to Identify Safe Drinking Water in the Wild
Learn how to find, judge, and purify drinking water in the wild with beginner-friendly survival tips for safer hydration anywhere.