A family emergency plan helps households respond faster and more safely during disasters by outlining risks, communication methods, meeting points, supply kits, and practice drills. New preppers should start by identifying likely emergencies, creating a written communication plan, assembling at least a three-day emergency kit, and practicing the plan regularly.
Key Takeaways
- Write a one-page family emergency plan tonight — it's free, takes one evening, and puts you ahead of most households.
- Designate three meeting points and an out-of-area contact so separated family members can reconnect fast.
- Build a 72-hour kit starting with water (1 gallon per person per day), medications, and printed contact cards — then extend toward two weeks.
- Run evacuation and communication drills at least twice a year, debrief every time, and update the plan based on what actually happened.
- Text before you call during a disaster — SMS punches through overloaded networks when voice calls won't connect.
Family Emergency Plan: A Practical Step-by-Step Guide
Twelve years of emergency response across the Pacific Northwest — ice storms that knocked power out for a week, wildfire evacuations with 30 minutes’ notice, flooding that turned neighborhoods into islands — and the families who handled it best always shared one thing: a simple written family emergency plan they’d actually practiced.
Not a binder full of theories. Not a basement stacked with gear they’d never opened. A one-page plan on the fridge, a few rehearsed actions, and the quiet confidence that comes from knowing what you’ll do when the lights go out or the sky fills with smoke.
I’m Josh Baxter, FEMA-trained Wilderness First Responder. I’ve been helping Pacific Northwest families prepare for and respond to disasters since 2014, and everything in this guide is built on what I’ve seen work in the field — and what I’ve watched fail spectacularly.
Quick Summary
- Write a one-page plan tonight — it’s free, takes one evening, and puts you ahead of most households in the country.
- Designate three meeting points (home, neighborhood, out-of-area) and assign one out-of-area contact as your family’s check-in hub.
- Build a 72-hour kit starting with water (1 gallon per person per day), medications, and printed contact cards.
- Text before you call during any disaster — SMS gets through overloaded networks when voice calls won’t connect.
- Practice evacuation and communication drills at least twice a year, then debrief and update the plan based on what actually happened.
- Don’t stop at 72 hours — extend your supplies toward 1–2 weeks based on your region’s realistic risk profile.
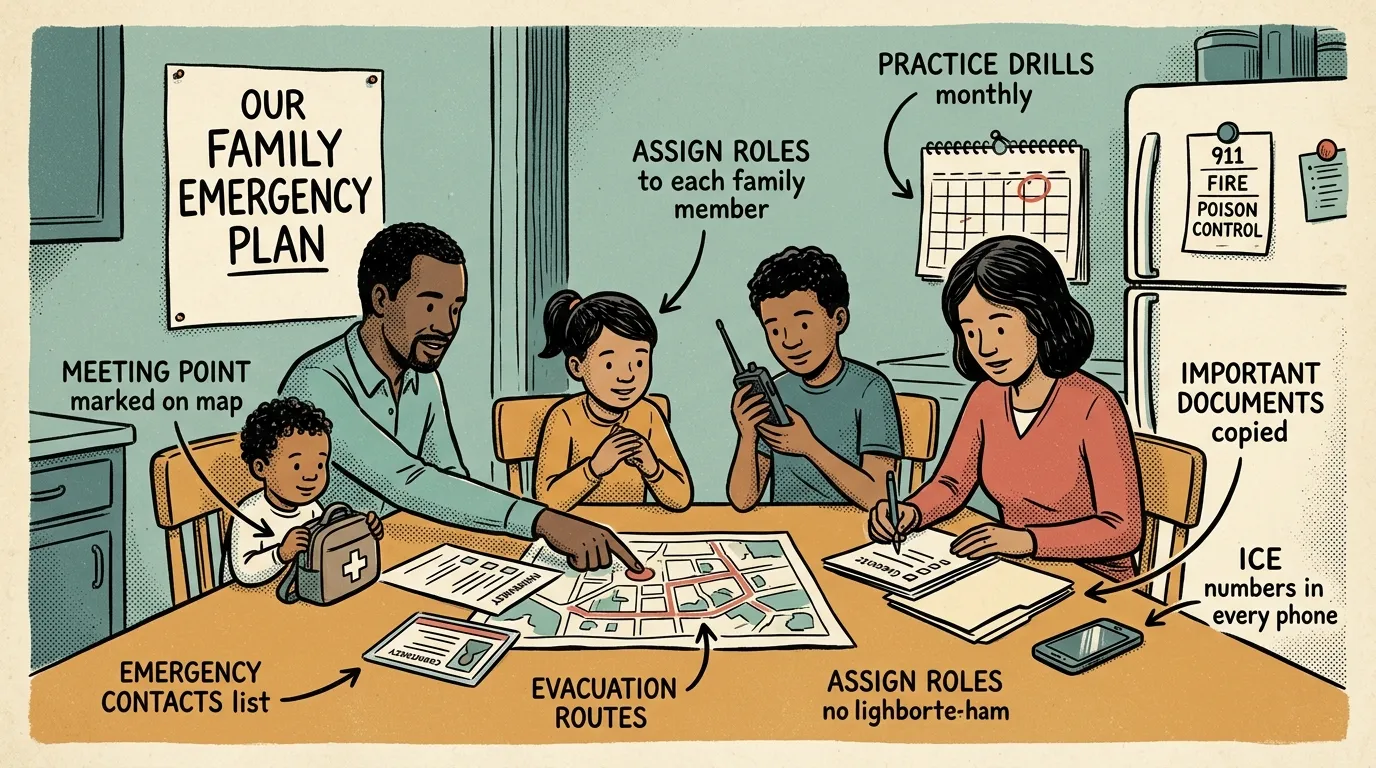
How to Make a Family Emergency Plan in 8 Steps
- Assess your local risks and rank them by likelihood
- Establish three meeting locations: home, neighborhood, and out-of-area
- Create a family emergency communication plan with an out-of-area contact
- Sign up for NOAA alerts and local emergency notifications
- Plan evacuation routes and shelter-in-place procedures
- Assemble a 72-hour emergency kit for each household member
- Assign age-appropriate roles to every family member
- Practice drills twice a year and update the plan seasonally
That’s the skeleton. Now let’s put muscle on each step so you can actually execute it.
Key Definitions
Before we dig in, here’s what these terms mean in practice:
- Family emergency plan: A short written set of actions and contacts your household follows during an emergency — evacuation routes, shelter-in-place steps, who does what, and where to meet.
- Go-bag (grab-and-go bag): A portable bag per person with at least 72 hours of basic supplies, ready to walk out the door.
- Shelter in place: Staying indoors and sealing the space to avoid outside hazards like chemical spills or wildfire smoke.
- Evacuation drill: A practiced sequence for leaving your home quickly and meeting at a designated location.
Why a Family Emergency Plan Matters
Here’s a stat that still hits me every time I teach a workshop: fewer than half of U.S. households have any kind of disaster plan, according to FEMA’s National Household Survey. That means most families will face their first real emergency with zero preparation.
I’ve seen the difference firsthand. During the 2020 Labor Day windstorms in Oregon, entire communities evacuated under Level 3 (“Go Now”) orders. Families who had a written family disaster plan — even a basic one — got out faster, forgot less, and reunited sooner. The families without plans? They stood in their driveways trying to remember what to grab while ash rained down around them.
A plan on the fridge beats a perfect plan in your head every single time.
Emergency planning for families matters for three concrete reasons:
- It slashes decision fatigue under stress. When adrenaline spikes, your brain’s executive function drops hard. A written plan offloads the critical decisions to a calmer version of yourself — the one who wrote it last Tuesday evening.
- It covers essential needs when services fail. Water, medications, communication — none of these are guaranteed in a disaster. Your plan bridges that gap.
- It dramatically improves your odds of reuniting separated household members. Pre-designated meeting points and an out-of-area contact turn a panicked search into a simple check-in.
Step 1: Assess Your Risks
Every solid plan starts with the same question: what’s most likely to actually happen here? A family in coastal Washington faces different threats than one in Phoenix. If you’re in a humid Gulf Coast climate, hurricane prep dominates your planning. High desert is a different problem — extreme heat, flash floods, and wildfire smoke. Be specific to your location.
Do this:
- Identify likely hazards: fire, severe storm, flood, earthquake, wildfire, extended power outage, extreme heat or cold, hazmat incidents.
- Layer in local factors: FEMA floodplain maps, wildfire risk zones, coastal storm surge, proximity to industrial sites, and major transportation corridors.
- Note household-specific needs: number of exits, mobility limitations, prescription medications, pet care requirements, and languages spoken.
- Sort everything into three buckets: most likely, most dangerous, and most disruptive.
This prioritized list drives every other decision — which supplies you buy first, which drills you practice, how your family evacuation plan gets structured. An earthquake plan looks different from a wildfire plan. A flood plan changes your evacuation routes entirely. Don’t build a generic plan when a specific one takes the same effort.
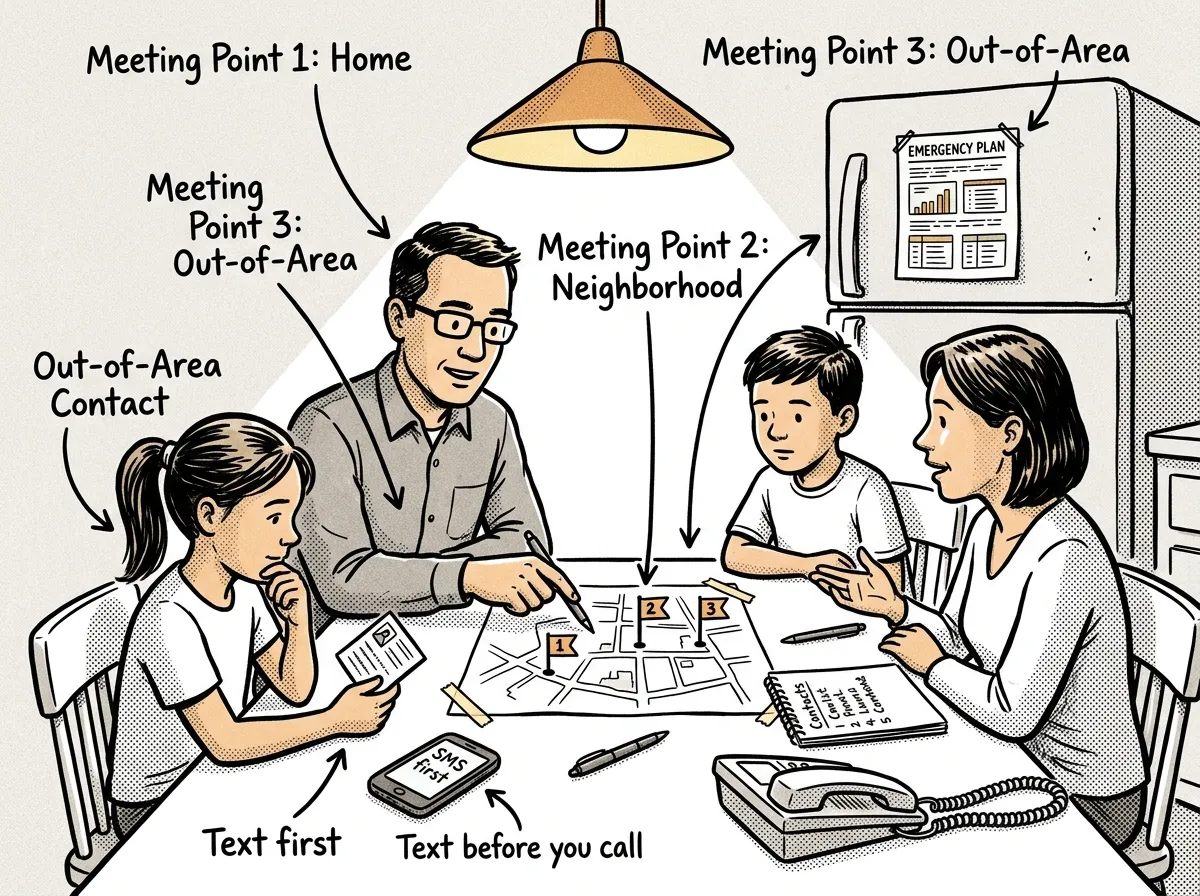
Step 2: Build Your Family Emergency Communication Plan
 A family gathered at the kitchen table mapping out meeting points and emergency contacts
Phones fail. Cell towers overload. Power goes out. Your family emergency communication plan needs to assume all of that happens simultaneously and still work.
Core elements:
- Primary methods: Calls, texts, messaging apps (Signal, WhatsApp), and email.
- Out-of-area contact: Designate one person outside your region as the central check-in hub. During the 2020 Oregon wildfires, I watched families reunite hours faster because they had a pre-designated out-of-area contact relaying status updates. Families without one spent days searching shelter lists.
- Meeting points: Three locations — at-home (front yard or mailbox), neighborhood (a park, school, or church within walking distance), and out-of-area (a relative’s home or a specific landmark in another town).
- Printed contact cards: One in every wallet, backpack, and glove compartment. A kid who can’t unlock a phone can still hand someone a card.
- School and workplace coordination: Call your children’s school and confirm their emergency release procedures. Know whether they shelter in place or transport to a secondary site, and who’s authorized for pickup.
So what actually works when the cell network is slammed?
- Text before you call. SMS uses far less bandwidth than voice. During overloaded networks, a text might get through in seconds while a call fails repeatedly. Make this your household rule.
- Program ICE contacts into every phone. “ICE” (In Case of Emergency) contacts are recognized by first responders. Takes 30 seconds. Do it right now.
- Use social media check-in tools as a secondary layer. Facebook Safety Check and Google Person Finder have proven useful in large-scale events, but never rely on them as your primary method.
- For rural families, invest in GMRS or HAM radios. Cell coverage in rural areas is unreliable on a good day. A GMRS radio — around $30–$80, no license exam required — provides family-level communication when towers go down. HAM extends that range dramatically for those willing to get licensed.
- Keep a battery-powered emergency radio tuned to NOAA frequencies. That’s how you’ll receive official warnings when your phone’s dead and the internet’s down.
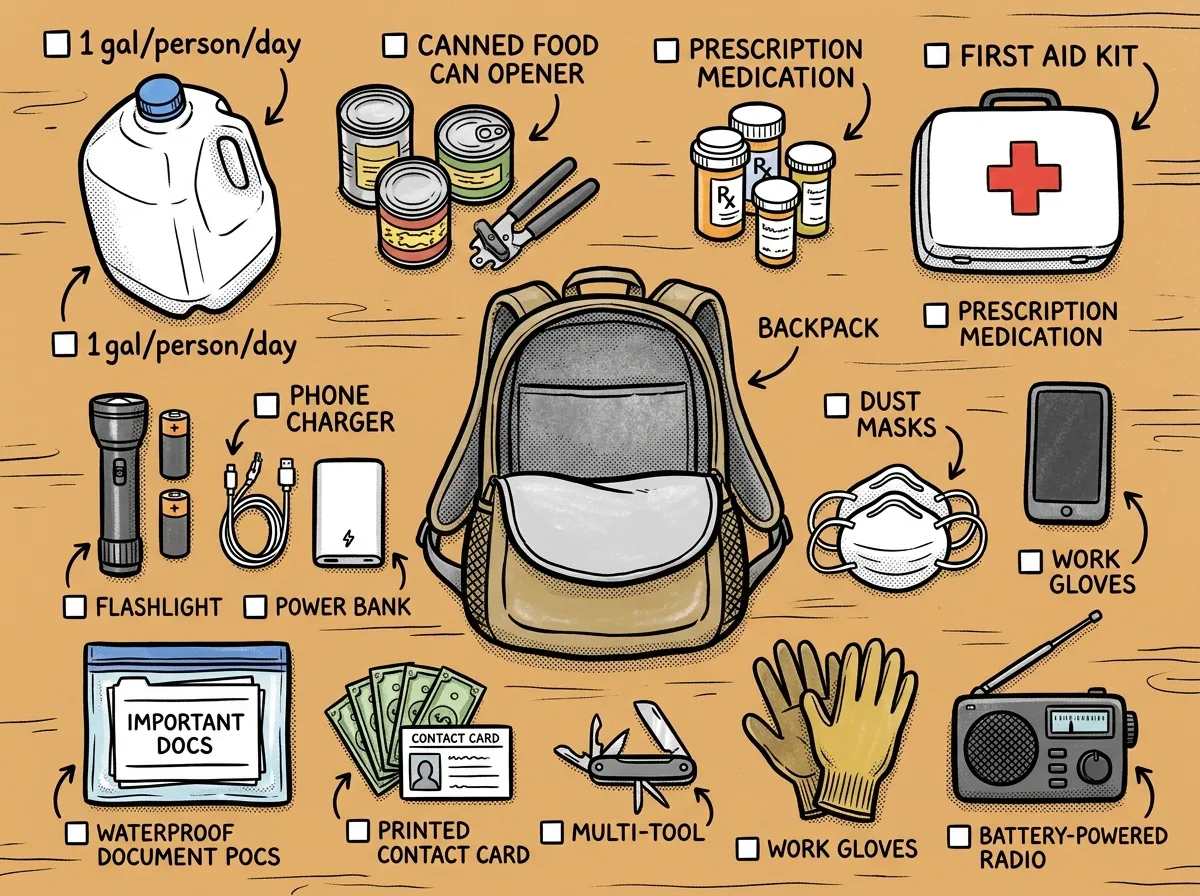
Step 3: Assemble Your Emergency Kits
 72-hour family emergency kit essentials laid out and ready to pack
A plan without supplies is a wish list. Start with a 72-hour emergency kit and build from there.
Home kit essentials:
- Water: 1 gallon per person per day for at least 3 days.
- Nonperishable food and a manual can opener.
- Prescription medications (7–14 days if possible) and a basic first aid kit.
- Flashlights and extra batteries — lithium AAs have a 10-year shelf life.
- Phone chargers and backup power banks (at least 10,000 mAh).
- Hygiene and sanitation supplies (toilet paper, soap, hand sanitizer, feminine products).
- Warm blankets or sleeping bags and a change of clothes per person.
- Important documents in waterproof storage — or better yet, build an emergency binder with all your critical documents.
- Cash in small bills ($5s, $10s, $20s). ATMs don’t work without power.
- Pet supplies: food, leash, carrier, and vaccination records.
Go-bag essentials (one per person):
- Water (1 liter) and high-energy snacks.
- Essential medications and copies of prescriptions.
- IDs and copies of important documents.
- Small first aid kit, flashlight, and whistle.
- Lightweight clothing layer and an emergency blanket.
- Printed contact card with meeting points and out-of-area contact number.
For a complete item-by-item breakdown, see our guide to building a 72-hour emergency kit.
Storage and maintenance:
Keep kits accessible — not buried behind holiday decorations. Put them near the door you’d actually use to evacuate. Rotate food, water, and batteries seasonally. I check mine at every daylight saving time change. Label each kit with the owner’s name and last-checked date.
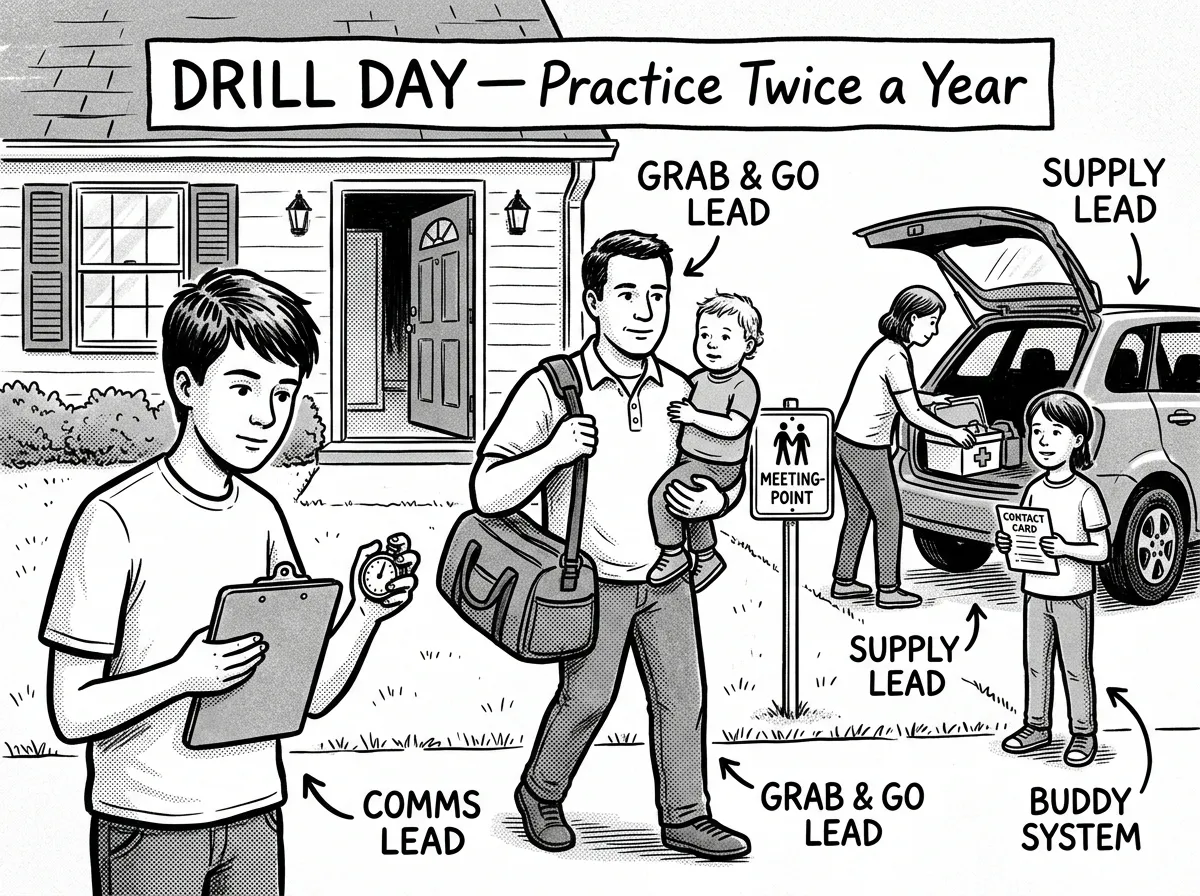
Step 4: Create Roles and Practice the Plan
 Family running an evacuation drill from their home with assigned roles in action
Here’s the thing I’ve seen dozens of times in the field: families who wrote a great plan but never rehearsed it froze when the moment came. A plan that’s never been practiced is a plan that won’t work.
Write a one-page action sheet with key contacts, meeting points, and the top three actions for your most likely scenarios. Post it on the fridge. Put a photo of it on every family member’s phone.
Assign clear roles:
- Who grabs the go-bags?
- Who collects the pets?
- Who shuts off the gas if needed?
- Who calls or texts the out-of-area contact?
- Who checks on elderly neighbors?
Run these specific drills:
- Timed nighttime evacuation. Wake everyone up at 10 PM on a weekend. Goal: every person and pet out the door and at your home meeting point in under 3 minutes. This drill is eye-opening — most families fail the first time, and that’s exactly the point.
- Communication-only drill. Each family member texts the out-of-area contact from memory (no looking at the contact card). If anyone can’t remember the number, you know what to fix.
- Shelter-in-place drill. Pick one interior room. Seal the door and window with plastic sheeting and duct tape. Goal: complete seal within 10 minutes. This matters for chemical spills, hazmat incidents, or severe air quality events like wildfire smoke. Our shelter-in-place guide covers the full procedure.
After every drill, debrief for 5 minutes. Sit down as a family and ask three questions: What went well? What went wrong? What do we change? Update the plan based on real performance, not assumptions.
Cadence:
- Review contact info every 3–6 months.
- Check and rotate supplies each season.
- Run drills at least twice a year — more often during your region’s high-risk season.
- Update the plan after any major life change: a move, new household member, new medical condition, or a child starting at a new school.
Involving Kids and Elderly Family Members
A family emergency plan only works if every member can execute their part. That means tailoring roles to age and ability — not handing a toddler a flashlight and hoping for the best.
Children Ages 5–8
Teach them to recite their full name, home address, and a parent’s phone number. Quiz them regularly — make it a game during car rides. Show them how to dial 911 and what to say (“I need help. My address is…”). Give them one simple job during drills — like grabbing their shoes or a favorite stuffed animal that’s always in the same place. Routine builds confidence at this age.
Children Ages 9–12
They can manage their own go-bag. Let them help pack it so they know what’s inside and why. Teach them where the fire extinguisher is and how to use it (pull, aim, squeeze, sweep). Practice the family communication plan with them — they should be able to text the out-of-area contact independently by this age.
Teenagers
Assign them as the household communication lead during drills. They’re glued to their phones anyway — channel that skill into something useful. Teach basic first aid: how to stop bleeding, recognize shock, and when to call for help. If they drive, make sure there’s a go-bag and printed contact card in their vehicle.
Elderly Family Members or Those With Mobility Limitations
Keep hearing aids, eyeglasses, and mobility device chargers in or immediately beside the go-bag. I’ve seen these items forgotten constantly in real evacuations — it’s one of the most common mistakes I encounter. Maintain a minimum 14-day medication supply and keep a written list of all prescriptions, dosages, and pharmacy contacts.
Establish a buddy system — pair each person with limited mobility with an able-bodied household member who’s specifically responsible for assisting them during evacuation. If a wheelchair, walker, or oxygen concentrator is involved, pre-plan how it gets to the car. Measure doorways. Practice the route. Seconds matter.
Family Members With Cognitive Disabilities or Dementia
Use visual cues — a red bag by the door, a photo-based instruction card — instead of written lists. Practice repeatedly in calm conditions so the routine becomes familiar. Make sure their ID and medical information are attached to their person (medical bracelet, lanyard card), not just in a bag they might not grab.
The 5 P’s of Emergency Preparedness
I use this framework in community workshops because it sticks in your head and covers the essentials for any go-bag or rapid evacuation:
- People: Account for every household member, including children, elderly relatives, and pets. Know where everyone’s likely to be at different times of day.
- Prescriptions: Medications, medical devices, eyeglasses, hearing aids. Keep at least a 7-day backup supply in your go-bag.
- Papers: IDs, insurance policies, birth certificates, mortgage/lease documents, medical records. Store copies in waterproof bags and keep digital backups in a secure cloud folder.
- Personal needs: Clothing, hygiene items, comfort items for children, specialty dietary foods, baby formula, pet food — anything specific to your household’s daily functioning.
- Priceless items: Irreplaceable photos, family heirlooms, hard drives with personal data. These are the last priority — never risk safety for stuff — but if you’ve got 60 seconds to spare, know exactly where they are.
The 5 P’s map directly to your go-bag contents and your evacuation action sheet. If every person’s bag covers all five categories, you’ve addressed the most critical needs for the first 72 hours.
The 4 R’s of an Emergency Plan
The 4 R’s give you a lifecycle view of disaster preparedness for families — not just what to do during an emergency, but before and long after.
- Readiness: Complete your risk assessment, write your plan, stock your kits, and train your family. This is everything you do before the disaster hits.
- Response: Execute the plan. Evacuate or shelter in place, activate your communication plan, get to your meeting point, and account for every family member.
- Recovery: File insurance claims using the documents you pre-copied. Return home safely, assess damage, and access community resources like FEMA assistance and local shelters.
- Resilience: Debrief as a family. What worked? What broke down? Update the plan, restock supplies, and address any gaps the event revealed. Resilience means your family’s better prepared after each event, not just back to baseline.
Most families focus entirely on Response and ignore the other three. In my experience, Readiness and Resilience are where the real safety gains live.
Practical Tips and Common Pitfalls
- Keep the plan short and visible. One page on the fridge, wallet cards for every family member, and a digital copy in a shared cloud folder. If it’s buried in a drawer, it doesn’t exist.
- Don’t rely only on phones. Keep paper contact lists, a printed map with evacuation routes marked, and a battery radio.
- Personalize every kit for medications, mobility devices, infant needs, and a child’s comfort item. Generic kits miss the things that matter most to your household.
- Plan for pets before the emergency. Identify pet-friendly shelters and boarding options now. Keep vaccination records and a photo of you with your pet in your kit for proof of ownership.
- Check expiration dates and battery levels every season. I rotate my supplies at every daylight saving time change — same day I check smoke detectors.
- Sign up for local alerts today. Your county’s emergency management office likely offers free text or email notifications. Combine with a NOAA weather radio for redundancy.
Gear That Sounds Good but Underperforms
Let me save you some money and storage space. I’ve field-tested a lot of emergency gear across Washington and Oregon, and some popular products are genuinely terrible.
Cheap multi-tool “survival kits” in a tin. The wire saw breaks on the second branch. The compass is wildly inaccurate. The credit-card knife couldn’t cut warm butter. Buy a single quality multi-tool instead — a Leatherman Wave or Victorinox SwissChamp outperforms that entire tin twenty times over.
“72-hour food buckets” from no-name brands. Some have impressive calorie counts on the label but deliver meals with almost no protein and extreme sodium that actually increases your water needs. Stick with reputable brands like Mountain House, Augason Farms, or ReadyWise, and always check per-serving macros before you buy.
Dynamo hand-crank everything. Most cheap models require 3–5 minutes of cranking for 10 minutes of dim light. The gears strip, your hand cramps, and you’re frustrated in the dark. Invest in a quality battery-powered or solar-hybrid option instead.
The first time I tested one of those $20 “100-piece survival tins,” the folding knife locked open and wouldn’t close, the fishhooks were too dull to pierce a worm, and the ferro rod threw sparks about as well as a wet match. Meanwhile, my Morakniv Companion — around $15 — has batoned firewood, processed game, and survived three seasons of hard use without a hiccup. A 4-inch Morakniv does more real work than a 12-inch Rambo blade. Stop buying kits that look cool on a shelf and start buying tools you’ve actually tested.
Other gear to approach with skepticism:
- Straw-type water filters with vague specs. If it doesn’t state its micron rating and NSF/ANSI certification, skip it. The Sawyer Squeeze — around $30 — is what I reach for every time. The LifeStraw is fine for personal hydration, but the Squeeze filters more volume and connects to standard bottles and hydration bags.
- “Survival seeds” vault cans. Unless you’re an experienced gardener, a sealed can of heirloom seeds isn’t emergency planning — it’s wishful thinking.
- Surplus military gas masks without fit testing. An improperly fitted mask provides zero actual protection. Your money’s better spent on N95 respirators and plastic sheeting for shelter-in-place scenarios.
The rule of thumb: if a product promises to do everything, it usually does nothing well. Buy fewer items, buy better quality, and test them before an emergency forces you to discover the flaws.
Urban vs. Rural: How Location Changes Your Plan
The biggest variable in emergency planning for families isn’t family size or budget — it’s where you live.
Urban Families
- Water storage is limited. In a 900-square-foot apartment, 12 gallons for a 72-hour supply for a family of four takes serious closet space. Use stackable water bricks (3.5 gallons each, designed for shelves) rather than bulky 5-gallon jugs.
- Evacuation means crowds. Know at least three ways out of your neighborhood on foot. Map pedestrian bridges, bike paths, and rail corridors — they stay passable when highways gridlock.
- Grocery stores carry about 3 days of inventory. After a major event, shelves empty in hours. Your home kit is the buffer.
- Vertical evacuation matters. In flood-prone urban areas, “evacuation” might mean going up, not out. Know your building’s roof access.
- Security shifts in density. DIY home security for apartments and rentals covers practical options that work without a standalone home.
Rural Families
- Response times are longer. If you’re 45 minutes from the nearest fire station, your first aid supplies and skills need to be significantly more robust. Consider a trauma kit and the training to use it.
- Water access may be power-dependent. Electric well pumps fail without electricity. A hand pump, gravity-fed system, or stored water is essential.
- You have space — use it. A dedicated closet or basement shelf can hold 2–4 weeks of family emergency supplies without any lifestyle disruption.
- Communication gaps are real. GMRS or HAM radios become primary tools, not backups.
- Neighbors are your network. Know who has medical training, heavy equipment, generators, and water access. A mutual aid agreement multiplies everyone’s resilience.
Budget Priority Order: Where to Spend First
Can’t drop $500 on emergency preparedness in one trip? That’s completely fine. Effective disaster preparedness for families is about sequencing, not spending.
Tier 1: The non-negotiables ($0–$50)
- Write the plan. Free. One page. Laminate it or put it in a zip-lock bag.
- Fill water containers you already own. Clean 2-liter bottles, add 2 drops of unscented bleach per liter, seal, date, and store.
- Stock an extra week of shelf-stable food. Around $15–$30. Peanut butter, canned beans, rice, oats, canned tuna.
- Print contact cards. Free. One for each wallet, backpack, and car.
- Buy a basic first aid kit. Around $10–$20.
Tier 2: Core capability ($50–$150)
- Portable water filter (Sawyer Squeeze, around $30).
- Two quality LED flashlights plus lithium AA batteries.
- Portable power bank (10,000+ mAh).
- Emergency weather radio with NOAA bands.
- Kitchen fire extinguisher.
Tier 3: Expanded resilience ($150–$400)
- Dedicated go-bags for each family member.
- Two weeks of freeze-dried meals and a propane camping stove.
- Fireproof/waterproof document bag with copies of all critical records.
- $200 cash reserve in small bills.
Tier 4: Advanced readiness ($400+)
- Generator or solar power station.
- Extended food storage (30–90 days).
- Advanced communication gear (HAM/GMRS radios).
- Comprehensive medical training courses.
Don’t let Tier 4 prices stop you from finishing Tier 1 today. A written plan with filled water bottles and a printed contact card puts you ahead of the majority of households right now.
Beyond 72 Hours: Planning for 1–2 Week Disruptions
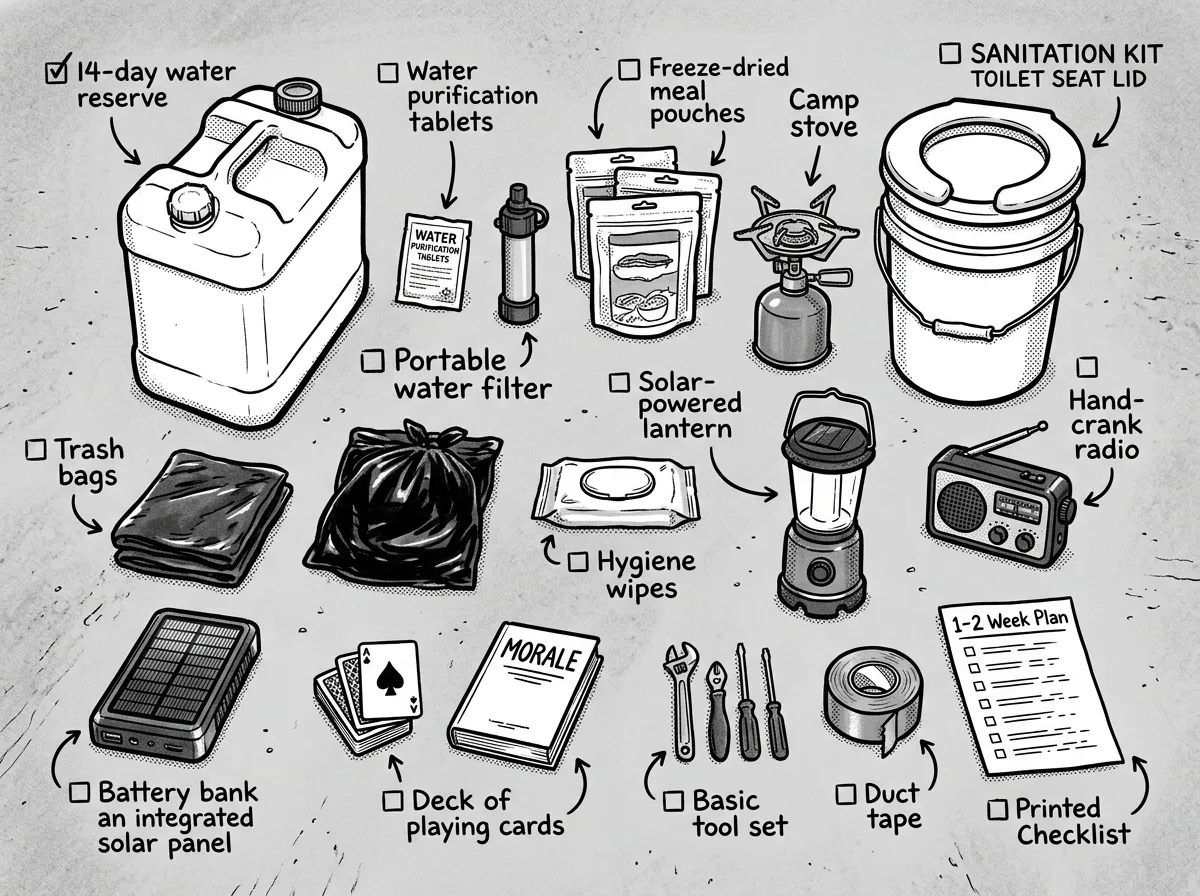 Extended supply inventory for surviving a one-to-two-week disruption at home
The 72-hour kit gets all the attention. But let’s be honest: Hurricane Katrina disrupted New Orleans for weeks. The 2021 Texas freeze left millions without power for 4–11 days. Seventy-two hours is a minimum, not a ceiling.
Water: The First Bottleneck
A family of four needs roughly 56 gallons for two weeks — over 460 pounds of water. Storing it all is possible but takes serious space.
Practical approach: Store 5–7 days of water and supplement with a filtration system. Your home water heater tank holds 40–50 gallons of potable water already — learn how to drain it safely. Water purification tablets (Aquamira or Potable Aqua, around $8) treat 25+ gallons as a lightweight backup. For deeper options, see our guide to water purification methods for emergencies.
Food: Beyond Cans and Granola Bars
Two weeks of food for four people means roughly 84,000 calories. A practical combination of rice, beans, peanut butter, pasta, cooking oil, and canned proteins is more affordable and calorie-dense than freeze-dried meals alone.
Cooking when the power’s out: A propane camping stove (Coleman Classic, around $40) with 2–3 one-pound propane canisters covers about a week of two-meals-a-day cooking. Store fuel in a ventilated area, never inside the house. Keep a backup manual method — a small wood-burning rocket stove or a Sterno folding stove — in case propane runs out.
Sanitation Beyond 72 Hours
Nobody wants to discuss this one until they’re living it. When water pressure drops and toilets stop flushing:
- A 5-gallon bucket with a snap-on toilet seat lid and enzyme waste bags (Restop or similar) provides a functional sanitary toilet. Budget about 2 bags per person per day.
- Garbage management becomes critical. Double-bag all waste, tie tightly, and store outside in a sealed container away from living areas.
- Hand sanitation supplies — hand sanitizer, soap, and water for handwashing — prevent the illness outbreaks that cause more post-disaster suffering than the disaster itself.
Mental Health and Morale
After 72 hours, survival shifts from physical to psychological. Boredom, anxiety, and conflict escalate — especially with kids.
- Maintain a routine: regular meal times, assigned chores, and a daily family check-in.
- Pack a morale kit: card games, coloring books, a paperback novel, a journal. These weigh nothing and matter enormously.
- Talk about what’s happening honestly but calmly, especially with children. Uncertainty is more stressful than bad news delivered straight.
Power Considerations
- A mid-size portable generator (Honda EU2200i or equivalent) burns roughly 1 gallon of gas per 4–8 hours depending on load. Two weeks of intermittent use (4 hours/day to run the fridge and charge devices) requires about 14 gallons of stored fuel. Rotate fuel every 3–6 months with stabilizer.
- A solar power station (Jackery 1000 or EcoFlow Delta) provides silent, fume-free power for devices and small appliances. Recharge time depends on solar panel wattage and sunlight — budget a full day of sun for a full recharge.
- At minimum, keep a solar USB charger (around $20–$30) for phones and radios. Communication is life.
I’ve watched people spend $800 on a generator and then realize they never stored any fuel. During the 2021 ice storm in the Willamette Valley, I met a family with a brand-new Honda generator sitting in their garage — and zero gasoline. Meanwhile, their neighbor with a $300 solar power station and a stockpile of canned soup was charging phones for the whole block. The tool only works if the consumables are there to feed it. If you buy a generator, store at least 10 gallons of stabilized fuel and rotate it every 6 months. Period.
When to Evacuate vs. Shelter Long-Term
If your home’s structurally sound, you’ve got water and food, and conditions outside are more dangerous than conditions inside, sheltering is usually the right call. Evacuate if your water supply is failing, the structure’s compromised, air quality is dangerous and you can’t seal a room, or official orders say to leave. Don’t wait until the decision gets made for you.
Free Family Emergency Plan Templates
You don’t need to build your family emergency plan from scratch. Several excellent free templates exist:
- FEMA Family Communication Plan (PDF): A one-page fillable form covering contacts, meeting points, medical info, and school/workplace details. This is the one I recommend starting with — it’s simple, complete, and takes about 15 minutes to fill out. Download from Ready.gov.
- American Red Cross Emergency Plan Worksheet: Slightly more detailed, with sections for evacuation routes and shelter locations. Good if you want more structure. Available at RedCross.org.
- Ready.gov Fillable Family Plan Template: A web-based version you can complete online, save, and print. Useful if you want a digital copy stored in a shared cloud folder.
My recommendation: Print the FEMA one-pager, fill it out in pen, and laminate it. Post one copy on the fridge. Put copies in each go-bag and each family member’s wallet. Then save a digital photo of the completed form in a shared cloud folder (Google Drive, iCloud, Dropbox) that every adult in the household can access from any device.
A template sitting in a drawer is useless. A laminated plan on the fridge gets looked at, practiced, and updated.
Your Next Move
A family emergency plan doesn’t require a big budget, a weekend of work, or a degree in emergency management. It requires one evening, a pen, and the willingness to have an honest conversation with your household about what you’d do if things went sideways.
Write the plan. Print the contact cards. Fill some water bottles. Schedule a drill within 30 days. That sequence — done this week — puts your family ahead of the majority of American households.
In my years of field response work, I’ve never once met a family who regretted being prepared. I’ve met plenty who wished they’d started sooner.
You’ve got the time right now. Use it.
The Complete
Prepper's Reference.
149 articles synthesized into one comprehensive PDF — twelve chapters covering water, food, shelter, first aid, comms, and scenario-specific preparedness. Free with your email.
Unsubscribe anytime · We never share your email
You're in. Check your inbox.
Keep Reading
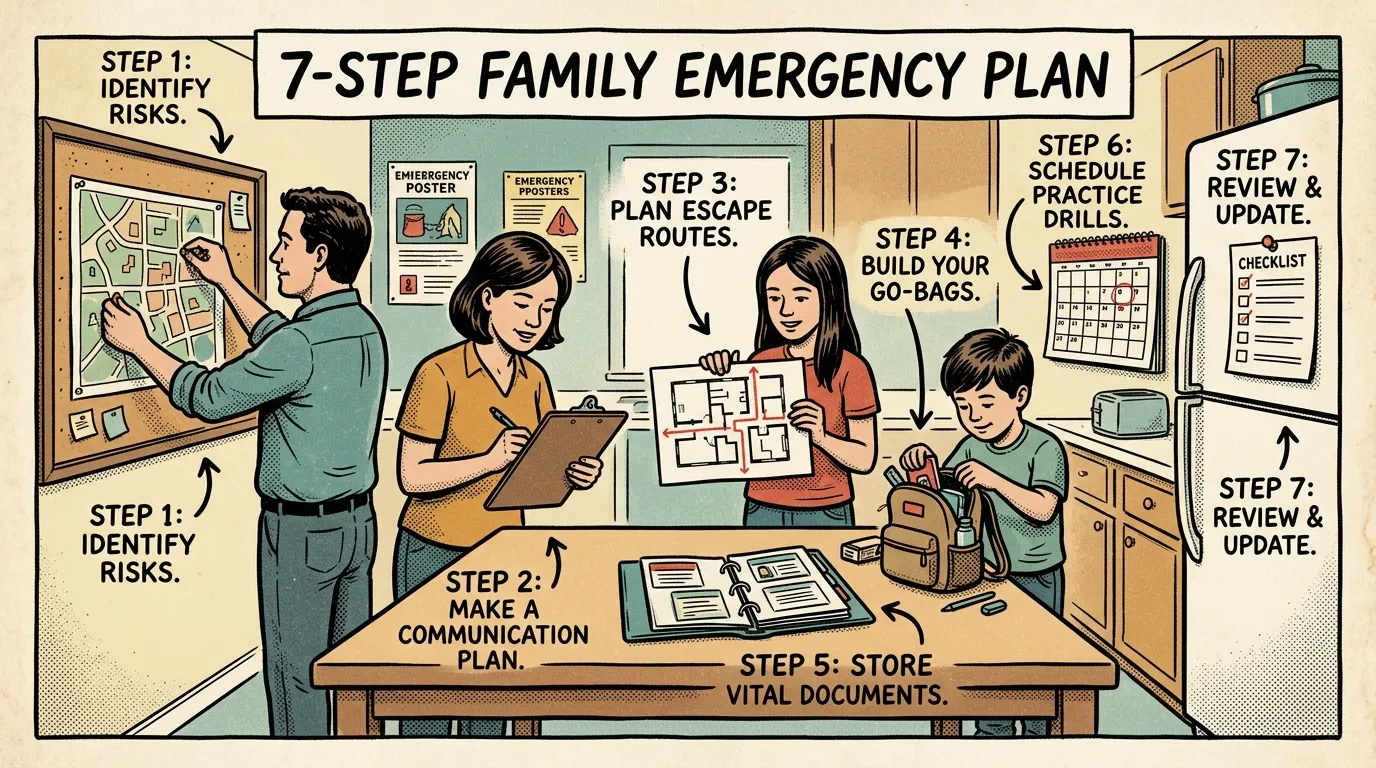
Emergency Preparedness Plan: 7-Step Family Guide
Build a complete emergency preparedness plan with evacuation routes, role assignments, and supply checklists. Step-by-step guide from a FEMA-trained responder.
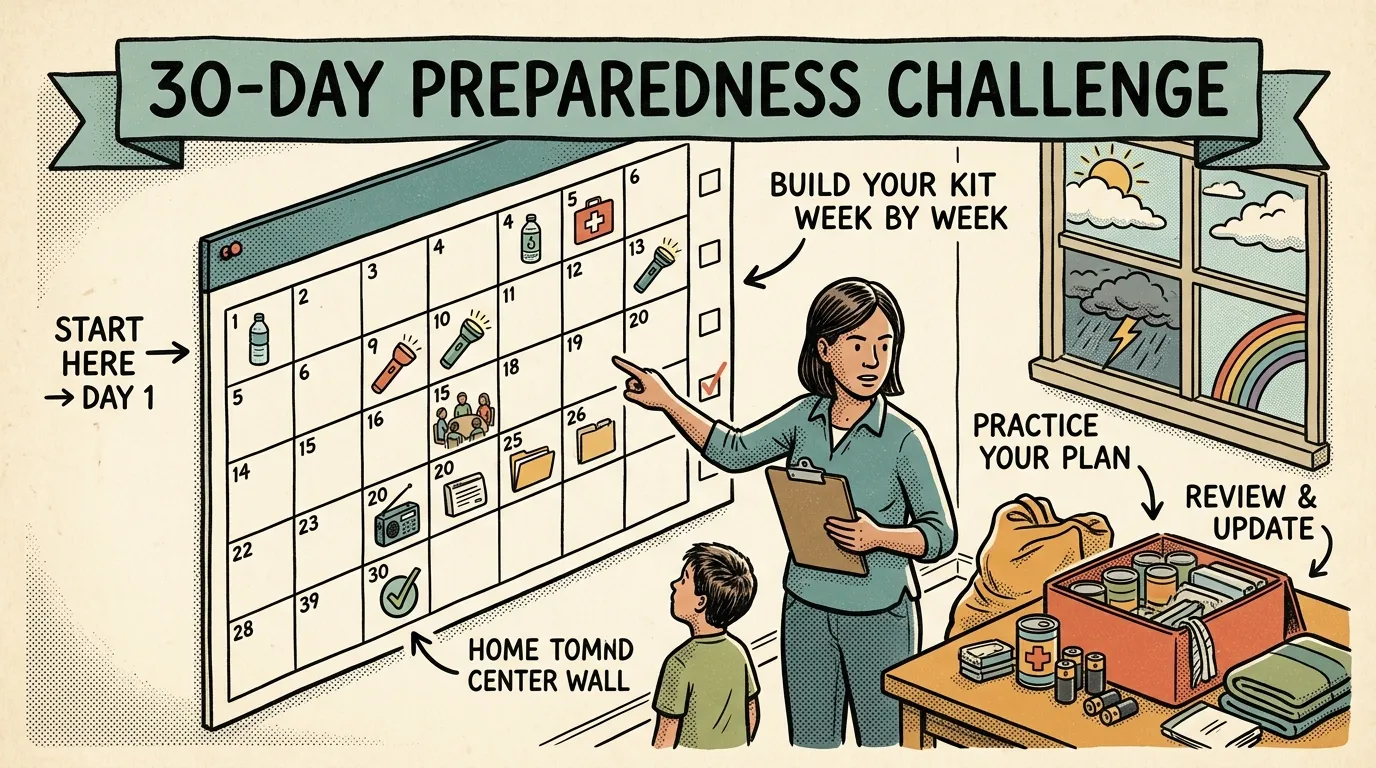
National Emergency Preparedness Month: 30-Day Plan
Use this 30-day National Emergency Preparedness Month challenge to go from unprepared to fully ready. One simple 15-minute task per day. Start now.
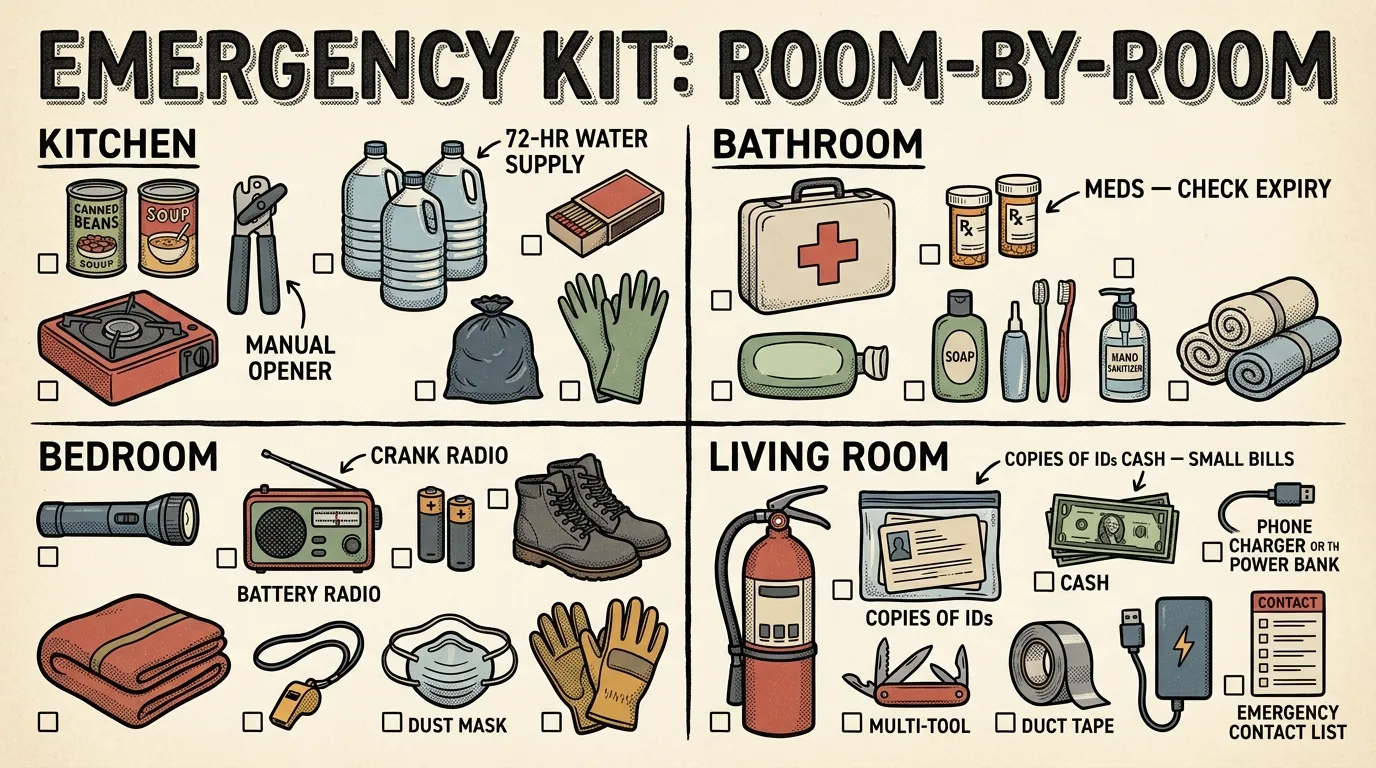
Emergency Preparedness Kit: Room-by-Room Home Guide
Build your emergency preparedness kit room by room for 14-day shelter-in-place readiness. Budget-friendly system from a FEMA-trained WFR. Start tonight.