Beginners can use survival fishing to secure food in emergencies with a compact kit that includes line, hooks, weights, a knife, and a multitool. The best wild fishing spots usually have cover, shade, deeper water, or current breaks, and effective low-tech methods include hand lines, makeshift rods, traps, and natural bait.
Key Takeaways
- Build a survival fishing kit for under $25 — it fits in a container smaller than a soda can and belongs in every bug-out bag.
- Default to passive methods like setlines and traps: they catch fish while you handle shelter, fire, and water.
- Target structure — current breaks, weed edges, submerged logs, and drop-offs — not open water.
- Master the Palomar and improved clinch knots by feel; they cover 90% of survival rigging needs.
- Practice legally at least once a year so the skills are automatic when you actually need them.
Survival Fishing: A Beginner’s Guide to Catching Fish
Quick Summary
- A compact survival fishing kit costs under $25, fits inside a container the size of a soda can, and belongs in every bug-out bag.
- Passive methods — setlines, traps, yo-yo reels — catch fish while you handle shelter, water, and fire. Default to these first.
- Target structure like current breaks, weed edges, and submerged logs. Open water is mostly dead water.
- Two knots handle 90% of survival rigging: the Palomar and the improved clinch. Learn them by feel, not just by sight.
- Always cook freshwater fish until the flesh is opaque and flakes easily — parasites aren’t something you want to deal with when help’s far away.
- Practice your skills legally at least once a year so they’re second nature when it counts.
In my 12 years of Pacific Northwest wilderness response work, I’ve watched people overestimate how many fish they’ll catch and underestimate how many calories they actually need. Survival fishing isn’t about landing a trophy. It’s about putting reliable protein on a flat rock next to your fire when everything else has gone sideways — and it’s one of the most accessible emergency skills you can learn.
I still remember a three-day SAR deployment along the upper Deschutes drainage in central Oregon where our resupply got delayed. My compact fishing kit — something I toss into my pack almost as an afterthought — produced four small rainbow trout on setlines overnight. That wasn’t a feast, but combined with forage and our remaining rations, it kept our team sharp when we needed to be. That experience cemented something I now teach in every community preparedness workshop: build the kit, learn the basics, and practice before you need it.
Survival fishing isn’t about landing a trophy — it’s about putting reliable protein next to your fire when everything else has gone sideways.
This guide covers everything you need — from building your survival fishing kit and choosing between active and passive methods, to constructing fish traps, improvising gear from found materials, and preserving your catch. If you’re working through a broader beginner’s guide to survival readiness, survival fishing is one of the highest-return skills you can add to your plan.
Building Your Survival Fishing Kit
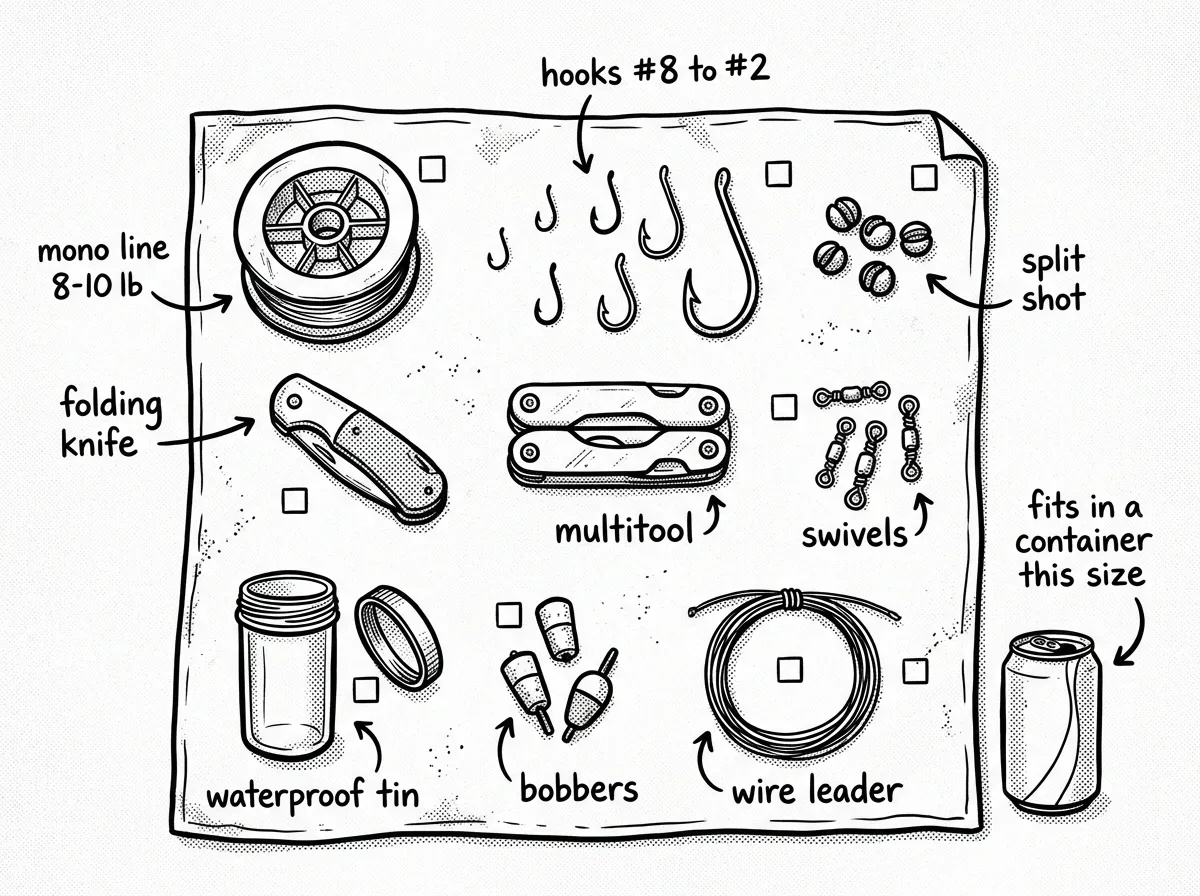 Everything in a survival fishing kit, laid out and labeled
How much does a functional kit actually cost? Less than you’d think.
- Monofilament line (50-100 ft spool, 8-10 lb test)
- Assorted hooks (sizes #8 through #2, including circle hooks)
- Split-shot weights (assorted sizes plus 2-3 heavier sinkers)
- Snap swivels (6-8 with short pre-tied leaders)
- Folding knife or fillet knife (3-4 inch blade)
- Small pliers or multitool for hook removal and crimping
- Waterproof container (small Pelican case, pill bottle, or Altoids tin)
That’s the core. Everything fits inside a container roughly the size of a soda can and weighs under 4 ounces. If you’ve got room, toss in a few soft plastic grubs, a small spinner, a simple float, and extra leader material.
Cost and Assembly Time
The total runs about $15-25. Monofilament spool: $3-5. Hook assortment pack: $4-6. Split-shot and sinker kit: $3-5. Snap swivels: $2-3. Small waterproof container: $3-6. If you don’t already own a decent fillet knife, add $10-20. A small pair of fishing pliers runs $5-8, or just use the pliers on a multitool you probably already carry.
Assembly takes 20-30 minutes. Buy the components, organize them in your container, and drop it into your bug-out bag. Done.
This is honestly one of the highest ROI items in any emergency pack. For the weight and cost of a candy bar, you’re carrying the ability to harvest protein from nearly any freshwater body you encounter. I keep one kit in my go-bag, one in my truck, and one in my backcountry pack.
Setting Realistic Expectations: Calories and Catch Rates
Let’s be straight about what survival fishing can and can’t do for you. It supplements your food plan — it doesn’t replace it.
Average calories per pound of common freshwater fish vary: panfish like bluegill run about 400-450 calories per pound, trout sits around 500-600, catfish and bass land between 450-500, and carp — often overlooked — packs 550-650. A beginner using passive methods in decent water can realistically expect 1-3 small fish per day. That translates to roughly 200-800 calories.
During that Deschutes deployment I mentioned, four trout gave our three-person team maybe 1,500 total calories to split. Helpful? Absolutely. Sufficient? Not even close. We still needed our other rations and foraged greens.
Fish does deliver outstanding nutritional value beyond raw calories, though. Complete protein, omega-3 fatty acids, B vitamins, phosphorus, selenium — in a prolonged emergency, those micronutrients matter as much as calorie counts for maintaining cognitive function and immune health. Just don’t stake your survival on fishing alone.
Active vs. Passive Fishing: The Strategic Decision
Here’s where most beginners get it wrong. They picture themselves sitting on a bank holding a line. That’s active fishing — and in most survival situations, it’s not the best use of your time.
Passive Methods
Passive methods work while you do other things. Set them up, walk away, check back periodically.
- Setlines and trotlines: A line strung between two anchor points with multiple baited hooks at intervals. Run along a bank, across a channel, or between two stakes.
- Fish traps and weirs: Structures that funnel fish into a confined area where they can’t escape.
- Yo-yo reels: Spring-loaded automatic reels that set the hook when a fish takes the bait. Compact, lightweight, and shockingly effective. Attach one to a branch overhanging a likely spot and let it work.
Active Methods
Active methods require your direct attention — you’re holding the line and responding to bites in real time.
- Handline fishing: Line wound on a spool or stick, worked by hand.
- Makeshift pole: A flexible branch rigged as a simple rod.
- Spearing and gigging: Visual hunting with a sharpened stick or multi-pronged gig.
- Hand-fishing (noodling): Reaching into holes and under structure to grab fish directly. Effective for catfish but carries real injury risk.
So which do you choose?
Default to passive methods. In a genuine survival situation, your time and energy are your most valuable resources. Running 3-5 passive setups simultaneously — a couple setlines, a bottle trap, and a yo-yo reel — maximizes your catch probability while you build shelter, purify water, tend fire, or rest. That’s time you can spend on water purification and other critical tasks.
Use active methods when you need food right now and can’t wait, when you’re mobile and moving through an area, when you’ve spotted fish actively feeding, or when water conditions favor sight-fishing in clear shallows.
In my experience, one hour of setting up passive lines and traps produces more fish over 24 hours than three hours of active handline fishing. Work smarter, not harder — especially when you’re already running a caloric deficit.
How to Build a Survival Fish Trap
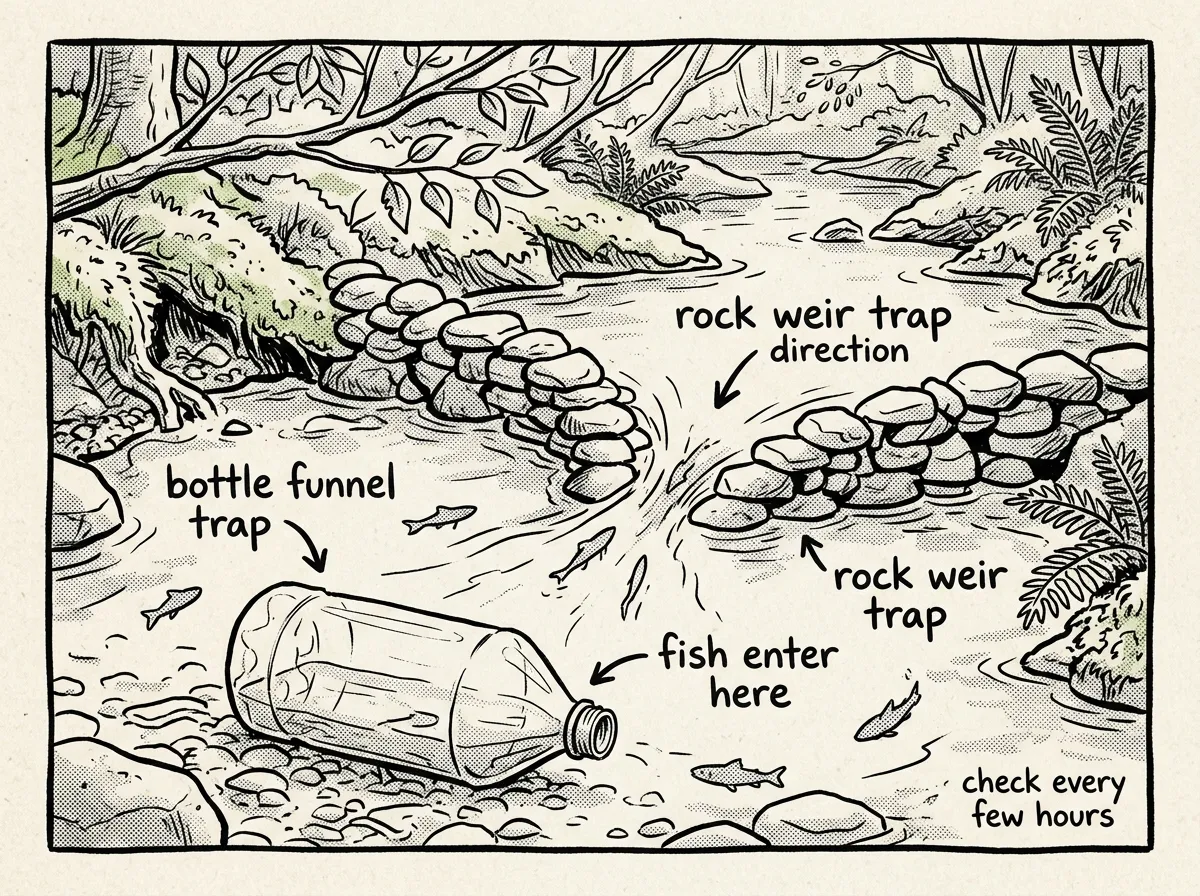 A bottle funnel trap and rock weir trap set in a shallow stream
Fish traps are one of the most effective primitive fishing techniques, and they require zero manufactured gear. I teach two methods — one using a found plastic bottle for quick deployment, and one using natural streambed materials for a more permanent setup.
Know this first: Fish traps are illegal in most jurisdictions during normal conditions. These are emergency-only techniques. Know your local laws.
Bottle Funnel Trap
- Cut a 2-liter bottle about one-third down from the top, just below where it narrows toward the cap. Remove the cap.
- Invert the top piece and nest it inside the bottom section, creating a funnel pointing inward. Fish swim in but can’t find the way out.
- Secure the funnel to the body using cordage through small punched holes. No cordage? Sharp thorns pushed through both layers work.
- Punch 6-8 small drainage holes in the body so the trap sinks. Bait with crushed insects, fish guts, bread, or anything pungent.
- Anchor the trap in a current seam or along a bank — tie it to a rock, root, or stake. Check every 2-4 hours, especially at dawn and dusk.
In my field experience, anchoring in current is critical. I’ve watched people lose unanchored traps downstream within minutes. Tie it off to something solid.
Rock Weir Trap
This classic primitive method works in any shallow stream and requires nothing but the rocks already in the streambed.
Choose a location where the stream narrows naturally, or where water flows over a shallow riffle into a pool. Build two converging rock walls forming a V-shape pointing downstream, each wall 12-18 inches high. At the narrow point, create a small opening (6-8 inches wide) leading into an enclosed circular pen roughly 2-3 feet in diameter. Seal gaps between rocks with smaller stones, gravel, and mud — fish will exploit any opening.
Building a functional rock weir takes 30-60 minutes depending on the streambed. It’s physical labor. But once built, it fishes 24/7 with zero additional effort. I’ve used variations of this in PNW streams where the rocky substrate makes construction straightforward. If you’re in a sandy-bottomed Gulf Coast creek, this method’s much harder to pull off — you’ll want to lean on bottle traps instead.
Low-Tech Active Techniques That Produce Results
Handline Fishing
Wrap 20-30 feet of line around a smooth stick or water bottle. Rig your terminal tackle: hook tied with a Palomar knot, split-shot weight 8-12 inches above the hook, swivel above the weight to reduce line twist. Bait and lower into a likely spot — against structure, near a current break, along a weed edge.
Detect bites by holding the line lightly between your thumb and forefinger. You’ll feel the tap-tap-pull directly. This is actually more sensitive than a stiff rod tip. Set the hook with a firm, steady pull — don’t jerk violently or you’ll rip the bait free. Hand-over-hand retrieve, coiling carefully to avoid tangles.
If fish are nibbling but not committing, downsize your hook and bait. A smaller presentation often seals the deal.
Makeshift Pole
Select a 6-10 foot sapling or branch — flexible enough to absorb a fish’s run, stiff enough to set a hook. Willow, alder, and hazel work well in the Pacific Northwest. Tie line to the tip using a clinch knot, run it down the pole secured with a couple half-hitches as backup. Present bait by dipping the tip over undercut banks, behind boulders, along weed lines.
Spearing and Gigging
This works in clear, shallow water when you can see fish. It’s harder than it looks.
Build your spear from a straight hardwood shaft, 5-7 feet long. Split the end 6-8 inches deep and wedge it open to create 2-4 prongs, then fire-harden the tips by rotating them slowly over coals. Stand still in shadow — fish spook at movement and silhouettes. Aim below the visual target by 30-50% of the apparent depth. Light refracts at the water’s surface, making fish appear higher than they actually are. This is the single most common mistake I see when I teach this skill. Strike fast and pin the fish against the bottom — don’t try to lift first.
Improvised Lures
No live bait? You’ve still got options. Shiny metal scraps — foil, can tabs, or reflective material tied near a bare hook — mimic a minnow. Wrap thread or fine fiber around a hook shank and tie in a small feather for a crude fly that’ll catch panfish all day. Whittle a small minnow shape from softwood, insert a hook, and jig it through likely water. The erratic falling action triggers predatory instinct in bass and trout.
Improvised Gear from Found Materials
Your prepared kit is always more effective than improvised gear. Always. But if you’re caught without one — or need to supplement — here’s what works.
Improvised Hooks
The simplest method is a gorge hook from a thorn. Find a strong, sharp thorn (hawthorn or honey locust work well) about 1.5 inches long. Tie your line to the center. The thorn sits parallel inside the bait — when a fish swallows and you pull, it turns sideways and lodges in the throat. This is one of the oldest fishing devices in human history, and it still works.
Safety pins from a first aid kit bend into functional hook shapes. Any thin wire — from a bra underwire, picture hanging wire, or electrical wire — can be shaped with pliers or rocks. Bone slivers sharpened at both ends make serviceable gorge hooks too.
Improvised Line
Standard 550 paracord contains 7 inner strands, each rated to about 35 lbs. A single strand works for most freshwater fish and is the best improvised line available. Plant fibers from dogbane, stinging nettle, and milkweed produce strong natural cordage when stripped, dried, and twisted — but this takes practice and time. In a real pinch, a thin shoelace or hoodie drawstring works for handline fishing. They’re visible and stiff, but fish in survival situations are often less wary than pressured sport fish.
Every time I teach improvised gear in a workshop, I follow up by saying now go build the real kit so you never have to carve a gorge hook under pressure. A $20 investment eliminates hours of improvisation. The Berkley Trilene XL — around $4 for a 110-yard spool — is what I stock in all my kits. It knots cleanly, handles well in cold fingers, and stores for years without getting brittle. I’ve tried braided line in survival kits and it’s just harder to work with when your hands are shaking.
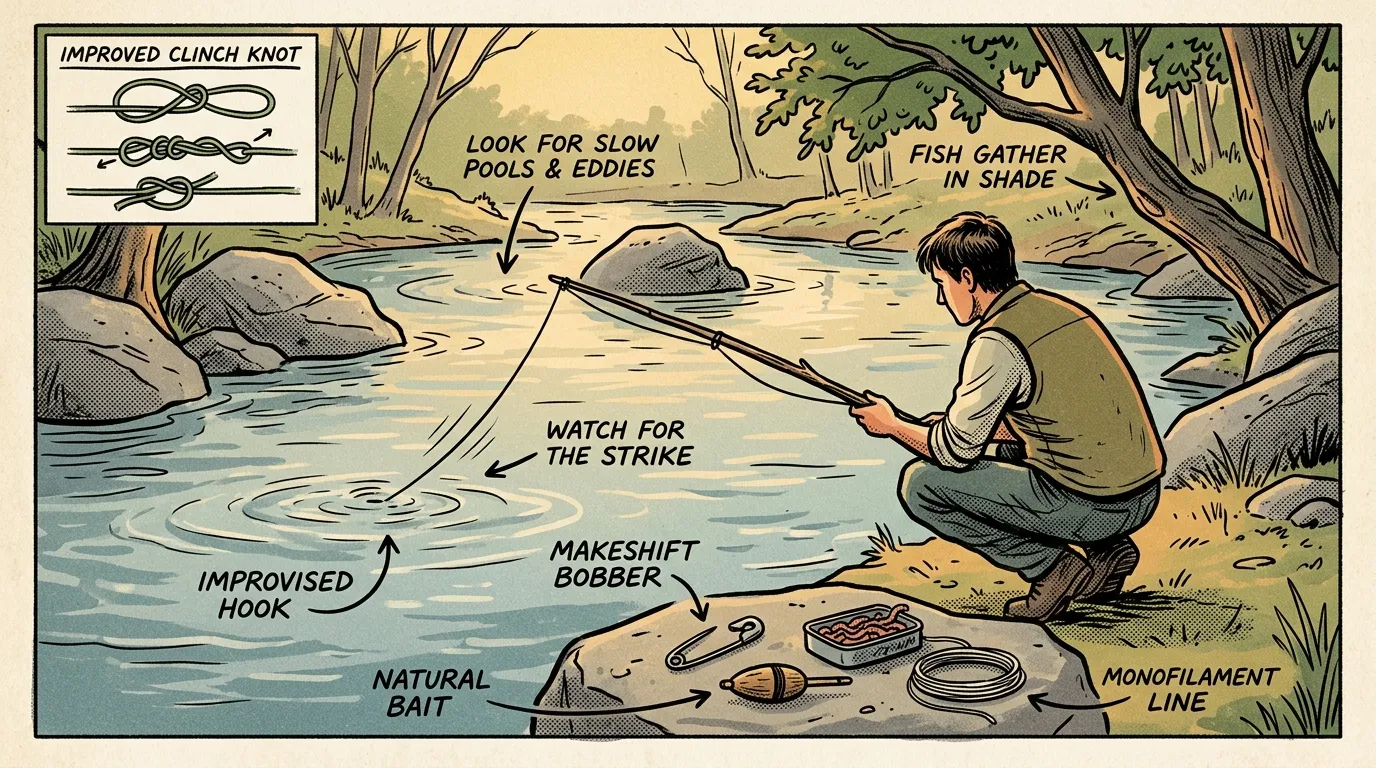
Finding Fish: Reading the Water
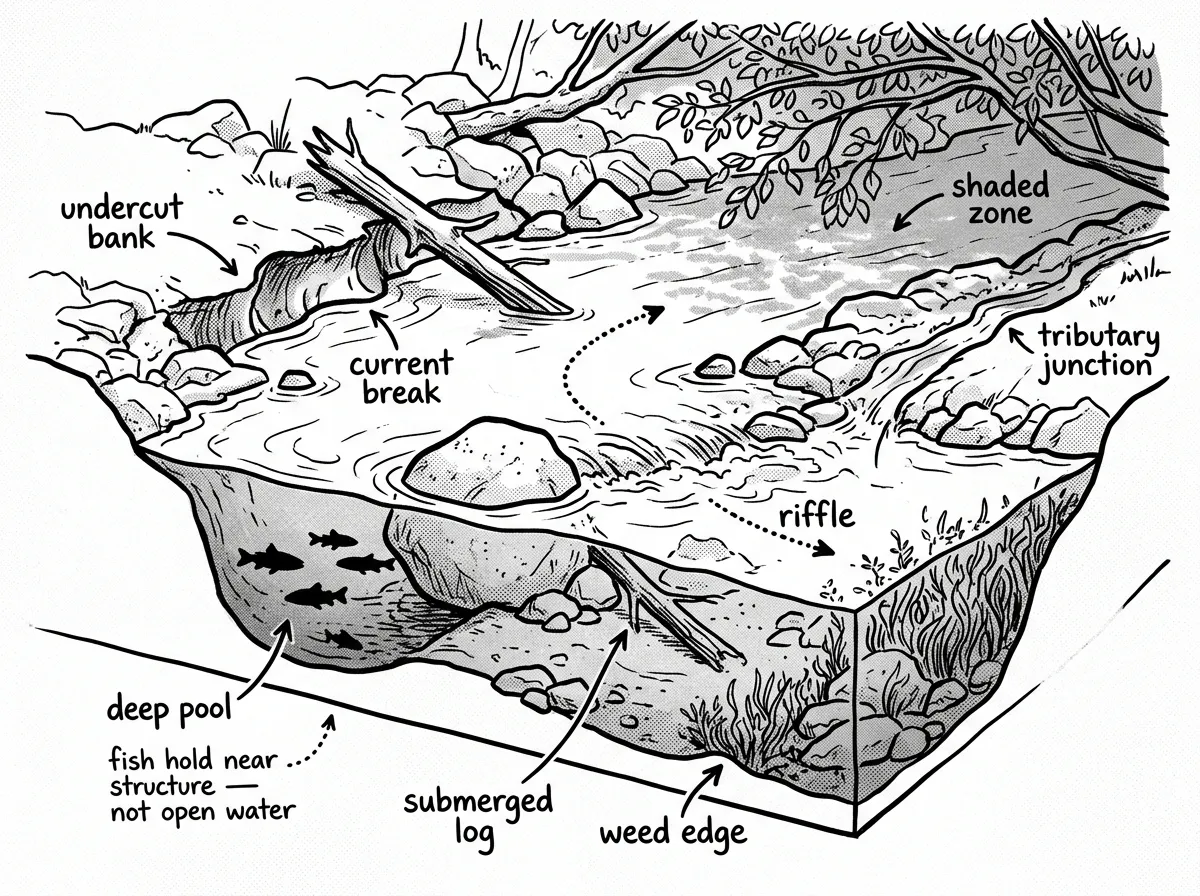 Key features of a river where fish hold — structure, current breaks, and depth changes
You can have perfect gear and still catch nothing if you’re fishing the wrong water. Learning to read water is arguably more important than any piece of equipment.
Rivers and Streams
Look for current breaks behind rocks, logs, and bridge pilings — fish hold here to ambush food carried by current. Deep pools below riffles are prime spots because the turbulent water above oxygenates the pool and washes food into it. Undercut banks and eddies provide natural shelter. And confluences where tributaries join the main channel concentrate food and attract fish.
Lakes and Ponds
Fallen trees and submerged structure attract fish — any cover is better than open water. Focus on weed edges and drop-offs where shallow transitions to deep. Points, shady shorelines, and inlet/outlet areas all concentrate fish through current and temperature changes.
Signs of Fish Activity
Insect hatches — clouds of bugs above the water — tell you fish are likely feeding. Schools of baitfish dimpling the surface, diving birds like kingfishers and herons, surface rises creating rings on still water — all of these point you to the right spots.
Timing
Fish feed most actively at dawn and dusk. These low-light periods are your highest-probability windows. In summer, nighttime fishing can be productive for catfish and other species that navigate by smell. If you’re in a high desert environment like eastern Oregon, the temperature swing between midday and evening is dramatic — fish basically shut down during peak heat and turn on hard at dusk.
Species, Bait, and Seasonal Patterns
Match Your Approach to the Species
- Panfish (bluegill, sunfish, crappie): Stay shallow near cover in warm months. Small hooks, worms, and grubs are deadly. These are the easiest fish to catch for survival — aggressive, abundant, and found in almost every warmwater pond and lake.
- Catfish: Most active at night. They respond to strong-smelling bait — liver, cheese, blood, fish guts, even soap. Bottom feeders, so present bait on the bottom near structure.
- Trout: Prefer cold, oxygenated water. Drift a natural bait — worm, grub, grasshopper — through a current seam for best results.
- Bass: Ambush predators that hide near structure and strike moving prey. Jig an improvised lure past logs and weed edges.
- Carp: Abundant in slow water, feed on the bottom. Bread, corn, doughballs, or insect larvae all work. Often overlooked by sport fishermen but excellent survival food.
Finding Natural Bait
The turn-over-rocks method is your best friend. Flip rocks in the shallows and along the bank — you’ll find caddisfly larvae, hellgrammites, crayfish, and worms clinging to the undersides. Grasshoppers and crickets from nearby meadows are also excellent, especially for trout and panfish.
Seasonal Patterns
Spring concentrates fish in predictable spawning locations — shallow bays, tributary mouths, gravel beds. This is the easiest season. Summer pushes fish deeper toward cooler, oxygenated areas, so fish early morning and late evening. Fall triggers heavy feeding before winter, creating aggressive bite windows. Winter? Fish are sluggish and deep. Survival fishing in winter is significantly harder — prioritize other food sources.
Essential Knots and Line Care
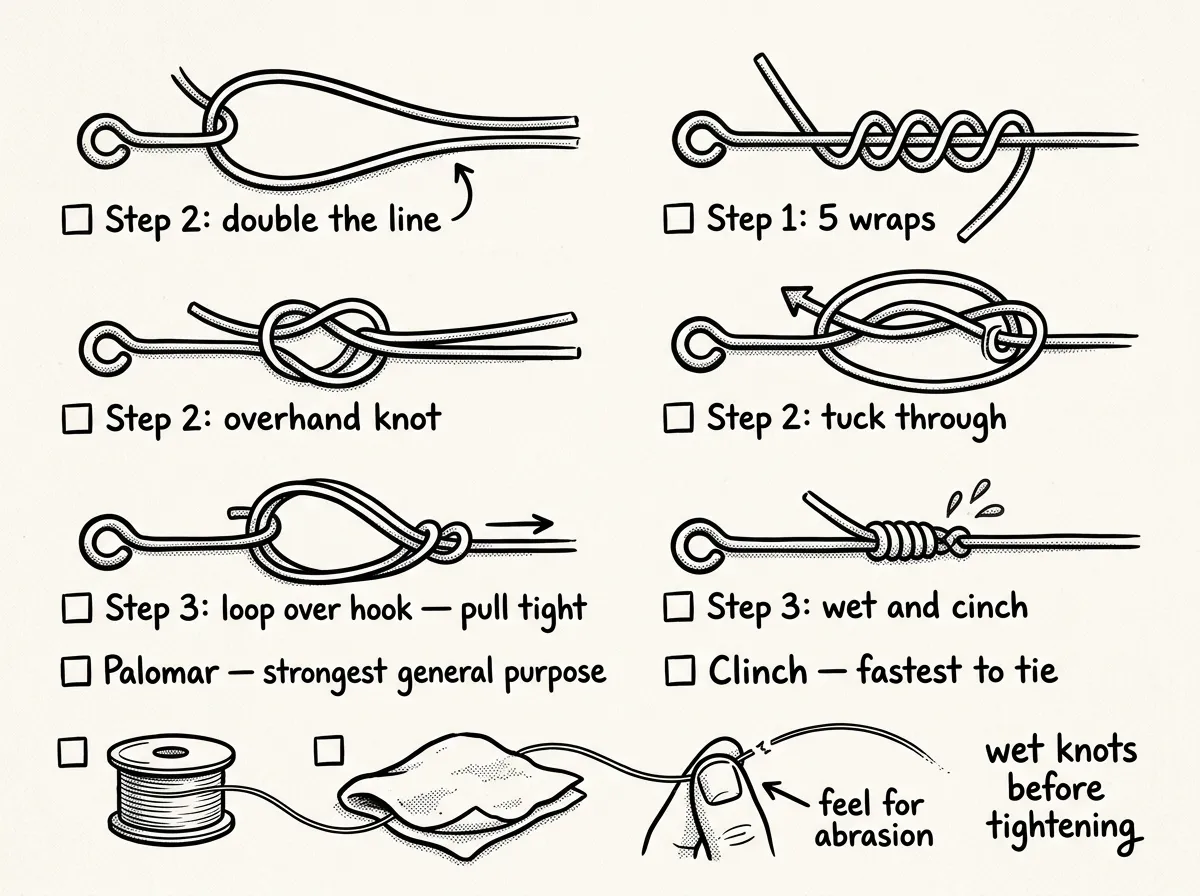 Step-by-step views of the Palomar and improved clinch knots with line care essentials
Knots are where most beginners lose fish. A bad knot fails at the worst possible moment. Learn two knots well, and you’ll handle 90% of survival rigging.
Palomar Knot (Strongest General-Purpose)
Double about 6 inches of line and pass the loop through the hook eye. Tie a simple overhand knot with the doubled line, leaving the hook hanging below. Pass the loop over the entire hook. Wet the line before cinching — saliva works. Pull both the standing line and tag end tight. Trim the tag end to about 1/8 inch.
I’ve broken enough Palomar knots on steelhead to know — wet the line before cinching or you lose roughly 20% of your knot strength from heat friction. This one detail saves fish.
Improved Clinch Knot (Fastest to Tie)
Thread line through the hook eye, leaving 6 inches of tag end. Wrap the tag end around the standing line 5-6 times. Thread the tag end through the small loop formed just above the hook eye, then back through the large loop you just created. Wet and pull tight against the hook eye.
Line Care
Run your line between your fingers before every use and feel for nicks, abrasion, or stiff spots. Replace damaged sections. Store line wound neatly, out of direct sunlight — UV degrades monofilament over time. Test knot strength by pulling firmly against a solid anchor before fishing. Better to discover a weak knot now than when a fish is on.
For a deeper dive on knot-tying for emergencies, check out our guide to essential survival knots every prepper should master.
Cleaning, Cooking, and Preserving Your Catch
Field Cleaning
Dispatch humanely with a sharp blow to the head. Scale if needed by scraping from tail to head with the back of your knife. Insert your knife at the vent and cut forward toward the gills to gut. Remove all entrails and pull or cut the gills out. In survival, keep the head — fish heads, cheeks, and roe are edible and calorie-dense. Don’t discard anything you can eat.
Cooking Methods
Roast on a stick over coals — split the fish open and skewer it on a green wood stick propped near the fire. Cook until the flesh flakes easily, about 10-15 minutes for small fish. Hot-rock frying works too: heat a flat rock at the fire’s edge until it’s searing hot, then lay fillets directly on it. You can boil fish for stew in any container that holds water, or wrap in large non-toxic leaves (burdock, maple) and bake near embers.
Always cook freshwater fish until the flesh is opaque throughout and flakes easily with a stick. That’s your field substitute for the 145°F internal temp target. Undercooked freshwater fish can carry tapeworms, flukes, and roundworms — not what you want when medical help isn’t available.
Preservation Without Refrigeration
Fish spoils fast in warm weather — within hours. If you catch more than you can eat, preserve the excess immediately.
Hot smoking is your best field option. Build a small tripod from three green wood poles lashed at the top. Hang thin fillets from cross-sticks near the top and build a low smoldering fire beneath using hardwood — alder, oak, hickory, or maple. Avoid resinous softwoods like pine. Maintain steady smoke (not flame) for 6-12 hours. Properly smoked fish can last 3-7 days without refrigeration depending on temperature and humidity.
Sun-drying works in dry climates. Cut fish into strips 1/4 inch thick or less, lay them on a clean rock or improvised rack in direct sunlight, and turn every few hours. Full drying takes 1-2 days. If you’re in a humid Gulf Coast climate, sun-drying is unreliable — you’ll want to stick with smoking.
Salt-curing, if you have access to salt, is the most reliable long-term method. Pack fish layers between heavy salt coats — this preserves for weeks to months.
Safety, Conservation, and Legal Notes
Check local regulations and licensing requirements before fishing outside a declared emergency. Traps, setlines, and trotlines are illegal in many areas during normal conditions. Respect bag and size limits — sustainable harvest protects the resource for everyone.
Follow consumption advisories for mercury, PCBs, and other contaminants. Check state and local sources before eating fish from unfamiliar waters. (Last verified against EPA and Oregon/Washington state advisories: April 2026.)
Wear a PFD when wading above knee-depth or when boating. Drowning is a real risk, and cold-water immersion kills faster than hunger. Be mindful of wildlife — bears, alligators, and venomous snakes are attracted to fish and fish scraps. Clean your catch away from camp.
Avoid fishing entirely in fast, unstable water or flood conditions, during thunderstorms, or at known contamination sites.
The first time I tried running setlines during a training scenario in the Cascades, I didn’t anchor them well enough and lost two rigs overnight to current. Sixteen dollars in gear, gone. Since then I’ve always used a double-anchor system — one tie to a bank-side root and a second wrap around a heavy rock in the water. Redundancy isn’t just for shelter and comms. It applies to your fishing setup too.
Frequently Asked Questions
What is the easiest way to catch fish in a survival situation?
Passive methods win here — specifically baited setlines and bottle funnel traps. They require minimal skill and work unattended. Set 3-5 baited setlines in likely spots near structure (current breaks, undercut banks, submerged logs) and check them every 2-4 hours. If you want to actively fish, a handline with a worm drifted near bottom in a deep pool is the simplest approach.
What fish are easiest to catch for survival?
Panfish — bluegill, sunfish, and crappie — are your best bet. They’re abundant in nearly every warmwater body, aggressive toward small baited hooks, and require no specialized technique. Catfish are also excellent survival targets because they respond to pungent bait and feed actively at night when other species go dormant.
How do you make a fishing hook in the wild?
The simplest method is a gorge hook from a thorn. Find a strong, sharp thorn about 1.5 inches long, tie your line to the center, and hide it inside your bait. When a fish swallows and you pull, the thorn turns sideways and lodges. Safety pins bend into hook shapes, bone slivers work as gorge hooks, and any thin wire can be shaped with pliers or rocks.
Can you survive on fish alone?
Not effectively long-term. Fish provides excellent complete protein and beneficial fats, but it’s low in carbohydrates and total calories compared to what an active person burns daily. A realistic beginner catch of 1-3 small fish per day yields 200-800 calories — a meaningful supplement, but well short of survival needs. Think of fish as one component of a broader food strategy, not your entire plan.
What is the best survival fishing line?
A spool of 8-10 lb monofilament is the best all-around choice. It handles most freshwater species, knots easily even with cold or shaky hands, and stores compactly. Braided line is stronger per diameter but significantly harder to knot without practice — and in a survival scenario, you don’t want to fight your gear.
The Complete
Prepper's Reference.
149 articles synthesized into one comprehensive PDF — twelve chapters covering water, food, shelter, first aid, comms, and scenario-specific preparedness. Free with your email.
Unsubscribe anytime · We never share your email
You're in. Check your inbox.
Keep Reading
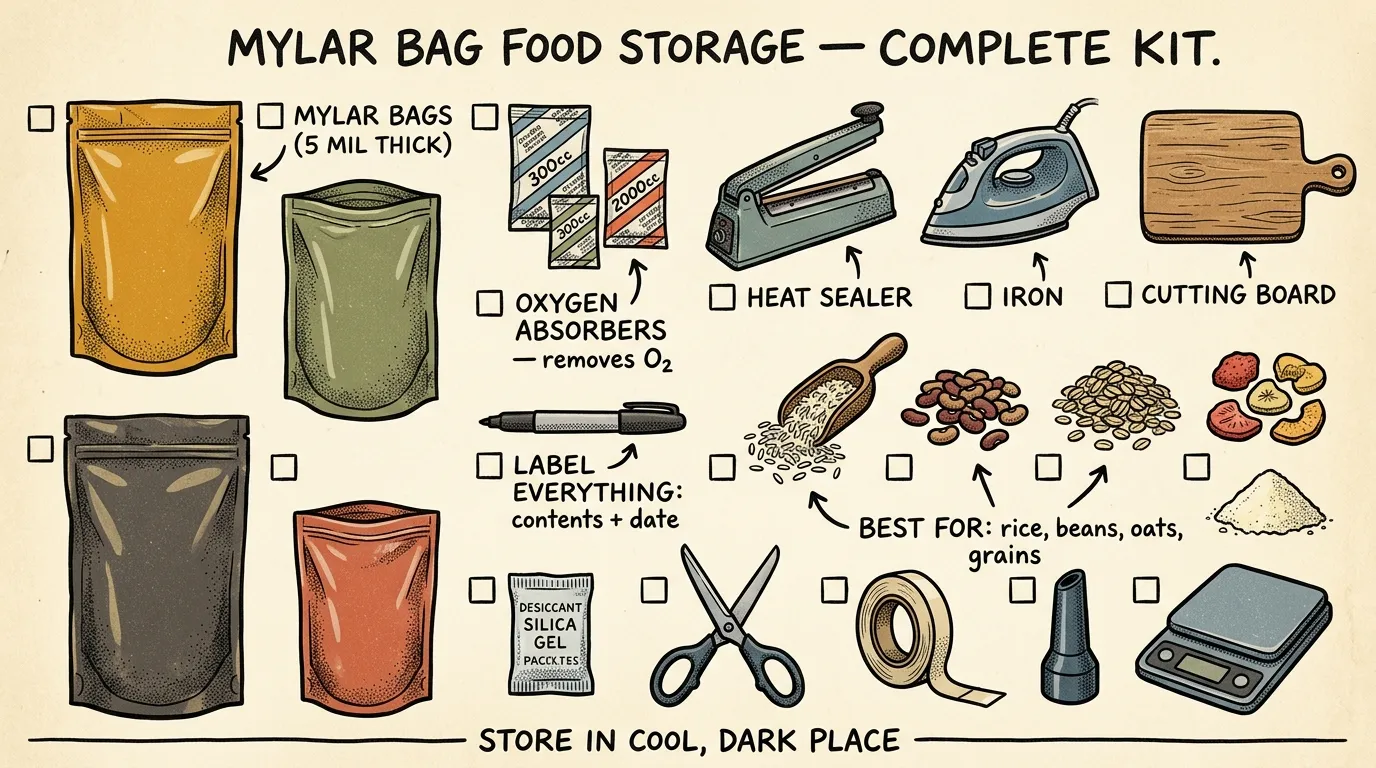
Mylar Bags for Food Storage: Complete Guide (2026)
Learn how to use mylar bags for food storage to preserve dry goods 25+ years. Expert guide covers thickness, sealing, oxygen absorbers & mistakes to avoid.

How to Start a Prepper Garden: A Complete Guide
Learn how to start a prepper garden step by step. Choose survival crops, build soil, and grow food for emergencies — even in small spaces. Start today.

Canned vs. Freeze-Dried: The Ultimate Prepper Showdown
Canned vs. freeze-dried food: compare shelf life, cost, nutrition, storage, and convenience so beginner preppers can build smarter emergency supplies.