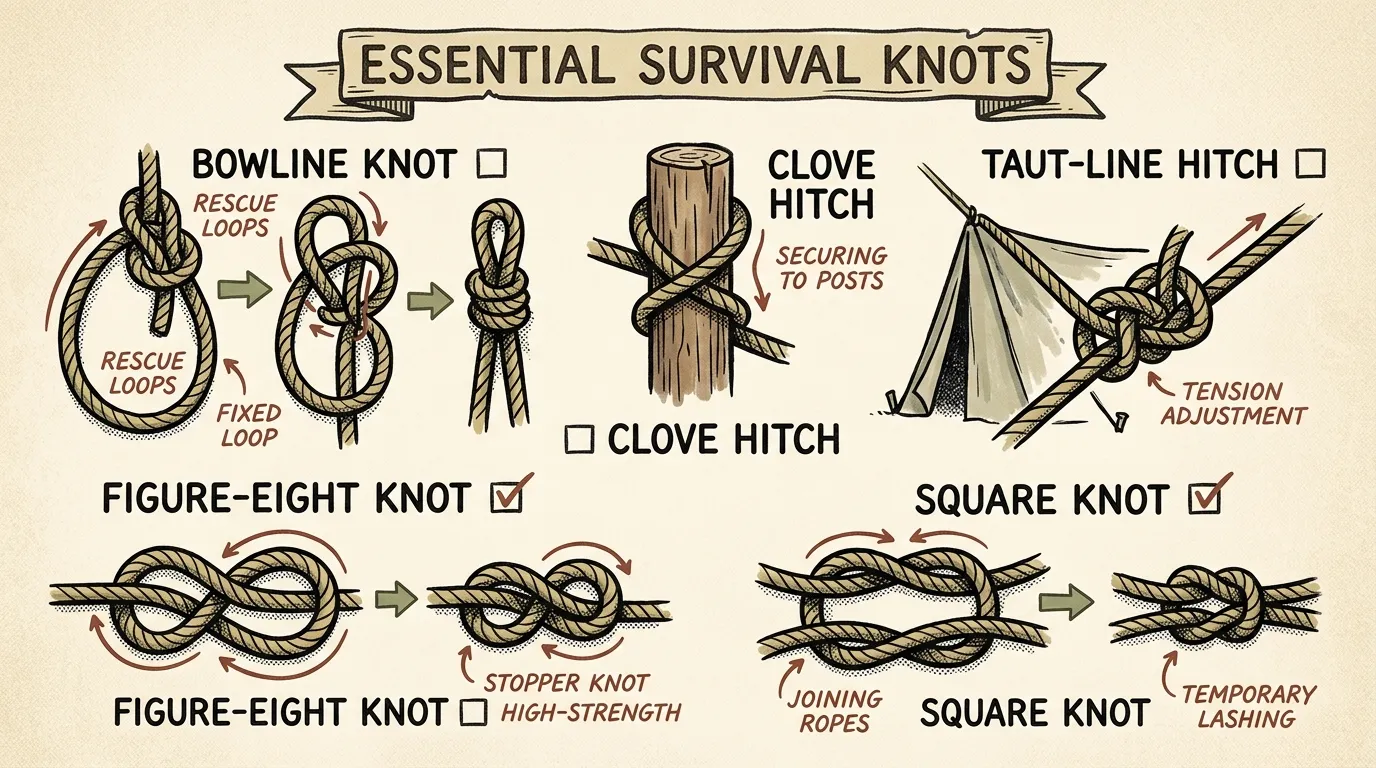
The most essential survival knots for beginner preppers are the Bowline, Square Knot, Clove Hitch, Figure Eight, and Sheet Bend. These knots help with shelter building, securing gear, joining ropes, and emergency repairs, and they can be practiced with paracord or basic utility rope.
Key Takeaways
- Five survival knots — Bowline, Clove Hitch, Figure Eight, Sheet Bend, and Square Knot — handle roughly 90% of field rope tasks you'll encounter.
- Practice 5-10 reps daily for one week per knot, progressing from thick cotton rope to slick wet paracord, until you can tie each one-handed or blindfolded.
- Always match the knot to the load: a Square Knot capsizes under unequal force, so never use it for life-safety applications.
- Back up every critical knot with a half hitch or stopper — redundancy costs five seconds and can prevent catastrophic failure.
- Start with around $10 in rope (cotton sash cord plus 550 paracord) and a laminated reference card in your pack.
Survival Knots: 5 Essential Knots Every Prepper Must Master
Three years ago, a November windstorm tore through the Oregon Cascades while I was leading a Wilderness First Responder field exercise. A massive Douglas fir limb crashed across our trail and shredded the team’s primary shelter tarp. Rain hammered sideways. The temperature was dropping fast. I had about four minutes to rig a replacement shelter using a backup tarp, 50 feet of paracord, and two standing trees. The knots I tied in those four minutes — a Bowline on each anchor, a Clove Hitch for the ridgeline tensioner, a Figure Eight stopper to keep line from pulling through a grommet — kept six people dry until the storm passed. No fancy gear. No complicated system. Just survival knots I’d practiced until they were muscle memory.
That experience reinforced something I’ve been teaching in FEMA emergency preparedness courses and WFR trainings for over 12 years: ropework is one of the highest-value, lowest-cost survival skills you can build. A $5 length of rope becomes a shelter, a rescue tool, a gear-hauling system, or an improvised splint — but only if you know the right knots.
If you’re just becoming a prepper, start here. These five survival knots will handle about 90% of the rope tasks you’ll face in the field.
Quick Summary
- Five knots cover nearly everything: Bowline (fixed loop), Clove Hitch (quick anchor), Figure Eight (stopper), Sheet Bend (rope joining), and Square Knot (binding).
- Total startup cost is around $10-15: A length of cotton sash cord plus 550 paracord is all you need.
- Practice one knot per week, 5-10 reps daily, until you can tie it one-handed or blindfolded.
- Every knot has a failure mode — knowing when to back up or swap knots matters as much as tying them.
- Dress it, then set it. A sloppy knot is a weak knot, no matter which one you choose.
- Pair knot skills with shelter, fire, and first aid for a core survival foundation that doesn’t depend on batteries or gadgets.
The 5 Essential Survival Knots at a Glance
Here’s the lineup. These are the five survival knots every prepper should master:
- Bowline — creates a fixed, non-slip loop for rescue, ridgelines, and hauling
- Clove Hitch — attaches rope quickly to posts, poles, and trees
- Figure Eight — stops rope from pulling through anchors and hardware
- Sheet Bend — joins two ropes, even of different diameters or materials
- Square Knot — binds bundles, bandages, and light lashings quickly
Master these five, and you’ve got a compact toolkit for shelter building, gear securing, rope joining, and basic emergency repairs. I selected these specific knots after years of field use and teaching beginners in WFR courses — not from a list in a book. They’ve earned their place because they work under real-world stress, in wet conditions, with cold hands, on imperfect rope.
A $5 hank of rope and five well-practiced knots will outperform a $500 gadget when the power’s out and the plan’s fallen apart.
What Makes a Good Survival Knot?
Not all knots deserve a spot in your kit. I evaluate every survival knot against four criteria — the same ones I use when teaching emergency ropework in my courses.
Strength retention. Every knot weakens rope to some degree. A well-tied Bowline retains about 60-75% of rope strength. A Figure Eight retains roughly 75-80%. A knot that cuts your rope’s capacity in half is a liability, not a tool.
Ease of tying under stress. Can you tie it with cold, wet hands? In the dark? One-handed while bracing against a tree? In my experience working in Pacific Northwest rain and cold, this single factor eliminates most fancy knots from the “essential” list.
Reliability under variable loading. Some knots hold beautifully under steady tension but fail the moment the load shifts direction or cycles on and off. The best knots handle jerking, swinging, and directional changes without working loose.
Ease of untying after loading. A knot that jams permanently after bearing weight is a rope-eating problem. You’ll often need to break camp fast, recover your cordage, and re-rig somewhere else. If you need a knife to remove your knot, that’s a failure.
These four criteria are why the five knots above beat dozens of alternatives. They’re not the only knots worth knowing — but they’re the ones I’d stake my shelter on in a storm.
Knot Terminology Every Beginner Needs
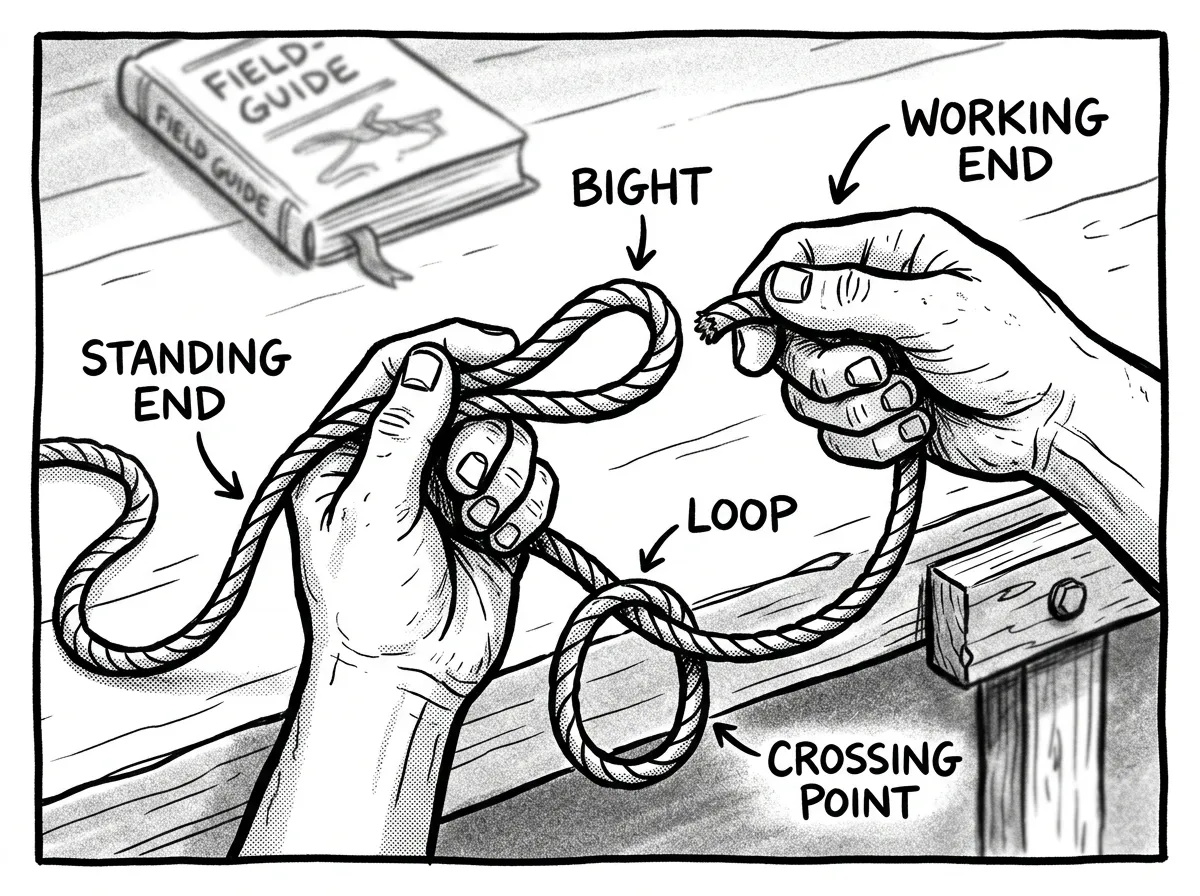 Visual guide to essential rope terms: standing end, working end, bight, and loop
Before you tie your first knot, learn these seven terms. Understanding them will make every tutorial, video, and field guide instantly clearer:
- Standing end (standing part): The long, “inactive” portion of the rope — the part you’re not manipulating
- Working end: The active end you’re threading, wrapping, or tucking
- Bight: A U-shaped bend in the rope that doesn’t cross itself
- Loop: A circle formed when the rope crosses over itself
- Turn (wrap): A single pass of the rope around an object like a pole or carabiner
- Dressing: Arranging all the rope parts of a finished knot so they lie neat and parallel, with no twists
- Setting: Pulling a dressed knot tight so it locks into its proper shape before you apply load
Here’s the habit I drill into every student: dress it, then set it. Three extra seconds. That’s all it takes. When I inspect knots in the field, twisted or poorly dressed knots are the number-one problem I find — even among experienced campers.
How to Tie Each Survival Knot (Step-by-Step)
1. Bowline — The Fixed Loop
The Bowline creates a stable, non-tightening loop at the end of a rope. It’s the primary rescue loop knot in Wilderness First Responder training because it holds under load and releases easily afterward.
- Form a small overhand loop about 18 inches from the working end (working end on top as it crosses)
- Pass the working end up through the loop from underneath
- Route the working end behind the standing part — around the “tree”
- Bring the working end back down through the same loop
- Dress the knot by aligning all four strands neatly, then set by pulling the loop and standing part apart
Mnemonic: “The rabbit comes out of the hole, goes around the tree, and back down the hole.”
Practice tying this one-handed. In a real emergency, your other hand may be occupied holding a branch, bracing yourself, or immobilized by injury. I practice one-handed Bowlines on my morning coffee mug handle — looks ridiculous, but it builds the muscle memory that matters.
Variations worth learning: Running Bowline (sliding loop for retrieving gear over branches), Bowline on a bight (two loops from a rope’s midpoint — useful for improvised harnesses).
Approximate strength retention: 60-75% of rated rope strength.
2. Clove Hitch — The Quick Anchor
The Clove Hitch is the fastest way to attach a rope to a post, pole, or tree. I use it constantly for tarp ridgelines and as the starting point of lashings.
Step-by-step:
- Wrap the working end around the pole once (a single turn).
- Cross the working end over the standing part diagonally.
- Wrap around the pole a second time.
- Tuck the working end under the second wrap (under the diagonal cross).
- Dress so both wraps sit neatly side by side. Set by pulling both ends snug.
You can also tie this “in the air” by forming two loops in the rope and stacking them over a post — much faster for fence posts and stakes. Practice both methods.
Variations worth learning: Constrictor Knot (non-slip version for permanent gripping), Round Turn and Two Half Hitches (more secure for heavy or shifting loads).
Approximate strength retention: 60-65% of rated rope strength.
3. Figure Eight — The Stopper Knot
The Figure Eight is your go-to stopper knot. It prevents rope from pulling through grommets, carabiners, belay devices, and pulley systems. It’s also the easiest knot to visually inspect — you can spot a mis-tied Figure Eight from ten feet away.
Step-by-step:
- Form a loop by crossing the working end over the standing part.
- Pass the working end behind (under) the standing part.
- Bring the working end back through the original loop from the top.
- You should see a clear figure-8 shape. Dress so both loops are distinct and flat, then set by pulling both ends.
For anchoring a rope to a harness or fixed point, tie a Figure Eight on a bight — the same motion but doubled back through. It’s the standard tie-in knot for climbing and rescue because it’s strong and unmistakable when inspected. I use it for any life-safety application.
Variations worth learning: Figure Eight on a bight (loop version for anchoring), Inline Figure Eight (fixed loop in the middle of a rope without access to either end).
Approximate strength retention: 75-80% of rated rope strength.
4. Sheet Bend — Joining Two Ropes
Need to extend your line? The Sheet Bend is the best knot for joining two ropes of different sizes or materials. When your 550 paracord isn’t long enough and you need to tie it to a thicker utility rope, this is what you reach for.
Step-by-step:
- Form a bight (U-shape) in the thicker or stiffer rope. Hold it in your non-dominant hand.
- Pass the working end of the thinner rope up through the bight from underneath.
- Wrap the thinner rope around the back of both legs of the bight.
- Tuck the thinner rope’s working end under itself — but over the bight.
- Dress so the working end and standing part of the thinner rope exit on the same side. Set by pulling all four strands.
For slick or wet rope, always use a Double Sheet Bend — make the wrap in step 3 twice instead of once. In my experience with PNW rain-soaked nylon cordage, the single Sheet Bend can creep loose. The double version adds five seconds and significant security.
Approximate strength retention: 55-65% of rated rope strength.
5. Square Knot (Reef Knot) — Simple Binding
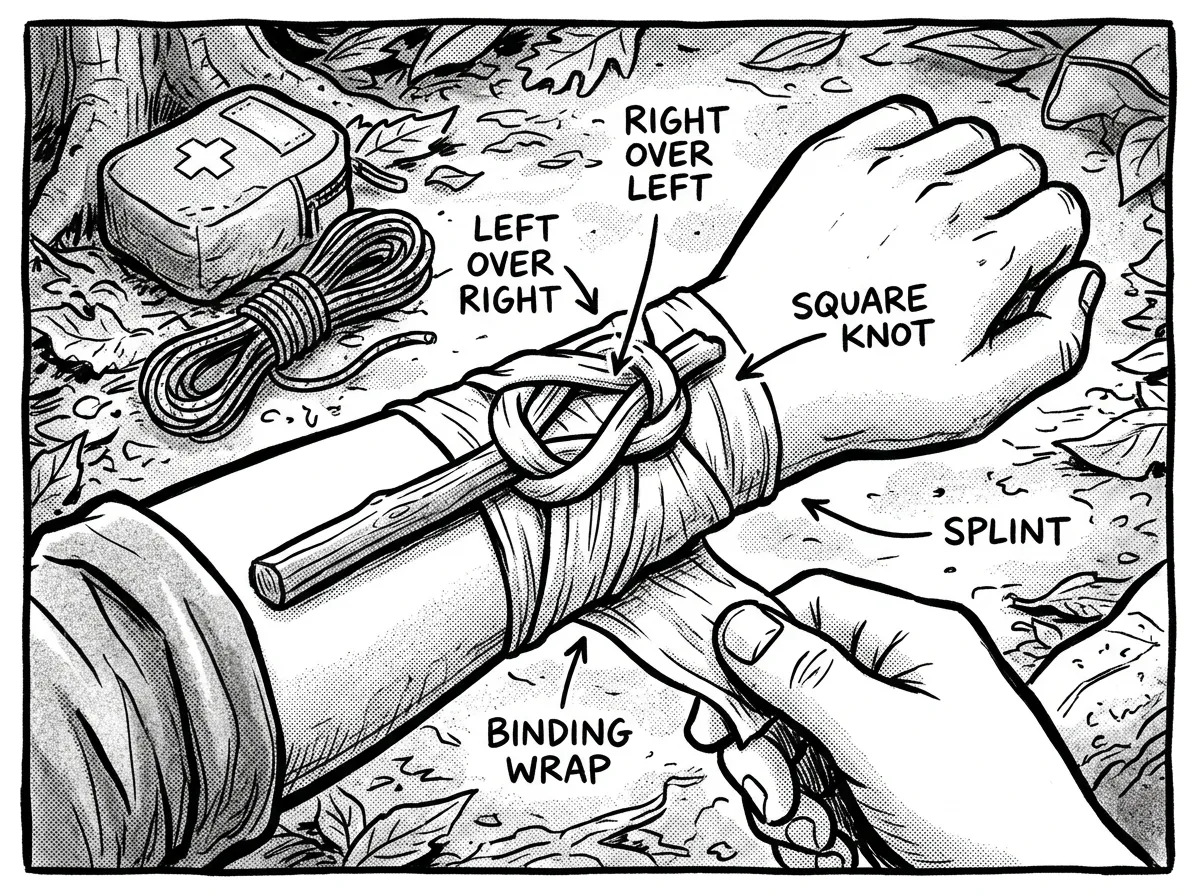 Tying a square knot to bind a splint wrap snug around a forearm
The Square Knot is the simplest binding knot for joining two ends of the same rope around a bundle. It’s the classic first-aid bandage knot. Works well for tying down tarps, bundling firewood, and lashing light loads.
Step-by-step:
- Hold one end in each hand.
- Cross right over left, wrap under and through. Pull snug.
- Now cross left over right, wrap under and through. Pull snug.
- The finished knot should lie flat with both working ends exiting on the same side as their respective standing parts.
- If the ends exit on opposite sides, you’ve tied a Granny Knot — untie it and start over.
The mantra is “right over left, then left over right.” Reverse the order and you get the unreliable Granny Knot, which slips under load. I’ve watched Granny Knots fail on bandages during WFR practical exams — it’s a common and completely avoidable mistake.
Approximate strength retention: 45-55% of rated rope strength (this is why it’s never for life-safety loads).
One thing I see constantly in my field courses: someone ties a beautiful knot, then immediately loads it without dressing or setting. That’s like building a house on a crooked foundation. I don’t care which knot you’re tying — take three seconds to make the strands lie flat and parallel, then pull it tight before you trust it. I’ve watched knots that looked perfect at a glance fail under moderate load because someone skipped the dress-and-set. It’s the single easiest way to improve every knot you tie.
When Each Knot Can Fail
Every knot has a failure mode. Knowing when yours might let you down — and having a backup plan — separates prepared from hopeful.
Bowline loosening under cyclic loading. If the load repeatedly goes on and off (a tarp flapping in wind, a boat bobbing in waves), a standard Bowline can work itself loose. Fix: Add a Yosemite finish — tuck the working end back through the knot alongside the standing part. This locks it against cyclic loosening.
Square Knot capsizing under unequal load. Pull one end of a Square Knot sharply and it flips into a slipknot (called “capsizing”) and falls apart. Happens when the two ropes differ in diameter or the load pulls asymmetrically. Fix: Switch to a Sheet Bend. Never use a Square Knot where lives depend on it.
Clove Hitch slipping on smooth poles. On a varnished post, metal pipe, or rain-slicked branch, a Clove Hitch can slide. Fix: Add two half hitches after the Clove Hitch. On very smooth surfaces, use a Round Turn and Two Half Hitches instead.
Figure Eight jamming after heavy load. After bearing significant weight, a Figure Eight can become extremely difficult to untie. Fix: Accept it and cut the knot out, or use a Bowline in non-critical applications where easy release matters more.
Sheet Bend slipping on wet synthetic rope. Modern slick synthetics — especially wet polypropylene — can defeat a single Sheet Bend. Fix: Double it. For critical applications on very slick cordage, consider a Zeppelin Bend, which is nearly slip-proof and unties easily.
The simplest backup for any knot: add a half hitch after it. Takes five seconds. I do this almost reflexively now on anything load-bearing.
Practical Applications: Survival Knots in the Field
Knowing knots in isolation isn’t enough. Here’s how I combine them in real Pacific Northwest scenarios.
Setting Up a Rain Shelter Between Two Trees
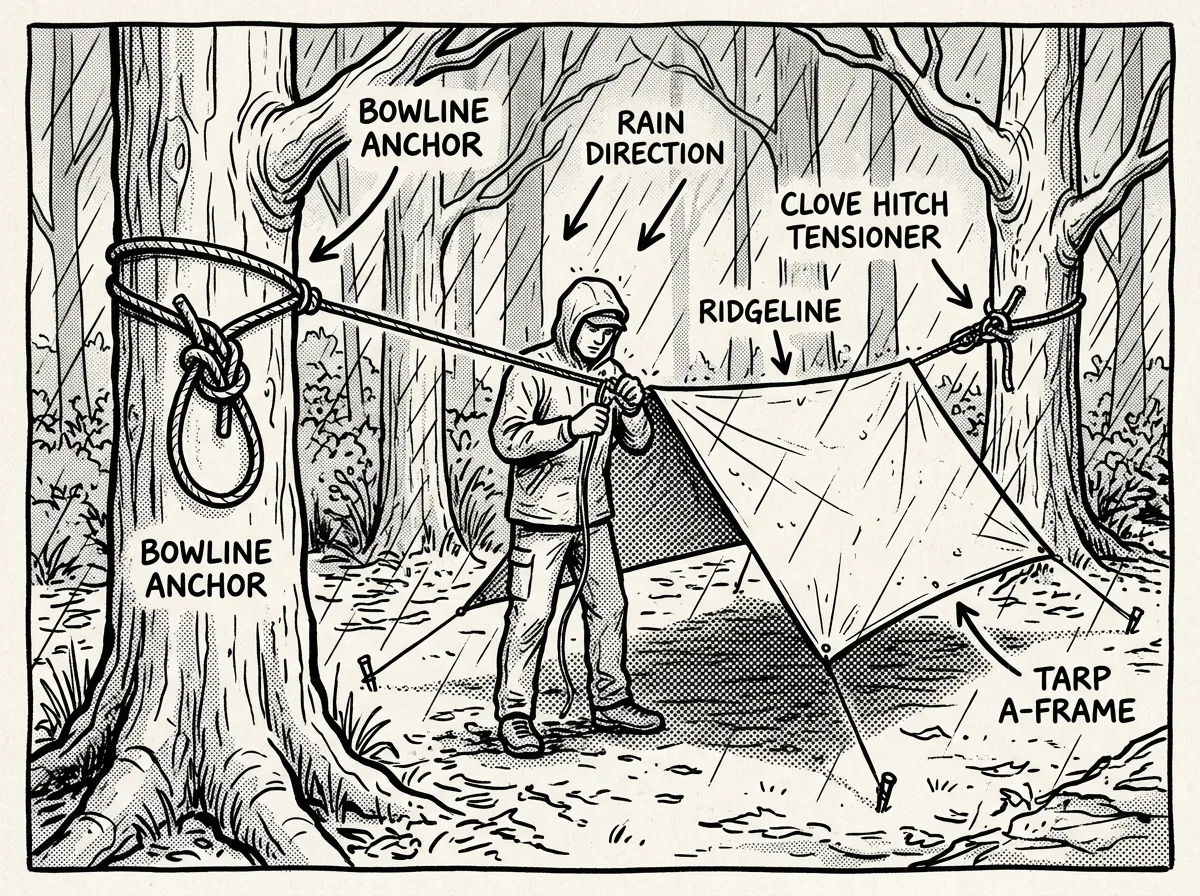 Rigging a tarp shelter with a bowline anchor and clove hitch tensioner between two trees
This is the scenario I run most often in field courses. Tie a Bowline around the first tree at chest height for a fixed anchor. Run the rope to the second tree and use a Clove Hitch with two half hitches to anchor and tension the ridgeline. Drape your tarp over the line. Use Figure Eight stopper knots at each grommet to prevent paracord guylines from pulling through. The whole system goes up in under five minutes and handles PNW horizontal rain. For the full approach, see my guide on shelter building basics.
Joining a Broken Line During a River Crossing
Your 50-foot utility rope isn’t long enough to reach across a flooded creek, and you’ve got 30 feet of paracord in your pack. Sheet Bend the paracord to the thicker rope — the diameter difference is exactly what this knot handles. Double it, because the rope is soaking wet. Test the join under load before anyone trusts weight to it.
Creating an Improvised Drag Litter
With two sturdy poles and a tarp or jacket, you can build an emergency litter using Square Knots to lash the crossbars. The Square Knot works here because both lashing ends are the same diameter and the load is distributed, not hanging from a single point. Pair this with emergency first aid basics for a complete field response.
A PNW windstorm knocks out power at your base camp. Tarps are flapping loose, gear bins are sliding, and rain isn’t stopping. You’ve got 15 minutes of daylight left. Clove Hitches on stakes and poles keep tarps in place. Bowlines create fixed loops for lashing coolers and bins to anchor points. Back everything up with half hitches — wind loads are cyclic and unpredictable.
Printable Survival Knots Quick Reference
Screenshot this table, save it to your phone, or print it for your pack. I keep a laminated version in my bug out bag.
| Knot | Type | Best For | Strength Retention | Key Warning |
|---|---|---|---|---|
| Bowline | Loop | Rescue loops, ridgelines, hauling | 60-75% | Can loosen under cyclic loading — add Yosemite finish |
| Clove Hitch | Hitch | Anchoring to posts, poles, trees | 60-65% | Slips on smooth surfaces — add half hitches |
| Figure Eight | Stopper | Preventing rope pull-through | 75-80% | Can jam after heavy loading |
| Sheet Bend | Bend | Joining ropes of different sizes | 55-65% | Slips on wet synthetics — double it |
| Square Knot | Binding | Bundling, bandages, light lashing | 45-55% | Capsizes under unequal load — never life-safety |
Practice Materials and Getting Started
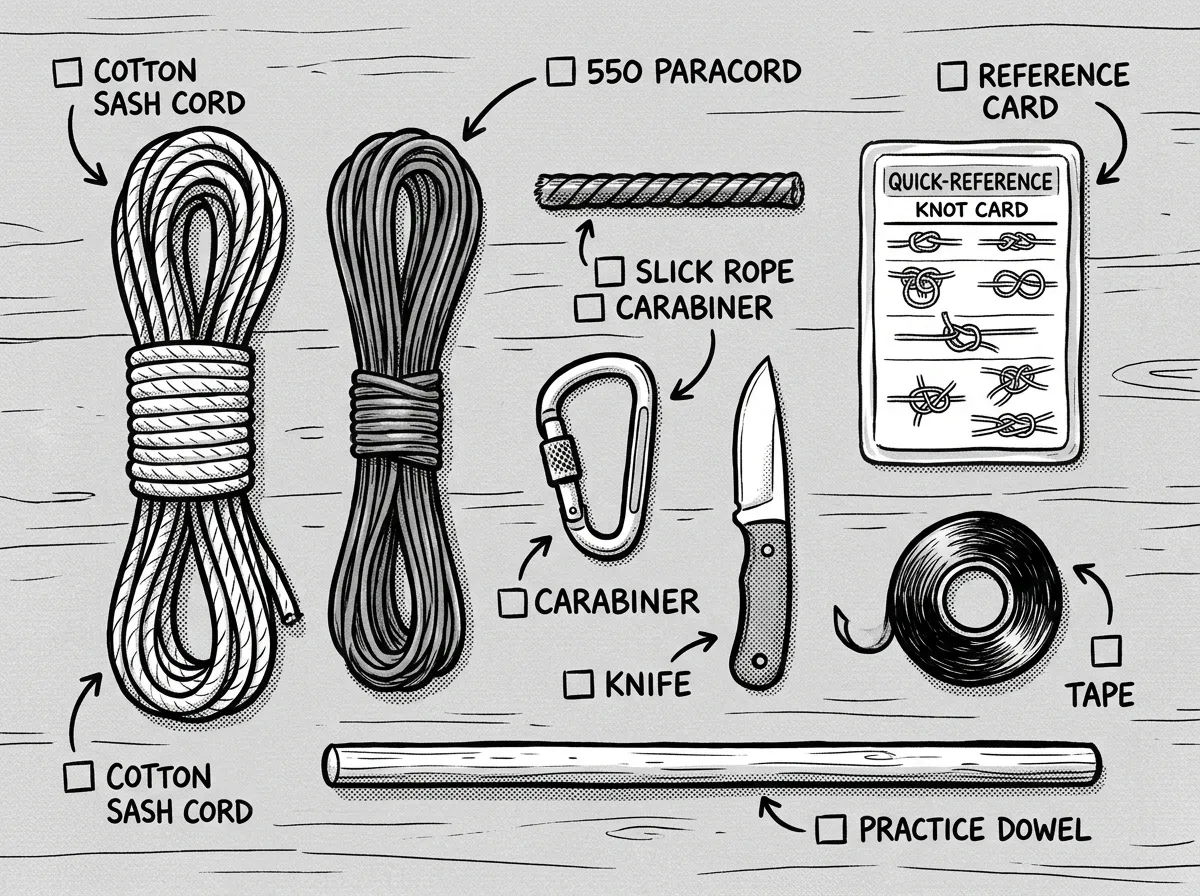 Starter knot-tying practice kit laid out and ready to go
You don’t need expensive gear to learn survival knots. Here’s exactly what I recommend.
Pick up 10 feet of 550 paracord and 10 feet of 3/8-inch braided nylon rope. That’s enough to practice all five knots. For paracord recommendations, check out our guide to the best paracord for survival kits.
Start with thick, grippy rope. Cotton or natural-fiber rope in 3/8-inch to 1/2-inch diameter is ideal for beginners. The larger diameter makes the knot structure clearly visible, and the texture gives your fingers grip while you’re learning. I have my students start on cotton sash cord — it’s cheap and doesn’t fight you.
Graduate to slick synthetics. Once you can tie all five knots on cotton, switch to paracord and polypropylene. This matters because in real emergencies, your rope will often be wet, muddy, or coated in tree sap. If you can tie a Bowline on slick wet nylon at 11 PM in the rain, you can tie it anywhere.
Practice on real tasks. Set up a tarp in your backyard. Hang a food bag from a tree branch. Lash two poles together. Real application cements muscle memory in a way that tying knots on your couch never will.
The Knot Cards waterproof reference set — around $10 — lives permanently in my field pack. I’ve tried apps, laminated printouts, and pocket guides, and nothing beats a set of durable cards you can flip through with wet hands while standing in the rain. Even after 12 years of tying these knots, I keep them in my kit. Under real stress, your memory can blank. A card doesn’t care about your adrenaline level.
How to Build Real Mastery
So how do you go from “I watched a video” to “I can tie this behind my back in the dark”? Here’s the progression I use with my students:
- Learn one knot at a time. Start with the Bowline. Don’t move on until you can tie it with your eyes closed.
- Practice 5-10 reps per knot, 10 minutes daily, for one week per knot. That’s five weeks to solid competency on all five.
- Practice in degraded conditions. Wet hands. Gloves. One hand. In the dark. Behind your back. These aren’t party tricks — they’re realistic emergency scenarios.
- Inspect every knot. Neat turns, no twists, working end tails at least 6 rope diameters long. Dress it, then set it.
- Test under load before relying on any knot. Pull hard. Bounce the load. Cycle the tension on and off. If it slips, you caught it on the ground instead of in a crisis.
The first time I tried tying a Bowline one-handed during a WFR exercise, I fumbled it three times in a row under time pressure. Embarrassing? Sure. But that failure taught me something no classroom session ever did: the gap between knowing a knot and owning a knot is enormous. You close that gap with reps, not reading.
Next Knots to Add to Your Repertoire
Once you’ve truly mastered these five essential survival knots, here are four worth adding:
- Trucker’s Hitch — creates a 3:1 mechanical advantage for tensioning ridgelines, tie-downs, and clotheslines. Hands down the single most useful “level two” knot.
- Prusik Hitch — a friction hitch that grips a rope when loaded and slides when unloaded. Essential for ascending fixed ropes and creating adjustable tarp anchors.
- Alpine Butterfly — creates a secure loop in the middle of a rope without needing access to either end. Perfect for multi-point anchor systems.
- Double Fisherman’s Knot — a near-permanent bend for joining two ropes of similar diameter. Used extensively in climbing for cord loops and backup systems.
Start Tying This Weekend
Survival knots are the ultimate high-return, low-cost preparedness skill. A $5 hank of rope and 10 minutes of daily practice give you capabilities that no gadget can replace — capabilities that work when batteries die, gear breaks, and plans fall apart.
I’ve relied on these five knots through Pacific Northwest windstorms, WFR rescue scenarios, backcountry shelter setups, and more improvised field situations than I can count. They haven’t let me down — because I practiced them until they were automatic.
Here’s your action plan: buy 10 feet of cotton rope and 10 feet of paracord this week. Learn the Bowline first. Practice 10 reps a day until you can tie it one-handed with your eyes closed. Then move to the Clove Hitch. Five weeks from now, you’ll own five survival knots that are truly yours — knots you can tie in the dark, in the rain, under stress.
Pair your knot practice with fire-starting skills, shelter building fundamentals, and first aid training, and you’ve built a core survival skill set that covers the fundamentals. Add a well-stocked bug out bag with paracord and a waterproof knot card, and you’re genuinely prepared — not just hoping for the best.
Start tying. Your future self will thank you.
The Complete
Prepper's Reference.
149 articles synthesized into one comprehensive PDF — twelve chapters covering water, food, shelter, first aid, comms, and scenario-specific preparedness. Free with your email.
Unsubscribe anytime · We never share your email
You're in. Check your inbox.
Keep Reading

Primitive Survival Skills: Zero-Gear Techniques That Work
Master 10+ primitive survival skills for fire, shelter, water, and tools with zero gear. Field-tested by a FEMA-trained WFR with 12 years of experience.
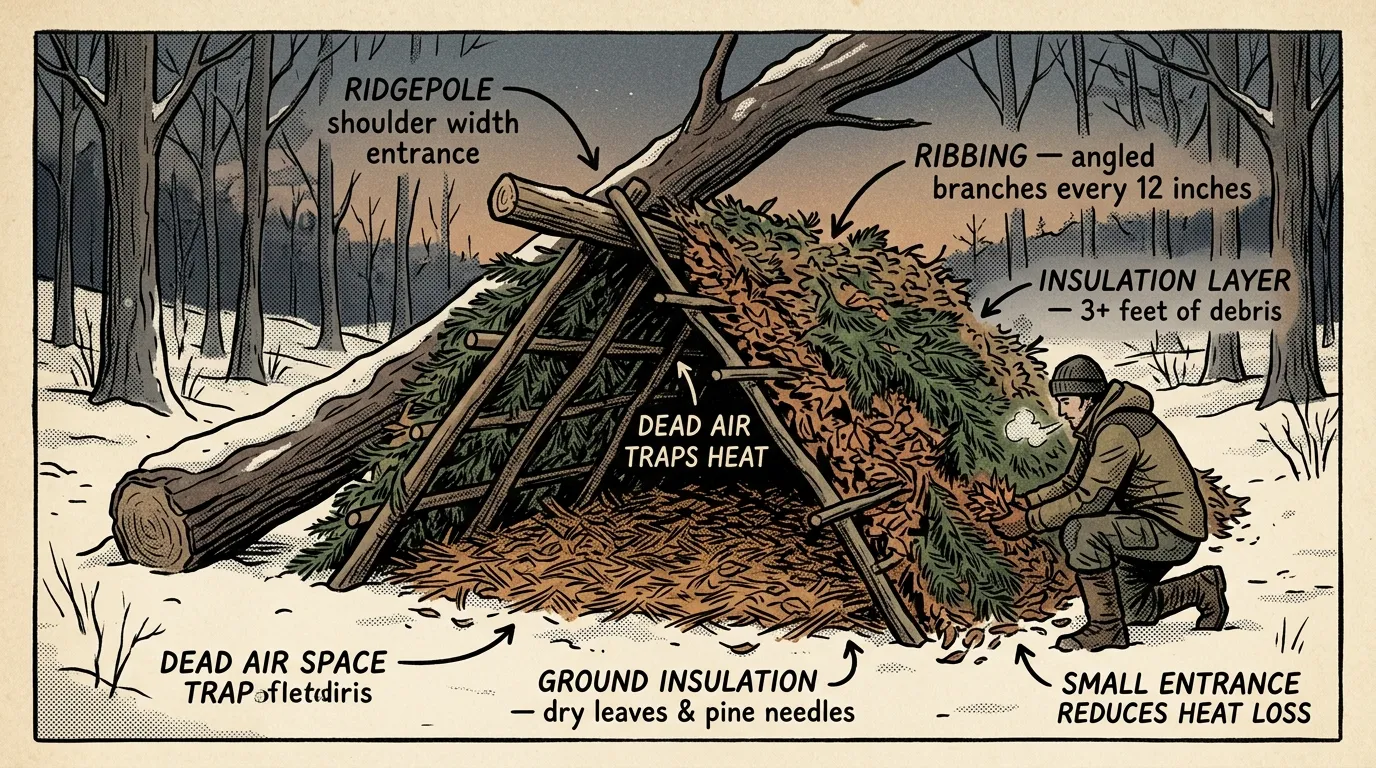
How to Build a Survival Shelter That Stays Warm
Learn how to build a survival shelter that stays warm and dry using natural materials. Step-by-step lean-to guide from a Wilderness First Responder.
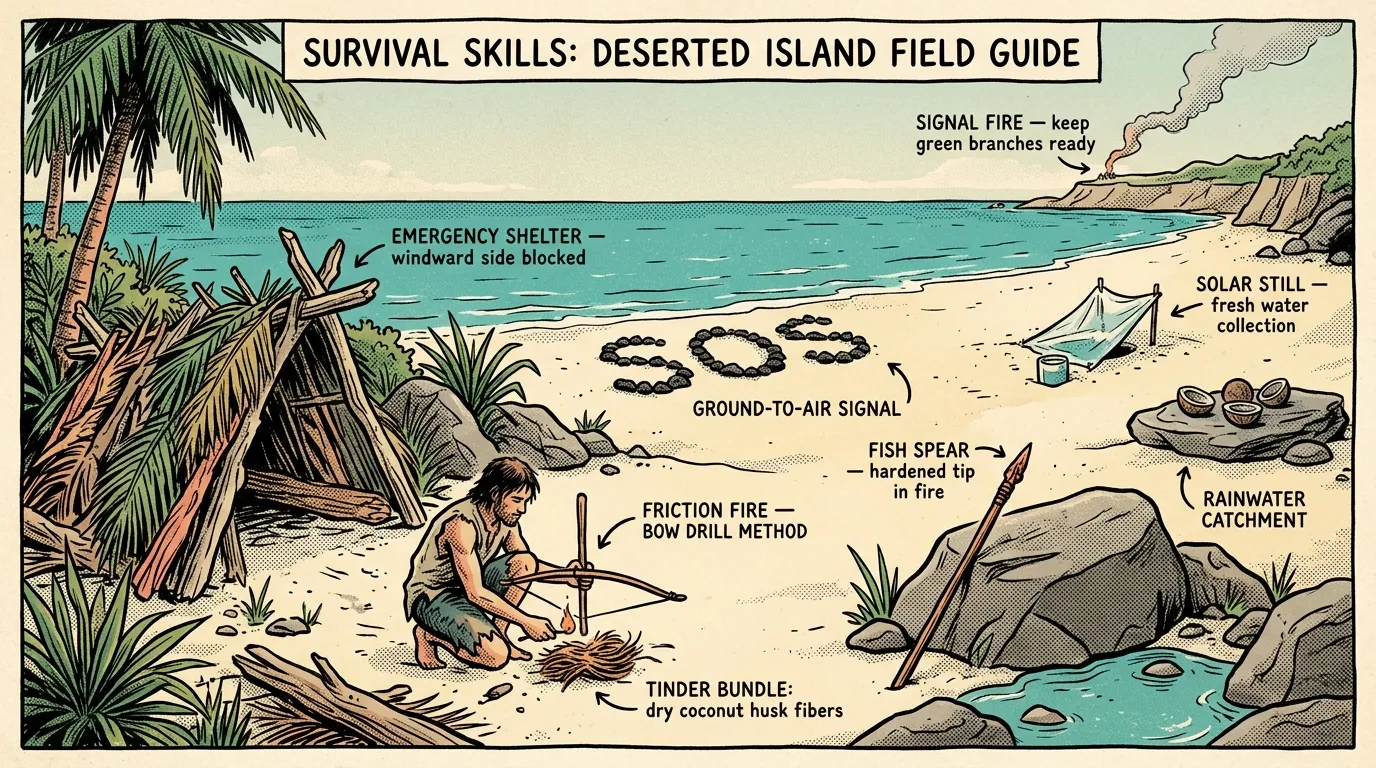
Survival Skills on a Deserted Island: Field Guide
Master survival skills on a deserted island — water, shelter, fire, food, and rescue signaling from a WFR with 12+ years of field experience. Start learning now.