To stay warm and dry in the wild, build a small lean-to shelter in an elevated, wind-protected location using sturdy branches, thick natural insulation, and plenty of ground bedding. Make it waterproof and windproof with a steep layered roof, blocked drafts, and more debris coverage than you think you need.
Key Takeaways
- Insulate the ground first with 6+ inches of dry material — conductive heat loss through cold soil kills faster than a drafty roof.
- Build your shelter barely wider than your body; every extra cubic foot of air is space your body has to heat for nothing.
- Use the light test from inside: if daylight shows through the roof, keep piling debris until it doesn't.
- Position a log reflector wall behind your fire to bounce radiant heat directly into your shelter opening — it's like adding a second heat source.
- Start building at least 2 hours before dark; a half-finished shelter in daylight beats a perfect plan after sunset.
How to Build a Survival Shelter That Stays Warm
TL;DR: Knowing how to build a survival shelter is the single most critical wilderness skill you can practice before you actually need it. Build a small, tight lean-to from natural materials, insulate the ground heavily, layer the roof until no light passes through, and use a fire with a reflector wall to stay warm overnight. Start at least two hours before dark — a half-finished shelter beats a perfect plan after sunset.
Quick Summary
- Shelter comes first — the Rule of Threes says you’ve got roughly three hours in harsh conditions without it, and wet plus wind can accelerate that dramatically.
- Build small. Your shelter should barely fit your body. Every extra cubic foot of air is wasted heat.
- Insulate the ground before anything else — you’ll lose more heat downward through conduction than upward through convection.
- The light test is your quality check. Lie inside, look up. If daylight shows through, keep adding debris.
- Fire plus a reflector wall raises interior temps 20–30°F above ambient when done right.
- Practice in safe conditions first. The skills you build in comfort are the ones that save you in crisis.
Why Shelter Is Your First Survival Priority
The survival Rule of Threes says you can survive roughly three hours in harsh conditions without shelter. That’s a memory aid, not a stopwatch — but the urgency behind it is dead real. As a certified Wilderness First Responder, I’ve treated hypothermia cases in 55°F rain that progressed faster than some I’ve seen at 30°F in dry air. Wet plus wind is the killer combo.
Your body loses heat through four mechanisms: conduction (contact with cold ground), convection (wind stripping warmth away), radiation (body heat escaping into open air), and evaporation (wet clothing or sweat cooling your skin). A good shelter addresses all four. That’s the entire game plan.
The shelter that keeps you alive isn’t the prettiest one — it’s the one you actually finish before dark.
Best Primitive Shelter for Cold Weather: Comparing Your Options
So which design should you actually build? That depends on your situation — fire availability, terrain, snow depth, and how much daylight you’ve got left. Here’s what I’ve found works best after 12+ years of testing across the Pacific Northwest.
Lean-To
A single sloping roof supported by a ridgepole, open on one side. This is the best cold-weather shelter when you have a fire — the open face catches radiant heat while the angled roof blocks wind and rain. Build time: 45–90 minutes with basic tools.
Debris Hut
A body-sized cocoon of sticks and dry debris that works like a primitive sleeping bag. It’s the warmest no-fire shelter for a single person because it minimizes air volume. Build time: 60–120 minutes.
Snow Cave
Dug into a deep, stable snowbank, a snow cave holds interior temps near 32°F regardless of what’s happening outside. Best for deep snow environments. Build time: 90–180 minutes with a shovel or improvised tool.
Quinzhee
A mound of piled snow that you hollow out after it sets. Easier to build than a snow cave when you don’t have a natural snowbank to work with. Build time: 2–4 hours including settling time.
Wickiup
A cone-shaped frame of poles covered in debris, similar to a tipi. Works well for longer-term camps and can accommodate a small fire with a smoke hole at the top. Build time: 2–3 hours.
| Shelter Type | Build Time | Warmth (No Fire) | Warmth (With Fire) | Best Conditions |
|---|---|---|---|---|
| Lean-To | 45–90 min | Moderate | Excellent | Forest, mild to cold |
| Debris Hut | 60–120 min | Excellent | N/A (enclosed) | Forest, cold, no fire |
| Snow Cave | 90–180 min | Good | N/A (enclosed) | Deep snowpack |
| Quinzhee | 2–4 hrs | Good | N/A (enclosed) | Moderate snow |
| Wickiup | 2–3 hrs | Moderate | Good | Forest, long-term camp |
For most emergency situations in forested terrain, I recommend the lean-to. It’s forgiving, quick, and when paired with a fire and reflector wall, it’s remarkably effective at keeping you warm through the night.
How to Build a Survival Shelter: Step-by-Step Lean-To
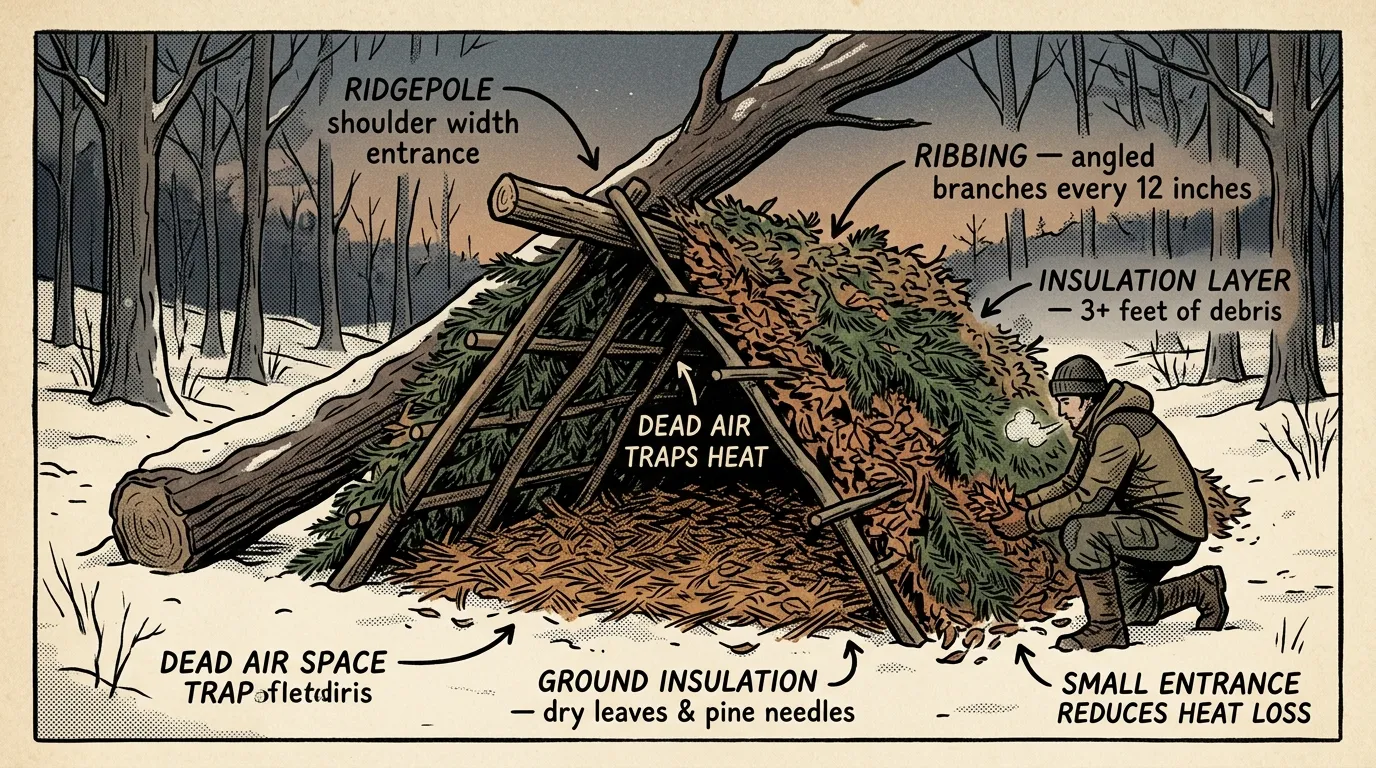
 Building a lean-to shelter step by step using natural materials
- Choose an elevated, wind-protected site — higher ground with natural windbreaks, away from flood channels, dead overhead limbs, and unstable rock.
- Set a sturdy ridgepole (8–10 feet) between two supports like forked branches or tree trunks. High end about 4 feet off the ground, low end around 3 feet for a solo shelter.
- Lean closely spaced rafters (4–6 inch gaps) against the ridgepole on the windward side. Press firmly on the ridgepole to test stability before adding weight.
- Weave a cross-branch lattice across the rafters to create a grid that prevents insulating debris from falling through.
- Layer debris roofing from bottom to top like shingles — leaves, pine needles, grass, boughs — at least 12 inches thick. Do the light test from inside: if daylight shows through, keep adding material.
- Insulate the ground with 6+ inches of dry bedding. Pile dry leaves, pine boughs, or ferns beneath you. In freezing conditions, double that thickness.
- Build a reflector wall opposite the opening by stacking green logs or rocks behind your fire pit to bounce radiant heat into the shelter.
This entire build takes 45–90 minutes with a knife and cordage. During a November training exercise near Mount Rainier, our team built a debris lean-to in 70 minutes that held interior temps 25°F warmer than ambient through the night. The key was 14 inches of packed cedar boughs on the roof.
I’ve built more lean-tos than I can count, and the Mora Companion — around $15–$20 — is what lives in my pack for shelter work. It’s not fancy, but the blade geometry handles batoning small limbs and processing boughs better than knives costing five times as much. I’ve broken exactly zero of them in the field, and I can’t say that about some pricier options I’ve tested.
Essential Materials for Wilderness Shelter Building
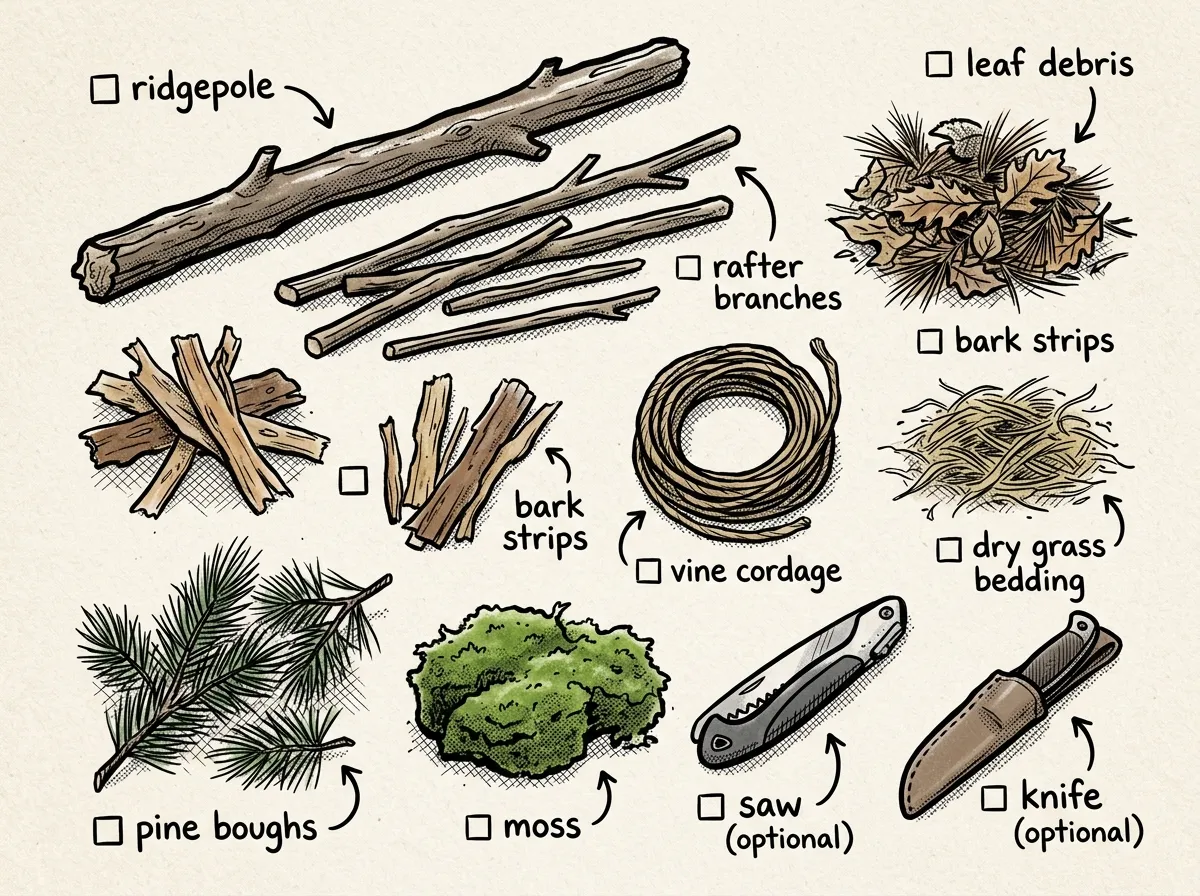 Core natural and improvised materials for building a survival shelter
Natural materials (collect dry whenever possible):
- Long sturdy poles for the ridgepole and main frame (8–10 feet for solo shelters)
- Thicker poles for rafters; smaller sticks and brush for the lattice
- Leaves, pine needles, grass, ferns, or bark for roof and wall insulation
- Pine boughs or dry debris for ground bedding
- Rocks or logs for anchoring edges and building reflector walls
- Vines or flexible roots for lashings if you don’t have cordage
Modern gear that speeds the job:
- Fixed-blade knife; a small saw or hatchet cuts build time significantly
- Paracord or strong cordage — learn essential survival knots for shelter building before you need them
- Tarp or emergency bivvy (Mylar) for instant waterproofing
- Closed-cell foam sleeping pad for ground insulation
- These items belong in every 72-hour emergency kit
Waterproofing, Windproofing, and Ground Insulation
Building a waterproof shelter without modern materials takes deliberate technique. Let me break down what actually works — and what doesn’t.
Roof Angle and Layering
Aim for a 45–60 degree roof angle. That’s the sweet spot where rain sheds quickly without making the interior so cramped you can’t move. Steeper is better for water shedding but worse for livable space.
Layering order matters. Start with your lattice of cross-branches, then pack fine debris — leaves, pine needles, grass — into the gaps. On top of that, add larger overlapping materials: broad leaves, fern fronds, or evergreen boughs. Work from the bottom edge upward like shingles so water runs down and off. Large overlapping sheets of bark from birch, cedar, or poplar make the best natural shingles when you can find them.
A 12-inch debris thickness will shed moderate rain for several hours. But I’ll be honest: in a sustained Pacific Northwest downpour, a tarp underneath your debris is the only reliable waterproofing. If you’ve got one, drape it over the frame first, tension it to prevent pooling, then layer debris on top for insulation and camouflage.
Wind Protection
Orient your entrance away from prevailing wind. Pack brush, logs, or banked debris on the windward side. In my experience, wind is the factor people underestimate most — even a slight breeze strips body heat through convection faster than most beginners expect.
Ground Insulation
Here’s where most people fail, and it’s the mistake that drives me crazy because it’s so easy to fix. You lose more heat downward through conduction than upward through convection. Cold ground is relentless. Sleep directly on frozen or wet soil and you’ll be hypothermic regardless of how gorgeous your roof is.
Build a ground bed at least 6 inches thick with dry leaves, pine boughs, or grass. In freezing conditions, I aim for 10–12 inches. If you’re carrying a closed-cell foam pad, use it — the R-value of even a cheap foam pad dramatically outperforms natural materials alone. If you’re in a humid Gulf Coast climate where everything on the ground is damp, you’ll need to dig deeper into leaf piles to find the dry layers underneath, or prioritize elevated platforms made from stacked branches.
Here’s the simplest ground insulation test: lie on your bed for two full minutes. If you feel cold creeping through your back or hips, you don’t have enough. Add more. Then add more again.
How to Build a Shelter With No Tools
Can you really build a functional shelter bare-handed? Absolutely. It just takes longer, so you’ve got to start earlier.
Breaking branches: Don’t try to snap thick limbs with your hands — you’ll exhaust yourself and probably hurt something. Instead, wedge a branch into a fork in a tree trunk and lever it until it breaks. For thinner branches, step on them near the base. Anything thicker than your wrist? Find it already on the ground.
Improvised cordage: Strip flexible inner bark from dead branches, or pull long strands from grapevines, willow shoots, or roots. These won’t hold like paracord, but they’ll secure a ridgepole long enough to get your shelter built.
Improvised hammering: A fist-sized rock works fine for pounding stakes or driving forked supports into the ground. Nothing elegant about it, but it works.
Natural supports: Look for naturally forked trees spaced 6–8 feet apart — these eliminate the hardest part of the build by giving you ready-made ridgepole supports. A fallen tree at the right height can serve as a pre-made ridgepole. I’ve found that scanning your surroundings for five minutes before you start building saves thirty minutes of construction. Nature’s already done half the work if you know what to look for.
Without tools, a lean-to that takes 60 minutes with a knife and cordage will take 2–3 hours. That’s fine — as long as you plan for it. Start building the moment you know you’ll be spending the night. Every minute of daylight counts.
Using Fire to Heat Your Shelter Safely
A survival shelter with fire is dramatically warmer than one without. When I tested lean-to setups during winter training in the Cascades, adding a properly placed fire with a reflector wall consistently raised interior temperatures 20–30°F above ambient. Here’s how to do it right.
Fire Placement
Position your fire 4–6 feet from the lean-to opening. Close enough that you feel radiant heat on your face while lying down, far enough that sparks and embers aren’t landing on your shelter or bedding. I’ve watched people make this mistake more times than I can count — building their fire too close, then spending the night paranoid about embers instead of sleeping.
Building a Log Reflector Wall
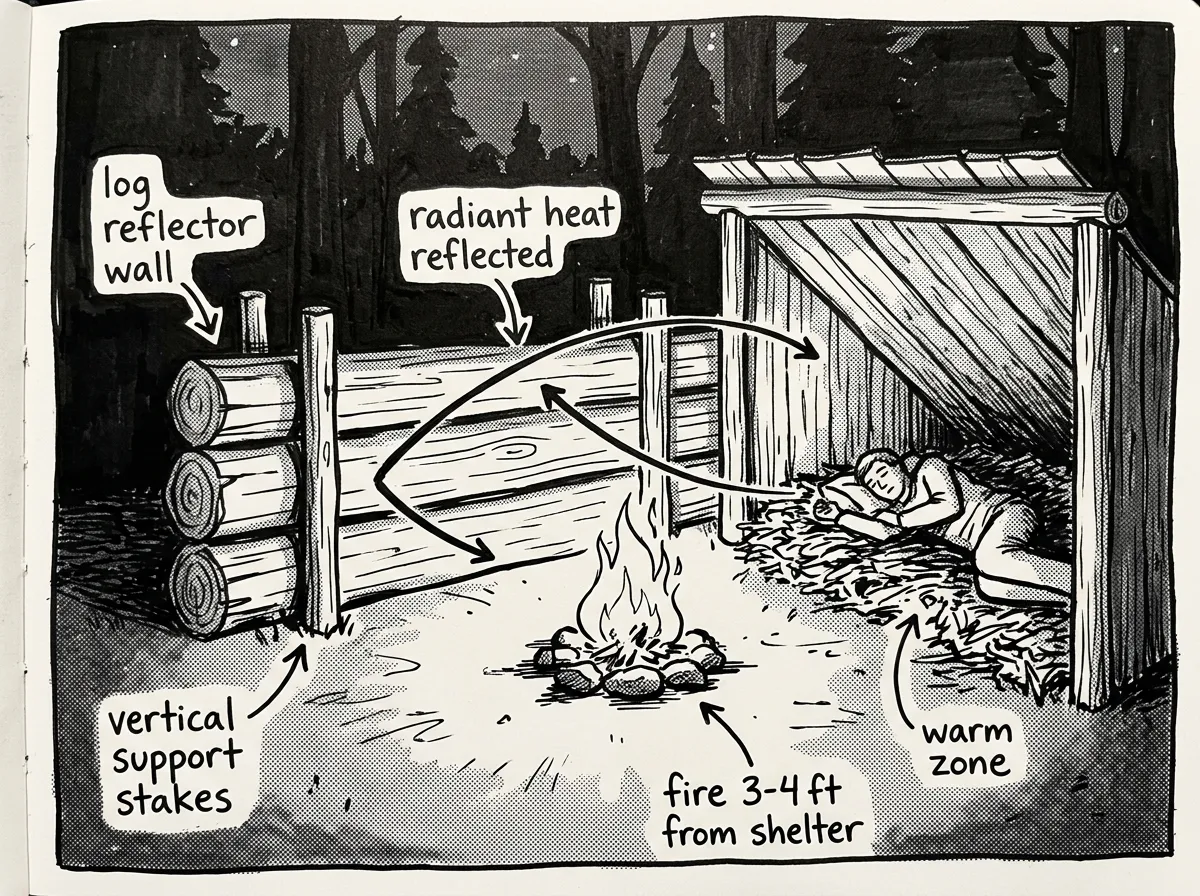 A log reflector wall bounces fire heat directly into the shelter opening
Stack green logs or rocks in a wall 2–3 feet high directly behind the fire, opposite your shelter opening. This wall bounces radiant heat back toward you instead of letting it escape into the forest. The difference is massive.
Build the wall by stacking logs horizontally between two driven stakes. Green logs work best because they resist burning. Angle the wall slightly forward — leaning toward the shelter — for maximum heat reflection.
Long-Log Fire for Overnight Warmth
For sustained warmth through the night, use the long-log fire technique: lay two thick logs (6–8 inches in diameter, 4–5 feet long) parallel with a 6-inch gap between them. Build your fire in the gap. As the logs burn from the inside, they feed the fire slowly and steadily for hours without you needing to wake up every twenty minutes to feed it.
Fire Safety
- Clear a 10-foot perimeter around your fire down to mineral soil when possible
- Never build a fire inside an enclosed shelter — carbon monoxide kills silently
- Keep water or loose dirt within arm’s reach
- Watch for wind shifts that could push flames or sparks toward your shelter
- If conditions are wet and you’re struggling to get flames going, review how to start a fire in wet conditions
Advanced: Hot-Coal Bed Technique
For extreme cold without a sustained fire, dig a shallow trench where you’ll sleep, build a fire in it for 1–2 hours, then scrape out the coals and cover the heated ground with 4–6 inches of dirt and debris before laying your bedding on top. The stored heat radiates upward for hours. This takes planning and real effort, but I’ve seen it work impressively in below-freezing conditions on Cascade training trips.
Staying Warm Without Fire: The Debris Hut
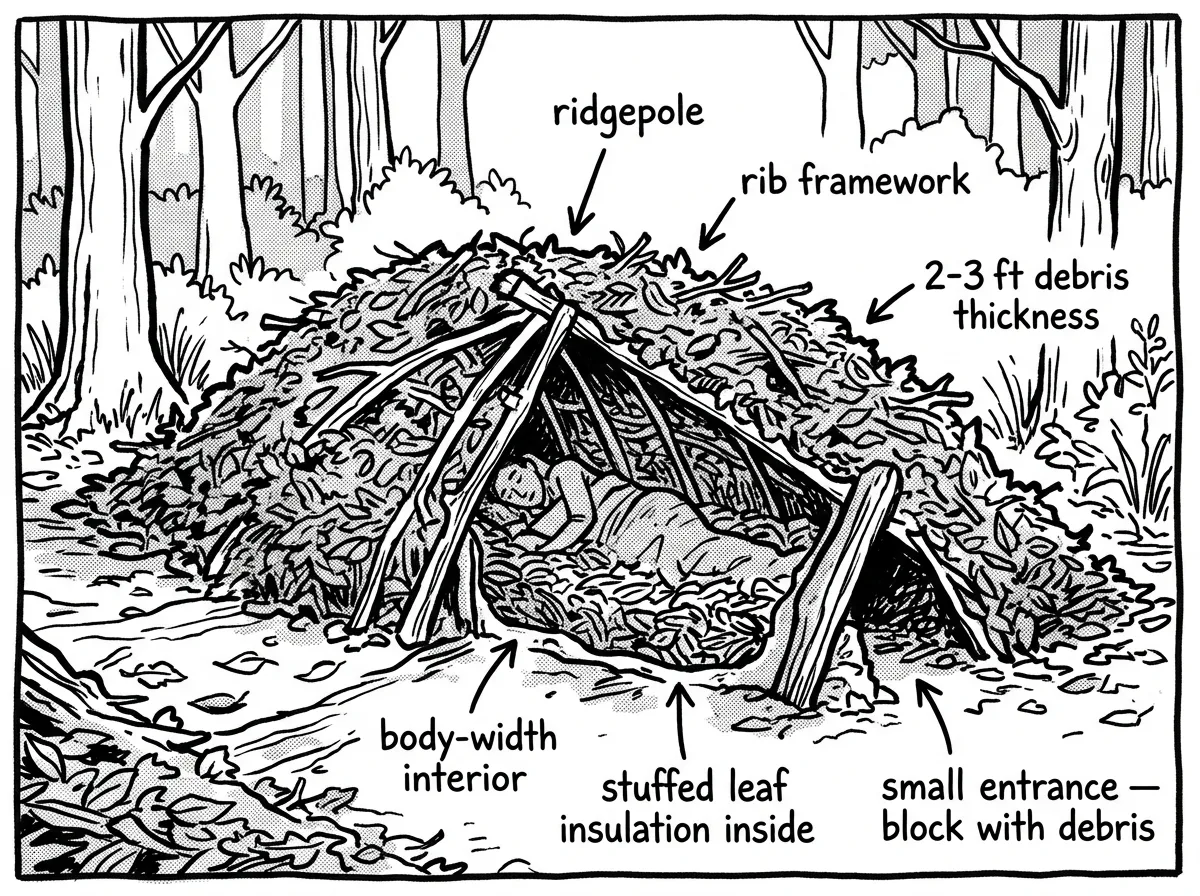 A debris hut traps body heat using thick insulation and minimal air volume
Sometimes you can’t build a fire. Maybe conditions are too wet, fire danger is too high, or you simply don’t have the means. The debris hut becomes your best option — it’s the warmest primitive shelter for cold weather when fire isn’t happening.
How It Works
Think of it as a human-sized sleeping bag made entirely from forest materials. The goal is creating a cocoon so heavily insulated that your body heat alone keeps the interior warm.
Start with a ridgepole propped at one end on a stump or rock, angled down to the ground at the other. The high end should be just tall enough for you to sit up slightly — no taller. Lean sticks against both sides to create a ribcage shape barely wider than your shoulders.
Now comes the critical part: bury it in debris. Pile dry leaves, pine needles, grass, and ferns 2–3 feet thick on all sides and on top. More is better. You want this thing to look like a giant mound of forest floor that nobody would look at twice.
Stuff the interior too. Crawl inside and pack loose, dry debris around and on top of you like a nest. This is what actually traps your body heat. Close the entrance with a plug of packed leaves or a stuffed backpack.
The Physics
Your body generates about 100 watts of heat constantly. A debris hut minimizes the air volume that heat has to warm and surrounds you with insulation that prevents it from escaping. Combined with proper layering of your clothing, this approach has kept people alive through freezing nights for thousands of years.
The key variables are insulation thickness (2–3 feet minimum on all sides) and dry materials. Wet debris conducts heat away from you instead of trapping it. If everything’s damp, dig deeper into leaf piles for the dry layers underneath. In high desert environments where leaf litter is sparse, you may need to gather dry grass and sagebrush from a wider area — plan extra collection time.
The first time I slept in a debris hut, I built it way too big. I’m talking room-for-two big. I was so proud of it — and then I shivered for six miserable hours. The second one I built was so tight I could barely roll over, and I slept warm through a 28°F night near the Olympic Peninsula. That lesson cost me one awful night, but I’ve never forgotten it. Build it coffin-tight. Your ego won’t keep you warm, but trapped body heat will.
Common Mistakes and How to Avoid Them
After building and evaluating hundreds of shelters during training courses, these are the errors that show up over and over:
Building too large. This is the number one mistake. A shelter for one person should be barely wider than your shoulders and just tall enough to sit up in. Every extra cubic foot of air is space your body has to heat for nothing. I’ve watched students build beautiful lean-tos big enough for three people, then shiver all night because the interior never warmed up.
Thin roof coverage. Here’s the field test: lie inside your shelter and look up. If you can see sky — even a pinhole of daylight — heat is escaping and rain will find its way in. Keep layering debris until the roof is a solid, dark mass above you. Twelve inches is the minimum; in cold rain, go thicker.
Skipping ground insulation. I’ve said it already and I’ll say it again because I keep seeing this failure in the field. Six inches of dry bedding is the floor — literally. Cold ground is unforgiving.
Building under widow-makers. A widow-maker is a dead limb or standing dead tree that could fall on you. Before you commit to a site, look up. I scan the canopy every single time, and I’ve relocated builds more than once after spotting a cracked limb overhead. It takes thirty seconds.
Starting too late. If you think you might need a shelter tonight, start building now. Right now. A rushed but functional shelter built in daylight will always outperform a carefully planned shelter you’re still fumbling with by headlamp.
- Site chosen: elevated, wind-sheltered, away from widow-makers and flood channels
- Ridgepole secured and tested for stability
- Rafters placed 4–6 inches apart
- Cross-branch lattice installed
- Roof debris layered 12+ inches — passes the light test
- Ground bedding installed: 6+ inches of dry material
- Wind wall or reflector wall built
- Fire positioned 4–6 feet from opening with cleared perimeter
- Fire safety and local regulations confirmed
Practice Before You Need It
Don’t wait for an emergency to figure this out. Practice lean-tos and debris huts in safe, dry conditions — your backyard works, a local campsite works even better. Build with and without a tarp so you understand what natural materials actually demand. Time yourself so you know how long each design takes.
Combine shelter drills with fire craft and wilderness water purification methods for realistic scenario training. Keep a small kit — knife, cordage, tarp, foam pad — in your pack or vehicle so you’re always ready to build.
It’s 4:30 PM in November. You took a wrong turn on a day hike, your phone’s dead, and the temperature’s dropping fast with rain moving in. You’ve got a pocket knife, a granola bar, and maybe 90 minutes of usable daylight. This is exactly the moment where knowing how to build a survival shelter — and having practiced it — separates a cold, uncomfortable night from a genuine emergency.
Build It Before You Need It
Learning how to build a survival shelter isn’t about memorizing perfect designs. It’s about understanding a handful of core principles and practicing them until they’re automatic. Build small. Insulate the ground first. Layer the roof until the light test passes. Use fire with a reflector wall when you can, and build a debris cocoon when you can’t.
In my experience teaching emergency shelter construction across the Pacific Northwest, the students who survive training scenarios aren’t the ones who build the fanciest structures. They’re the ones who start early, build small, and insulate relentlessly. That’s the entire formula.
Get outside this weekend. Find a patch of woods. Build a lean-to. Time it. Sleep in it if you can. Your future self — cold, wet, and running out of daylight — will thank you for the practice.
Frequently Asked Questions
What is the best primitive shelter for cold weather?
It depends on whether you’ve got fire. The debris hut is the warmest no-fire option for a single person because it minimizes air volume and surrounds you in thick insulation. If you can safely build a fire, a lean-to with a log reflector wall is the best cold-weather shelter — blocked wind, shed rain, and directed radiant heat is a combination that’s hard to beat. In deep snow, a snow cave holds interior temps near 32°F regardless of outside conditions, which can be a lifesaver when ambient temps drop well below zero.
How to build a shelter to stay warm?
Build small, insulate heavily, and address heat loss in all directions. Your shelter should be barely wider than your body. Insulate the ground with at least 6 inches of dry material — this stops conductive heat loss, which is your biggest enemy. Layer the roof thick enough that no daylight passes through. If you’ve got fire, position it 4–6 feet from the opening with a reflector wall behind it. If you don’t, build a debris hut and stuff the interior with dry material around your body like a nest.
What is the easiest type of shelter to build in the wild?
The lean-to is the easiest and most forgiving design for beginners. It requires one ridgepole, evenly spaced rafters, a simple lattice, and layered debris. You can build one in 45–90 minutes with basic tools or 2–3 hours without any tools at all. It pairs naturally with a fire for warmth and adapts to almost any forested environment.
How do you build a shelter in the woods with no tools?
Use naturally forked trees as ridgepole supports, break branches by leveraging them against tree trunks, and strip flexible bark or vines for improvised cordage. Use rocks as hammers to drive stakes. Focus on a simple lean-to or debris hut design — avoid anything complex. The build takes roughly twice as long without tools, so start 2–3 hours before dark.
How do you waterproof a shelter in the woods?
Set your roof angle between 45–60 degrees for maximum water shedding. Layer materials from bottom to top like shingles — lattice first, then packed fine debris, then larger leaves or boughs as a cap. Bark sheets from birch, cedar, or poplar make excellent natural shingles. Build at least 12 inches of total thickness. For sustained heavy rain, a tarp under the debris layer is the only truly reliable waterproofing method in the field.
The Complete
Prepper's Reference.
149 articles synthesized into one comprehensive PDF — twelve chapters covering water, food, shelter, first aid, comms, and scenario-specific preparedness. Free with your email.
Unsubscribe anytime · We never share your email
You're in. Check your inbox.
Keep Reading

Primitive Survival Skills: Zero-Gear Techniques That Work
Master 10+ primitive survival skills for fire, shelter, water, and tools with zero gear. Field-tested by a FEMA-trained WFR with 12 years of experience.
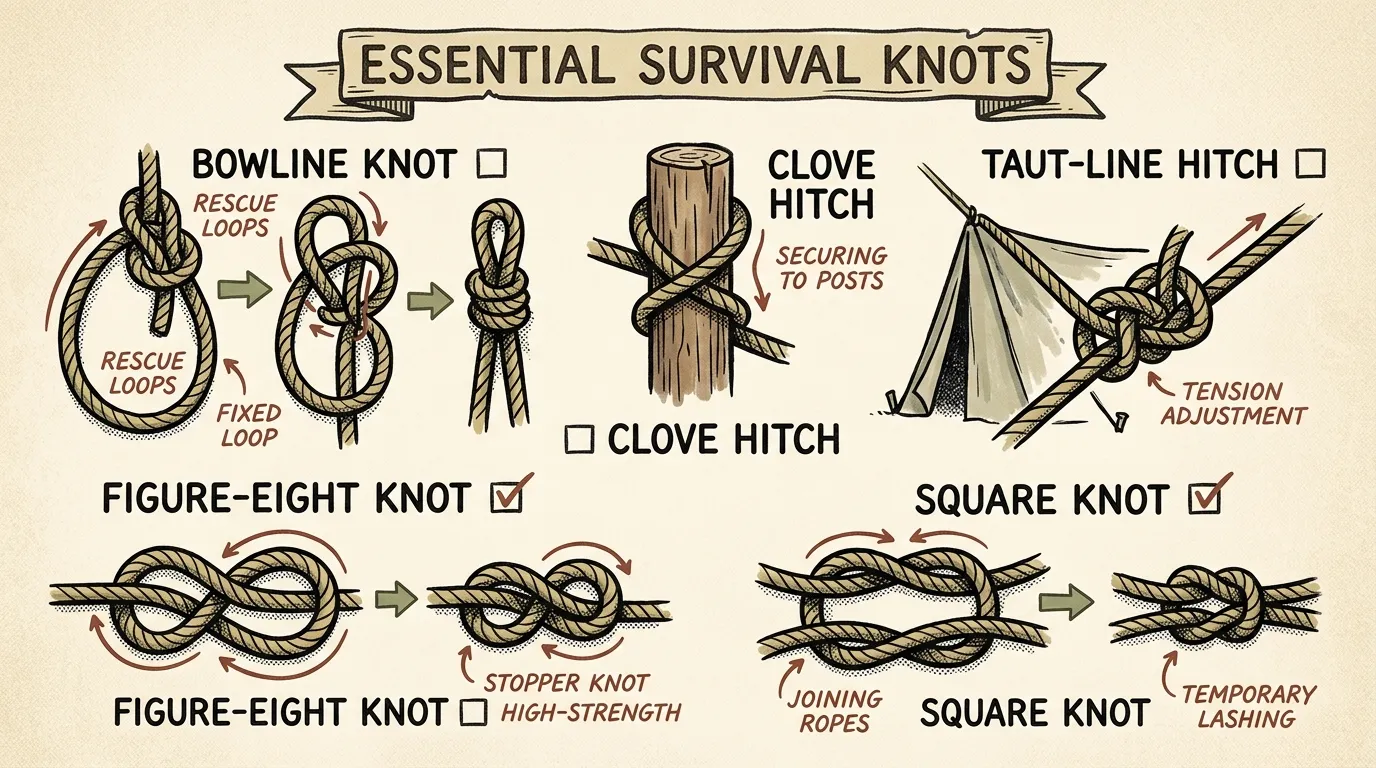
Survival Knots: 5 Essential Knots Every Prepper Must Master
Learn the 5 survival knots every beginner prepper needs: Bowline, Clove Hitch, Figure Eight, Sheet Bend, and Square Knot. Step-by-step instructions inside.
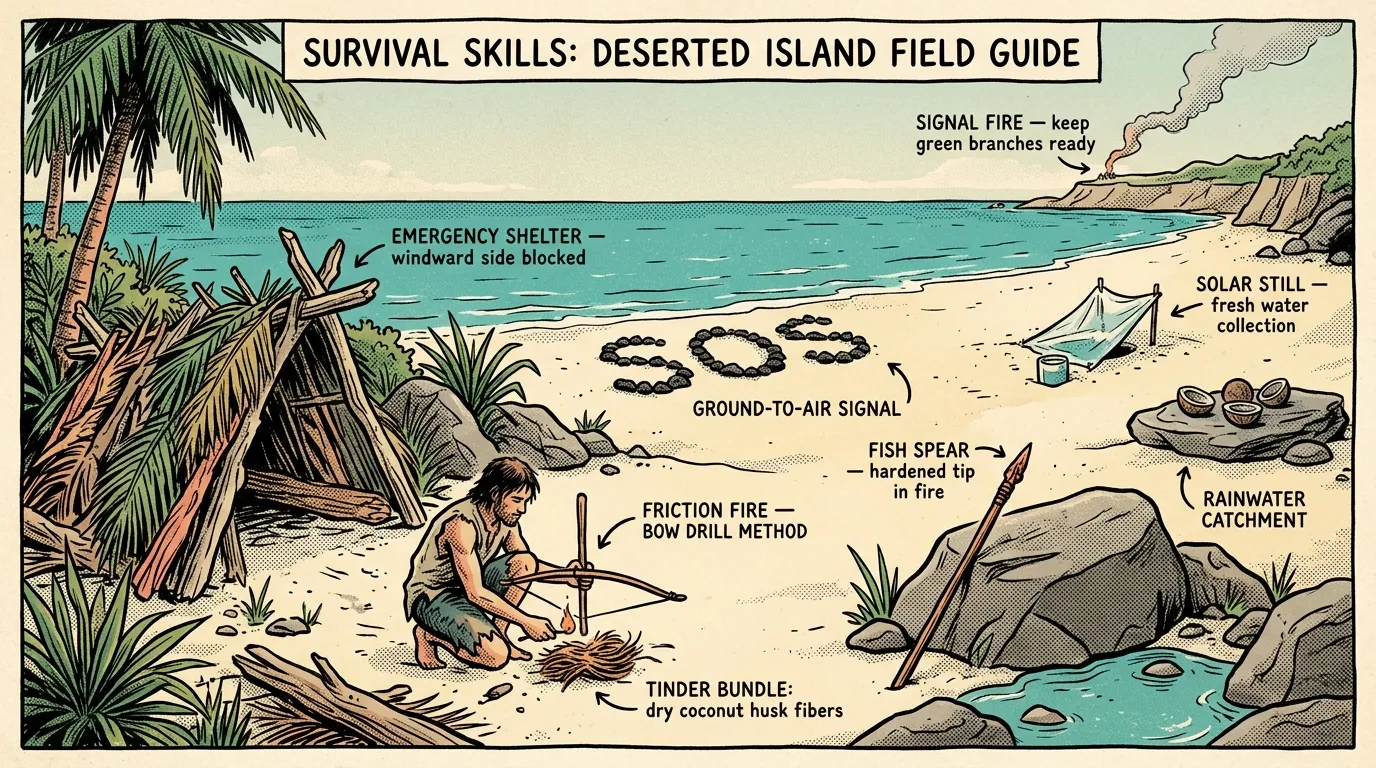
Survival Skills on a Deserted Island: Field Guide
Master survival skills on a deserted island — water, shelter, fire, food, and rescue signaling from a WFR with 12+ years of field experience. Start learning now.