
This article teaches hands-on primitive survival skills for fire-making, shelter construction, water procurement, and tool creation using zero modern gear, written by a FEMA-trained emergency management professional with over 12 years of Pacific Northwest field experience.
Key Takeaways
- Build shelter before anything else — hypothermia kills in as few as 3 hours in harsh conditions
- Master bow drill fire first, then graduate to hand drill — material selection matters more than technique
- Learn natural cordage making early because it's required for shelter, fire, tools, and trapping
- Practice each primitive skill at home before you ever need it in the field — muscle memory beats memorized steps
- Carry a backup water filter like the Sawyer Squeeze, but train to purify water by rock boiling without one
- Start with 5 regionally specific edible plants you can identify in every season
I’ve spent over twelve years in the Pacific Northwest backcountry, and I’ll tell you something that still surprises people: the moments that tested me most weren’t when I had my pack. They were when I didn’t. A dropped bag in a river crossing. A day hike that turned into an unplanned overnight. Those are the moments where primitive survival skills stop being a YouTube hobby and start being the only thing between you and a very bad night.
Here’s the uncomfortable truth. A recent survey found the average American believes they can survive 16 days alone in the wilderness. But less than 1% of people in developed nations could actually survive six months without tools and supplies. That gap — between what you think you can do and what you’ve actually practiced — is where people get hurt. Or worse.
This isn’t about cosplaying as a caveman. It’s about building a foundation of no-gear survival techniques so that if your equipment fails, gets lost, or was never there to begin with, you don’t freeze up. You adapt. As a FEMA-trained emergency management professional and Wilderness First Responder, I’ve seen firsthand how the people who practice these skills — even casually — handle emergencies fundamentally differently than those who haven’t.
Techniques in this article were most recently field-tested in March 2026 in the Gifford Pinchot National Forest.
Quick Summary
- Shelter comes first — exposure can kill in as little as 3 hours, long before thirst or hunger become factors
- Friction fire is learnable but requires far more practice than most people expect — start with bow drill, not hand drill
- Water procurement without a container is possible through rock boiling, transpiration bags, and seep wells
- Natural cordage is the backbone of almost every primitive skill — learn to make it from plant fibers before anything else
- Stone tools don’t need to be pretty to be functional — a simple hammerstone and flake edge handles 90% of cutting tasks
- Signaling and navigation are critical survival skills most primitive living guides completely ignore
- Practice at home first — trying any of these cold in a real emergency is a recipe for panic
The Rule of 3s: Your Decision-Making Framework
Before you build anything or start any technique, you need a mental model for prioritization. The Rule of 3s gives you that:
These numbers shift based on your specific situation. In a Pacific Northwest rain at 40°F with wind, hypothermia can set in well under three hours. In the Arizona desert in July, dehydration accelerates dramatically. The framework isn’t gospel — it’s a triage tool that tells you what to work on first.
And almost every time, the answer is shelter.
What Are Examples of Primitive Skills?
Examples of primitive skills include techniques that use only natural materials found in the wilderness:
- Bow drill friction fire making
- Debris hut shelter construction
- Natural cordage from plant fibers
- Flintknapping for stone cutting tools
- Rock boiling for water purification
- Gorge hook fishing with bone or hardwood
- Figure-four deadfall trapping
- Wild plant foraging and identification
- Pine pitch adhesive for tool hafting
- Shadow-stick navigation for finding direction
Every one of these primitive wilderness survival skills can be learned and practiced without spending a dollar on gear. They represent the core toolkit humans used for tens of thousands of years before modern equipment existed — and they still work today.
Primitive Shelter Building: Your First Priority
So what kind of shelter can you actually build with nothing? More than you’d think, but it takes physical effort and time — which is why you start before you’re desperate.
The Debris Hut
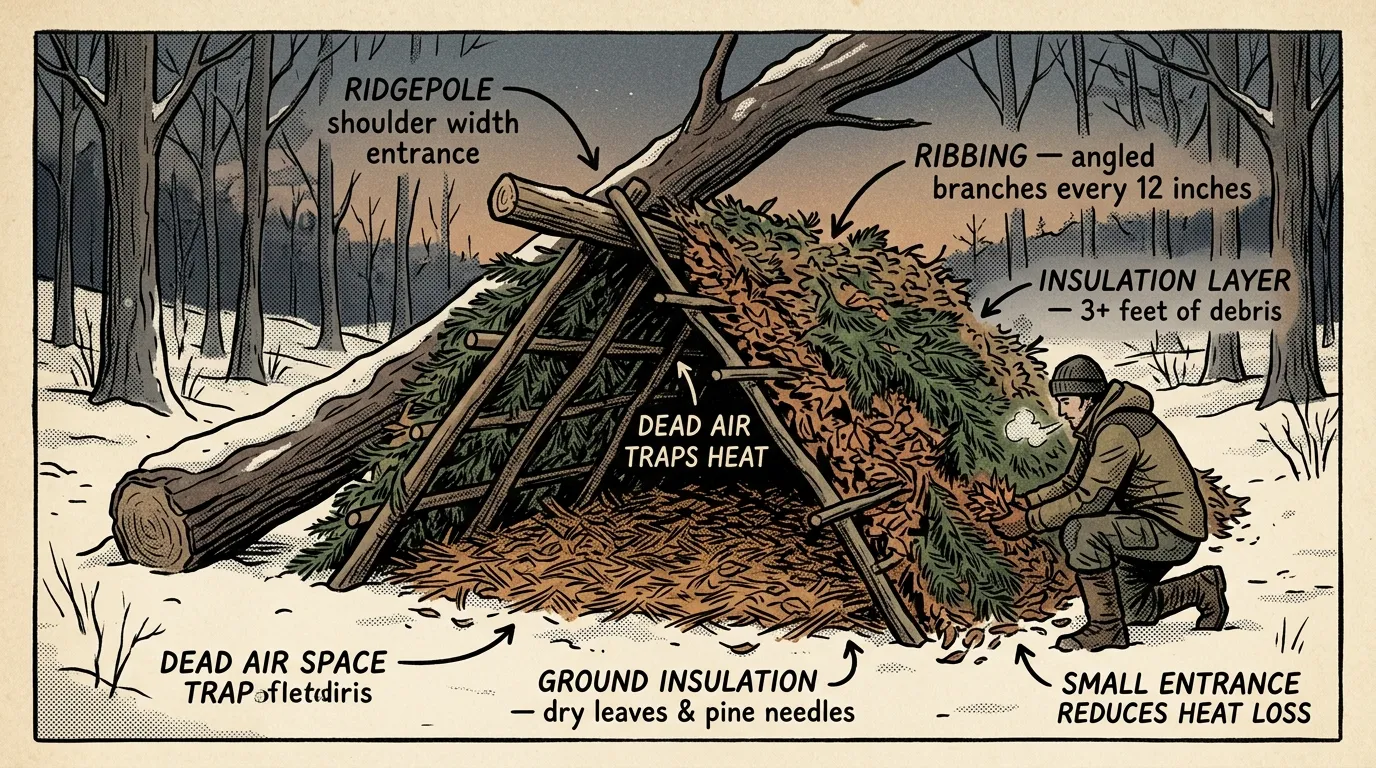
 Constructing a debris hut shelter from forest-floor materials
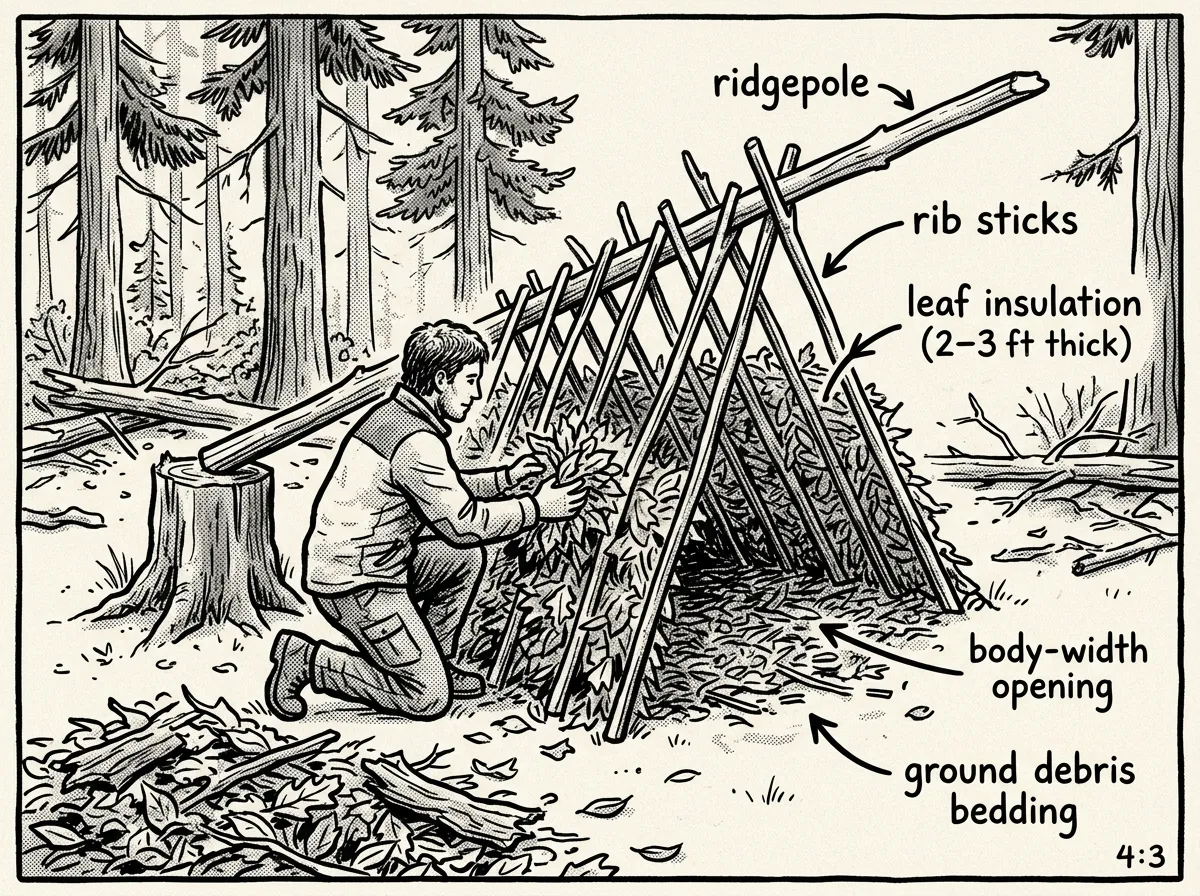
This is the gold standard for no-gear, cold-weather primitive shelter. It works on the same principle as a sleeping bag: dead air space trapped around your body.
- Find a strong ridgepole — a fallen branch or small tree about 9-10 feet long that can support weight
- Prop one end on a stump, rock, or forked tree about 3 feet high — the other end rests on the ground
- Lean sticks along both sides at a 45-degree angle, creating a ribcage framework just wide enough to fit inside
- Pile leaves, pine needles, ferns, and forest debris over the ribs until the covering is at least 2-3 feet thick
- Fill the inside with the driest, fluffiest debris you can find — this is your insulation mattress
- Stuff more debris into the entrance as a door plug once you’re inside
The first time I built a debris hut during a WFR training exercise, I made it way too big. Felt roomy and comfortable — until the temperature dropped and all that extra interior space meant my body heat had nothing to trap against. You want this thing tight. Coffin-sized. Your shoulders should barely clear the rib sticks. Claustrophobic is warm.
I’ve responded to two search and rescue calls in the Cascades where lost hikers survived overnight because they piled enough forest debris around themselves to stay warm — no training, just good instinct. Imagine what intentional practice could do.
The Lean-To
A lean-to is faster to build but far less thermally efficient. It’s best when you’ve got a fire going in front of it, because it acts as a wind break and heat reflector rather than an insulated cocoon.
Find two trees roughly six feet apart. Lash or wedge a horizontal crossbar between them at chest height. Lean branches at an angle from the crossbar to the ground, then layer debris on top. The key detail most people miss: angle the opening away from prevailing wind, and make the back wall as thick as possible.
If it’s raining, layer bark shingles (birch, cedar, or large flat pieces of any species) over your debris, starting from the bottom and overlapping upward like roof tiles. Water runs down and off rather than soaking through.
Regional Considerations
If you’re in a humid Gulf Coast climate or southern hardwood forest, your debris options are incredible — magnolia leaves alone can shingle a shelter fast. High desert is a different problem entirely. You might be building with sage brush, stacking rocks for wind walls, or digging into a sandy embankment. The principles stay the same: get out of wind, trap dead air, insulate from the ground. The materials just change.
Friction Fire: The Skill That Separates Theory from Practice
Let’s be honest. This is the one everyone wants to learn and the one that humbles people the hardest. I’ve watched experienced hikers spend two hours failing at a friction fire bow drill because they skipped the fundamentals. Friction fire isn’t magic. It’s material selection, form, and persistence.
Bow Drill Basics
 Generating an ember with a bow drill fire set
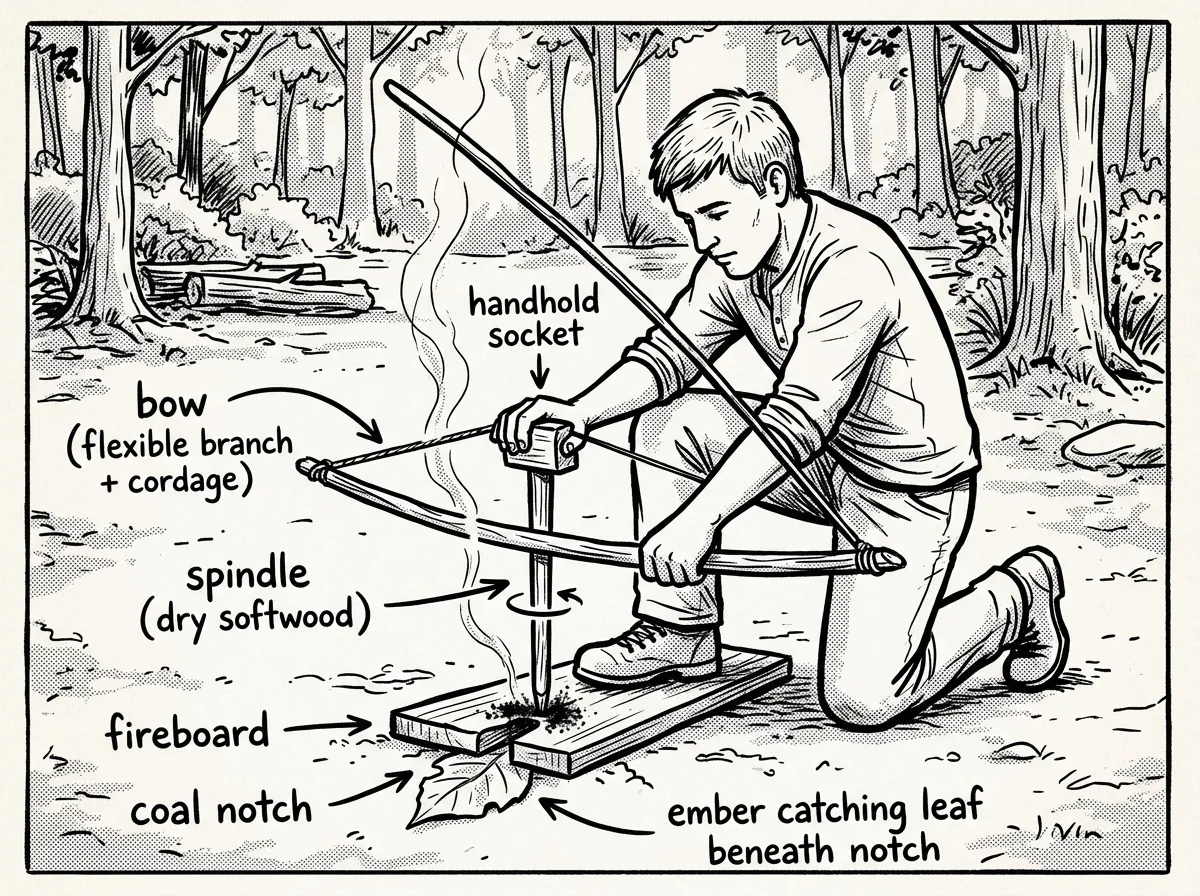
The bow drill has four components: the fireboard, the spindle, the bow, and the handhold (bearing block). Each one matters.
Material selection is everything. You want soft, dry, dead wood that you can dent with a thumbnail. In the Pacific Northwest, I reach for cedar, willow, or cottonwood. In the eastern U.S., tulip poplar and basswood are excellent. Avoid resinous woods like pine — they’ll glaze over instead of producing a coal.
- Carve a spindle about 8 inches long and thumb-thick, pointed on top and rounded on the bottom
- Cut a fireboard about the length of your forearm, carve a shallow divot, and cut a V-notch that reaches almost to the center of the divot
- Make a bow from a slightly curved stick and cordage — natural or improvised
- Place a coal-catching leaf or bark chip under the V-notch
- Kneel with one foot pinning the fireboard, spindle in the divot, handhold on top, and bow wrapped around the spindle
- Use long, smooth bow strokes at moderate speed, applying steady downward pressure — speed up when you see smoke pooling in the notch
- Once a glowing coal forms in your notch, carefully transfer it to a tinder bundle and blow it to flame
During a November training weekend near Mount Rainier, I got my first consistent bow drill coal using red cedar — the same wood I’d failed with for three months because I was choosing pieces that were too green. When I finally found a standing dead cedar with the bark sloughing off and the heartwood bone-dry, everything clicked. The dust turned dark brown and smelled like hot chocolate instead of burnt rubber. That’s the moment I understood: this skill is 70% material selection, 30% technique.
Here’s where I see people fail the most: they use wet wood, or they use wood that’s too hard. I don’t care how perfect your form is — if that fireboard isn’t bone-dry, dead, and soft enough to dent with your thumbnail, you’re not getting a coal. Period. I carry a small piece of practice fireboard in my jacket pocket on training weekends so I can test random wood against it.
Hand Drill: Harder Than It Looks
The hand drill eliminates the bow and cordage — it’s just a spindle rolled between your palms against a fireboard. Sounds simpler. It’s actually significantly harder because you can’t maintain consistent downward pressure. I’ve met maybe a dozen people who can reliably get a hand drill coal, and most of them practiced for months.
My advice? Master the bow drill first. Get consistent with it. Then graduate to hand drill if you want the challenge. If you’re still building your fire-starting fundamentals, the bow drill gives you the mechanical advantage to actually succeed while you’re learning.
What About Tinder?
Your coal is useless without a prepared tinder bundle. You need a nest of the driest, finest material you can find — shredded cedar bark, dried grass, cattail fluff, birch bark fibers, or even the dry inner fibers of dead goldenrod stalks. Shape it like a bird’s nest with a depression in the center for your coal. When you blow, use slow, steady breaths aimed at the base of the coal. Don’t hyperventilate and blow your coal apart — I’ve done that more than once.
Fire isn’t about speed. It’s about preparation. The coal takes care of itself if the materials are right.
Water Procurement and Purification Without a Container
So you’ve got shelter and fire handled. Now you need water. And here’s where primitive survival skills get genuinely challenging, because water in the wild can kill you just as surely as dehydration can — just slower, through waterborne pathogens like giardia and cryptosporidium.
In my Wilderness First Responder training, we studied giardia infection timelines — symptoms can take 1-3 weeks to appear, meaning you might feel fine drinking untreated water and pay for it long after rescue. Don’t gamble with untreated water unless you’re choosing between that and severe dehydration.
Finding Water
Look downhill. Follow animal trails — they often converge near water. Listen for moving water, especially in the early morning when ambient noise drops. In the Pacific Northwest, you’re rarely far from a stream. In drier climates, look for green vegetation in draws and valleys, dig seep wells in sandy riverbeds, or collect dew from grass at dawn using an absorbent cloth (even a t-shirt works).
Rock Boiling
You don’t have a metal pot. Fine. You can boil water in a wooden bowl, a bark container, a clay depression, or even a hollowed-out rock. Rock boiling water purification is one of the oldest techniques on earth, and it’s straightforward once you’ve done it.
Heat rocks in your fire for 20-30 minutes — use dense, dry rocks and avoid river rocks (they can contain trapped moisture that causes them to explode when heated). Using wooden tongs or two sticks, transfer the hot rocks into your water container one at a time. The rocks will bring the water to a rolling boil. Keep cycling in fresh hot rocks as the others cool.
Test rocks before heating by tapping them together — dense, ringing rocks are generally safer. Crumbly, porous, or layered rocks are the ones that shatter. I stick to granite and basalt when I can identify them.
Transpiration Bags
This one’s slow but nearly effortless. Tie a clear plastic bag (or any non-porous material if you’ve got it) around a leafy branch in full sun. Over several hours, the leaves transpire moisture that collects in the lowest corner of the bag. You won’t get a gallon, but you might get a few ounces — enough to keep you going.
Without any container at all? Look for standing water in tree crotches after rain, dew collection, or natural rock catchments. None of these are ideal. All of them are better than nothing.
Natural Cordage: The Skill Behind Every Other Skill
Natural cordage making is the single most underrated primitive skill. Cordage connects everything. You need it for your bow drill. You need it for lashing shelter frames. You need it for snares, fishing lines, and tool bindings. Without it, your primitive toolkit falls apart.
Best Natural Cordage Materials
- Dogbane and stinging nettle — the strongest natural plant fibers in North America, with dogbane cordage capable of holding 40+ pounds per strand
- Inner bark of basswood, tulip poplar, or cedar — peel strips, soak if possible, then separate into fibers
- Yucca leaves — pound and separate the long fibers (outstanding in desert/southwest environments)
- Cattail leaves — significantly weaker and best for lashing only, but widely available near any wetland
The Reverse Wrap Technique
 Making natural cordage using the reverse wrap method
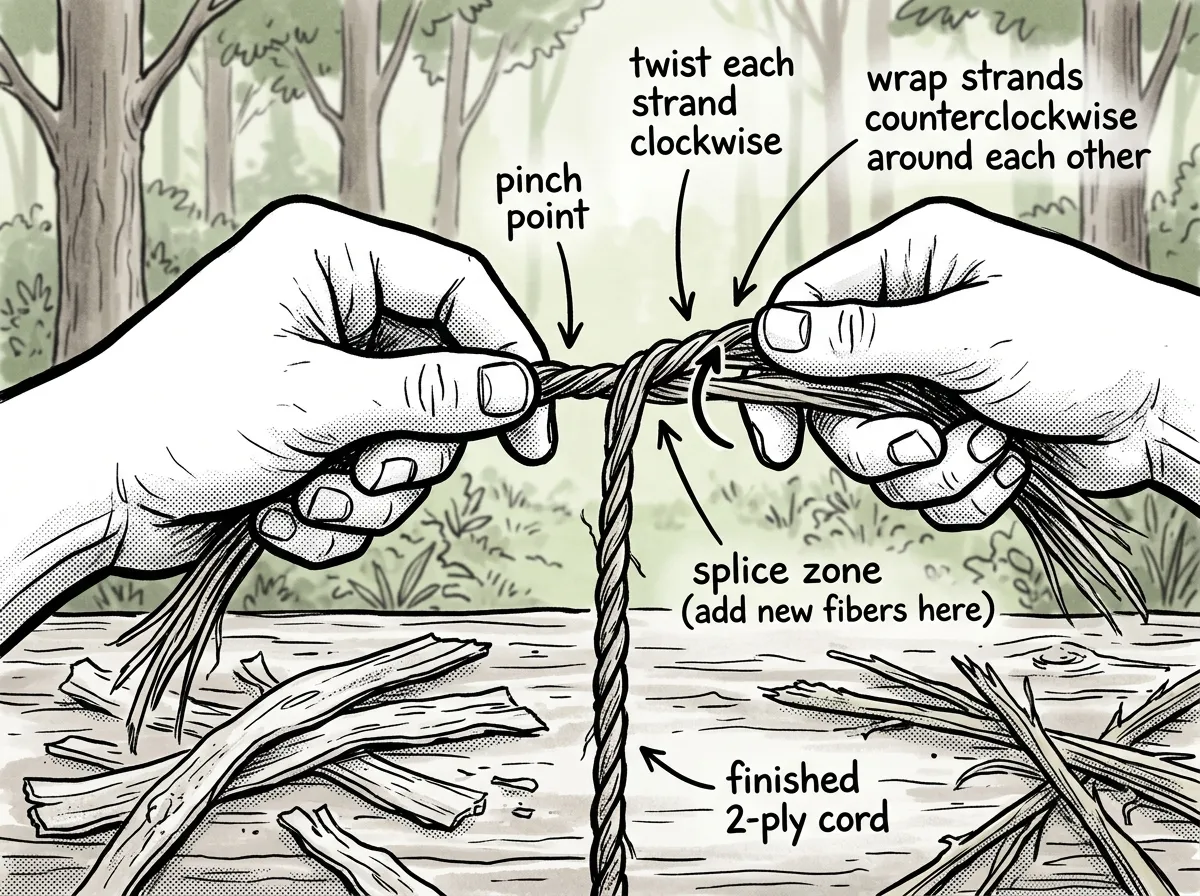
This is the fundamental cordage-making method. Take a bundle of fibers, twist the top tight, then fold it at the twist point so you have two legs. Twist each leg clockwise, then wrap them around each other counterclockwise. The opposing twists lock the rope together. Splice in new fibers before you reach the end of your current ones to build continuous length.
Cordage Benchmarks and Tips
A skilled practitioner can produce roughly one foot of two-ply cordage per minute. That means a 10-foot lashing for your shelter takes about 10 minutes — not bad, but it adds up when you need 50 feet for a full debris hut frame. This is why I practice cordage-making during downtime. I’ve twisted dogbane fibers while sitting around camp, while waiting out rain under a tarp, even while watching TV at home in the off-season.
One tip that dramatically improved my results: soak inner bark fibers overnight before processing them. The moisture softens the material and makes it far easier to separate into fine, flexible strands. When the cordage dries, it actually tightens and strengthens. Wet fibers work easier. Dry fibers hold stronger. Use that to your advantage.
You’re four hours into what was supposed to be a two-hour loop trail. Your phone is dead, it’s 4 PM in November, and you realize you’re not finding the trail junction before dark. Temperature’s dropping fast. You’ve got the clothes on your back — no pack, no lighter, no knife. Everything you build tonight comes from what’s around you on the forest floor.
That scenario isn’t far-fetched. It’s practically the template for the majority of backcountry search and rescue calls. And in that moment, knowing how to strip inner bark from a dead cedar and twist it into usable cordage in twenty minutes could mean the difference between a debris hut that holds together and a pile of sticks that collapses at 2 AM.
Primitive Tools: Stone, Bone, and Wood
You don’t need a full stone tools flintknapping kit to make functional cutting implements. Here’s the minimalist version that actually works in the field.
Hammerstone and Flake Tools
 Primitive stone tool kit for cutting, scraping, and processing
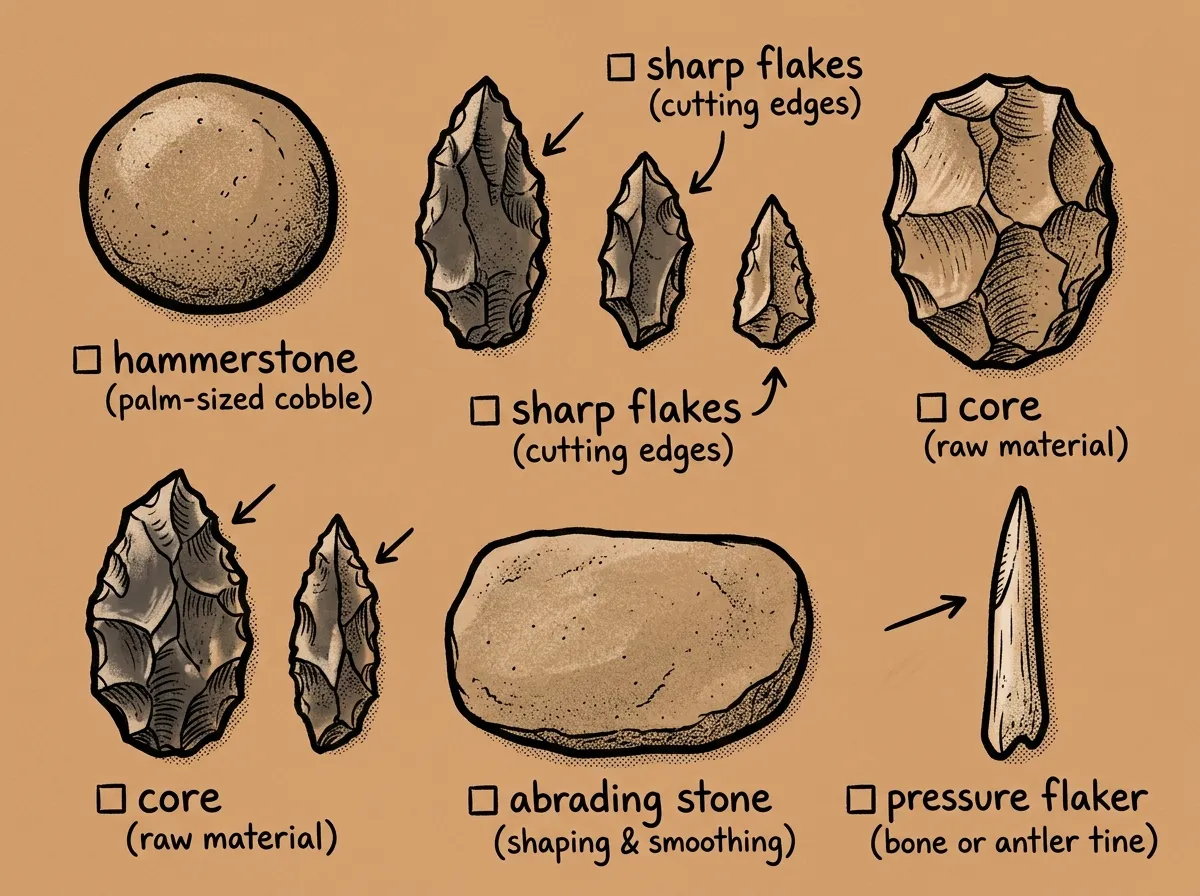
Find a hard, fist-sized river cobble — that’s your hammerstone. Find a piece of flint, chert, obsidian, or even fine-grained quartzite. Strike the edge at an angle with your hammerstone. The flakes that break off have razor-sharp edges that can cut cordage, process game, shave tinder, or split wood.
I’ll be honest — I’ve cut myself more times with stone flakes than I have with my actual knives. They’re incredibly sharp and incredibly unpredictable. Wrap the base of your flake tool with a strip of bark or leather before using it for any extended task. It’s not just comfort — it’s keeping all your blood inside your body where it belongs.
Hafting: Making Tools Actually Usable
A bare stone flake works in a pinch, but for any sustained cutting, chopping, or scraping, you need to haft that stone to a handle. This means attaching a stone blade to a wooden shaft using cordage and adhesive.
The best primitive adhesive is pine pitch glue. Here’s the recipe I use: collect pine or spruce resin (the hardened sap on wounded trees), melt it over low heat on a flat rock near your fire, mix in crushed charcoal from your fire pit at roughly a 1:1 ratio, and add a binder — finely ground plant fiber or even powite dust works. The charcoal prevents the resin from being too brittle, and the binder adds structural strength. Spread this mixture over the joint where stone meets wood, wrap tightly with cordage, and let it cool.
I’ve used hafted stone tools for processing firewood during extended backcountry camps in the Gifford Pinchot National Forest. They’re not as efficient as a steel hatchet, but they absolutely work — and knowing you can build one from scratch is a different kind of confidence.
Digging Sticks and Wooden Wedges
A hardwood stick with a fire-hardened point becomes a digging tool for roots, tubers, and seep wells. Hold the sharpened end in coals briefly, scrape off the char, and repeat — this hardens the wood fibers and makes the tip more durable. Wooden wedges split dead logs for firewood when you don’t have an axe.
Bone Tools
If you’ve procured any animal protein — even a small one — save the bones. Sharpened bone splinters make excellent awls for punching holes in bark or hide. A deer shoulder blade works as a surprisingly effective shovel for digging fire pits or seep wells. Split leg bones can serve as chisels for more precise wood working. Rib bones can be ground into needles for stitching bark containers together. Fish bones, when carefully split and sharpened, become the smallest needles — useful for fine repair work on clothing or gear.
The key with bone tools is patience during shaping. Use a rough stone to grind edges rather than trying to snap bone to shape — you’ll waste less material and get cleaner, stronger tools.
Food Foraging and Procurement: Last on the List for a Reason
Remember the Rule of 3s — you’ve got roughly three weeks before starvation becomes critical. That’s why food ranks below shelter, fire, and water in your priority list. But if you’re beyond the 72-hour mark, you need calories.
Wild Edible Plants by Region
I only recommend foraging plants you’ve positively identified with a regional field guide and confirmed with an experienced forager. I’ve been studying Pacific Northwest wild edibles for over a decade and I still carry a reference guide on every outing. That said, here are plants worth learning:
Available across most of North America:
- Cattail — rhizomes, young shoots, and pollen heads are all edible; found near any standing water
- Dandelion — entire plant is edible, leaves are most palatable young
- Chickweed — mild-flavored green, often found in disturbed soils
- Pine needle tea — steep fresh needles for 10 minutes for a vitamin C-rich drink (avoid yew, which is toxic)
- Acorns — calorie-dense but require leaching tannins by soaking crushed nutmeat in running water or multiple changes of water
Pacific Northwest specifics I forage regularly:
- Sword fern fiddleheads — available in early spring, cook before eating
- Salal berries — abundant in summer and fall, mild flavor, excellent energy source
- Oregon grape berries — tart but edible, the inner bark has traditional medicinal uses
Start with five plants in your specific region that you can identify confidently in every season. Build from there.
Insects: The Overlooked Calorie Source
Insects are the most reliable primitive food source. Seriously. Grubs, ants, crickets, and grasshoppers are calorie-dense, available almost everywhere, and require zero tools to collect. Remove wings and legs from grasshoppers, roast them on a hot rock near your fire, and you’ve got protein. Rotting logs are goldmines for grubs — peel back bark and collect what you find.
Simple Traps and Snares
A figure-four deadfall trap uses three carved sticks balanced against each other to hold a heavy rock. When an animal disturbs the bait stick, the rock falls. These work for small game like squirrels and rabbits when placed on established game trails.
Primitive Cooking Methods
Once you’ve procured food, you need ways to cook it beyond holding it over a flame:
- Ember roasting — bury root vegetables or tubers directly in hot coals and ash; they cook evenly in 20-40 minutes depending on size
- Rock-slab frying — find a flat, thin stone, prop it over your fire, and let it heat for 15 minutes; it becomes a griddle for insects, thin-sliced meat, or ground acorn paste
- Pit cooking — dig a hole, fill it with hot rocks from your fire, layer in green leaves, add your food, cover with more leaves and earth, and let it slow-cook for several hours
- Clay baking — coat a whole fish or small game in a thick layer of wet clay and bury it in coals; when you crack the clay open, skin and scales pull away cleanly
I’ve clay-baked rainbow trout on the banks of the Lewis River in Washington using nothing but streamside clay and a fire. The meat was perfectly steamed inside the clay shell. It’s one of those primitive cooking methods that feels almost luxurious given the circumstances.
Primitive Fishing and Trapping Techniques
Most primitive survival guides skip food procurement beyond basic foraging. But if you’re near water — and in a true survival situation lasting more than a few days — knowing how to catch fish without modern tackle becomes a serious calorie advantage.
Gorge Hooks
A gorge hook is not a curved hook — it’s a straight piece of sharpened bone or hardwood, about 1-2 inches long, pointed on both ends, with your cordage tied to the center. Bait conceals the entire gorge. When a fish swallows the bait and you pull the line, the gorge turns sideways in the fish’s throat and lodges. I’ve carved gorge hooks from deer bone and from the hardwood of Pacific madrone. They work best for larger, more aggressive fish species.
Woven Fish Traps
In shallow streams, you can weave a funnel-shaped trap from flexible sticks and willow branches. The principle is simple: fish swim into the wide end and can’t figure out how to swim back through the narrow funnel opening. Place these in natural choke points — where a stream narrows between rocks, or at the outflow of a pool. I’ve watched cutthroat trout in Cascade streams funnel themselves into surprisingly crude stick traps.
Improvised Spears
A straight hardwood shaft with a fire-hardened point works, but a split-tip spear is more effective. Split the end of your shaft about 6 inches down, wedge a small rock between the tines to spread them, and lash below the split to prevent further cracking. The spread tines increase your margin of error when striking.
Primitive fishing and trapping carry legal restrictions in nearly every state. Practice these skills only in genuine survival situations or with appropriate permits. Many wilderness survival schools hold special permits for training purposes — that’s the ideal context for hands-on practice.
Signaling and Navigation Without Modern Tools
Here’s a gap I see in almost every bushcraft skills guide: they cover shelter, fire, water, and food, then completely ignore the fact that in most survival scenarios, your best outcome is getting rescued. Signaling and navigation are primitive survival skills too — and they might get you home faster than anything else on this list.
Signal Fires
Three fires arranged in a triangle is the internationally recognized distress signal. Space them roughly 100 feet apart if you can, and keep fuel piled nearby each one so you can light them quickly if you hear aircraft. During the day, add green branches, wet leaves, or damp moss to create thick white smoke that contrasts against dark terrain. At night, bright flame contrasts against darkness — keep fires burning clean and hot.
Ground-to-Air Signals
Use contrasting materials to create large symbols visible from above. In a dark forest, lay out light-colored rocks or stripped bark in an X pattern (the international symbol for “need assistance”). On snow, use dark branches. Make your signals at least 10 feet across — from aircraft altitude, anything smaller is invisible.
Mirror Signaling
Any reflective surface — a piece of quartz, a flat wet rock, even the bottom of an aluminum can if you have one — can direct a flash of sunlight toward aircraft or distant rescuers. Hold the reflective surface near your eye, extend your other hand toward the target, and adjust the reflection until it hits your outstretched fingers, then move your fingers out of the way. That flash can be seen for miles.
Primitive Navigation
When you don’t have a compass, the shadow-stick method gives you a reliable east-west line. Plant a straight stick in the ground, mark the tip of its shadow, wait 15-20 minutes, mark the new shadow tip. A line between those two marks runs approximately east-west (first mark is west, second is east). A perpendicular line gives you north-south.
At night in the Northern Hemisphere, find Polaris (the North Star) by following the two “pointer” stars at the end of the Big Dipper’s bowl. Polaris indicates true north within about one degree.
One important caveat: ignore the old advice about moss growing on the north side of trees. In my experience across the Pacific Northwest, moss grows on whatever side gets the most moisture — which can be any direction depending on local conditions. It’s one of those survival myths that gets people turned around.
The most reliable no-tool navigation strategy in mountainous terrain? Follow drainages downhill. Streams flow to rivers, rivers flow to valleys, and valleys have roads and people. It’s not always the fastest route, but it’s the hardest to get wrong.
Primitive Survival Skills Training: How to Start Practicing
Knowing these techniques exist isn’t enough. You need to build muscle memory, and that requires structured practice. Here’s the four-week beginner training plan I recommend — one skill focus per weekend session.
Week 1: Cordage and Shelter
Spend Saturday morning making cordage from whatever plant fibers you can find locally. Aim for 3 feet of two-ply reverse-wrap cordage. In the afternoon, build a debris hut and evaluate it critically — is it tight enough? Is the debris thick enough? If you’re feeling ambitious, sleep in it overnight and take honest notes about what failed.
Week 2: Bow Drill Fire
Dedicate an entire day to friction fire. Collect and test multiple wood species. Carve at least two complete bow drill sets. Your goal by the end of the day isn’t necessarily a coal — it’s understanding what the right wood feels like, what proper form looks like, and where your specific weaknesses are. If you do get a coal, transfer it to a tinder bundle and build a full fire.
Week 3: Water Procurement and Rock Boiling
Find a natural water source. Practice building a bark or wooden container (even a simple folded bark trough works). Collect rocks, heat them, and bring water to a rolling boil. Time the process. You’ll be surprised how long it takes — and that’s exactly why you need to practice it before an emergency.
Week 4: Stone Tools and Foraging
Practice basic flintknapping — just producing usable flake edges from local stone. Haft one to a handle using cordage and pine pitch. Then spend the afternoon with a regional field guide identifying every edible plant you can find within a half-mile radius.
Ongoing Practice
After your initial four weeks, dedicate one weekend per month to a single primitive technology survival skill. Track your progress in a field journal — note what materials you used, what worked, what failed, and how long each task took. I’ve kept a field journal since my second year of backcountry work, and looking back through old entries is one of the best ways to see how much faster and more efficient you’ve become.
For formal training, look into wilderness schools like NOLS, Outward Bound, or regional programs like the Tracker School or your state’s primitive skills gatherings (most states have annual events). Many community colleges also offer outdoor skills courses. These programs give you instructor feedback that self-study can’t replicate.
Recommended Primitive Survival Skills Books and Resources
I’m a firm believer that hands-on practice beats reading every time — but the right books accelerate your learning dramatically. Here are the ones that have earned permanent spots on my shelf:
“Primitive Wilderness Living and Survival Skills” by John and Geri McPherson — This is the bible. The McPhersons actually lived these skills long-term, and it shows in every chapter. I’ve dog-eared my copy so heavily it barely closes anymore. If you buy one book, make it this one.
“Bushcraft 101” by Dave Canterbury — Outstanding for beginners who want to bridge modern outdoor skills with primitive techniques. Canterbury’s “5 C’s of Survivability” framework gave me a useful mental checklist I still reference when packing for trips.
“Tom Brown’s Field Guide to Wilderness Survival” — Tom Brown’s tracking and awareness content is unmatched. I used his debris hut specifications for my first solo overnight without gear, and his approach to awareness training fundamentally changed how I move through the woods.
“The SAS Survival Handbook” by John Wiseman — More military-oriented and broader in scope, but the signaling, navigation, and extreme-environment chapters fill gaps other books leave open. I keep a copy in my vehicle kit.
“Participating in Nature” by Thomas J. Elpel — Underrated and excellent for understanding the interconnected nature of primitive living skills rather than treating each technique in isolation.
For free resources, be cautious with random PDFs floating around the internet — I’ve seen dangerously incorrect plant identification in several. Government sources like USDA plant databases are reliable for species identification. But nothing replaces getting your hands dirty. Building a solid prepper library is valuable, but the best book in the world won’t teach your hands what the right bow drill pressure feels like.
One Piece of Modern Gear Worth Mentioning
I know this article is about zero-gear techniques. But I’d be doing you a disservice if I didn’t say this: the single best insurance policy you can carry is the ability to purify water quickly if things go sideways. The Sawyer Squeeze — around $30 — is what I reach for every time I leave the house for anything beyond a parking-lot walk. It weighs next to nothing, filters down to 0.1 microns, and handles thousands of gallons before replacement. The LifeStraw is fine in a pinch, but the Squeeze filters more volume with less effort and threads onto standard water bottles.
That said, the whole point of learning primitive survival skills is redundancy. Gear breaks. Gear gets lost. What’s in your head doesn’t.
- Bow drill fire — can you get a coal in under 5 minutes consistently?
- Debris hut — have you slept in one overnight?
- Natural cordage — can you make 3 feet in 20 minutes?
- Rock boiling — have you actually boiled water this way?
- Stone flake tools — can you produce a cutting edge from local stone?
- Hafting — can you attach stone to wood with cordage and pitch?
- 5+ local edible plants — can you identify them in every season?
- Gorge hook or fish trap — have you built one and tested it?
- Signal fire — can you produce thick smoke on demand?
- Shadow-stick navigation — have you verified it against a compass?
The Complete
Prepper's Reference.
149 articles synthesized into one comprehensive PDF — twelve chapters covering water, food, shelter, first aid, comms, and scenario-specific preparedness. Free with your email.
Unsubscribe anytime · We never share your email
You're in. Check your inbox.
Keep Reading
How to Build a Survival Shelter That Stays Warm
Learn how to build a survival shelter that stays warm and dry using natural materials. Step-by-step lean-to guide from a Wilderness First Responder.
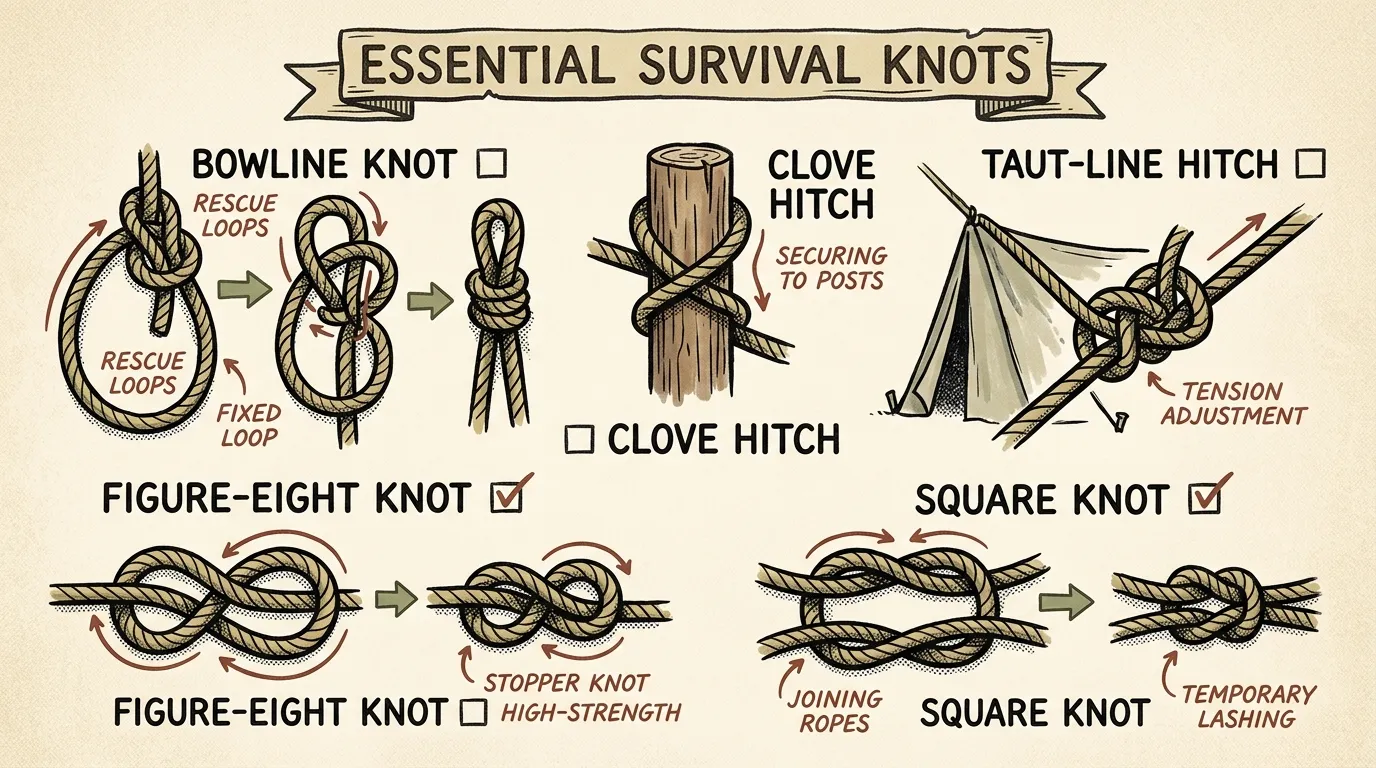
Survival Knots: 5 Essential Knots Every Prepper Must Master
Learn the 5 survival knots every beginner prepper needs: Bowline, Clove Hitch, Figure Eight, Sheet Bend, and Square Knot. Step-by-step instructions inside.
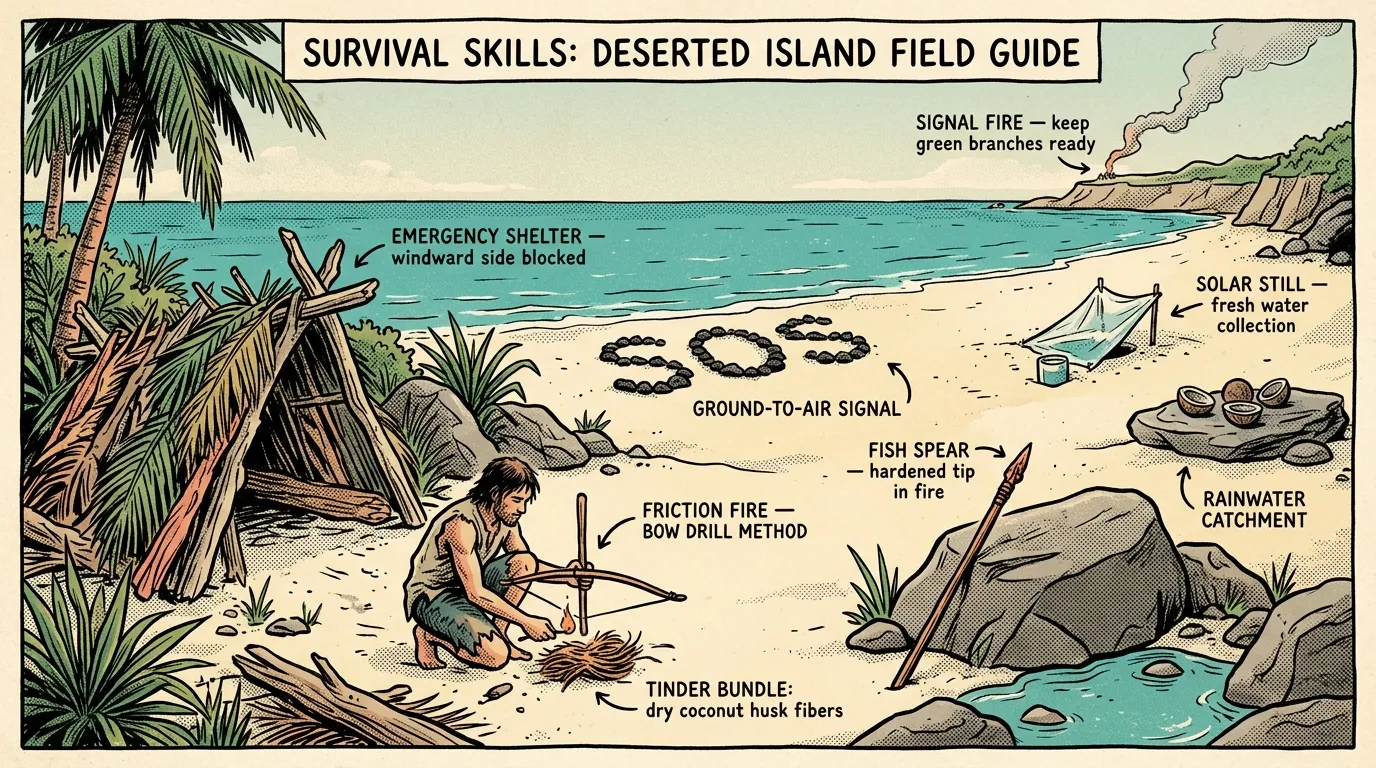
Survival Skills on a Deserted Island: Field Guide
Master survival skills on a deserted island — water, shelter, fire, food, and rescue signaling from a WFR with 12+ years of field experience. Start learning now.