To start a fire safely in a survival situation, use dry tinder, small kindling, and progressively larger fuel in a clear, controlled fire site. Beginners should carry reliable tools like lighters, waterproof matches, and ferro rods, and always follow local fire rules and full extinguishing procedures to prevent wildfires.
Key Takeaways
- Carry at least two ignition methods — a lighter and a ferro rod — stored in separate locations so one failure doesn't leave you cold.
- Gather three times more tinder and kindling than you think you'll need before you ever strike a spark.
- In wet conditions, split logs to expose dry inner wood and build a raised platform to keep your tinder off saturated ground.
- Match your fire lay to conditions: teepee for speed, lean-to for wind, log cabin for sustained cooking coals.
- Practice fire building in safe, legal settings until it's automatic — your hands need to know the process when your brain is foggy from cold and fatigue.
How to Start a Fire in Survival Situations Safely
Knowing how to start a fire in survival situations is one of the most critical skills you can build — and one of the most commonly botched under pressure. I’m a FEMA-trained Wilderness First Responder with over 12 years of field experience in the Pacific Northwest, and I’ve started fires in sideways rain on the Olympic Peninsula, in whiteout snow above treeline in the Cascades, and on windswept ridgelines where every spark seemed to vanish into nothing. The difference between success and a cold, dangerous night almost always comes down to preparation and practice. Not luck.
This guide covers everything: the fire triangle, material selection, fire lays, modern and primitive ignition methods, wet-weather techniques, smoke signaling, safety protocols, and the mistakes I see beginners repeat constantly. Whether you’re building your first beginner’s guide to survival readiness kit or sharpening backcountry skills, this is the resource I wish someone had handed me on day one.
Quick Summary
- The fire triangle — heat, fuel, oxygen — is your diagnostic framework every time a fire struggles. Miss one element and nothing happens.
- Gather three times more tinder and kindling than you think you’ll need before striking your first spark.
- Carry at least two ignition methods (lighter + ferro rod) stored in separate places in your kit.
- Match your fire lay to conditions: teepee for fast warmth, lean-to for wind, log cabin for sustained coals.
- In wet conditions, split wood for dry inner layers, build a raised platform, and shield your tinder nest while lighting.
- Extinguish completely — douse, stir, douse again, confirm cold to the touch — every single time.
Why Fire Matters in a Survival Situation
The survival rule of threes puts this in perspective: you can survive roughly three hours without shelter or warmth in harsh conditions, three days without water, and three weeks without food. In a cold, wet environment — which describes most of the Pacific Northwest year-round — fire often becomes your first priority after basic shelter.
A usable fire warms your core and fights hypothermia. I’ve seen it set in faster than most people expect. During a three-day search-and-rescue training in the northern Cascades, I watched a teammate — an experienced hiker — start shivering uncontrollably after just 90 minutes of sitting still in 45°F drizzle. Fire reversed that slide within minutes.
Beyond warmth, fire lets you boil water for purification, which connects directly to your next survival priority. If you want a deeper dive on water storage and treatment, check out how to store water for emergencies. Fire also cooks food, dries soaked gear, signals rescuers, and — something I don’t think gets enough credit — steadies your mind. There’s a primal calming effect to firelight. In my experience, the moment a fire catches, panic drops and problem-solving kicks in. That psychological shift can save your life.
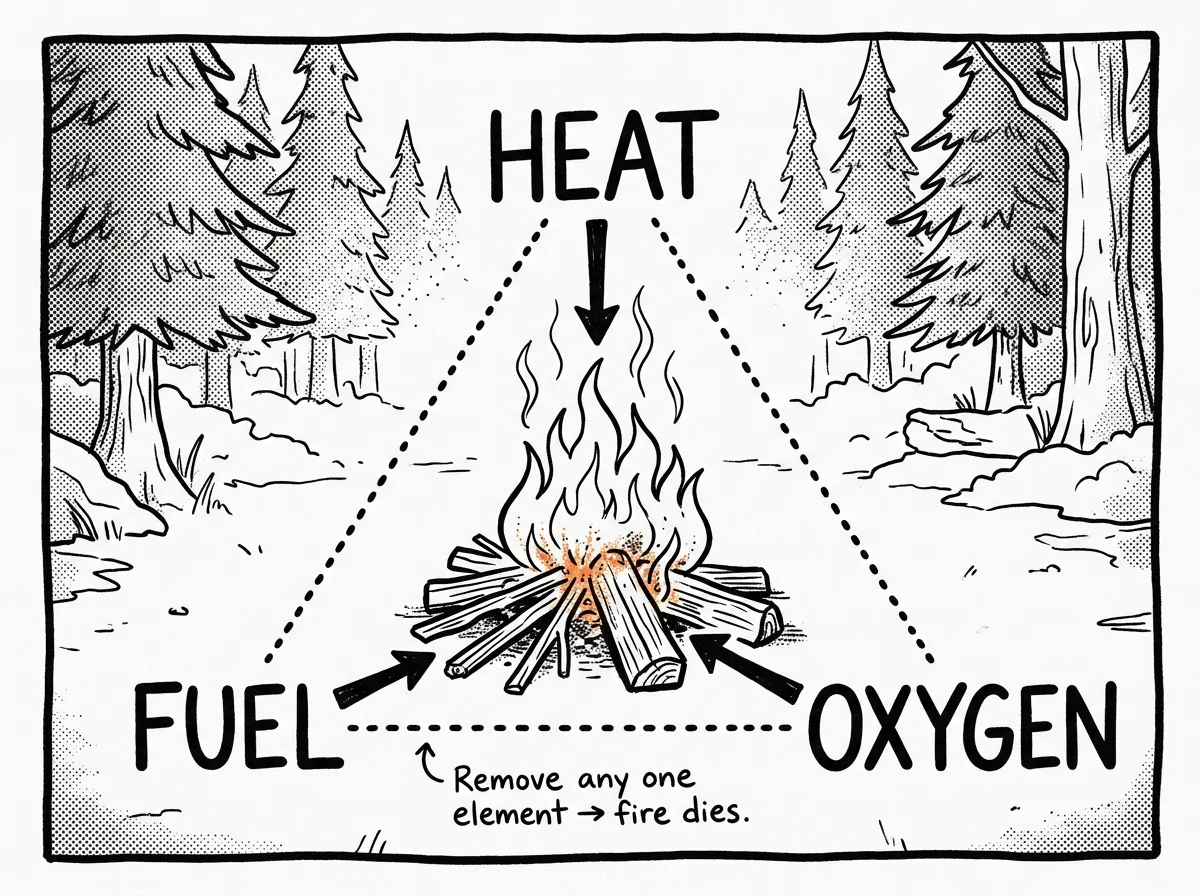
The Fire Triangle: Heat, Fuel, and Oxygen
 The three elements every fire needs to ignite and sustain itself
Every fire requires three elements, known as the fire triangle — a concept taught in FEMA and National Wildfire Coordinating Group (NWCG) training materials:
- Heat: The ignition source — a spark, flame, or friction-generated ember.
- Fuel: Anything combustible, organized from fine tinder to large fuel wood.
- Oxygen: Ambient air, which you manage through fire lay design and gentle blowing.
Remove any one element and the fire dies — that’s not abstract theory, it’s your diagnostic checklist every time a flame struggles.
This isn’t some textbook concept you memorize and forget. It’s the framework I use every single time a fire struggles. If flames die, I ask: Did I choke off airflow by packing fuel too tight? Is my tinder too damp to hold heat? Am I feeding it too slowly? Understanding this triangle turns fire starting from guesswork into a repeatable, diagnosable process.
What to Gather: Tinder, Kindling, and Fuel Wood
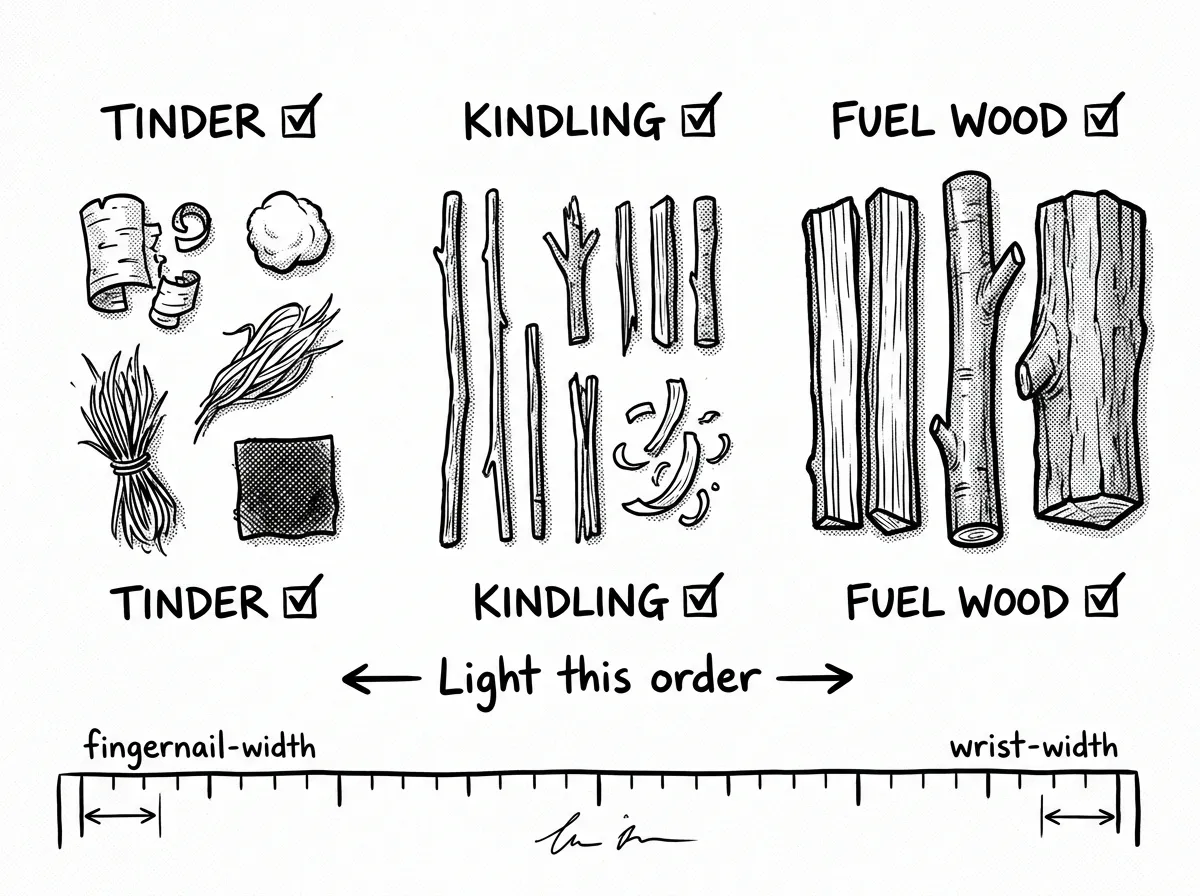 The three classes of fire material sorted by size and purpose
Tinder — What Catches the Initial Spark
- Natural sources: Birch bark, cedar inner bark fibers, dry grass, pine needles, cattail fluff, fatwood shavings, feather sticks.
- Prepared tinder: Petroleum-jelly cotton balls, commercial tinder tabs, char cloth, dryer lint sealed in a waterproof bag.
I’ve found that fatwood — the resin-saturated heartwood of dead conifers — outperforms cotton balls in sustained rain because it burns hotter and longer. If you’re in the Pacific Northwest, look for old-growth stumps of Douglas fir or ponderosa pine. The resin concentrates over decades and it’s like nature’s fire accelerant.
Kindling — Feeds the Growing Flame
Pencil-thin dry twigs, split wood slivers, and feather sticks are what you’re after here. Use the snap test: if a twig bends without breaking, it’s too green or wet. You want a clean snap. No exceptions.
Fuel Wood — Sustains the Fire
Progress from thumb-thick pieces to wrist-thick logs to larger split wood. Hardwoods like oak, maple, and madrone burn longer and produce better coals for cooking. Softwoods like pine, fir, and cedar ignite quickly but spark more and burn faster. Avoid green or freshly fallen wood — standing dead wood is your best bet in the field.
In the Pacific Northwest specifically, I rely on western red cedar bark for tinder, Douglas fir twigs for kindling, and big-leaf maple for sustained fuel. If you’re in a different region, learn your local species. The Southeast has longleaf pine and hickory. High desert has juniper and sagebrush. Know what’s around you.
How to Choose and Build a Fire Lay
Teepee Fire Lay
Best for: Fast ignition, quick warmth, and boiling water. Place your tinder nest in the center, lean pencil-thin kindling into a cone around it, and leave a gap on the windward side for lighting. The teepee provides excellent airflow because oxygen feeds from every direction. Common mistake? Building the cone too tight, which chokes the whole thing.
Lean-To Fire Lay
Best for: Windy conditions and protecting your flame during ignition. Lay a thick log or green branch as a windbreak, place your tinder nest against its sheltered side, and lean kindling at an angle over the tinder. This is my go-to in exposed terrain. Make sure wind blows against the back wall — not into the opening.
Log Cabin Fire Lay
Best for: Cooking, sustained warmth, and building a deep coal bed. Stack fuel logs in alternating layers like a cabin frame with tinder and kindling in the center. This structure collapses inward as it burns, feeding itself. It takes longer to ignite but rewards you with steady, long-lasting heat.
Star Fire (Long-Log Fire)
Best for: Overnight warmth with minimal tending. Arrange four or five long logs in a star pattern with ends meeting at a central fire. As logs burn down, push them inward. I’ve used this layout on cold October nights in the Cascades when I needed sleep more than I needed to babysit a fire.
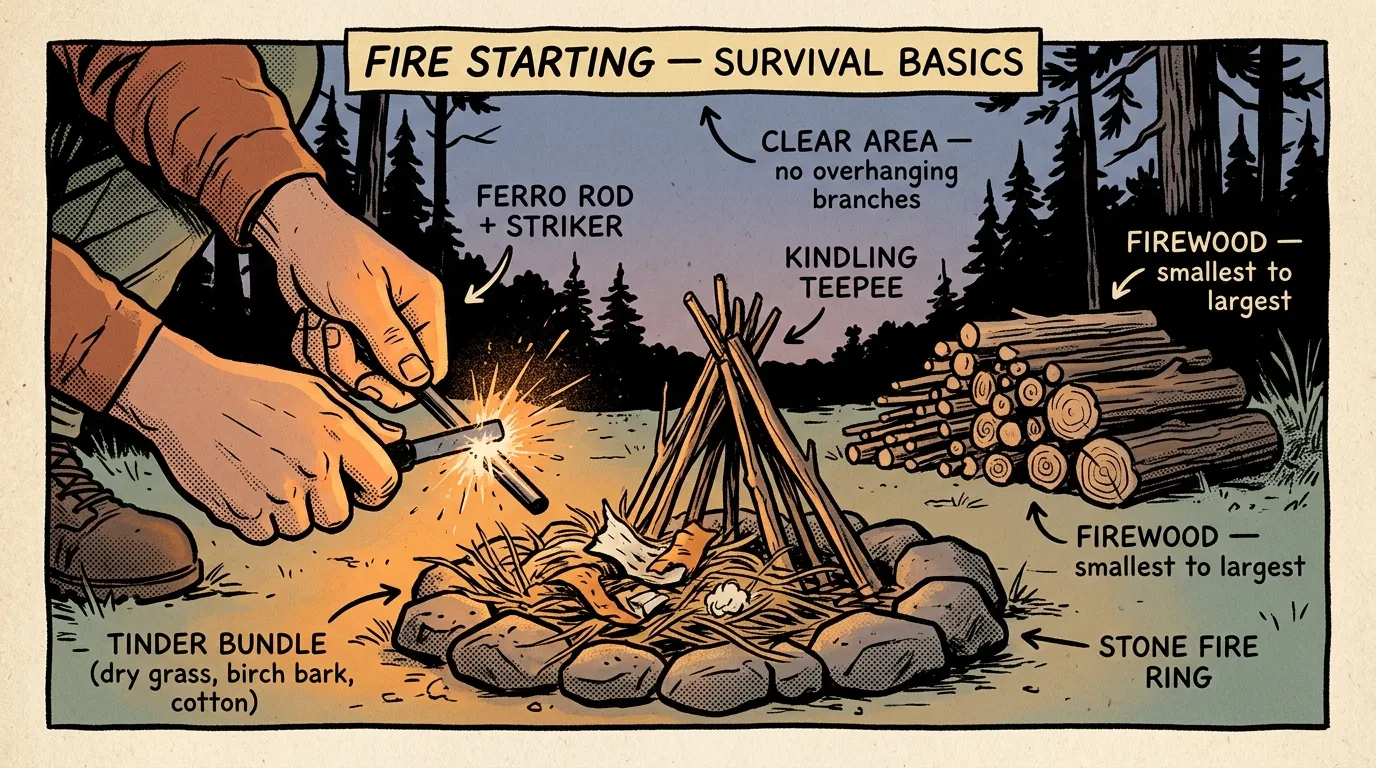
How to Start a Fire in Survival Situations: Step by Step
- Pick a safe site — use an existing fire ring when available, clear loose debris in a 3-to-5-meter radius, never build under low branches or near dry brush
- Build a dry base — lay bark strips, flat branches, or stones beneath your tinder nest to insulate from moisture, and sort kindling by size with smallest on top
- Arrange your fire lay — teepee for speed, lean-to for wind protection, log cabin for sustained coals
- Ignite with a reliable tool — protect tinder from wind, aim sparks into the center of a compact tinder nest, blow gently when an ember glows, and add the smallest kindling first
- Feed progressively — add larger wood only after each previous size is burning confidently, resist the urge to pile on big logs too soon
- Extinguish completely — douse with water until hissing stops, stir ashes, douse again, confirm cold to the touch before walking away
So which ignition tool should you actually reach for? A butane lighter is the simplest option. Waterproof matches work as a backup. But a ferrocerium rod and striker throws sparks exceeding 3,000°F and works when wet.
The Überleben Zünden ferro rod — around $18 — is what I carry on every outing. I’ve used it on over 200 field trips and it’s never once failed me, even soaking wet at 28°F. A standard BIC lighter is still my first-reach tool because it’s effortless, but lighters crack, run out of fuel, and won’t spark below freezing. The ferro rod doesn’t care about any of that. If you can only buy one fire tool beyond a lighter, make it a ferro rod.
How to Start a Fire With Nothing: Primitive Methods
Modern tools should always be your primary plan. But gear gets lost, lighters fail, and matches run out. Knowing primitive methods gives you a backup that depends on nothing but skill and available materials.
Bow Drill
This is the most reliable friction-based method. You’ll need a flat fireboard of dry softwood (cottonwood, willow, or cedar work best), a straight spindle about ¾-inch thick, a curved bow with cordage, and a hard socket to press on top. Carve a notch in the fireboard, wrap the bow string once around the spindle, press the socket down, and saw back and forth. The friction creates a dark, smoking coal in the notch. Transfer it to your tinder nest and blow gently into flame.
Here’s the honest truth about the bow drill: I’ve taught it to over 300 students in community preparedness workshops across Oregon and Washington, and the average beginner needs 20–30 attempts before getting a reliable coal. It’s a real skill that takes real practice. Train in your backyard, not in an emergency.
Hand Drill
Simpler setup but far more physically demanding. Roll a thin spindle between your palms while pressing down into a fireboard notch. Even experienced practitioners struggle with this in cold or wet conditions. I consider it a genuine last resort.
Flint and Steel
Strike high-carbon steel (like the spine of certain knives) against a sharp edge of flint, quartz, or quartzite to throw sparks into char cloth or very fine tinder. Stainless steel won’t work — it has to be high-carbon. This method is more reliable than friction but still requires practice and the right materials.
Bottom line: Carry modern tools as your primary. Learn primitive methods as insurance. Practice both before your life depends on them.
How to Start a Fire in the Rain: Wet-Weather Techniques
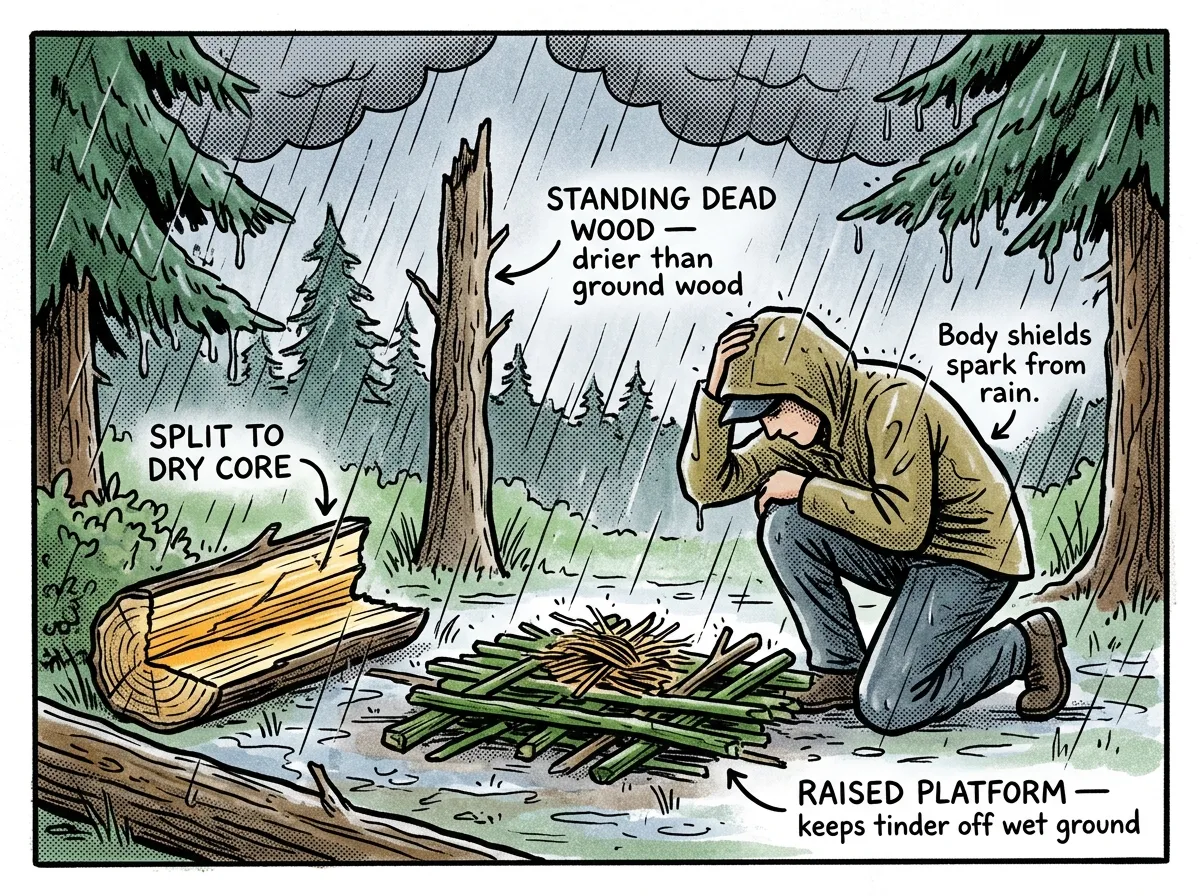 Key wet-weather fire techniques: splitting for dry wood, raised platform, and body shielding
Fire starting in wet conditions is the single most common challenge I encounter in Pacific Northwest field work. Here’s what actually works.
Find Standing Dead Wood
Wood lying on the ground absorbs moisture like a sponge. Standing dead trees and branches — snags that’ve died but haven’t fallen — stay significantly drier. Snap off dead branches from standing timber whenever possible.
Baton to Access Dry Inner Layers
Even soaked logs contain dry wood inside. Use your fixed-blade knife and a baton (a thick stick used as a mallet) to split wood lengthwise. The exposed inner surfaces are your best fuel in rain. Shave thin curls from these dry inner faces to create improvised tinder.
The Inner-Bark Trick
Cedar, birch, and poplar all have fibrous inner bark that catches a spark even when the outer bark is damp. Peel back the wet exterior and shred the dry inner fibers into a loose nest.
Shield your tinder nest with a poncho, pack lid, or your body while you strike. Once flames establish, the fire generates enough heat to dry surrounding kindling on its own.
Build a Raised Platform
Lay a grid of green wrist-thick sticks on saturated ground. This elevates your tinder above standing water and mud. Place your dry base and tinder nest on top.
If you’re at higher elevations, keep in mind that thinner air means less oxygen. Above 8,000 feet, I’ve noticed fires need more aggressive airflow — fan the flames more, keep the fire lay open, and use smaller-diameter fuel. If you’re in a humid Gulf Coast climate, the challenge is different: everything holds moisture, so prepared tinder becomes even more critical than natural sources.
How to Signal for Rescue Using Fire and Smoke
Fire is one of the oldest and most effective rescue signals. But only if you do it right.
You took a wrong fork on a trail in the Cascades. It’s day two, your phone’s dead, and you can hear a helicopter in the distance. You’ve got a fire going for warmth — now you need it to talk. Adding green pine boughs creates a column of white smoke visible for miles against dark timber. That single column cut a SAR team’s search grid from 12 square miles to a quarter-mile radius in one real operation I witnessed.
White smoke comes from adding green vegetation, damp leaves, or fresh pine boughs to an established fire. It’s visible against dark terrain and forest. Dark smoke comes from burning rubber, oil-soaked rags, or plastic — visible against overcast skies or snow. Use whatever contrasts most against your background.
The international distress signal is three fires arranged in a triangle, spaced roughly 25 meters apart. If you can only manage one fire, make it as smoky as possible and build it on high, open ground — ridgelines, clearings, or lakeshores. Tree canopy blocks visibility.
Common Fire Starting Mistakes
After years of teaching, I see the same errors on repeat. Here are the top six — and the fix for each.
- Using wet or green wood. Snap-test every stick. Bends? Skip it. Clean snap? Use it.
- Building too large too fast. Your first five minutes should involve pieces no bigger than a pencil. Patience is the skill.
- Collecting too little tinder. Gather three times what you think you need. Then gather more.
- Ignoring wind direction. Face the opening of your fire lay away from the wind, or use a lean-to as a shield.
- No dry base on wet ground. Always elevate your tinder nest with a platform.
- Leaving a fire unattended. If you walk away, the fire should be dead cold. No exceptions.
The first time I tried building a fire in real rain — not a drizzle, genuine Pacific Northwest rain — I made mistakes two, three, and four simultaneously. I burned through half my matches before I slowed down, gathered three times more tinder, repositioned for wind, and got it on the next strike. That lesson cost me 20 minutes of shivering. In a real emergency, it could cost everything.
The 4 P’s of Fire Safety
The 4 P’s give you a simple framework that applies whether you’re at a campground or in a survival scenario:
- Prevention: Check burn bans, local restrictions, and weather before you strike a match. Clear your site of dry leaves, grass, and overhanging branches.
- Preparedness: Carry redundant fire starting tools — at minimum, a lighter and a ferro rod — stored in separate locations. Pack prepared tinder in a waterproof pouch.
- Practice: Build fires in controlled, legal settings until the process is automatic. The time to learn isn’t when you’re hypothermic and losing daylight.
- Protection: Keep suppression tools within arm’s reach — water, a small shovel, or a bucket of dirt. Monitor your fire at all times. Never sleep without a containment plan.
These aren’t just boxes to check. They’re a mindset that keeps you, your group, and the landscape safe.
Building a Beginner’s Fire Starting Kit
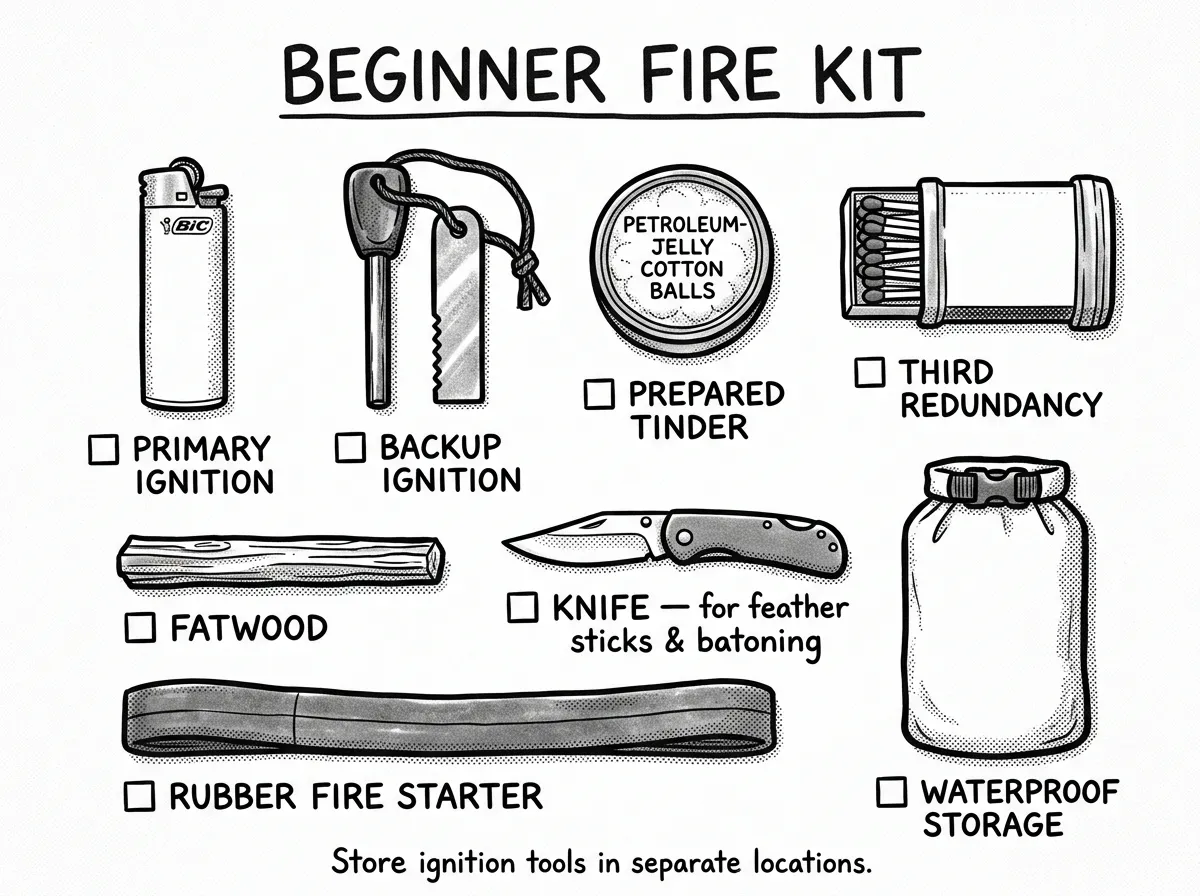 A complete beginner fire kit with redundant ignition tools and prepared tinder
You can assemble a solid kit for around $20–$40. Here’s what I carry:
- Two butane lighters — one in your pocket, one in your pack (store one against your body in cold weather)
- Waterproof matches as a backup that doesn’t depend on butane
- Ferrocerium rod and striker — works wet, works cold, throws sparks at 3,000°F+
- Tinder pouch with petroleum-jelly cotton balls or fatwood sticks in a waterproof bag
- Fixed-blade knife or multi-tool for batoning and feather sticks
- Compact folding saw for processing fuel-sized logs
- Small folding shovel for site prep and suppression
Why two ignition methods minimum? Lighters fail. Matches get wet. A ferro rod with no tinder is useless. Redundancy across ignition methods and tinder sources is non-negotiable. When you’re packing these into a go-bag, check our guide on how to build a bug out bag for full kit recommendations.
One thing I see constantly: people buy a ferro rod and toss it in their pack without ever striking it. Then they’re in the field for the first time, hands shaking, scraping at the wrong angle, getting zero sparks. Take it out of the package tonight. Strike it 50 times against cotton balls in your driveway. Learn the angle and pressure your specific rod needs. That 10-minute investment pays off more than any piece of gear you’ll ever buy.
Weather Adjustments Beyond Rain
Wind
Build a lean-to fire lay or position yourself behind a natural windbreak — a boulder, fallen log, or embankment. Keep the fire low and feed from the sheltered side. High wind turns sparks into wildfire starters, so increase your cleared radius substantially.
Snow and Cold
Build a solid platform of green logs above the snow surface — at least two layers thick. Without it, your fire melts down into a pit and drowns itself. Keep ignition tools warm in an inner pocket. Cold hands lose dexterity fast, so practice ferro rod strikes with gloves on before you need to.
Hot and Dry Conditions
Follow all restrictions — fire bans exist for a reason. Prefer a camp stove when possible. If fires are allowed, keep them small and well within your cleared radius. If you’re in high desert or chaparral country, understand that one stray ember can start something you can’t stop.
Practice, Training, and Honest Limits
Practice survival fire starting in a backyard, at a campground, or in a structured class. Master your ferro rod, make feather sticks until it’s automatic, and test your kit in simulated rain. If you’re serious about field readiness, consider taking a hands-on course in wilderness first aid basics — fire building and medical response go hand-in-hand in real emergencies.
I’ll be honest about limits: success depends on environment, available materials, physical condition, and experience. No article replaces hands-on training. Build the skill now, carry redundant tools always, and plan for the scenario where your first method fails.
Build the Skill Before You Need It
Knowing how to start a fire in survival situations isn’t a party trick. It’s a core survival competency that connects to warmth, water purification, food preparation, signaling, and psychological resilience. Every section of this guide exists because I’ve personally needed that knowledge in the field, taught it to hundreds of students, or watched someone struggle without it.
Start simple. Buy a ferro rod and a bag of petroleum-jelly cotton balls this week. Go to your backyard or a local campground and light ten fires. Then do it in the rain. Then do it with cold hands. Build the muscle memory so that when the stakes are real — when you’re wet, tired, losing daylight, and everything depends on that first ember catching — your hands already know what to do.
Master the fire triangle. Carry redundant tools. Practice until it’s automatic. And never leave a fire without confirming it’s dead cold.
This guide was last field-tested and updated May 2026 based on current Leave No Trace and local burn-ban guidelines.
The Complete
Prepper's Reference.
149 articles synthesized into one comprehensive PDF — twelve chapters covering water, food, shelter, first aid, comms, and scenario-specific preparedness. Free with your email.
Unsubscribe anytime · We never share your email
You're in. Check your inbox.
Keep Reading
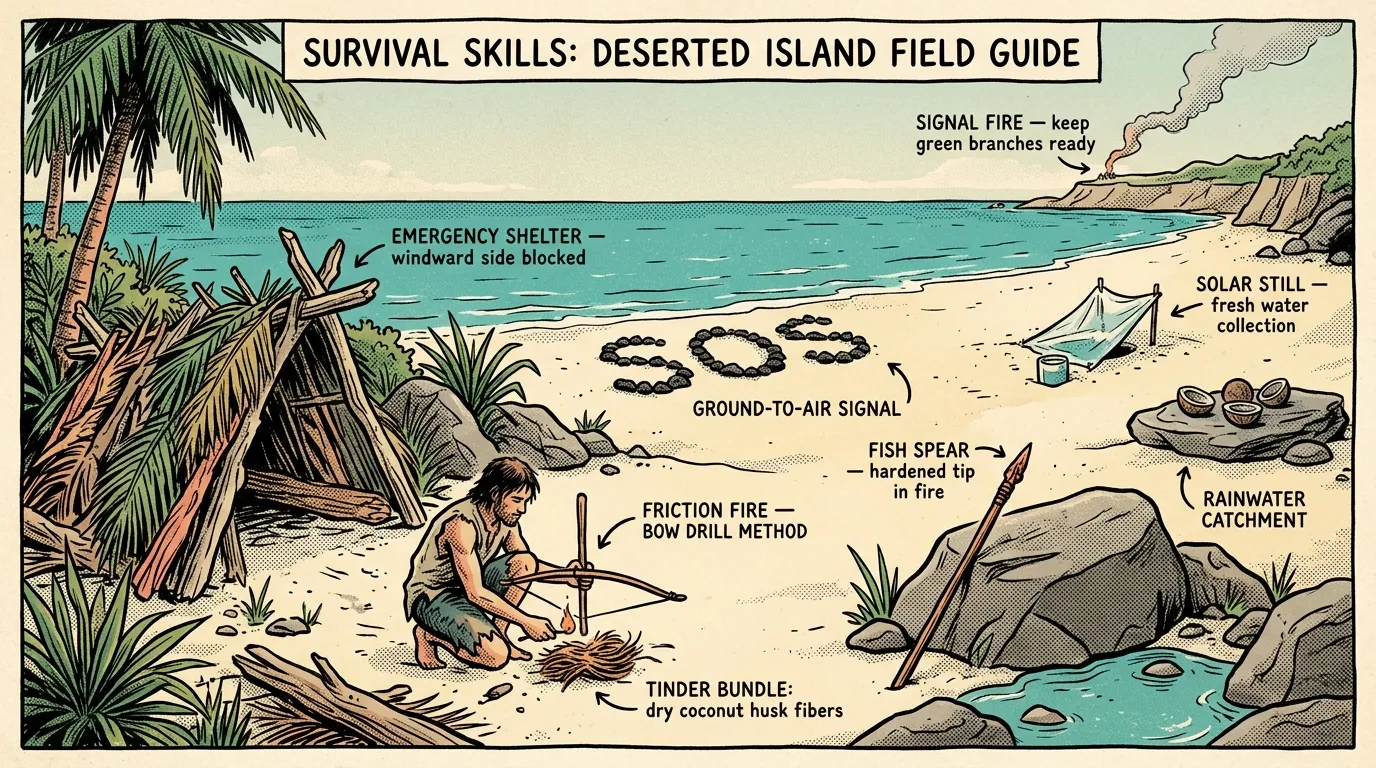
Survival Skills on a Deserted Island: Field Guide
Master survival skills on a deserted island — water, shelter, fire, food, and rescue signaling from a WFR with 12+ years of field experience. Start learning now.
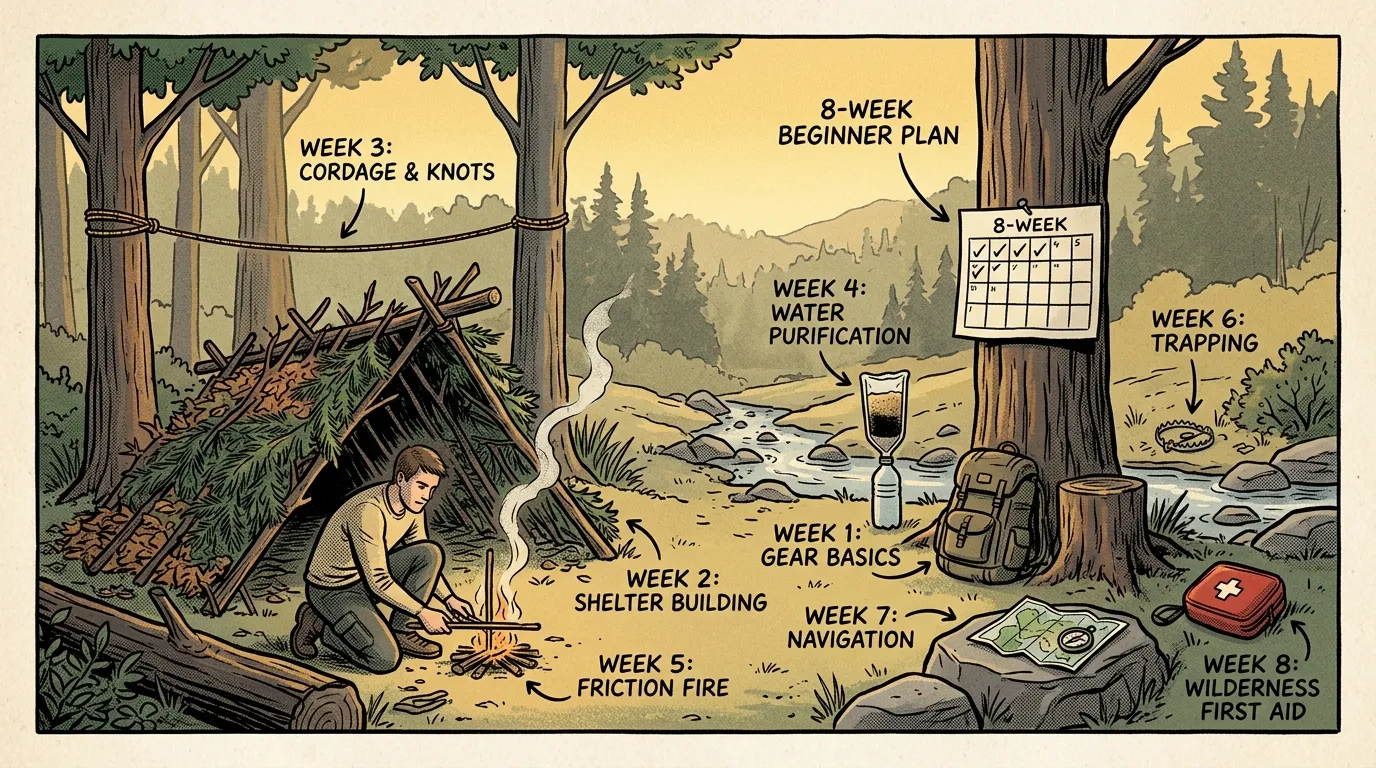
Survival Skills Training: 8-Week Plan for Beginners
Follow this 8-week survival skills training plan to master shelter, fire, water, navigation & first aid. Built by a FEMA-trained WFR. Start this weekend.
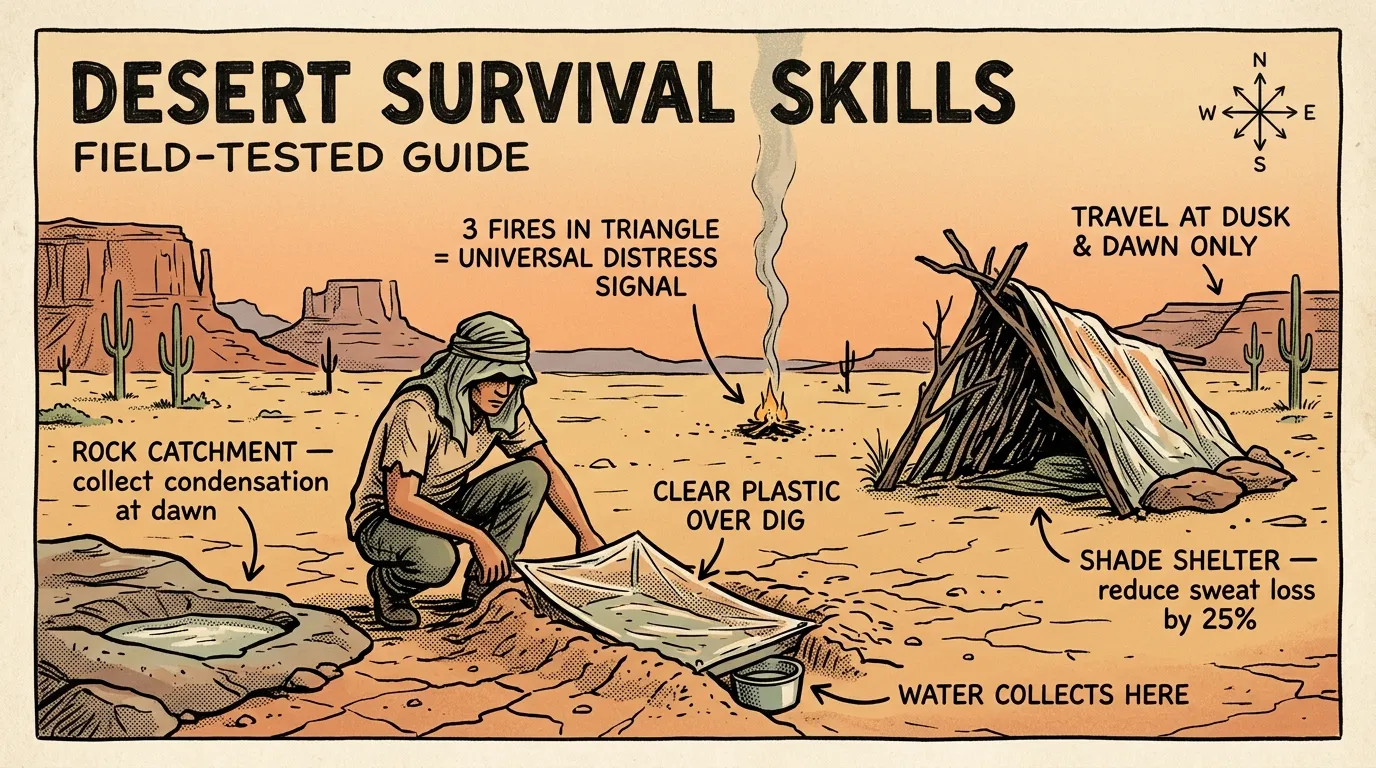
Desert Survival Skills: A Field-Tested Guide
Master 12 essential desert survival skills from a FEMA-trained Wilderness First Responder — water finding, heat management, shelter, and navigation. Start preparing now.