This article provides a structured 8-week survival skills training curriculum that readers can follow at home and outdoors, covering shelter building, fire-making, water procurement, navigation, foraging basics, first aid, signaling, and scenario integration — written by a FEMA-trained emergency management professional.
Key Takeaways
- Follow the Rule of Threes to prioritize training: shelter first, then water, fire, and navigation — in that order
- Dedicate 3-5 hours per week for 8 weeks to build genuine survival competence without expensive courses
- Practice every skill hands-on in realistic conditions — reading about fire-making and actually starting a fire in the rain are completely different experiences
- End your training with a 48-hour integration scenario that forces you to combine all skills under mild stress
- Maintain skills monthly with rotating 2-hour drills — untrained skills degrade within 6 months
- Total gear investment for the entire 8-week plan is under $150 — skill always outweighs equipment
I’ve spent twelve years responding to emergencies across the Pacific Northwest — from hypothermic hikers on Mount Hood to families cut off by flooding in rural Washington — and here’s the pattern I see over and over: people invest hundreds of dollars in gear, stack their shelves with freeze-dried food, and never once practice the skills that’ll actually keep them alive when systems fail. Survival skills training isn’t about buying things. It’s about doing things — repeatedly, under varying conditions, until your hands know what to do before your brain catches up.
The problem with most survival content online is that it reads like an encyclopedia. “Here are 47 wilderness survival skills.” Great. Where do you start? What do you practice this Saturday? That’s what this article solves. I’ve built an 8-week structured survival training plan — the same general framework I’ve used training over 200 community volunteers through my FEMA work and SAR support — that takes you from zero to genuinely competent. No $2,000 course required.
Quick Summary
- Week-by-week, 8-week survival skills training plan you can follow at home and in local outdoor spaces
- Follows the Rule of Threes — prioritizing shelter, water, fire, then expanding to navigation, first aid, food, and signaling
- Each week includes specific drills with time estimates (3–5 hours/week)
- Total gear investment under $150 for the entire 8 weeks
- Designed for adults and families — adaptable for kids with supervision
- Ends with a 48-hour integration scenario to test everything you’ve learned
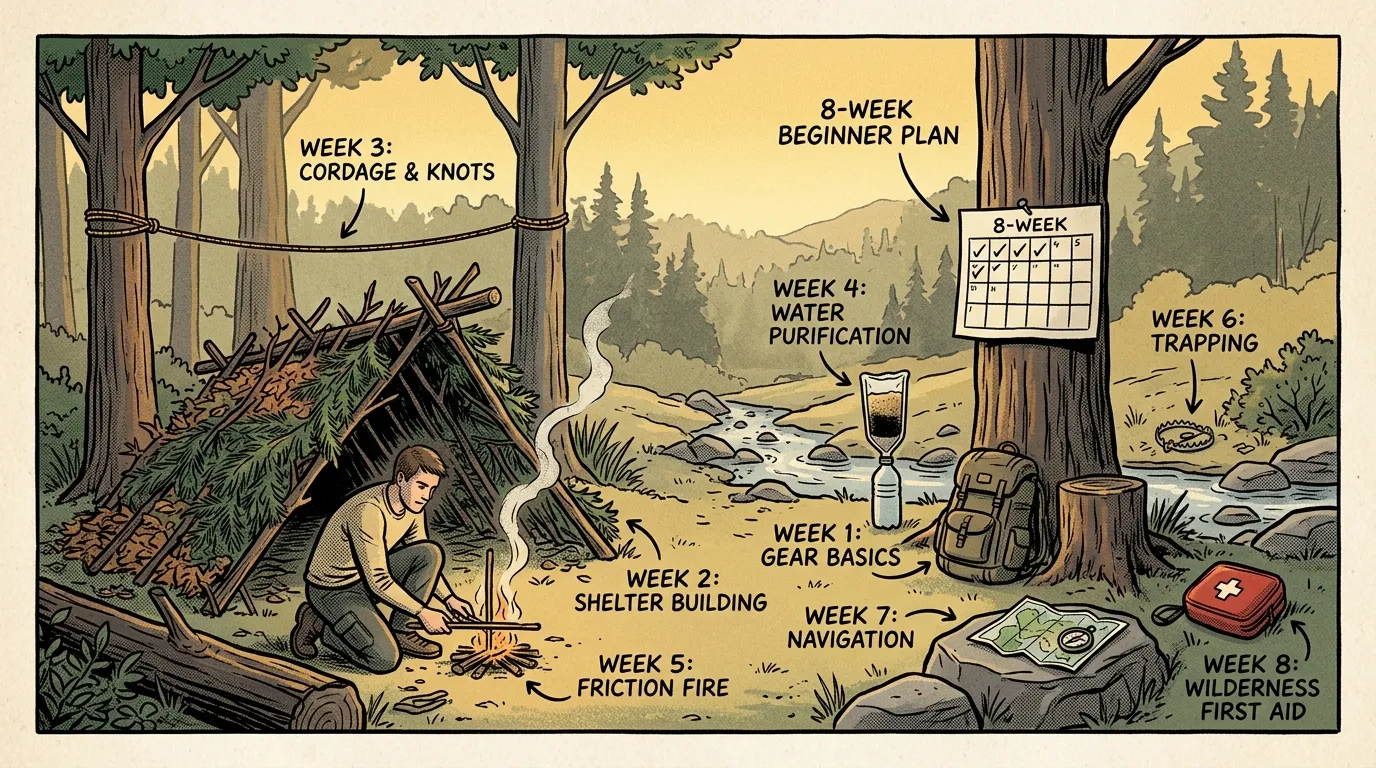
Your 8-Week Survival Skills Training Plan at a Glance
- Week 1: Build three shelter types to master exposure protection.
- Week 2: Source and purify water using chemical, boiling, and filter methods.
- Week 3: Start fires with four ignition methods, including in wet conditions.
- Week 4: Navigate a 2-mile route using only a map and compass.
- Week 5: Practice wilderness first aid including bleeding control and splinting.
- Week 6: Master signaling techniques and electronic rescue tools.
- Week 7: Identify five edible plants and build basic traps.
- Week 8: Complete a 48-hour integration scenario combining all skills.
The Rule of Threes: Why This Survival Training Plan Is Ordered the Way It Is
You might be itching to start with fire. Everyone wants to start with fire — it’s dramatic, it’s satisfying, and it’s the skill that looks coolest on YouTube. But that’s not how survival priorities actually work.
The Rule of Threes governs this entire curriculum:
- 3 minutes without air (we’ll skip this one — you’re not training underwater escape)
- 3 hours without shelter in harsh conditions
- 3 days without water
- 3 weeks without food
Shelter comes first. Then water. Then fire — which supports both shelter (warmth) and water (purification). Everything else layers on top. Don’t skip ahead. There’s a reason this order has been drilled into every Wilderness First Responder and FEMA field team I’ve worked with.
Week 1: Shelter — Your First and Most Critical Skill
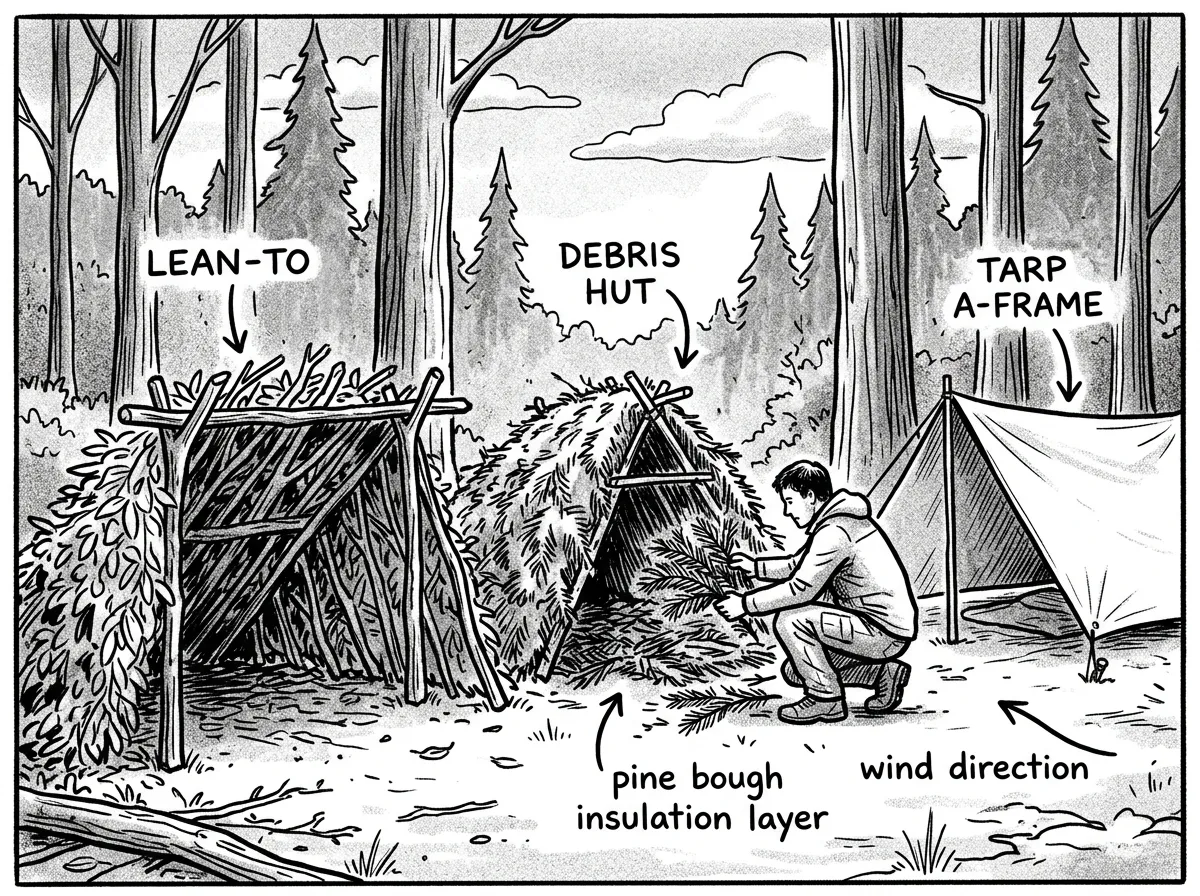 Three essential shelter types every beginner should master
Time commitment: 4 hours Location: Backyard or local wooded park
Most survival situations that turn fatal involve exposure. Not dehydration, not starvation — hypothermia or heat-related illness. That’s why your basic survival skills training starts here.
Saturday drill (3 hours): Build three shelter types using only natural materials and a single tarp:
- Debris hut — A-frame style with a thick layer of leaf litter insulation. Your body should barely fit inside. Bigger isn’t better.
- Tarp lean-to — Practice with a 10×10 tarp and 550 paracord. Time yourself. First attempt, you’ll fumble. That’s the point.
- Emergency bivouac — Using only a large trash bag and whatever’s around you. This is your “I have nothing” scenario.
For more detail on shelter construction fundamentals, I’ve written a full breakdown elsewhere.
Weeknight study (1 hour): Watch three different shelter-building tutorials and note what they do differently. Then think about what works for your region. If you’re in the humid Southeast, ventilation matters more than insulation. Pacific Northwest? Waterproofing is everything. High desert? Shade and wind protection dominate.
Sleep in your debris hut for at least one hour. You’ll immediately discover if your insulation is thick enough — your body won’t lie to you the way your eyes will.
Week 1 gear cost: A 10×10 tarp ($15–25), 100 feet of paracord ($8), and a contractor trash bag ($2). Under $35 total.
Week 2: Water Procurement and Purification
Time commitment: 4 hours Location: Home kitchen + nearby water source (creek, pond, lake)
Water is where people die from overconfidence. I’ve watched hikers scoop water straight from a crystal-clear mountain stream and end up evacuated with giardia three days later. Clear doesn’t mean clean. Ever.
Saturday drill (3 hours):
- Collect water from a natural source (creek or pond) in a clean container
- Practice chemical treatment using Aquatabs — follow exact dosing and wait times
- Boil a second batch using your camp stove or fire pit — rolling boil for 1 full minute (3 minutes above 6,500 feet)
- Filter a third batch through a Sawyer Squeeze and taste-compare all three
- Build an improvised pre-filter using a cut water bottle, sand, gravel, and charcoal — note how slow and imperfect it is
Weeknight study (1 hour): Map every water source within 5 miles of your home. Creeks, ponds, retention ponds, swimming pools, water heaters — all of it. You’ll be shocked how much water exists near you that you’ve never thought about. For a deeper dive into identifying safe water sources in the field, check out my dedicated guide.
The Sawyer Squeeze — around $30 — is what I reach for every single time over the LifeStraw. The LifeStraw is fine for drinking directly from a source, but the Squeeze lets you filter into a container, share clean water with others, and process higher volumes. I’ve pushed over 500 liters through one on extended backcountry trips without a hiccup. It’s the best $30 you’ll spend on survival gear.
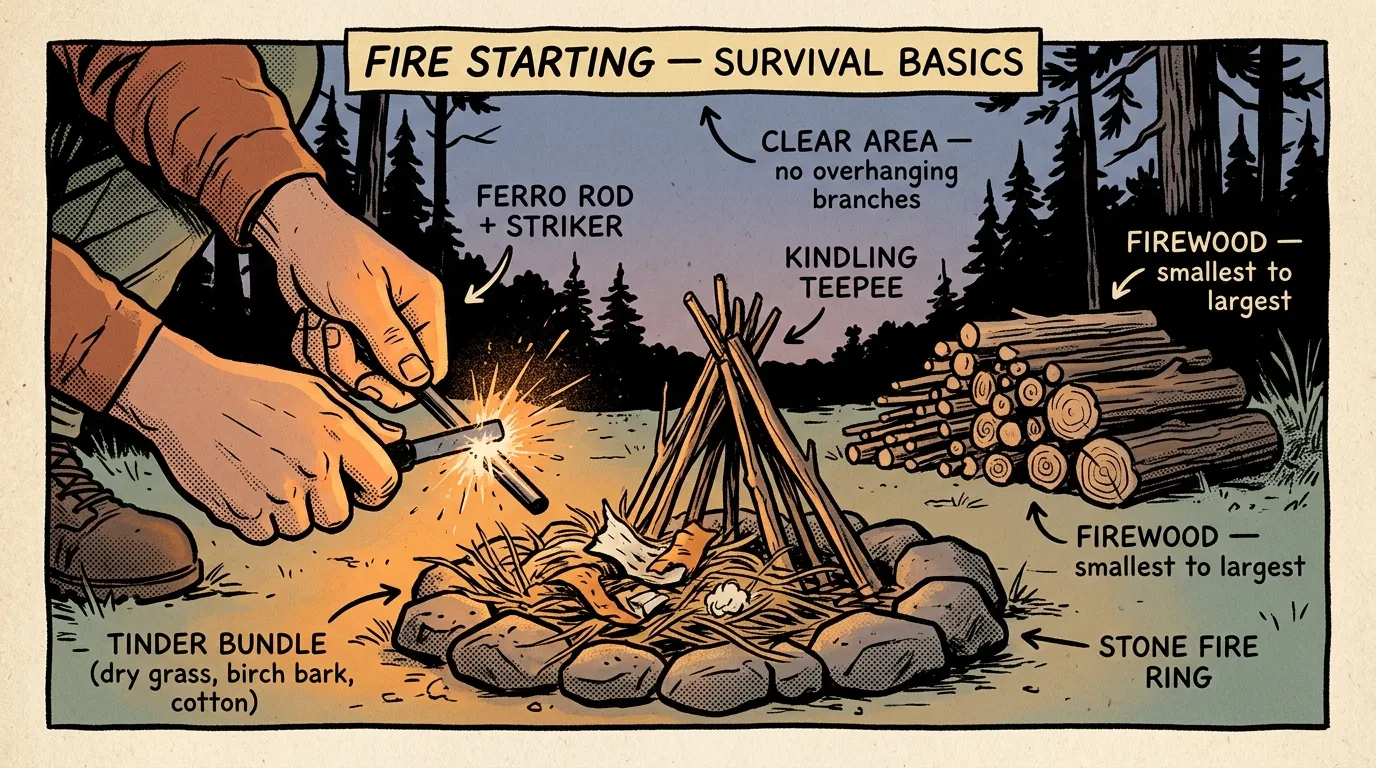
Week 3: Fire-Making Skills
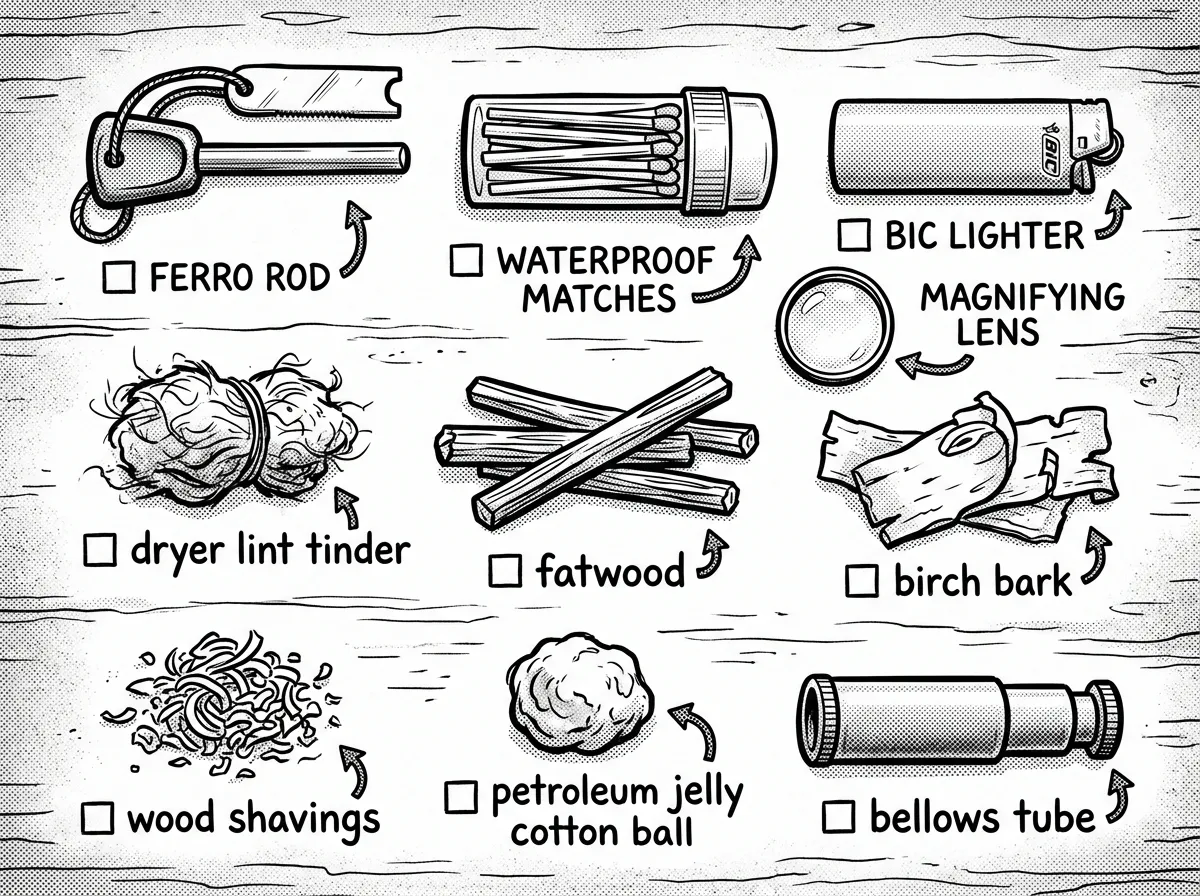 Four ignition methods and fire-starting essentials laid out for practice
Time commitment: 5 hours Location: Backyard fire pit or designated campfire area
Now we get to the fun week. But I’m going to push you past the comfort zone of “light a match and call it done.”
Saturday drill (3.5 hours): Successfully start a fire using four different ignition methods:
- Ferro rod and steel — You should be able to throw sparks into a tinder bundle in under 30 seconds by the end of this session.
- Waterproof matches — Easier, but practice in wind. Cup your hand. Shield with your body.
- Friction fire (bow drill) — This will humble you. Budget 90 minutes just for this. Your first attempt will probably fail. That’s fine.
- Battery and steel wool — A great emergency hack. Understand why it works.
Weeknight drills (1.5 hours across two evenings): Practice making tinder bundles from different materials. Dryer lint, cotton balls with petroleum jelly, fatwood shavings, birch bark, dry grass. Time how quickly each catches a spark. Keep notes. If you want to go deep on fire-starting techniques, I cover the full spectrum in a separate article.
It’s been raining for 36 hours straight. Everything on the ground is soaked. You need a fire to purify water and warm up. This weekend, deliberately soak your fire area with a garden hose, then try to get a fire going using only standing dead wood (which stays drier inside) and your ferro rod. This drill alone teaches more than ten YouTube videos.
The first time I tried a bow drill in genuinely wet conditions — not the conveniently dry demonstrations you see online — it took me nearly two hours. My hands were raw. That failure taught me to always carry a ferro rod and petroleum jelly cotton balls as a backup, no matter how good I think my primitive skills are.
Week 4: Navigation Without GPS
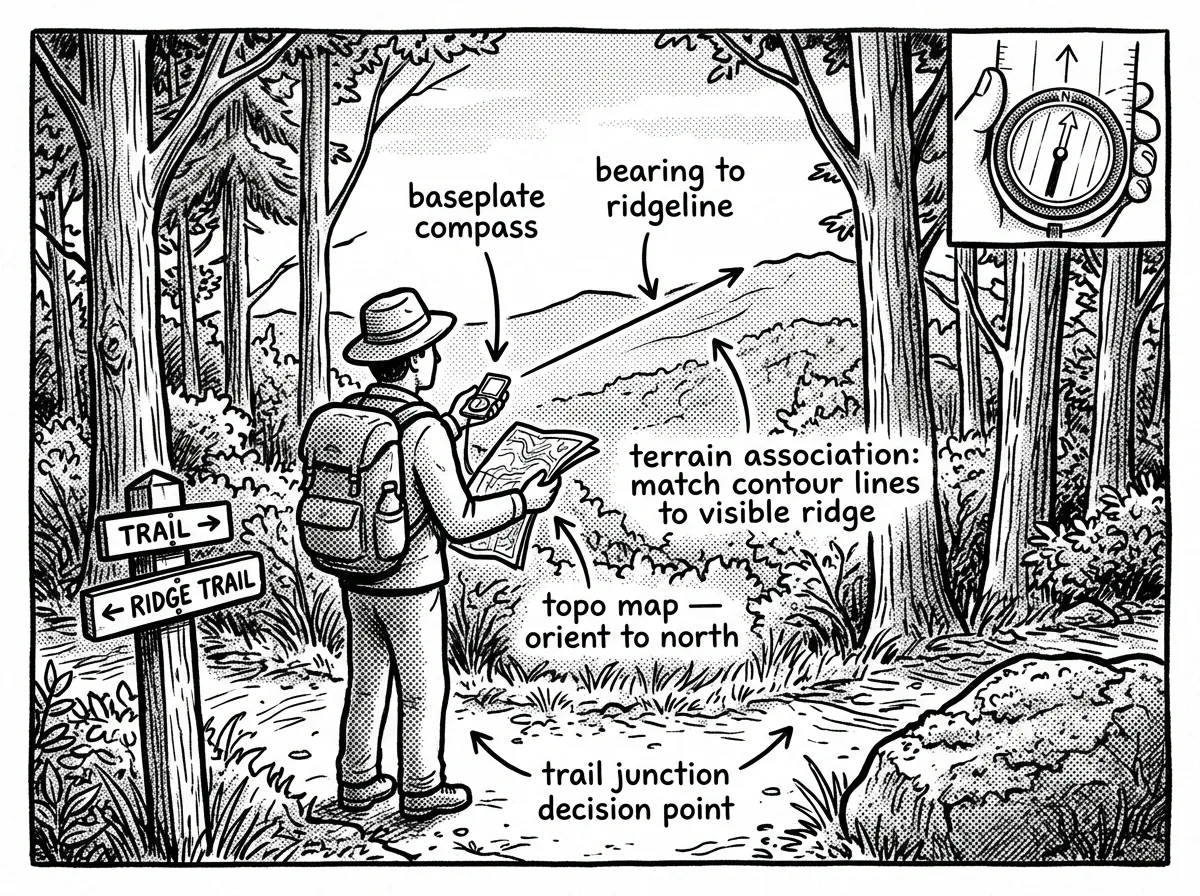 Navigating a wooded trail using map, compass, and terrain association
Time commitment: 4 hours Location: Local park or trail system with a printed topographic map
Your phone will die. Your GPS might break. And if you’re lost, navigation is literally the difference between walking toward help or walking deeper into trouble. Over the past twelve years, I’ve navigated well over 2,000 backcountry miles across the Pacific Northwest using map and compass — and I can tell you that this skill is non-negotiable.
Saturday drill (3 hours):
- Compass basics — Learn declination for your area. Practice taking a bearing to a visible landmark, walking to it, and taking a back bearing to confirm your position.
- Map reading — Use a USGS topo map of your local area. Identify terrain features (ridgelines, saddles, drainages) on the map, then find them in real life.
- Natural navigation — Practice finding south using an analog watch method. Note how moss, tree growth, and sun position can give directional hints (but aren’t gospel).
Weeknight study (1 hour): Plot a 2-mile route on your topo map using only compass bearings and terrain association. You’ll walk it next Saturday. For a more thorough overview, my article on basic orienteering for new preppers covers declination, pace counting, and terrain association in depth.
Buy a quality baseplate compass like the Suunto A-10 ($25–$35) or Silva Starter ($20–$30). Skip cheap gas station compasses — they’ll frustrate you and teach you nothing.
Digital Backup and Low-Visibility Navigation
Compass skills are primary, but smart preppers use layers. Download USGS topo maps of your area through apps like Gaia GPS or Avenza Maps and cache them for offline use. These are complements, not replacements — your phone battery dies eventually, but offline maps give you redundancy while it lasts.
Here’s what most navigation training misses: you rarely get lost in perfect conditions. You get lost in fog, at dusk, in dense tree cover. In the Pacific Northwest, I deal with fog and heavy canopy constantly — celestial navigation is nearly useless half the year. That’s why I rely heavily on terrain association: matching the shapes of ridgelines, drainages, and slope angles to my map rather than looking at the sky.
Bonus drill: Practice navigating a short course (even 200 yards) at dusk or in dense tree cover using compass bearings and pace counting. The disorientation you feel will teach you why this skill matters when you need it most.
Week 5: Wilderness First Aid Fundamentals
Time commitment: 4 hours Location: Home
This is the week most survival training plans skip entirely, and it drives me crazy. My Wilderness First Responder certification through NOLS Wilderness Medicine has been more useful in emergencies than every fire-starting technique combined.
Saturday drill (3 hours):
- Stop severe bleeding using direct pressure, wound packing, and a tourniquet (CAT tourniquet, ~$30)
- Improvise a splint from sticks and cloth — immobilize a “broken” forearm and a “broken” ankle
- Assess for shock — practice the full patient assessment system using the ABCDE approach (Airway, Breathing, Circulation, Disability, Exposure)
- Document a mock patient encounter using SOAP notes (Subjective, Objective, Assessment, Plan) — this is the standard WFR protocol and it forces clear thinking under pressure
- Treat a simulated burn using cool running water and clean dressings
- Practice the recovery position on a family member or willing friend
Weeknight study (1 hour): Take the free Red Cross first aid online module. It’s not a substitute for hands-on training, but it gives you the knowledge framework. About 16,000 people receive Red Cross lifesaving training every single day — there’s a reason it’s that popular.
The best survival tool you own is the ability to keep someone alive until help arrives.
In 2019, I responded to a call near the Hoh Rainforest where a hiker had taken a bad fall on a wet scramble — compound fracture of the tibia. The hikers with him had no first aid training. They’d tried to move him and made the injury significantly worse. If any one of them had known basic splinting and patient assessment, that man’s recovery would have been months shorter. That’s why this week matters.
If you can swing it, I’d strongly encourage you to take a formal Wilderness First Aid (WFA) course — they’re typically 16 hours over a weekend and cost $200–$350. But this week’s self-training gets you started with the skills that matter most in the first critical minutes.
Week 6: Signaling and Rescue
Time commitment: 3.5 hours Location: Backyard + open field
Here’s a truth that a lot of survival content ignores: the best survival strategy is usually getting found. Not living off the land for weeks. Getting rescued. I assisted on a SAR operation near Mount Rainier in 2021 where a solo hiker had been missing for two days. He had a signal mirror, used it correctly when he heard a helicopter, and was picked up within 20 minutes of that flash. Without it, the search team estimated another full day of grid searching. Signaling works.
Saturday drill (2.5 hours):
- Signal mirror practice — Aim a mirror’s reflection at a target 100+ yards away. Harder than it looks. Use the sighting hole to direct the flash accurately.
- Whistle signals — Three blasts is universal distress. Practice carrying a whistle on your person at all times during outdoor activities.
- Ground-to-air signals — Use rocks, logs, or bright clothing to create a large X or V in an open clearing. Make it at least 10 feet across — small signals are invisible from altitude.
- Smoke signals — Add green vegetation to your fire to create white smoke visible against a forest background.
Electronic Signaling Devices: PLBs and Satellite Communicators
If you spend any time in the backcountry, electronic signaling is the single highest-impact investment you can make beyond basic skills. There are two categories you need to understand:
Personal Locator Beacons (PLBs): These are one-way distress devices. Press the button, and a 406 MHz signal goes to NOAA’s SARSAT satellite system, which dispatches rescue to your GPS coordinates. No subscription fee after purchase. The ACR ResQLink (~$250–$300) is the standard. It does one thing and does it perfectly.
Satellite Messengers: Devices like the Garmin inReach Mini 2 (~$350–$400) offer two-way text messaging, tracking, and an SOS button — but require a monthly subscription ($12–$65/month depending on plan). The two-way communication is valuable because you can relay your condition and receive instructions from rescue teams.
I carry a Garmin inReach Mini 2 on every backcountry trip. The two-way communication has been worth the subscription multiple times — not just for emergencies, but for coordinating logistics and giving my family peace of mind. If budget is tight, a PLB is the smarter buy because there’s zero ongoing cost. But whichever you choose, create an activation protocol with your family before you head out: who gets notified, what the SOS means, and who calls SAR if you don’t check in by a certain time.
Weeknight study (1 hour): Program emergency contacts and learn how to send your GPS coordinates via text even with weak cell signal. If you own a ham radio or FRS radio, learn the local emergency frequencies.
Week 7: Food Procurement Basics
Time commitment: 5 hours Location: Local trails, parks, and your backyard
I’m putting food last for a reason. You won’t starve in most survival scenarios — you’ll be rescued, walk out, or die of something else first. But knowing basic foraging and trapping calms the mind, which is worth more than the calories.
Saturday drill (4 hours):
- Plant identification walk — With a regional field guide (not an app — apps need batteries), identify 5 edible plants and 3 toxic look-alikes in your area. Never eat anything you haven’t identified with 100% certainty.
- Snare construction — Build a basic figure-4 deadfall and a simple snare loop. Practice setting them (without actually trapping anything in a park — check local laws).
- Insect identification — Most people don’t realize that crickets, grasshoppers, and grubs are legitimate protein sources. Know which insects to avoid (brightly colored, hairy, or foul-smelling).
In the Pacific Northwest, I personally rely on three edible plants I can identify with absolute confidence year-round: stinging nettle (incredible nutrient density once boiled — the cooking neutralizes the sting), salal berries (mild flavor, abundant from late summer through fall), and sword fern fiddleheads (available in spring, best lightly sautéed). I didn’t learn these from an app. I learned them by walking the same trails dozens of times with a field guide until the identification became instinctive.
Weeknight study (1 hour): Learn the Universal Edibility Test — it’s slow and imperfect, but it’s a last-resort protocol that could matter. For a fuller introduction to foraging wild edibles, I’ve written a separate guide.
I’ll be blunt: wilderness foraging as a primary food strategy is mostly fantasy for the average person. I’ve been studying Pacific Northwest edible plants for a decade and I still won’t eat something unless I’m absolutely certain. Focus your food energy on carrying emergency rations — a few Clif bars and a bag of peanuts will outperform your foraging skills in any 72-hour scenario. Learn foraging for the long game and for peace of mind, not as your plan A.
Week 8: The 48-Hour Integration Scenario
Time commitment: Full weekend (or a solid Saturday) Location: Campground, private land, or backcountry (with a safety plan)
Everything you’ve learned comes together now. This is your final exam — and it’s the most important week of your entire survival skills training journey.
The scenario: You’re dropped into a location with only what’s in your pockets and a small daypack. No phone (or phone sealed in a bag for emergency-only use). You must:
- Build a shelter that’ll keep you dry and insulated for two nights
- Source and purify all your drinking water from natural sources
- Start a fire using at least two different methods across the weekend
- Navigate a 3-mile route using map and compass only
- Treat a simulated injury (have a friend “assign” you one — sprained ankle, deep cut, etc.)
- Set up at least one signaling method visible from a distance
Don’t do this alone on your first attempt. Bring a buddy or tell someone exactly where you are and when you’ll check in. This isn’t about being reckless — it’s about testing your skills with a safety net you hopefully won’t need.
After the weekend: Write down everything that went wrong, everything you forgot, and everything that worked better than expected. This debrief is where the real learning lives.
Essential Gear for Your Survival Skills Training (Complete Budget List)
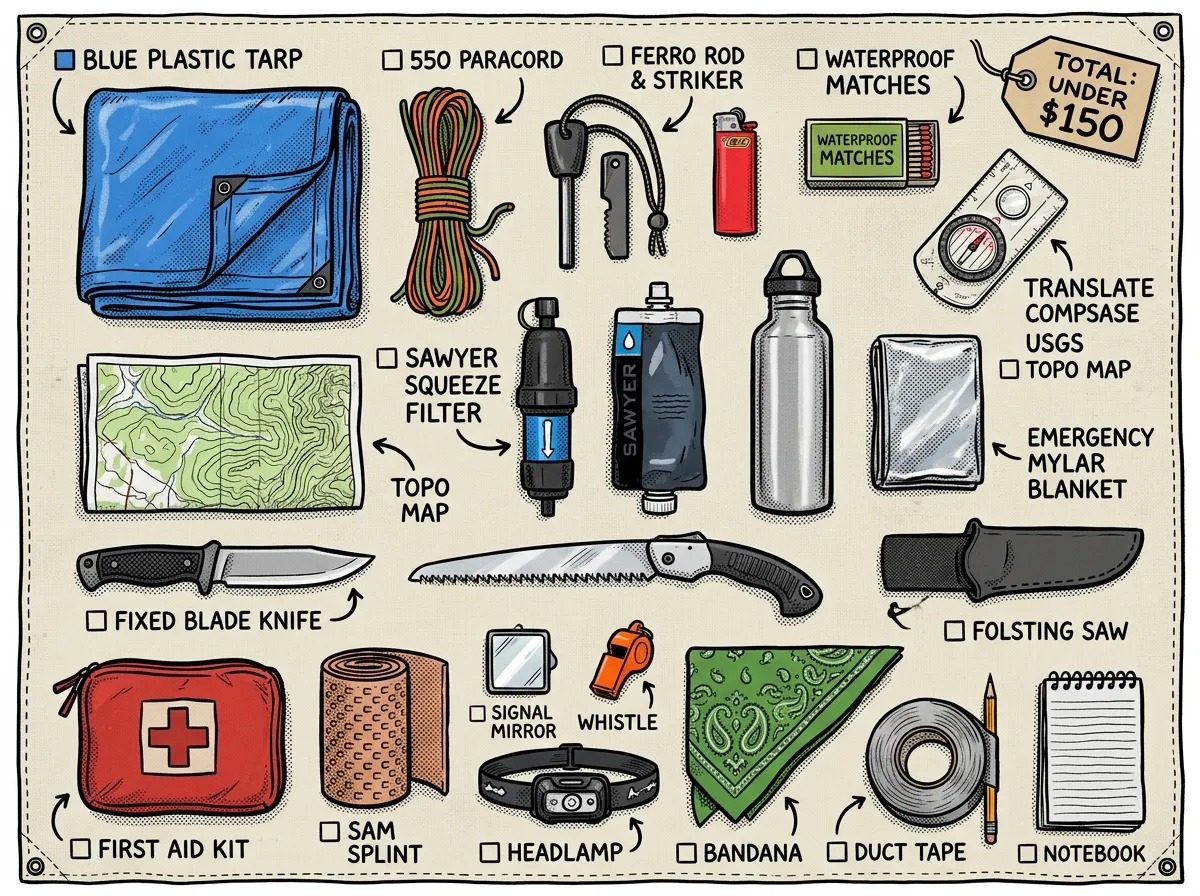 Complete under-$50 gear kit for the full 8-week training plan
One of the most common objections I hear is that survival skills training requires expensive gear. It doesn’t. Here’s everything you need for the entire 8-week curriculum, organized so you can buy as you go:
| Week | Gear Needed | Estimated Cost |
|---|---|---|
| 1 | 10×10 tarp, 100ft paracord, contractor trash bags (3-pack) | $35 |
| 2 | Sawyer Squeeze filter, Aquatabs (50-pack), 1L Nalgene bottle | $40 |
| 3 | Ferro rod with striker, waterproof matches, bow drill materials (free wood) | $15 |
| 4 | Baseplate compass (Suunto A-10), USGS topo map of your area | $30 |
| 5 | CAT tourniquet, Israeli bandage, SAM splint, nitrile gloves | $45 |
| 6 | Signal mirror, Fox 40 whistle (if not already owned) | $10 |
| 7 | Regional field guide (used is fine), snare wire (25ft) | $15 |
| 8 | No new gear — use everything you already own | $0 |
Running total: approximately $140–$190 depending on brands and whether you already own items like a water bottle or compass.
Many of these items serve double duty across multiple weeks and belong in your everyday carry kit afterward. The tarp, ferro rod, Sawyer filter, and compass are permanent additions to your outdoor gear.
Truly essential vs. nice-to-have: If you need to cut this list down to $50, prioritize the Sawyer Squeeze, ferro rod, compass, and tarp. Those four items cover the critical four skills. Everything else can be improvised or borrowed.
Survival Skills Training for Kids and Families
I get asked constantly whether this curriculum works for families. The answer is yes — with modifications. Kids are often better students than adults for this stuff because they haven’t yet developed the adult tendency to overthink and under-practice.
Age-Appropriate Modifications by Week
Ages 6–10:
- Shelter (Week 1): Kids this age are excellent debris gatherers. Let them pile leaves and branches while you build the frame. Have them crawl inside and tell you if it’s “cozy” — they’ll naturally assess if it’s insulated enough.
- Water (Week 2): They can operate the Sawyer Squeeze with supervision. Make it a science experiment — “dirty” water goes in, clean water comes out.
- Fire (Week 3): No unsupervised fire or knife work under 12. Period. But they can prepare tinder bundles and learn fire safety rules.
- Navigation (Week 4): Teach the whistle protocol (three blasts = help) and basic compass directions. Treasure hunts with a compass are incredibly effective.
- First Aid (Week 5): Practice the recovery position and how to call 911. Kids this age can learn to apply direct pressure to a wound.
- Signaling (Week 6): Whistle training is perfect for this age. Three blasts, pause, three blasts. Make it a game until it’s automatic.
Ages 11–13:
- Can participate in most drills with direct supervision
- Capable of learning full compass navigation and basic fire-starting with a ferro rod
- Excellent age for regional plant identification — they absorb visual details quickly
Ages 14+:
- Can attempt the full curriculum with a mentor or experienced adult present
- Consider modifying the Week 8 scenario to a 24-hour version in a familiar location
- Old enough for a formal Wilderness First Aid course (many programs accept 14+)
Family resources: REI offers family outdoor skills workshops in many markets. Your state’s parks department often runs free or low-cost nature programs. Scout programs (BSA, Scouts BSA) remain one of the best structured pathways for youth outdoor skills training.
Best Survival Schools and Courses Worth the Investment
Self-training builds a strong foundation, but there comes a point where professional instruction accelerates your growth dramatically. After twelve years in this field, here are the civilian survival schools I recommend most:
Pathfinder School (Ohio) — Founded by Dave Canterbury. Strong bushcraft focus with courses ranging from weekend workshops ($250–$400) to week-long advanced programs ($800+). Excellent for anyone who wants deep primitive skills and self-reliance training.
BOSS — Boulder Outdoor Survival School (Utah) — The gold standard for immersive primitive survival. Their 7-day and 14-day field courses ($1,000–$2,500) strip away modern gear and force true primitive competence. Not for beginners — do this plan first.
Mountain Shepherd Wilderness Survival School (Virginia) — Run by ex-military instructors with a practical, no-nonsense approach. Courses from $200–$1,200. Great for those who want structured, disciplined outdoor survival skills training.
Thomas Coyne Survival Schools (California/Alaska) — Offers everything from single-day critical skills courses ($150) to 7-day cross-climate intensives ($1,800). Strong medical crossover curriculum and one of the few schools with dedicated wilderness first aid certification.
Wilderness Awareness School (Washington State) — My Pacific Northwest bias showing, but this school’s nature connection philosophy produces deeply competent outdoors people. Multi-day programs ($300–$1,500) with a strong emphasis on tracking, awareness, and ecological knowledge alongside survival skills.
Online alternatives: If travel isn’t feasible, Sigma 3 Survival School and the Pathfinder School both offer structured online programs ($50–$200) that pair video instruction with at-home practice assignments. They’re not as powerful as field courses, but they’re vastly better than random YouTube browsing.
Urban Survival Skills Training: Adapting for City Dwellers
If you live in an apartment and read through this curriculum thinking “I don’t have a backyard or a creek,” this section is for you. Every week of this plan can be modified for urban environments.
Week-by-Week Urban Adaptations
Shelter: Practice tarp setups on a rooftop, in a parking garage, or at a local park. Your urban shelter priority shifts to knowing your building’s structural safe zones, locating emergency exits, and having a window escape ladder for upper floors (starting at $25 for a two-story model).
Water: Map urban water sources — water heater tanks (40–80 gallons of drinkable water sitting in your home right now), toilet tanks (not bowls — tank water is potable if untreated with chemical cleaners), rain collection on balconies, and public fountains. Practice your Sawyer Squeeze on tap water to build muscle memory with the equipment.
Fire: No campfires on balconies, obviously. Practice ferro rod technique into a charcoal grill or a fire-safe metal container on a patio. Focus on tinder preparation and spark accuracy rather than sustained fires.
Navigation: Urban navigation training means learning your city’s grid system, identifying landmarks visible from multiple neighborhoods, and practicing compass bearings between intersections. Download offline maps of your metro area. Walk a 2-mile route using only a paper map and compass — you’ll be surprised how disorienting it is without your phone.
First Aid: This week translates directly to urban settings — no modification needed.
Building-specific skills: Know where your utility shutoffs are — gas, water, electrical. Practice turning them off and on. Know your building’s fire escape routes. These aren’t glamorous bushcraft skills, but in an urban disaster, they’re the skills that save lives.
For a broader look at urban preparedness strategies, I cover city-specific scenarios in detail.
Can Civilians Do SERE School?
This comes up a lot. The short answer: no. Military SERE (Survival, Evasion, Resistance, Escape) training is restricted to active military personnel in combat-risk roles. It includes classified resistance-to-interrogation components that aren’t available — or appropriate — for civilian training.
But here’s the good news: the survival portion of SERE overlaps significantly with what you’re learning in this 8-week plan. Shelter, fire, water, navigation, signaling — it’s all here. If you want to go further, the civilian survival schools listed above offer multi-day immersive courses that’ll push you hard. The survival training market has grown to over $3.3 billion and is projected to hit $5.7 billion by 2030 — which means more quality options are becoming available each year.
The Complete
Prepper's Reference.
149 articles synthesized into one comprehensive PDF — twelve chapters covering water, food, shelter, first aid, comms, and scenario-specific preparedness. Free with your email.
Unsubscribe anytime · We never share your email
You're in. Check your inbox.
Keep Reading
How to Start a Fire in Survival Situations Safely
Learn how to start a fire in survival situations step by step. Beginner-friendly methods, safety tips, and gear from a Wilderness First Responder. Read now.
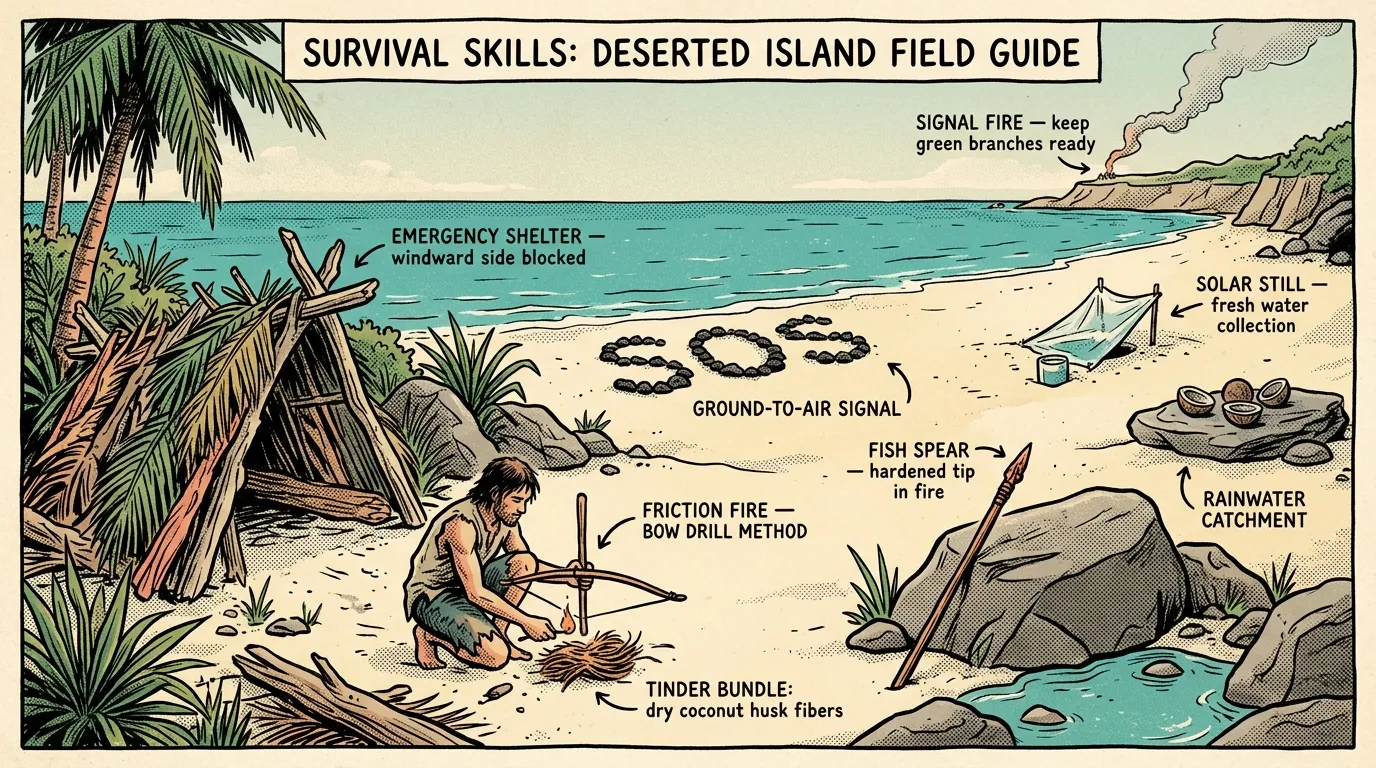
Survival Skills on a Deserted Island: Field Guide
Master survival skills on a deserted island — water, shelter, fire, food, and rescue signaling from a WFR with 12+ years of field experience. Start learning now.
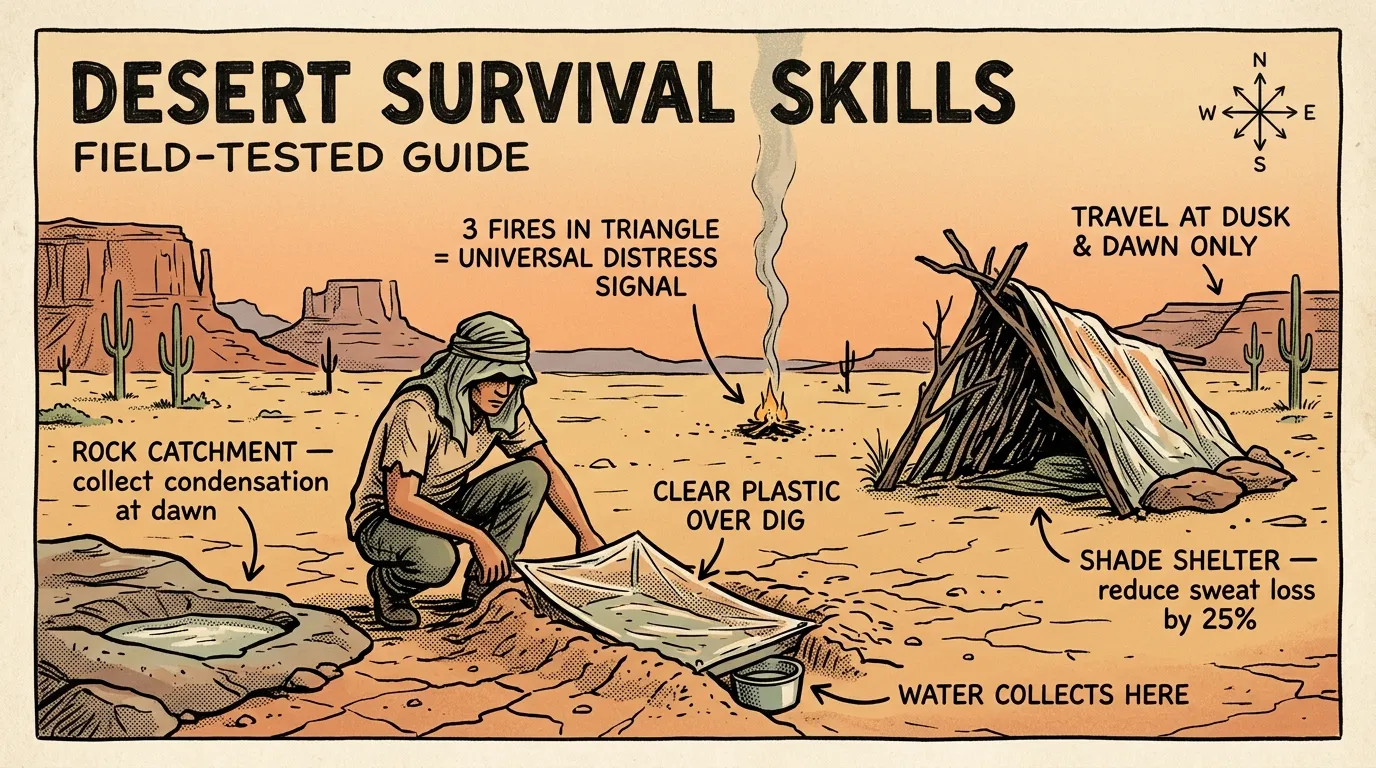
Desert Survival Skills: A Field-Tested Guide
Master 12 essential desert survival skills from a FEMA-trained Wilderness First Responder — water finding, heat management, shelter, and navigation. Start preparing now.