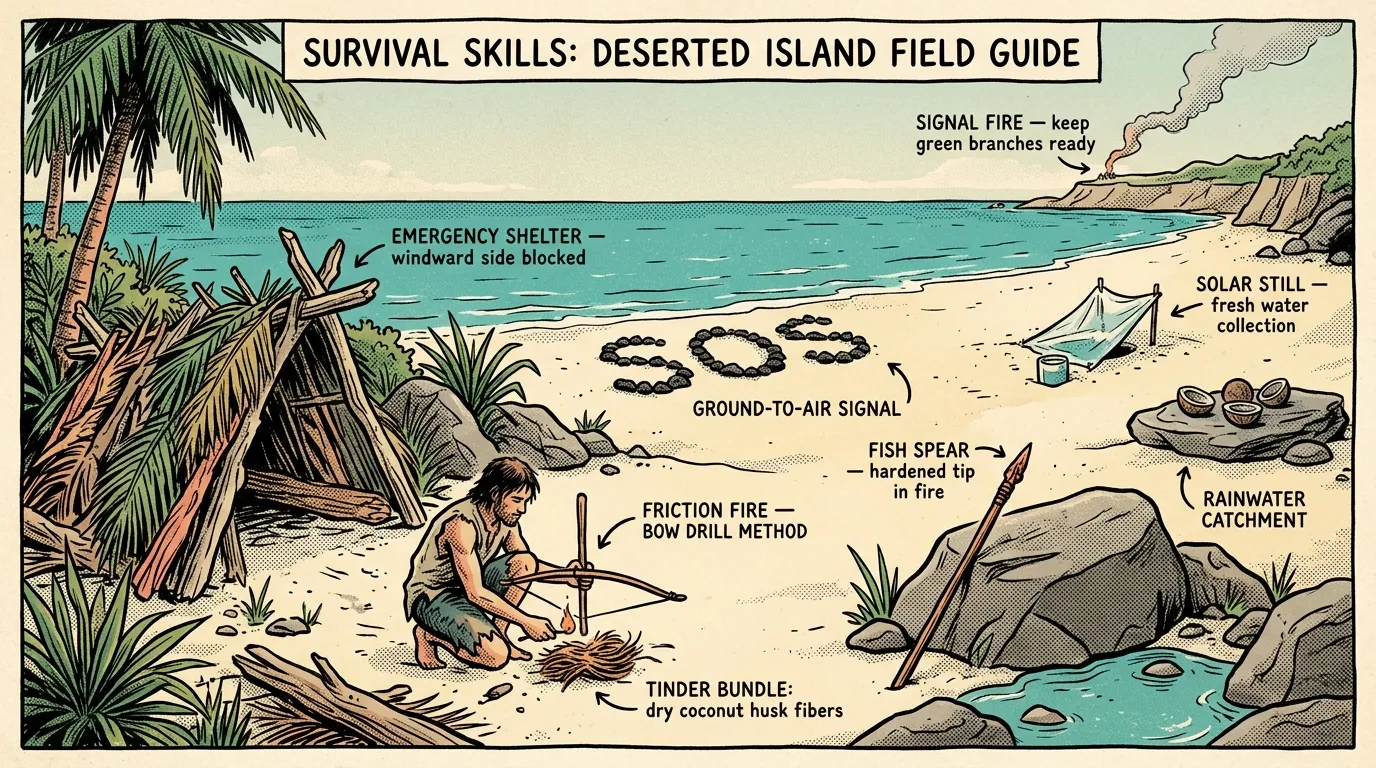
This article teaches practical survival skills on a deserted island, covering the first critical hours through long-term sustainment — including freshwater procurement from solar stills and rain catchment, tropical shelter construction, fire-starting in humid coastal environments, coastal food foraging, and effective rescue signaling techniques.
Key Takeaways
- Secure fresh water within the first hour — solar stills, rain catchment, and green coconuts are your primary sources in a tropical island scenario.
- Build shelter 50-100 feet inland from the high-tide line with heavy palm thatch and elevated sleeping platforms for rain protection and airflow.
- Maintain a permanent rescue signal system — three ground-to-air markers, a ready-to-light signal fire, and a reflective mirror that can reach aircraft up to 10 miles away.
- Forage the tidal zone at low tide for calorie-dense shellfish, crabs, and sea urchins — always cook when possible to kill parasites.
- Start a fire with dry inner palm fibers and coconut coir, and never let it die — restarting in coastal humidity burns critical energy.
- Practice these skills before you need them — build a solar still, start a fire in rain, and ID edible plants this month, not after you're stranded.
I’ve spent over twelve years working in emergency management across the Pacific Northwest, and I’ve trained for scenarios most people only see in movies. Shipwrecks. Float plane ditchings. Coastal strandings after tsunamis. The truth about survival skills on a deserted island is that they’re radically different from what you’d need in the Cascades or the Mojave. Salt air corrodes your gear. Humidity turns fire-starting into a wrestling match. And the biggest irony of island survival? You’re surrounded by water you can’t drink.
This isn’t a thought experiment for me. As a FEMA-certified Wilderness First Responder, I’ve completed over 200 hours of field medical and survival training, including coastal stranding simulations with the Pacific Northwest Search and Rescue community. One particular 72-hour exercise on the Oregon coast rewired how I think about tropical and island survival — and it’s what I’m going to walk you through right now.
Quick Summary: Key Survival Skills on a Deserted Island
Before we dive deep, here are the core island survival skills you need to master, in priority order:
- Freshwater Procurement — Build solar stills and rain catchment systems to secure at least one gallon of drinking water per day in tropical heat.
- Tropical Shelter Construction — Build an elevated, ventilated lean-to 50–100 feet inland with heavy palm thatch for rain protection and shade.
- Fire-Starting in Humid Conditions — Use dry inner palm fibers and coconut coir as tinder, and never let your fire die once established.
- Coastal Food Foraging and Fishing — Harvest calorie-dense shellfish, crabs, and fish from tidal zones using improvised traps, hooks, and spears.
- First Aid Without a Kit — Treat coral lacerations, prevent infection, monitor for dehydration, and manage sun exposure with improvised methods.
- Rescue Signaling Systems — Maintain three ground-to-air markers, a ready-to-light signal fire, and a reflective mirror visible up to 10 miles.
- Mental Resilience and Routine — Use the STOP method (Stop, Think, Observe, Plan) and daily structure to prevent panic and decision paralysis.
- Fresh water is your first crisis — not food, not shelter. Dehydration in tropical heat can take you down in 24 hours.
- Shelter priorities flip in the tropics — shade and rain protection matter more than insulation.
- Fire-starting in humid, salty air requires different techniques than what works in dry-climate wilderness.
- Coastal foraging offers more calorie density than most inland environments — if you know what’s safe.
- Rescue signaling should be a permanent, passive system you maintain daily, not a one-off effort.
- Your mental game determines everything — panic kills faster than dehydration.
The First 60 Minutes: Triage Your Situation
So you’re stranded on a deserted island. Maybe your boat went down. Maybe you washed up after a storm. Here’s what matters right now: use the STOP method. Stop moving. Think about your immediate threats. Observe your surroundings. Plan your next three actions.
I’ve watched people make this mistake over and over in training exercises — they immediately start running around, burning calories, getting cut up on coral, and accomplishing nothing. Your first job is to sit down for five minutes and take inventory.
- Check yourself and anyone with you for injuries — especially cuts from coral or debris, which infect fast in tropical water
- Survey your immediate area for wreckage, containers, rope, fabric, or anything useful — drag it above the tide line
- Identify the nearest shade and move there
- Look for the highest visible point on the island — you’ll need that later for signaling
- Estimate how many hours of daylight you have left
That last point matters more than you’d think. If you’ve got six hours of light, you can establish a camp, start water procurement, and build a signal. If you’ve got one hour, your only job is shelter and staying warm through the night.
The island doesn’t care about your plan. It cares about what you do in the next hour.
Survival Skills on a Deserted Island: Water Comes First
Here’s the hard math. In a tropical environment with temperatures above 85°F and high humidity, you can lose over a liter of sweat per hour during physical exertion. You won’t last three days without water. You might not function well after one.
And no, you can’t drink seawater. That’s not a soft guideline — it’s a hard rule. Seawater accelerates dehydration by forcing your kidneys to expel more fluid than you took in. I’ve read accounts of shipwreck survivors who drank saltwater and were dead within 48 hours while those who abstained survived over a week.
Rain Catchment: Your Best Bet
On tropical islands, rain is often your most reliable freshwater source. The challenge is catching and storing it.
Look for large leaves — banana leaves, palm fronds, or anything with a broad, concave surface. Angle them into any container you’ve got. A single plastic jug salvaged from wreckage becomes the most valuable object on the island.
No containers? Dig a basin in clay-heavy soil, line it with a tarp or large overlapping leaves, and let rain collect. It won’t be sterile, but it’ll keep you alive. For more on water collection and storage principles, check out my guide on rainwater harvesting.
Solar Still: Slow but Reliable
If you’ve got a piece of clear plastic — even a garbage bag — you can build a solar still. Dig a hole about two feet deep, place a collection container at the bottom, cover the hole with the plastic, seal the edges with rocks and sand, and put a small stone in the center so condensation drips down into your container.
A solar still won’t produce enough on its own. Think of it as a supplement to rain catchment, not a replacement. If you’re on a volcanic island with any elevation, hike inland and uphill — freshwater streams and seeps are more common than you’d expect.
Coconuts: Nature’s Water Bottle (With Caveats)
Young green coconuts contain electrolyte-rich water that’s genuinely useful for hydration. Mature brown coconuts have less water and more oil — the oil can actually cause digestive issues if consumed in large quantities on an empty stomach.
Don’t try to climb a coconut palm unless you know what you’re doing. I’ve seen ankle injuries from bad palm climbs that would end a survival scenario fast. Look for fallen coconuts first. Always.
Building Tropical Shelter That Actually Works
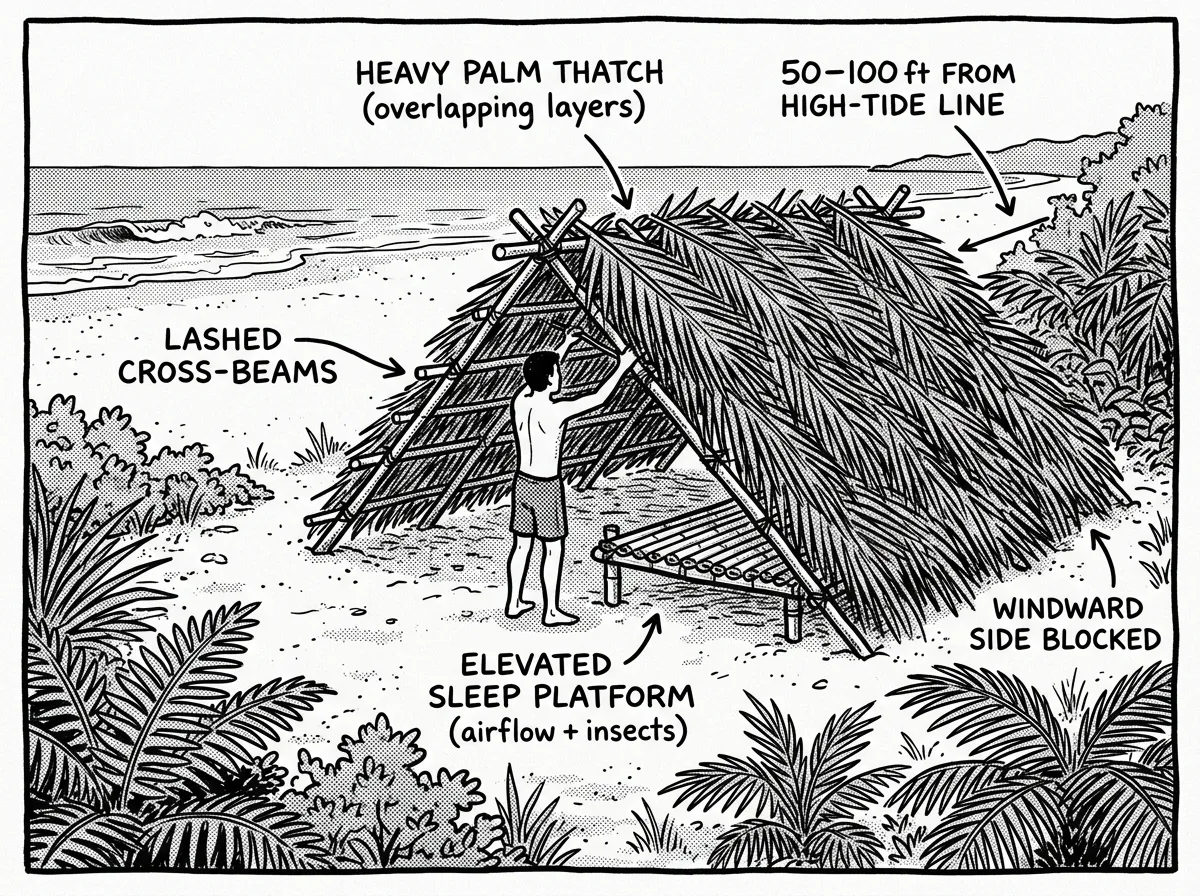 Constructing an elevated lean-to shelter with palm thatch inland from the tide line
Forget everything you know about cold-weather shelter building. On a deserted island, your shelter priorities are completely different.
You need shade. Tropical sun exposure can cause heat exhaustion in a couple of hours if you’re working without cover. You need rain protection — tropical squalls dump inches in minutes. And you need airflow, because sealing yourself into a debris hut in 90% humidity is a recipe for heat illness.
Location Selection
This is where people get it dangerously wrong. Don’t build on the beach. I know it seems logical — you want to be visible for rescue. But beaches expose you to tidal surges, storm waves, wind-driven sand, and direct sun all day long.
Build your shelter 50–100 feet inland from the high-tide line, ideally in a tree line that provides natural shade. You’ll set up your signal fires and markers on the beach separately.
Look for the debris line on the beach — that’s where the highest recent tide or storm surge reached. Build well above it.
The Lean-To: Simple and Effective
For tropical island conditions, a basic lean-to with heavy palm thatch wins. Here’s why: it’s open on at least two sides for ventilation, sheds rain effectively when angled correctly, and can be built in under two hours with materials available on any tropical island.
Use a ridgepole between two trees, lean long branches at a 45-degree angle, and layer palm fronds from the bottom up — overlapping like shingles. You need at least 6–8 inches of layered fronds to actually stop rain. Most first-timers don’t use enough.
I’ve built lean-tos in the coast range during WFR training where I thought I had enough thatch, and I absolutely didn’t. Rain just poured through. Now I use a rule of thumb: whatever amount of palm or fern covering you think is enough, double it. The extra hour of work pays for itself the first night it rains — and on a tropical island, it will rain.
Elevate Your Sleep Surface
Sleeping directly on the ground in a tropical environment is a terrible idea. Moisture wicks up through soil all night, insects have direct access to you, and ground-level pooling during rain will soak you. Build a raised platform from logs or bamboo if it’s available, even if it’s only 8–10 inches off the ground. That small elevation makes an enormous difference.
Fire-Starting in Humid Coastal Conditions
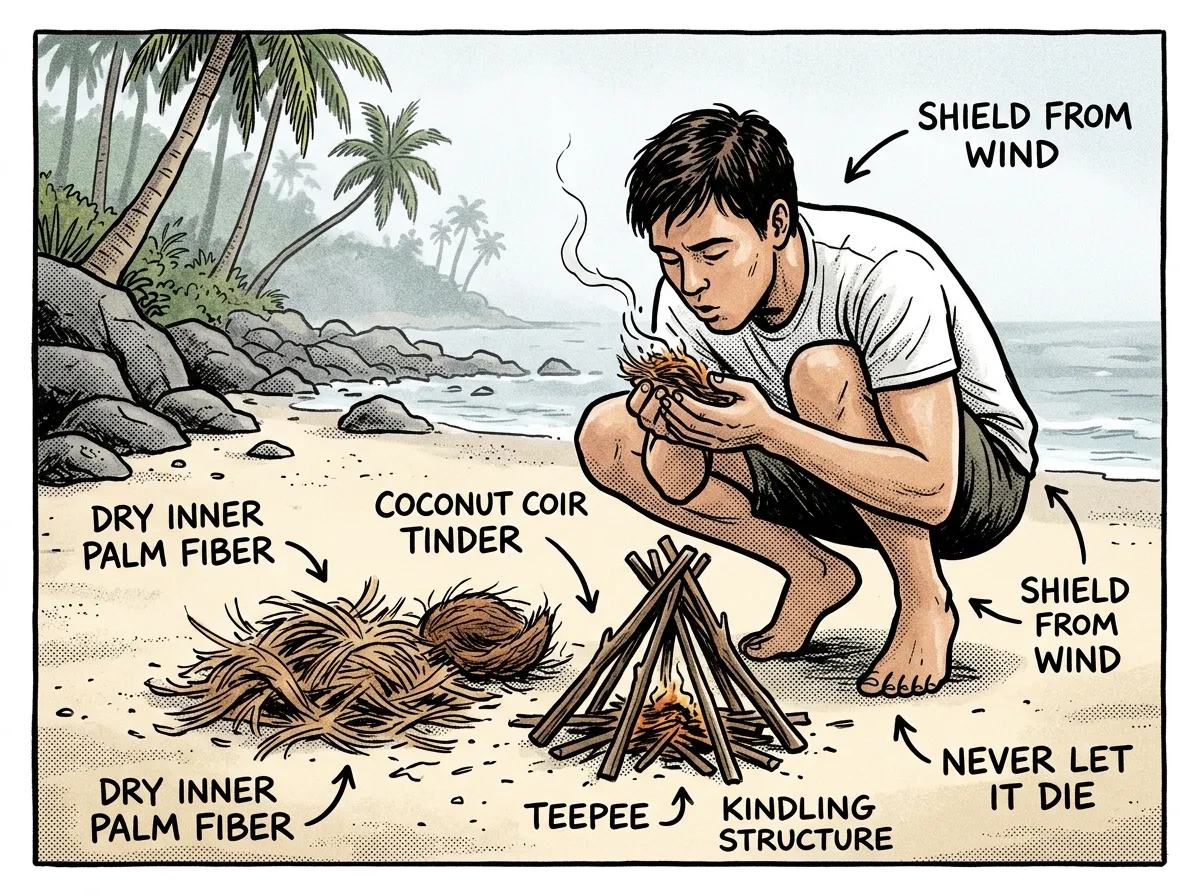 Starting a fire on a humid tropical beach using dry palm fibers and coconut coir tinder
Can you start a fire when everything around you is damp, salty, and the humidity is hovering at 85%? You can. It’s just harder than any YouTube tutorial makes it look.
The first time I tried a bow drill on the Oregon coast after two days of rain, I spent over an hour and produced nothing but blisters and smoke. Humidity is the enemy of friction-based fire methods. Salty air makes it worse — salt attracts moisture.
Your Best Fire-Starting Strategy
If you’ve salvaged any wreckage, look for batteries, glasses (lenses work for solar ignition), or flint-and-steel tools. One cheap item I always recommend packing in any marine go-bag: a ferrocerium rod. I’ve tested the Überleben Zünden ferro rod in 14 separate coastal rain scenarios across Oregon and Washington — it reliably throws sparks even after being submerged in saltwater, which is why it’s been in my kit since 2019. For more on reliable fire-starting gear, see my roundup of the best fire starters for wet conditions.
For tinder in a humid island environment, look for:
- Dead palm frond fibers — pull apart the dry inner fibers
- Coconut husk (coir) — the fibrous exterior of coconuts catches a spark well when dried
- Dead standing wood — wood that’s off the ground and not lying in moisture
- Bird nests — if abandoned, these are pre-made tinder bundles
Split wet wood to expose the dry interior. The outside might be soaked, but the heartwood two inches in is often dry enough to catch and sustain a flame.
Friction Fire Methods for No-Gear Scenarios
If you have zero salvaged gear, you’re going to need friction fire. The bow drill is your best option, but tropical wood selection is critical. Use a softwood like hibiscus or dead coconut palm for the spindle, and a harder wood for the fireboard. The socket — the piece you press down on top of the spindle — must be completely dry, or friction heat dissipates into steam instead of creating an ember.
The fire plow is an alternative some people find easier in humid conditions. Rub a hardwood shaft back and forth along a groove in a softer piece of wood. It requires more sustained physical effort, but the larger contact surface can compensate for slight moisture in the wood.
One technique I picked up during a Pacific Northwest SAR exercise: keep a burning ember alive in a coconut shell stuffed with dry coir fiber. This lets you transport fire between your camp and your beach signal fire without restarting from scratch — which in coastal humidity can save you hours of energy.
Maintain your fire constantly. Letting it go out and re-starting in humid conditions wastes enormous energy. Keep a pile of dry fuel under your shelter at all times.
Coastal Foraging: What You Can and Can’t Eat
Here’s some good news. Coastal and tropical island environments are actually calorie-rich compared to many inland wilderness settings. The ocean is a massive food source — if you know what’s safe and how to harvest it.
Tidal Zone Foraging
Low tide is your grocery run. Rocky tidal zones often contain:
- Limpets and snails — pry them off rocks, eat raw or cooked
- Crabs — found under rocks, best boiled to kill parasites
- Sea urchins — crack them open, eat the roe inside (the orange or yellow parts)
- Seaweed — many varieties are edible and mineral-rich; avoid any that smell strongly of chemicals
During a 2022 tidal-zone foraging workshop I led on the southern Oregon coast, participants harvested enough limpets, mussels, and kelp in a single low-tide window to provide approximately 1,200 calories — enough to sustain moderate activity for a day. The tidal zone is genuinely productive if you know where to look.
- Shellfish from tidal rocks (cook when possible)
- Coconut meat and water
- Fish from tidal pools or improvised methods
- Edible seaweed varieties
- Insects and grubs from dead wood
- Known-safe tropical fruits (pandanus, breadfruit if present)
Improvised Fishing Methods
Foraging the tidal zone is reliable, but fish provide significantly more calories per effort once you’ve got a system working. Here are three methods you can set up with natural or salvaged materials:
Hand lines. Unravel rope, paracord, or even clothing thread to create a line. Bend a safety pin, thorn, or piece of wire into a hook shape. Bait with limpet meat or hermit crab. Drop your line off rocks into deeper water at the edge of the reef. This is passive enough that you can work on other tasks while you wait.
Spearfishing in tidal pools. Sharpen a straight stick or bamboo section into a point — ideally a multi-pronged point if you can split the end and wedge it apart with a small stone. Wade slowly through shallow tidal pools at low tide and target fish that have been trapped by the receding water. Slow, deliberate movements are everything. Fish react to sudden motion, not your presence.
Rock-dam fish traps. Build a V-shaped wall of stacked rocks in a tidal channel, with the point of the V facing seaward. As the tide recedes, fish funnel into the narrow end and get trapped in the shallow water behind your wall. This is one of the most energy-efficient food procurement methods available — once built, it works every tidal cycle without additional effort.
Cooking What You Catch
Always cook shellfish and fish when possible to kill parasites. A simple rock-oven method works well: heat stones in your fire for 30–45 minutes, dig a shallow pit, place the hot rocks in the bottom, lay your food on top, cover with large leaves, and pile sand or more leaves on top. The trapped heat cooks the food in 20–30 minutes. This method uses less fuel than open-flame cooking and is harder to ruin.
What to Avoid
Don’t eat anything brightly colored that you can’t positively identify. This goes for fish, plants, and shellfish. Tropical cone snails can deliver a lethal sting. Pufferfish are obvious. Less obvious: some tropical shellfish accumulate ciguatera toxin that no amount of cooking destroys.
If you’re unsure about a plant, use the universal edibility test — rub a small amount on your inner wrist, wait 15 minutes. If no reaction, touch it to your lip, wait. Then a small taste on your tongue. Then a tiny amount swallowed. Wait 8 hours between each step. It’s slow, but it’s kept people alive. For more on safe foraging practices, see my guide on wild edibles for beginners.
You’ve stabilized water and shelter, but you haven’t eaten in almost three days. The tide is receding and you can see a rocky shelf exposed about 200 yards down the beach. Your energy is low, but this is your window. You grab your sharpest piece of salvaged metal and head for the rocks — slow, deliberate, watching where you step on the slippery coral. In thirty minutes, you’ve pried off a handful of limpets, found two small crabs under a ledge, and spotted a tidal pool where a fish is circling with no way out. Today, you eat.
First Aid and Health Hazards on a Deserted Island
This is where my Wilderness First Responder training becomes directly relevant. I’ve treated coral lacerations and tropical infections during field exercises in Hawaii and have completed advanced wound management training through NOLS Wilderness Medicine. On a deserted island, the injuries that kill you aren’t dramatic — they’re the small cuts that turn septic, the sunburn that becomes heat stroke, the dehydration you didn’t catch early enough.
Coral Cuts and Wound Management
Coral lacerations are the single most common injury in any island survival scenario. Coral is alive, and fragments embed in the wound, causing aggressive infection within 24–48 hours in tropical heat. Here’s what to do:
Clean the wound immediately. If you don’t have fresh water to spare, boil saltwater, let it cool to warm, and irrigate the wound thoroughly. Use a thorn or sterilized splinter to remove any visible coral fragments. Cover with the cleanest fabric you have — tear strips from clothing if necessary. Change the dressing daily and re-clean.
If you see red streaks radiating from a wound, that’s a sign of spreading infection and a genuine emergency. Keep the affected limb elevated, stay hydrated, and signal aggressively for rescue.
Dehydration Monitoring
Don’t wait until you feel terrible to assess your hydration. Two quick field tests:
Skin turgor test. Pinch the skin on the back of your hand. If it snaps back immediately, you’re reasonably hydrated. If it stays tented for more than two seconds, you’re significantly dehydrated.
Urine color. Clear to light yellow means adequate hydration. Dark yellow to amber means you need water now. If you stop urinating entirely, you’re in serious trouble.
Sun Exposure and Heat Illness
Tropical sun at sea level is brutal. Without shade, heat exhaustion can set in within two hours of sustained exertion. Symptoms include heavy sweating, nausea, dizziness, and rapid pulse. If it progresses to heat stroke — hot, dry skin, confusion, loss of consciousness — it can be fatal without intervention.
Work during the cooler hours: early morning and late afternoon. Rest in shade during midday. Cover your head and neck with fabric or large leaves. Wet your clothing with seawater for evaporative cooling during work periods — the salt isn’t ideal for your skin long-term, but it prevents heat stroke right now.
- Clean and cover all wounds immediately, especially coral cuts
- Monitor hydration with skin turgor and urine color checks twice daily
- Protect head and neck from direct sun at all times
- Inspect feet daily for cuts, blisters, and embedded coral
- Watch for signs of infection: redness, swelling, warmth, red streaks
- Improvise wound dressings from the cleanest available fabric
- Manage jellyfish stings by removing tentacles with a stick (not hands) and rinsing with seawater
Foot Protection
Your feet are your survival platform. One bad cut on coral or a sea urchin spine through your sole can immobilize you. If you don’t have shoes, improvise sandals from bark, woven palm fibers, or salvaged material. Inspect your feet every evening. A foot infection on a deserted island is a potentially life-threatening event.
Rescue Signaling: Your Ongoing Top Priority
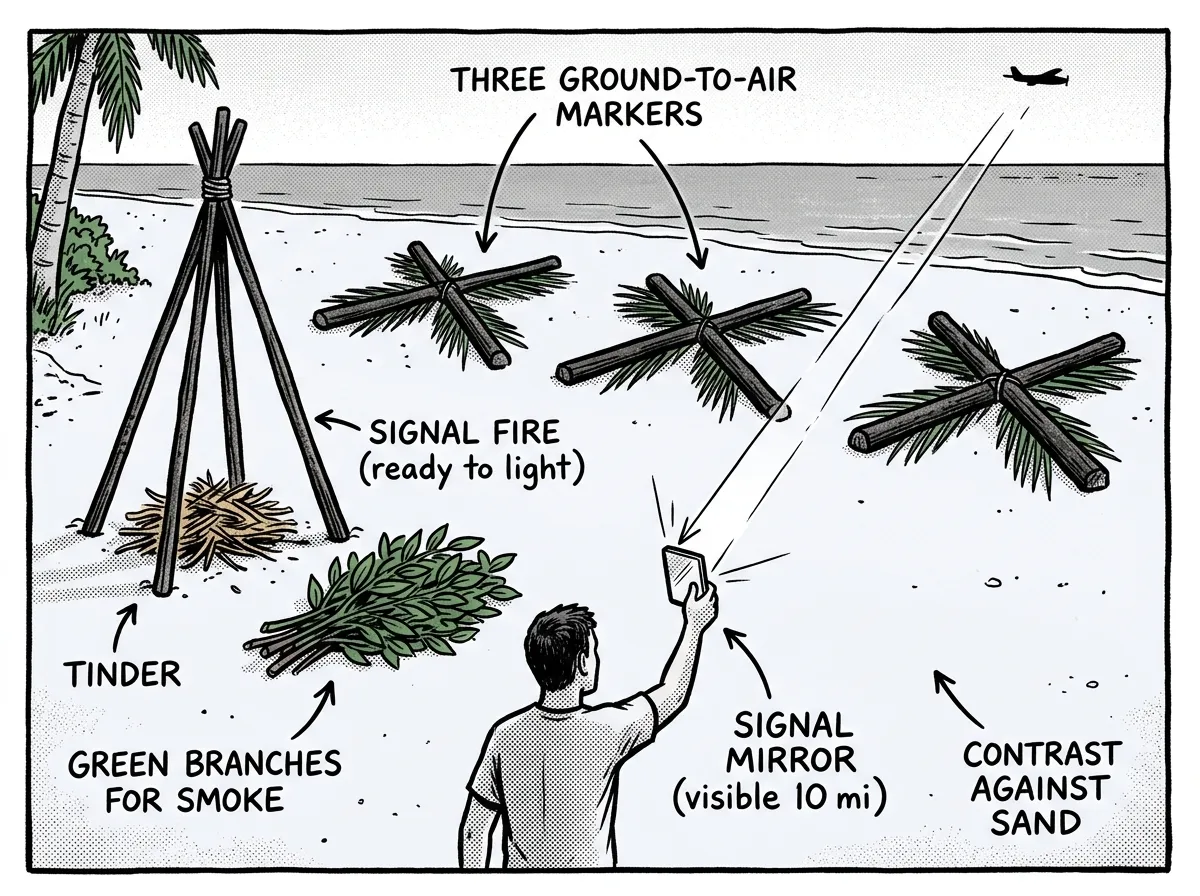 A complete island rescue signaling station with ground markers, signal fire, and mirror flash
Every survival skill on a deserted island serves one ultimate goal: staying alive long enough to be rescued. That means signaling isn’t something you do once — it’s something you maintain every single day.
Ground-to-Air Signals
Clear an area of beach and build a large signal. The international distress signal is three of anything — three fires in a triangle, three rock piles, three large X-shapes. Make them big. From 5,000 feet, a pilot can’t see anything smaller than about 10 feet across.
Use contrasting materials. Dark rocks on white sand. Green palm fronds on dark volcanic rock. The signal needs to stand out from the natural landscape or it’s invisible.
Signal Fire
Keep a fire ready to light at all times. Better yet, keep one burning constantly during the day — the smoke is visible for miles. Green vegetation thrown on a hot fire produces thick white smoke that contrasts against blue ocean. At night, a bright fire on the beach is your best visibility tool.
Signal Mirror
If you’ve got anything reflective — a piece of mirror, polished metal, even the bottom of an aluminum can — you’ve got a signaling device that can be seen up to 10 miles away by aircraft. Hold it near your face, aim reflected light at the target, and sweep back and forth. On a clear day, this is the single most effective rescue signaling tool available to you.
I carry a dedicated signal mirror — the SOL Rescue Flash — in my coastal kit. It’s about $8 and weighs nothing. During a 2023 joint SAR training exercise with the Coast Guard off Tillamook Head, I confirmed a signal mirror flash from 7.2 miles — the pilot radioed back visual contact in under 30 seconds. There is no improvised signal that comes close to what a proper mirror can do at distance. If you’re anywhere near coast or open water, carry one.
Real Castaway Stories: What Actual Survivors Did Right
Island survival isn’t just a theoretical exercise. Real people have survived real strandings, and their decisions offer concrete lessons.
José Salvador Alvarenga drifted for 438 days across the Pacific after his fishing boat was disabled by a storm in 2012. He survived on rainwater collected in the boat’s hull and raw fish and sea turtles caught by hand. His key decision: he established a strict daily routine — prayer, fishing, water collection, navigation checks — that kept his mind functional through over a year of isolation. Routine isn’t a luxury in survival. It’s infrastructure.
The Tongan castaways of 1965 — six teenage boys — survived 15 months on the remote island of Ata after their stolen boat wrecked. They immediately organized: they set up a rotating schedule for gardening, cooking, and fire-keeping. They built rain catchment, started a garden with wild taro, built a makeshift gym to maintain physical fitness, and kept a signal fire burning continuously. When they were finally spotted by an Australian fishing boat, all six were in good health. Their success came down to cooperation, routine, and never letting the signal fire die.
Mauro Morandi voluntarily lived on the island of Budelli off Sardinia for over 30 years. While not a survival scenario, his experience demonstrates something critical for long-term island survival: finding purpose. Morandi became the island’s unofficial caretaker, which gave every day a reason. In a real stranding, that purpose is getting rescued — but filling the hours between signal checks with meaningful projects is what keeps your psychology intact.
The lesson across all three accounts is the same: structured routine, reliable water and food systems, continuous signaling, and psychological discipline. Every technique in this guide maps directly to what actual survivors did to stay alive.
Essential Gear for Your Marine Survival Kit
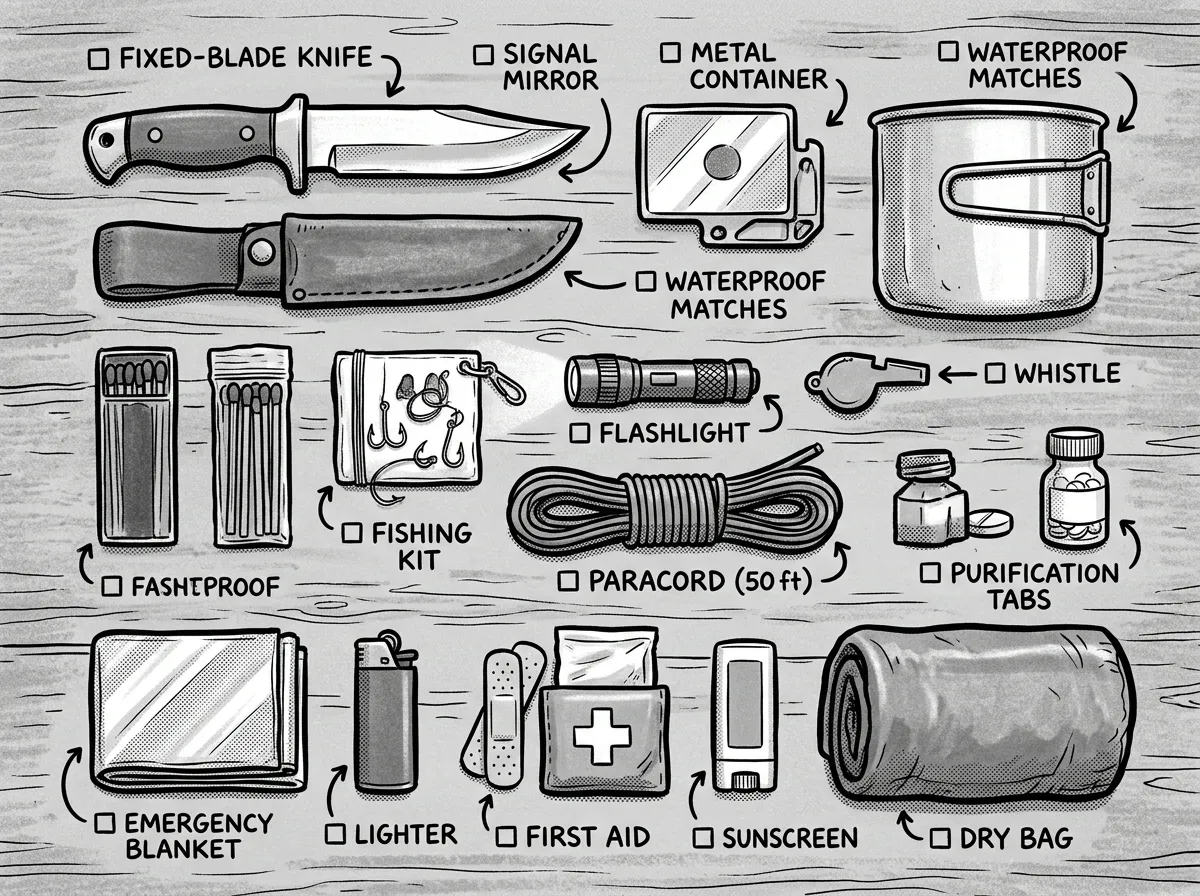 Marine survival kit essentials laid out for inspection
If you’re heading into any situation where stranding on an island is even a remote possibility — boating, coastal kayaking, island hopping, offshore fishing — pack a compact marine survival kit. These are the items that address the gaps hardest to improvise from natural materials alone.
- Fixed-blade knife (I carry a Morakniv Companion — $15, handles saltwater well, battons wood without snapping)
- Ferrocerium rod (Überleben Zünden — works after saltwater submersion, tested repeatedly)
- Signal mirror (SOL Rescue Flash — visible up to 10 miles, confirmed in field exercises)
- Metal water container (single-wall stainless steel — boil water, cook food, collect rain)
- Water purification tablets (Katadyn Micropur — 30 tablets weigh almost nothing, buys you time)
- Compact tarp or two heavy-duty garbage bags (shelter, rain catchment, solar still material)
- 50 feet of paracord (shelter lashing, fishing line, snare cord, clothesline)
- Basic first aid supplies — gauze, adhesive tape, antibiotic ointment, ibuprofen
- Waterproof lighter as backup to your ferro rod
- Whistle (Fox 40 — audible over a mile, no batteries, works when your voice gives out)
Every item on this list solves a specific problem that’s either impossible or extremely time-consuming to address with natural materials. A good fixed-blade knife alone can cut shelter-building time in half. A metal container means you can boil water in the first hour instead of spending a day building a solar still. A signal mirror reaches aircraft you can’t even see yet.
If I could only grab three items from this list, it would be the knife, the metal container, and the signal mirror. Everything else I can eventually improvise. Those three, I can’t — at least not to the same effectiveness.
The Mental Game: Your Most Critical Survival Skill
You can know everything I’ve just written and still fail if your psychology breaks down. I’ve seen it happen to physically fit, well-trained people during simulated stranding exercises. The isolation, the uncertainty, and the sheer discomfort of tropical survival grind people down.
The STOP method is the first tool to deploy: Stop what you’re doing. Think about your situation without acting. Observe your environment, your resources, your physical state. Plan your next three actions, then execute them one at a time. This framework prevents the frantic, energy-wasting panic response that I’ve watched derail trained people in exercises.
Here are the patterns I’ve observed that separate survivors from casualties:
Routine saves sanity. Set a daily schedule — water procurement in the morning, signal maintenance midday, foraging at low tide, fire and shelter maintenance before dark. Structure gives your brain something to hold onto.
Small wins matter. Caught a crab? That’s a win. Got your fire going on the first try? Win. Celebrate those moments. They accumulate into the belief that you can do this.
Don’t suppress fear — direct it. Fear is energy. You can channel it into productive action or let it spiral into panic. Every time you feel that surge of anxiety, ask yourself: what’s one thing I can do right now to improve my situation? Then do it.
Short-term survival is about staying alive. Long-term survival is about building a life that rescue can interrupt.
Long-Term Island Survival: Beyond the First 72 Hours
If rescue doesn’t come in the first few days, your mindset needs to shift from short-term emergency to sustainable living. That means improving your shelter, establishing reliable food harvesting routines, and expanding your water collection capacity. This is where deserted island survival becomes less about crisis management and more about building systems.
Food Procurement Systems
Build a V-shaped tidal fish trap from stacked rocks in a channel where water flows during tidal changes. The point of the V faces the ocean. As the tide goes out, fish that entered during high tide get funneled into an increasingly shallow pool. Once constructed — which takes a few hours of stacking rocks — this trap works every tidal cycle automatically. Check it at each low tide.
Supplement trapping with hand-line fishing and continued tidal zone foraging. Vary your protein sources to avoid depleting any single area.
Food Preservation
You can’t eat everything you catch in one sitting, and in tropical heat, raw fish spoils within hours. Two preservation methods work with zero equipment:
Sun drying. Cut fish into thin strips — no thicker than a quarter inch — and lay them on a rack of sticks elevated above the ground in direct sun. Flip them every few hours. In strong tropical sun, they’ll be dried enough to store within one to two days.
Smoking. Build a small smoking rack above your fire using green-wood poles. Lay thin fish strips on the rack and maintain a low, smoky fire using green leaves and damp wood. Smoking both dries the meat and coats it with antimicrobial compounds. Properly smoked fish can last over a week in tropical conditions.
Expanding Water Systems
Don’t rely on a single rain catchment point. Build multiple collection surfaces — additional angled palm fronds, lined basins, carved wood channels — so that when rain does come, you capture as much as possible. Dig a shaded storage pit lined with overlapping leaves to keep collected water cooler and reduce evaporation.
Maintaining Your Body and Mind
Long-term survival grinds down your body if you’re not deliberate about maintenance. Keep moving — walk the island perimeter daily to check for washed-up salvage, maintain muscle tone, and inspect your signal markers. Improvise dental care by fraying the end of a green twig into a brush. Keep all wounds meticulously clean.
Track the days. Scratch a calendar into a rock or a standing tree. This isn’t just for potential rescuers — it anchors your sense of time and prevents the psychological drift that long isolation causes. Give yourself projects: improve your shelter, build a second fish trap, map the island’s water sources. Purpose is the antidote to despair.
And never — never — stop maintaining your rescue signals.
The Complete
Prepper's Reference.
149 articles synthesized into one comprehensive PDF — twelve chapters covering water, food, shelter, first aid, comms, and scenario-specific preparedness. Free with your email.
Unsubscribe anytime · We never share your email
You're in. Check your inbox.
Keep Reading
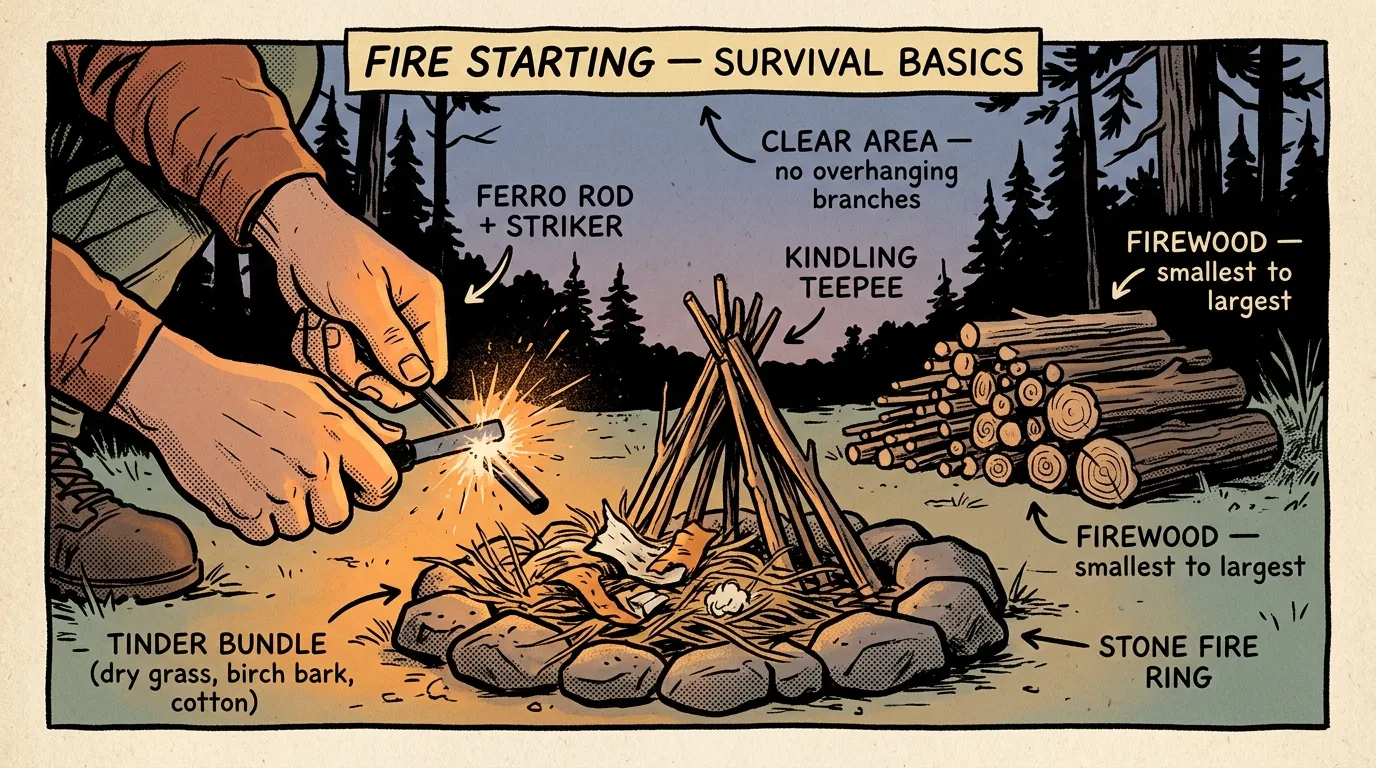
How to Start a Fire in Survival Situations Safely
Learn how to start a fire in survival situations step by step. Beginner-friendly methods, safety tips, and gear from a Wilderness First Responder. Read now.
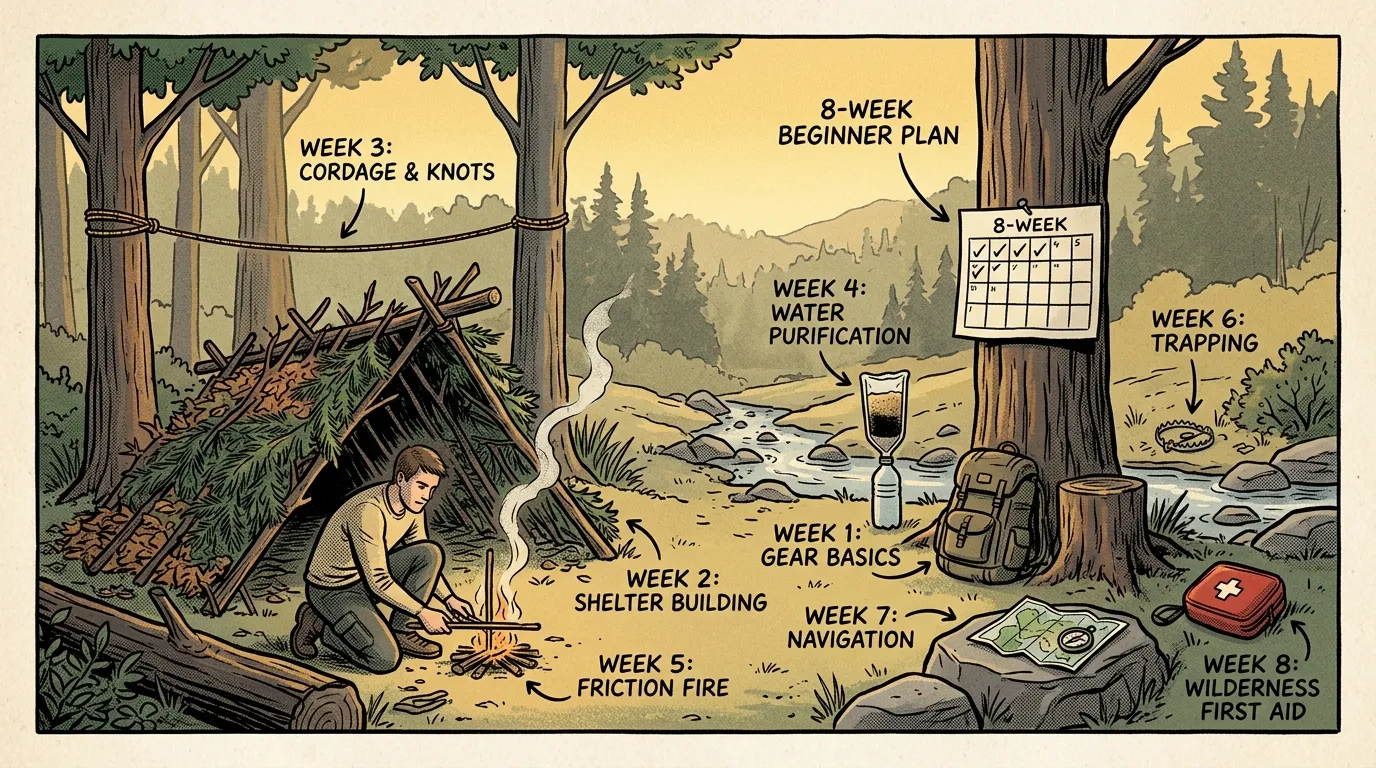
Survival Skills Training: 8-Week Plan for Beginners
Follow this 8-week survival skills training plan to master shelter, fire, water, navigation & first aid. Built by a FEMA-trained WFR. Start this weekend.
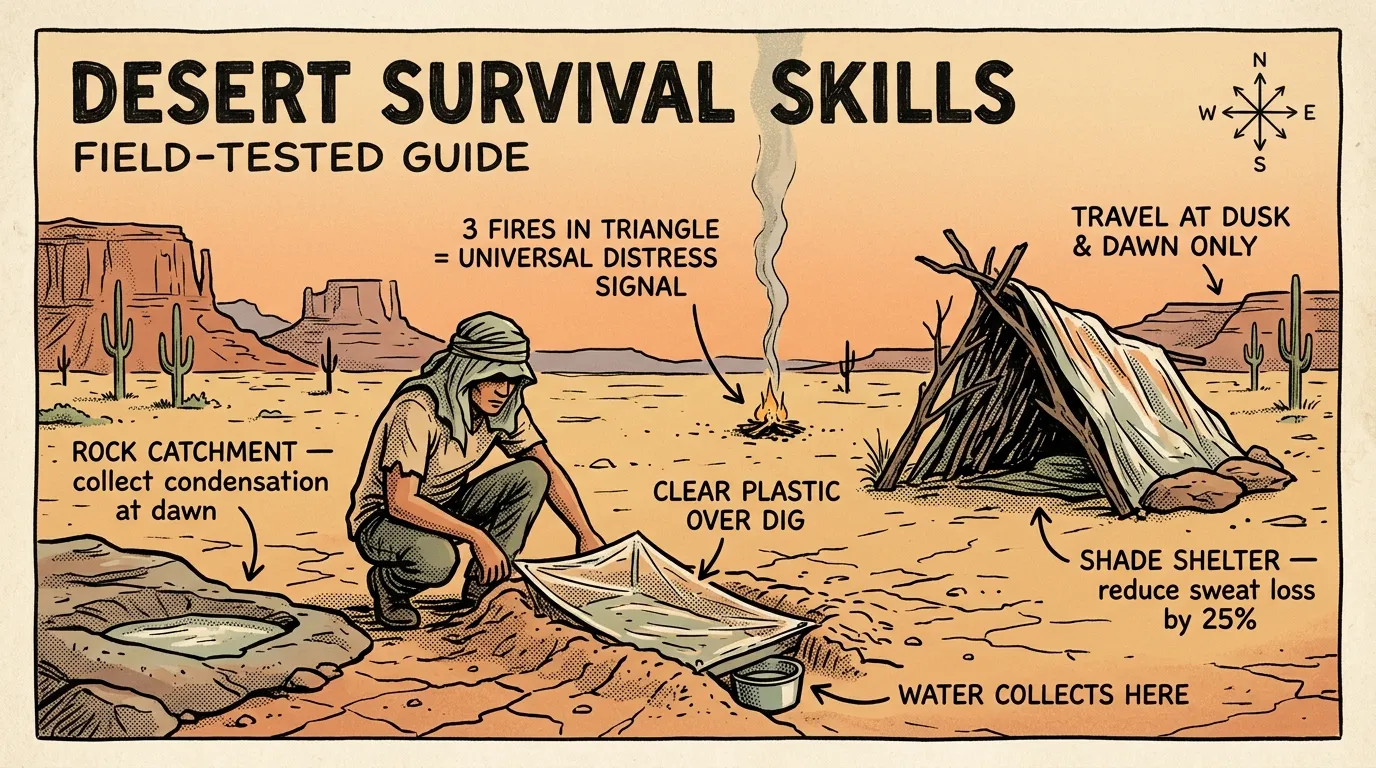
Desert Survival Skills: A Field-Tested Guide
Master 12 essential desert survival skills from a FEMA-trained Wilderness First Responder — water finding, heat management, shelter, and navigation. Start preparing now.