For most beginners, the best survival knife is a full-tang fixed blade with a 4 to 6 inch blade made from high-carbon stainless steel. Choose a larger, tougher knife for wilderness survival, a compact folding knife for urban emergencies, and maintain any knife by cleaning, drying, and sharpening it regularly.
Key Takeaways
- Choose a full-tang fixed blade with a 4–6 inch drop-point blade — it'll handle 90% of wilderness tasks reliably.
- Match your steel to your climate: high-carbon (1095, 5160) for toughness and easy field sharpening; stainless (S30V, VG-10) for wet or coastal environments.
- Skip hollow-handle and partial-tang designs — they create weak points that snap under heavy batoning.
- Pair a fixed blade with a compact folder or multitool for a two-knife system that covers wilderness and urban scenarios.
- Practice field sharpening before you actually need it — a dull knife forces more pressure, slips easier, and turns dangerous fast.
Best Survival Knife: How to Choose the Right Blade
Affiliate disclosure: This article contains affiliate links. We may earn a commission if you buy through them. All knives discussed were purchased with personal funds or borrowed from fellow instructors for field comparison. Recommended gear focuses on beginner and intermediate preppers.
Finding the best survival knife shouldn’t require a metallurgy degree or hours lost in forum arguments about tang geometry. After 12+ years carrying fixed blades through Pacific Northwest backcountry — on search and rescue callouts, wilderness medicine courses, and multi-day trips in every season — I’ve learned something pretty simple. A good survival knife is defined by what it does reliably. Not by what it looks like on a shelf.
I’m going to walk you through exactly how to choose the right blade for your needs, share my field-tested picks across every budget, and help you dodge the mistakes that waste money and compromise safety.
Last updated: May 2026. Prices and availability verified at time of publication.
Quick Summary
- Go full-tang, fixed blade, 4–6 inches. A plain-edge drop point in tough steel handles the vast majority of wilderness tasks.
- Match steel to your climate. High-carbon (1095, 5160) for easy field sharpening and toughness; stainless (VG-10, S30V) for wet or coastal environments.
- Handle grip matters more than you think. G10, Micarta, or textured polymer won’t slip when your hands are cold and wet.
- Skip hollow-handle “Rambo” knives and bundled kits. They look cool and fail when it counts.
- Pair a fixed blade with a compact folder or multitool for a two-knife system that covers both wilderness and everyday carry.
- Practice sharpening before you need it. A dull knife in the field isn’t just useless — it’s dangerous.
- Fixed blade, full-tang, 4–6 inch blade
- Plain edge, drop-point shape
- Steel matched to environment (1095/5160 for toughness, VG-10/S30V for corrosion resistance)
- Non-slip handle: G10, Micarta, or textured polymer
- Kydex or Boltaron sheath for low maintenance
- Lanyard hole and a 90-degree spine for ferro rod strikes
What Actually Makes a Survival Knife?
A survival knife is a fixed-blade, full-tang knife with a 4–6 inch plain-edge blade designed for wilderness emergency tasks — shelter building, firecraft, food preparation, cordage processing, and wood batoning. It prioritizes durability, versatility, and ease of field maintenance over specialized performance in any single area.
The concept traces back to military survival knives issued to downed pilots during World War II and the Cold War. Those tools were designed to keep someone alive with a single blade when everything else was gone. Modern survival knives have evolved from those military roots into refined field tools that balance strength, weight, and versatility.
Here’s what a survival knife isn’t. It’s not a hunting knife optimized for skinning game. It’s not a tactical knife designed for combat. It’s not a kitchen knife built for precision slicing on a cutting board. It’s a generalist — the one blade you’d want if you could carry only one into the woods for building an emergency shelter, processing firewood, preparing food, and improvising tools.
In my experience as a FEMA-trained Wilderness First Responder, I’ve seen survival knives prove their value not in dramatic Hollywood scenarios, but in practical, unglamorous ways. Splitting kindling for a warming fire when a hypothermic hiker needed heat fast. Cutting paracord to rig a litter. Processing branches for a debris shelter when weather turned nasty two hours before anyone expected it to.
How I Tested These Knives
I don’t recommend gear I haven’t put through real work. Over the past decade, I’ve used over 30 fixed blades and folders in Pacific Northwest field conditions — roughly 1,500+ hours of combined field use across trips, training exercises, and SAR callouts.
For this guide, I evaluated each recommended knife against a consistent set of field tasks:
- Batoning: Splitting seasoned alder and green Douglas fir rounds (4–6 inch diameter) to test spine durability and blade geometry
- Feathersticking and fine carving: Processing kindling and tinder to evaluate edge control
- Ferro rod strikes: Testing the spine’s ability to throw consistent sparks
- Cordage processing: Cutting natural fiber, paracord, and bank line to assess edge retention on fibrous materials
- Wet-grip ergonomics: Using every knife in sustained Pacific Northwest rain to evaluate handle security during extended tasks
- Edge retention under load: Tracking how many camp tasks each knife handled before needing a touchup on a pocket stone
I also factored in warranty support, replacement parts availability, and each manufacturer’s quality control reputation. Every knife on this list was purchased with personal funds or borrowed from fellow instructors for side-by-side comparison — none were manufacturer samples sent for review.
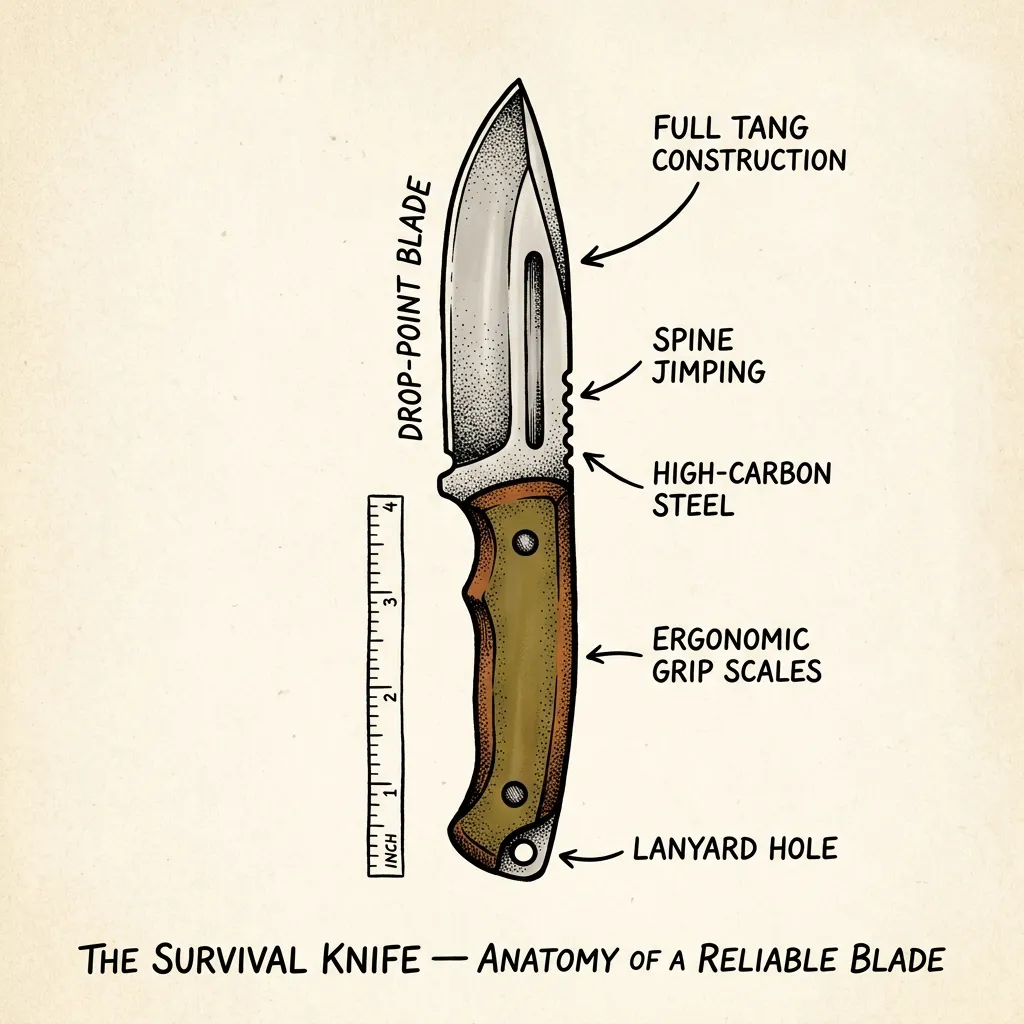
Key Features to Look for in the Best Survival Knife
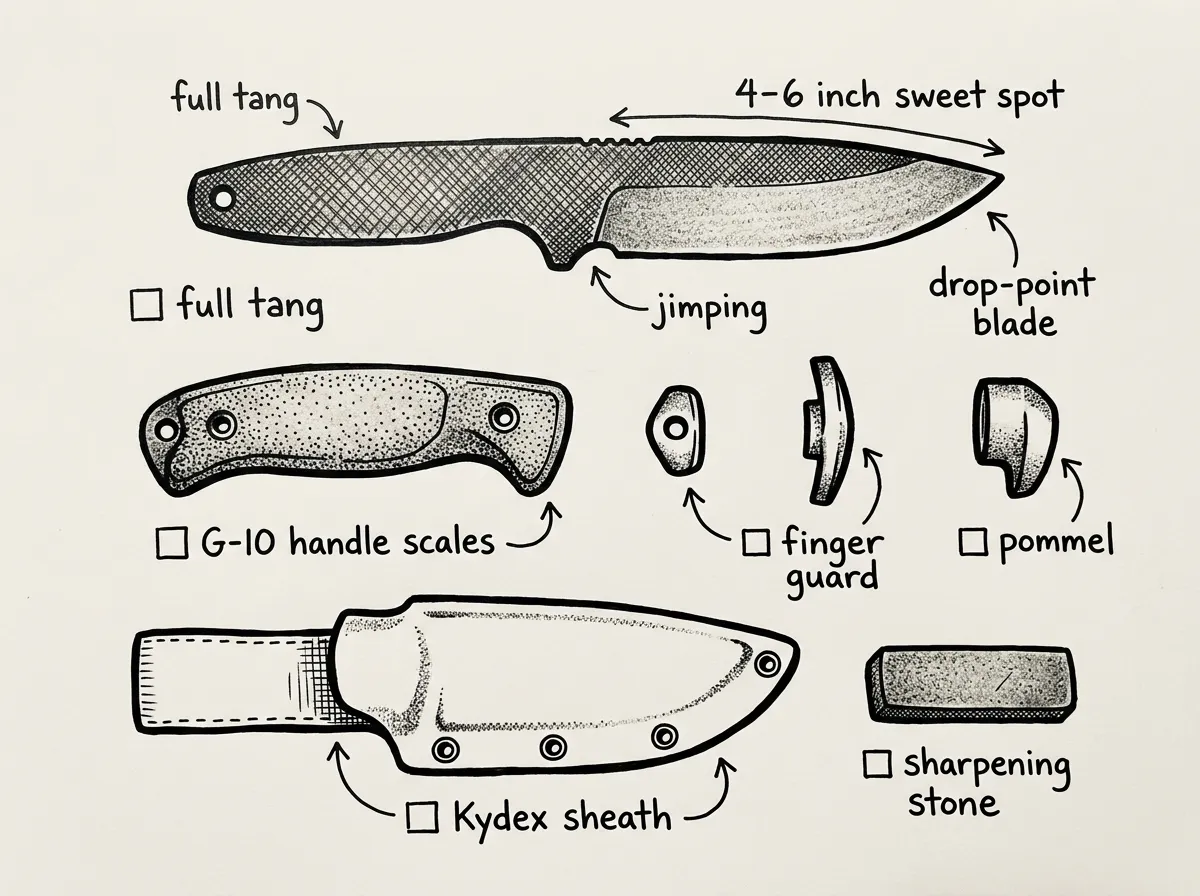 Anatomy of a survival knife — key features at a glance
Match construction and materials to the tasks and environment you expect. Here’s what actually matters.
Blade Steel — What You Really Need to Know
This is where most people get overwhelmed, and honestly, it doesn’t need to be complicated. Survival knife steel is a balance between four things: toughness, edge retention, corrosion resistance, and ease of sharpening. No steel wins in every category.
Harder stainless steels like CPM S30V and S35VN hold an edge longer but require more effort to sharpen in the field and can chip under heavy impact. Simple high-carbon alloys like 1095 and 5160 are tougher and reprofile quickly when you don’t have access to workshop tools.
I’ve seen this play out firsthand many times. My 1095 ESEE developed visible surface rust within 48 hours in PNW winter conditions when I forgot to oil it — but it reprofiles in under five minutes on a pocket stone. My S30V folder shrugged off a week of coastal rain without a spot of rust but needed a diamond rod and serious patience to bring back to shaving sharp.
One thing that trips people up: the same steel can perform very differently depending on heat treatment. That’s why brand reputation matters. A well-heat-treated 1095 from ESEE will outperform a poorly treated 1095 from a no-name manufacturer every time. Buy from makers who publish their Rockwell hardness specs and have a track record.
| Steel | Toughness | Corrosion Resistance | Field Sharpening | Typical Price Tier |
|---|---|---|---|---|
| 1095 | Excellent | Low (oil regularly) | Very easy | Budget–Mid |
| 5160 | Excellent | Low | Easy | Budget–Mid |
| D2 | Good | Moderate (semi-stainless) | Moderate | Budget–Mid |
| 14C28N | Good | Good | Easy | Budget |
| VG-10 | Good | Good | Moderate | Mid |
| 440C | Moderate | Good | Moderate | Mid |
| CPM 3V | Excellent | Moderate | Moderate | Premium |
| CPM S30V | Good | Excellent | Difficult | Premium |
| CPM S35VN | Good | Excellent | Difficult | Premium |
If you’re a beginner: Start with 1095 or 14C28N if you’re comfortable with basic maintenance. Choose VG-10 or S30V if you want lower maintenance in wet environments and can accept harder field sharpening.
Blade Length, Shape, and Grind
How long should your survival knife be? 4–6 inches is the sweet spot. That range handles shelter work, food prep, and controlled batoning without the fatigue and loss of control that comes with oversized blades. I’ve batoned with a 4.5-inch ESEE 4 through frozen alder for two hours — blade length is less important than good geometry and steel.
Shape: A plain-edge drop point is forgiving and versatile. Clip points and spear points are more specialized and slightly more fragile at the tip.
Grind: Flat or saber grinds are common and versatile. Scandi grinds excel at woodworking and are the easiest to sharpen freehand — if bushcraft is your focus, lean toward a Scandi.
Serrations: Good for cutting fibrous material and webbing, but they complicate field sharpening significantly. For a primary survival knife, stick with a plain edge.
Fixed Blade vs. Folding Knife
 Fixed blade and folding knife compared side by side
This one’s straightforward. A fixed blade wins for wilderness use. No pivot to fail, no lock to disengage under pressure, no hinge collecting debris. Fixed blades are stronger, simpler to clean, and far more reliable for heavy tasks like batoning and prying.
Folding knives have their place — they’re lighter, more discreet, and legal in more jurisdictions. I carry a folder daily as part of my everyday carry essentials. But if I’m heading into the backcountry or packing a bug-out bag, the fixed blade goes on my belt first.
If you must choose a folder for survival use, pick one with a robust lock (liner lock, frame lock, or AXIS lock), thick blade stock, and a quality pivot. But understand it’s a compromise.
Handle, Tang, and Sheath
Full-tang construction is the standard recommendation for good reason. When the steel runs the full length of the handle, you get maximum structural integrity — essentially one continuous piece of metal with handle scales bolted on. This matters when you’re driving the blade through a stubborn piece of hardwood with a baton.
For handle materials, prioritize wet grip. G10, Micarta, and textured polymer all perform well in rain. I’ve found that smooth handles — even on otherwise excellent knives — become genuinely dangerous when your hands are cold and wet. This isn’t theoretical. I watched a student slice his palm open during a basic carving exercise because his knife handle had no texture. Cold hands plus smooth wood scales equals zero grip.
For sheaths, Kydex or Boltaron require the least maintenance and provide positive retention you can trust. Quality leather works if you condition it and store it dry, but in damp climates leather can trap moisture against the blade and promote rust. I’ve switched entirely to Kydex for my PNW field knives.
A squared 90-degree spine that throws sparks from a ferro rod is a genuinely useful feature — learn to start a fire with one and you’ll understand why this matters. A built-in compass, saw-back edge, and hollow handle full of fishing hooks? That’s a gimmick.
Survival Knife vs. Bushcraft Knife
This is one of the most common questions I get from students, and the honest answer is: there’s significant overlap, but they’re optimized differently.
A survival knife prioritizes durability and versatility under stress. Think thicker blade stock (typically 0.16–0.25 inches), a robust drop point, and a design that can handle batoning, prying, and improvised tasks without catastrophic failure. It’s built for when things go wrong.
A bushcraft knife prioritizes fine woodworking and craft. Think thinner blade stock, a Scandi grind for precise carving, and a design optimized for feathersticking, notching, spoon carving, and trap building. It’s built for deliberate, extended time living with the land.
Where they overlap: Many excellent knives serve both roles well. The Morakniv Garberg has a full tang and enough spine thickness for moderate batoning but carries a Scandi grind that excels at fine carving. The TOPS B.O.B. Fieldcraft was literally designed by a bushcraft instructor as a survival knife.
If you’re focused on emergency preparedness and want one knife that won’t let you down when stakes are high, lean survival. If you’re experienced and enjoy craft and extended woods time by choice, lean bushcraft. Not sure? A mid-weight knife like the Garberg or the ESEE 4 covers both reasonably well.
Best Survival Knife Picks by Scenario
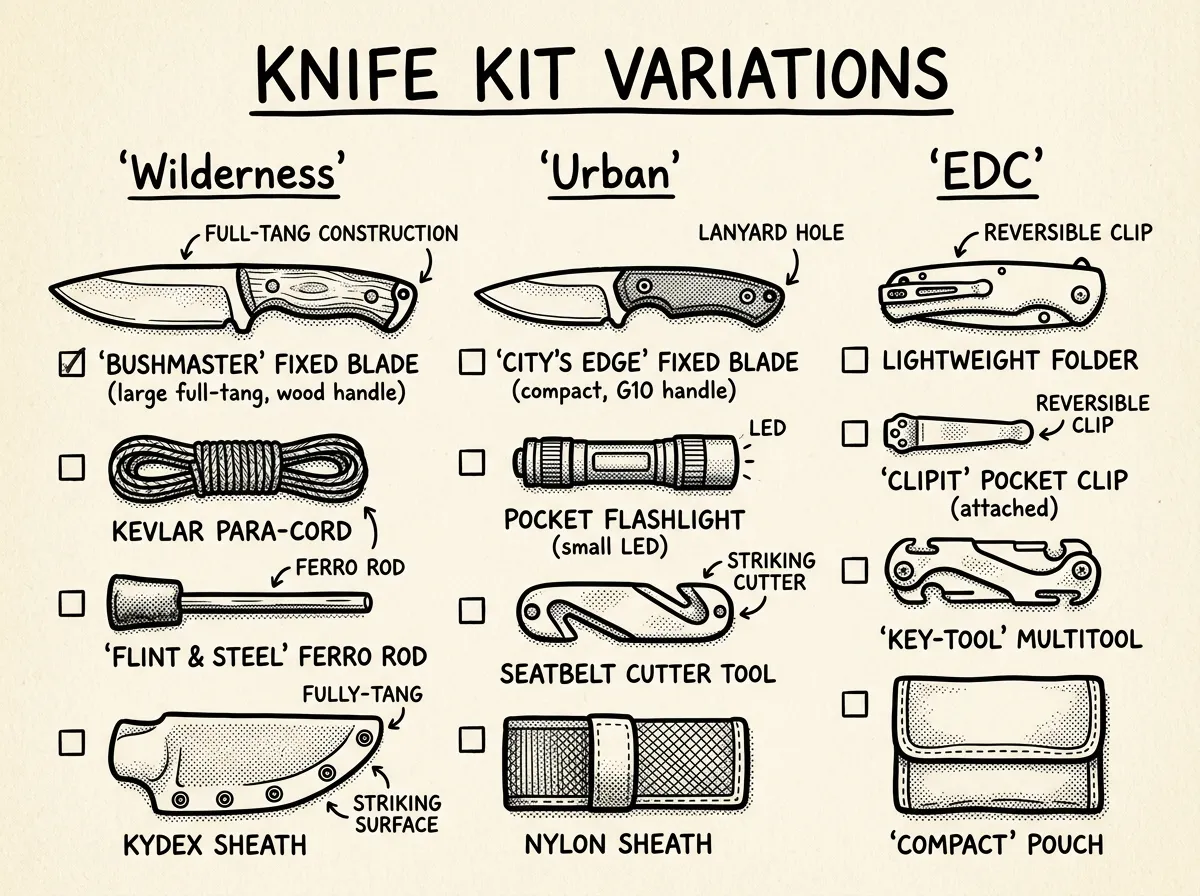 Three survival knife setups matched to wilderness, urban, and EDC scenarios
I’ve organized picks by use case because the best survival knife for a bug-out bag isn’t the same blade I’d recommend for EDC. Availability and prices fluctuate — verify before purchasing.
Wilderness Survival (Strength and Batoning)
These are the knives I trust for backcountry emergencies and hard field use. All are fixed blade, full tang, with 4–6 inch blades.
ESEE 4 — 1095 carbon steel, 4.5-inch blade, 8.0 oz, around $110–130. During a 2019 SAR callout near Mt. Hood, my ESEE 4 batoned through frozen alder for two hours straight without losing its edge — that experience is why it’s at the top of this list. The edge reprofiles easily on a pocket stone, and ESEE’s no-questions warranty is the best in the industry. Limitation: Requires regular oiling in humid conditions or surface rust develops within days.
KA-BAR Becker BK2 Campanion — 1095 Cro-Van steel, 5.25-inch blade, 16.0 oz, around $80–100. This is the heavy-duty workhorse. Thick 0.25-inch blade stock makes it a batoning beast, and the flat grind handles food prep better than you’d expect from a knife this beefy. Limitation: It’s heavy. At a full pound, it’s noticeably more fatiguing during extended carving. The factory edge benefits from reprofiling before first use.
Fallkniven A1 — Laminated VG-10 steel, 6.3-inch blade, 12.3 oz, around $200–250. The laminated construction gives you a hard VG-10 core for edge retention wrapped in softer, tougher steel for impact resistance. This is the knife I recommend when someone says they want one blade that does everything. Limitation: The price, and the convex grind requires a strop or mousepad technique to sharpen — not as intuitive as flat or Scandi grinds.
TOPS B.O.B. Fieldcraft — 1095 steel, 4.5-inch blade, 7.5 oz, around $150–180. Designed by bushcrafter Bob Hansler, this bridges the survival and bushcraft worlds beautifully. The curved handle fits the hand naturally, and the high flat grind excels at both wood processing and food prep. Limitation: Smaller handle may not suit very large hands.
The ESEE 4 — around $120 — is what I reach for every single time I’m heading into the backcountry. It’s not the fanciest knife on this list, and it’ll rust if you look at it wrong in the rain. But after that Mt. Hood callout where I beat on it for two hours in freezing conditions and it never once complained, I stopped second-guessing it. The unconditional warranty seals it — ESEE will replace your knife even if you broke it doing something stupid. I can’t say that about any other manufacturer.
Urban Emergencies (Compact, Corrosion-Resistant)
For urban scenarios and EDC survival knife options where concealment, weight, and corrosion resistance matter:
Spyderco Para 3 — S30V or S45VN steel, 3.0-inch blade, 3.4 oz, around $140–170. Fast deployment, excellent steel, and the Compression Lock is one of the strongest folding mechanisms available. I’ve carried this as my urban folder for three years. Limitation: The blade is short — this is a utility cutter, not a survival knife replacement.
Benchmade Griptilian — S30V steel, 3.45-inch blade, 3.8 oz, around $130–160. The AXIS lock allows one-hand opening and closing even with gloves. Comfortable enough for extended work. Limitation: The Grivory handle feels hollow compared to G10 alternatives, though it saves weight.
CIVIVI Elementum — D2 or 14C28N steel, 3.5-inch blade, 3.5 oz, around $50–65. This is the best budget EDC folder I’ve tested. Smooth action, solid lockup, and a blade that performs well above its price point. Limitation: D2 can develop surface staining in wet conditions. Choose the 14C28N version if you’re in a humid environment.
Everyday Carry (Lightweight and Legal)
- Victorinox Swiss Army Fieldmaster — Stainless steel, multiple tools, around $35–45. Not a survival knife, but a versatile companion that’s reliable and legal almost everywhere.
- Leatherman Skeletool — 420HC blade plus pliers and basic tools, 5.0 oz, around $65–80. My everyday carry essentials always include a multitool, and this is the best balance of capability and weight I’ve found.
- Ontario RAT Model II — AUS-8 steel, 3.0-inch blade, 3.0 oz, around $30–35. Punches way above its price. The liner lock is solid, and AUS-8 is easy to maintain.
Best Budget Survival Knives Under $75
You don’t need to spend $200 for a dependable survival knife. I’ve tested several knives under $75 that meet full-tang, quality-steel standards and perform reliably in the field. Budget doesn’t mean unsafe — it means knowing where the compromises are.
Morakniv Garberg — 14C28N stainless steel, 4.3-inch blade, 7.8 oz, around $60–75. This is my top budget recommendation, full stop. The Sandvik 14C28N steel is stainless, tough, and sharpens easily on a ceramic rod. The Scandi grind bites into wood beautifully for feathersticking and carving. I’ve batoned this knife through 3-inch alder rounds without a hint of concern. Limitation: The blade is slightly thinner than dedicated survival knives, so I wouldn’t baton hardwood rounds over 4 inches.
Condor Bushlore — 1075 carbon steel, 4.3-inch blade, 7.4 oz, around $40–55. Incredible value. The walnut handle is attractive, the 1075 steel is tough and easy to sharpen, and the Scandi grind makes this a capable bushcraft and survival crossover. Limitation: The leather sheath is mediocre — plan to upgrade to Kydex or add a retention strap.
Ontario RAT-5 — 1095 carbon steel, 5.0-inch blade, 10.0 oz, around $45–60. A proven design with the same 1095 steel used in military-issue knives. Full tang, secure Micarta handles, and a blade length that handles batoning confidently. Limitation: The factory edge often arrives under-sharpened. Plan to reprofile it before your first outing.
Cold Steel SRK (Survival Rescue Knife) — SK-5 carbon steel, 6.0-inch blade, 8.2 oz, around $50–70. The longest blade in this budget lineup and one of the toughest. SK-5 is a close cousin to 1080 carbon steel — excellent toughness, easy sharpening. Limitation: At 6 inches, it’s on the long side for fine carving. Better suited for shelter building and heavy camp tasks.
Any of these knives will serve you well. If you’re building a bug-out bag on a budget, the Garberg or RAT-5 paired with a basic folder gives you a capable two-knife system for under $100.
A $65 Morakniv Garberg with a practiced hand behind it will outperform a $300 custom knife sitting in a drawer every single time.
Brands You Can Trust
When you’re choosing a knife for potential emergencies, the manufacturer behind the blade matters as much as the specs on paper. These brands have earned trust through consistent quality control, transparent specifications, and responsive customer service:
- ESEE: Unconditional lifetime warranty with no registration required. They’ll replace a broken knife even if the damage was your fault.
- Morakniv: Swedish craftsmanship at accessible prices. Over 130 years of production with remarkably consistent heat treatments across production runs.
- Fallkniven: Premium Swedish knives with laminated steel technology. Expensive but built to last decades.
- Benchmade: LifeSharp warranty includes free sharpening for life. Oregon-based manufacturing.
- KA-BAR: Military heritage dating to WWII. The Becker line offers exceptional value in hard-use fixed blades.
- Cold Steel: Known for overbuilding their knives. Their budget fixed blades are some of the strongest in their respective price ranges.
- TOPS Knives: American-made with a focus on hard-use field knives. They work closely with survival instructors and military end users on design.
Survival Knives to Avoid: Common Mistakes
This section might save you more money than any recommendation above. I’ve seen — and unfortunately tested — knives that look impressive in photos but fail when it matters.
Hollow-handle “Rambo” knives: That hollow handle with the compass cap and fishing kit inside? It means the blade isn’t full tang. I’ve seen these snap at the blade-handle junction during moderate batoning. The “survival kit” inside typically contains worthless components — a few feet of monofilament line and some matches that won’t strike. Buy a proper full-tang knife and carry your fire kit separately.
Saw-back spines: Those aggressive teeth on the spine look tactical, but they shred your baton stick during batoning, tear up your ferro rod, and make the spine unusable as a 90-degree striker. In 12 years, I’ve never encountered a field situation where a saw-back spine was the right tool.
Ultra-cheap mystery steel: If the listing says “stainless steel” or “surgical steel” without specifying the alloy, walk away. Quality makers publish their steel type because they’re proud of it. Unknown steel means unknown heat treatment, which means unpredictable performance — exactly what you don’t want in an emergency.
Oversized blades: Knives with 8–12 inch blades look impressive but sacrifice the fine control needed for most survival tasks. I’ve watched students struggle with basic feathersticking using oversized blades and then produce beautiful tinder curls the moment they switched to a 4.5-inch fixed blade. The difference was immediate and dramatic.
You’re scrolling online and find a “complete survival knife kit” — knife, firestarter, whistle, compass, and paracord bracelet — for $25 shipped. You figure it covers all the bases. But when you actually try to baton with it, the partial-tang blade wobbles. The firestarter throws weak sparks. The compass needle sticks. You’ve spent $25 on gear you can’t trust when it counts — and you still need to buy everything again.
Online red flags to watch for:
- No steel type specified
- Stock photos instead of actual product images
- “Military grade” with no specific mil-spec reference
- Reviews that all sound similar and were posted within the same week
- Price that seems impossibly low for the claimed features
Matching Your Knife to Your Environment
Choosing between all these options comes down to honestly assessing three things: your environment, your experience level, and your budget.
Climate Matters More Than You Think
- Pacific Northwest / wet forests: Stainless steel (VG-10, 14C28N, S30V) reduces maintenance burden. If you go carbon, commit to regular oiling. I carry a small bottle of Tuf-Glide in my field kit specifically for this.
- Desert / arid conditions: Carbon steel performs excellently here with minimal corrosion concerns. 1095 and 5160 are ideal — tough, easy to sharpen, and affordable.
- Coastal / saltwater exposure: Prioritize high corrosion resistance. S30V, H1, or LC200N are your best bets. Salt air corrodes carbon steel aggressively.
- Cold weather / alpine: Choose a handle that’s comfortable with gloves and a steel that maintains toughness at low temperatures. Avoid extremely hard steels (above 62 HRC) that can become brittle in severe cold.
Experience Level
- Beginner: Morakniv Garberg or ESEE 4. Forgiving steels, excellent manufacturer support, and enough online tutorials to learn proper technique.
- Intermediate: Fallkniven F1 or TOPS B.O.B. Fieldcraft. Better steels and grinds that reward developing skill.
- Advanced: Fallkniven A1, Bark River Bravo 1 in CPM 3V, or a custom knife matched to your specific requirements.
How to Sharpen a Survival Knife in the Field
 Field sharpening a survival knife on a river stone at camp
A dull knife is a dangerous knife. Period. It requires more force, slips more easily, and makes every task harder. Field sharpening is a skill you need to practice before you need it in an emergency.
I carry a Fallkniven DC4 combination stone — diamond on one side, ceramic on the other — in every field kit. It’s around $30 and weighs almost nothing. Here’s the method I’ve used for years:
- Find your angle: hold the blade perpendicular to the stone (90°), halve it to 45°, then halve again to roughly 22°. That’s close enough for most survival grinds.
- Start on the coarse/diamond side if your edge is significantly dulled or has minor chips. Use light, consistent pressure — let the stone do the work.
- Alternate sides evenly: five strokes on one side, five on the other. This keeps the edge centered and prevents a wire edge from forming.
- Switch to the ceramic/fine side for finishing strokes. Same angle, lighter pressure, alternating sides.
- Test the edge: gently rest it on your thumbnail at a shallow angle. A sharp edge catches and bites; a dull edge slides. You can also try slicing paper or shaving arm hair.
Scandi grinds are the easiest to sharpen freehand because the flat bevel itself registers against the stone, giving you a built-in angle guide. That’s one big reason I recommend Scandi-ground knives for beginners.
For convex grinds (like the Fallkniven A1), use a leather strop or the mousepad technique — lay sandpaper on a mousepad and draw the blade across it, using the give of the mousepad to follow the convex profile.
Carry your sharpening tools with your knife, not packed separately in a bag you might not have when you need them.
The first time I tried to field-sharpen a convex grind, I ruined the edge. Completely flattened out a section of my Fallkniven A1’s profile because I used the same flat-stone technique I’d been using on Scandi grinds for years. Took me an hour with a strop to fix it. That failure taught me something valuable: practice sharpening your specific knife’s grind type at home, with no time pressure, before you’re sitting in the rain trying to process firewood for a hypothermic patient. The technique for each grind is different, and muscle memory matters.
Building Your First-Knife Setup
If you’re building your preparedness kit from scratch, here’s the system I recommend:
- Primary: Full-tang fixed blade, 4–6 inches — the Morakniv Garberg (around $65) or ESEE 4 (around $120) depending on budget
- Secondary: Compact folder or multitool for daily carry and urban tasks
- Maintenance kit: Pocket stone (Fallkniven DC4 or similar, around $30), small bottle of oil, and a microfiber cloth
That’s it. Three components. You don’t need a knife collection to be prepared — you need one proven blade, one versatile secondary tool, and the knowledge to maintain both.
The knife you carry confidently and maintain consistently will always outperform the “perfect” knife gathering dust at home. Get something solid, take it outside, and put it to work.
The Complete
Prepper's Reference.
149 articles synthesized into one comprehensive PDF — twelve chapters covering water, food, shelter, first aid, comms, and scenario-specific preparedness. Free with your email.
Unsubscribe anytime · We never share your email
You're in. Check your inbox.
Keep Reading
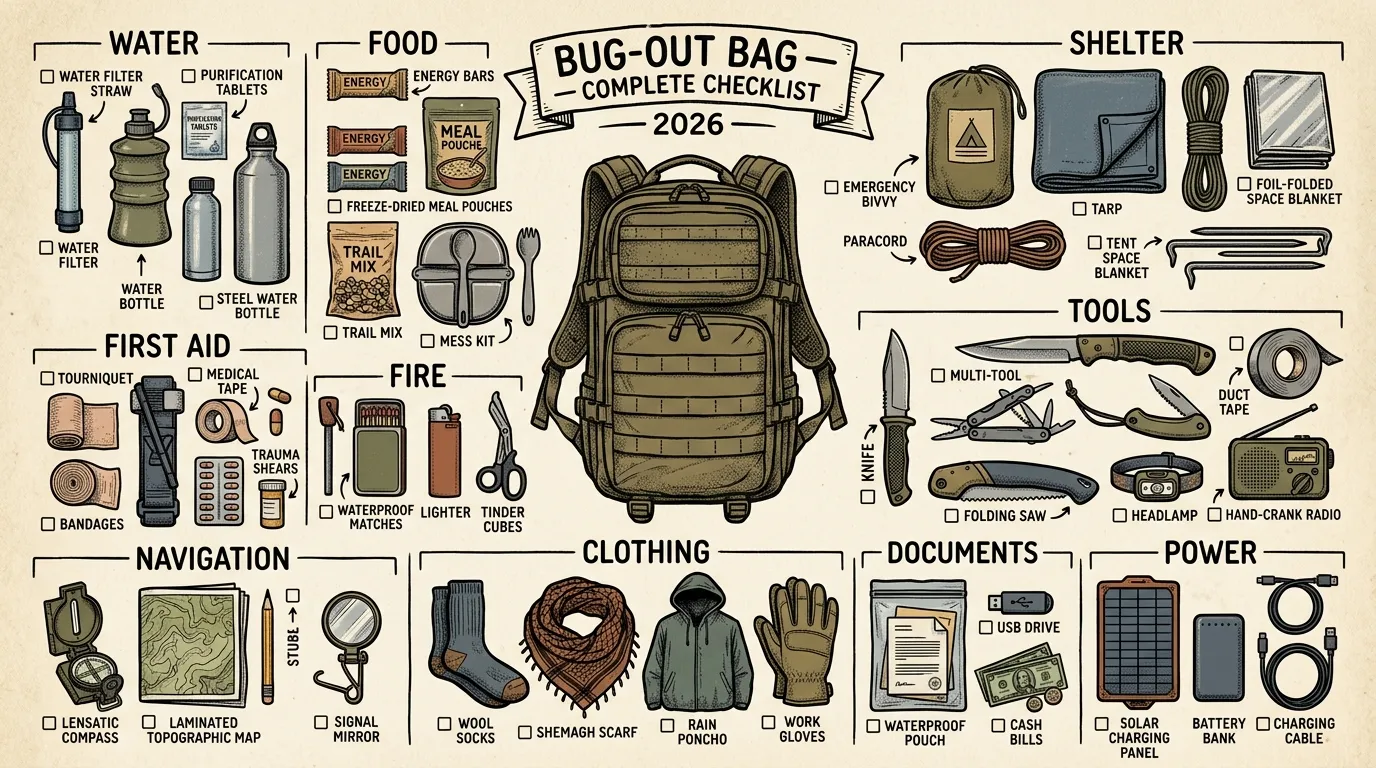
Bug-Out Bag List: Complete Checklist by Category (2026)
Field-tested bug-out bag list with 8 survival categories, weight budgets, and a 3-tier priority system. Printable checklist included — start packing today.
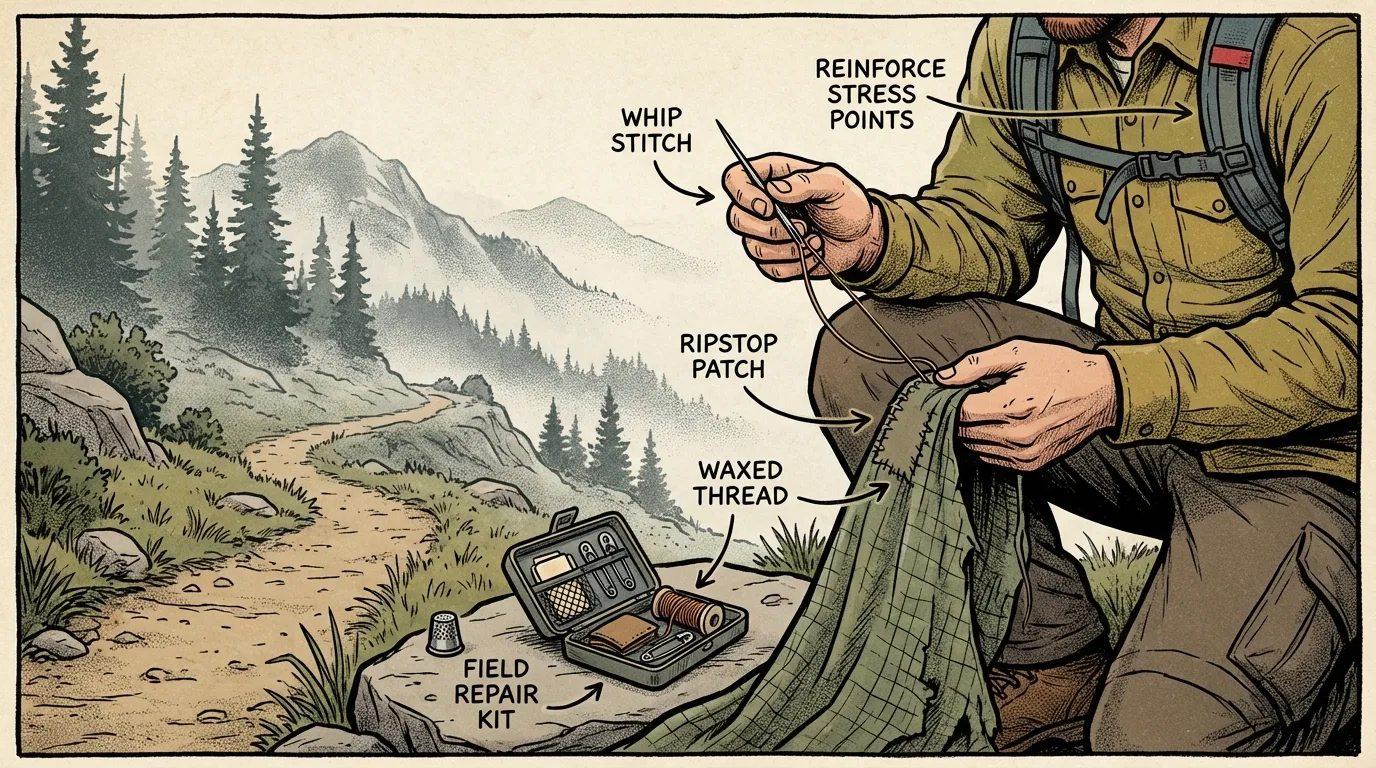
Survival Sewing: How to Repair Your Gear on the Go
Learn essential survival sewing skills to repair backpacks, tents, and clothing fast with beginner-friendly tools, stitches, and field-ready fixes.
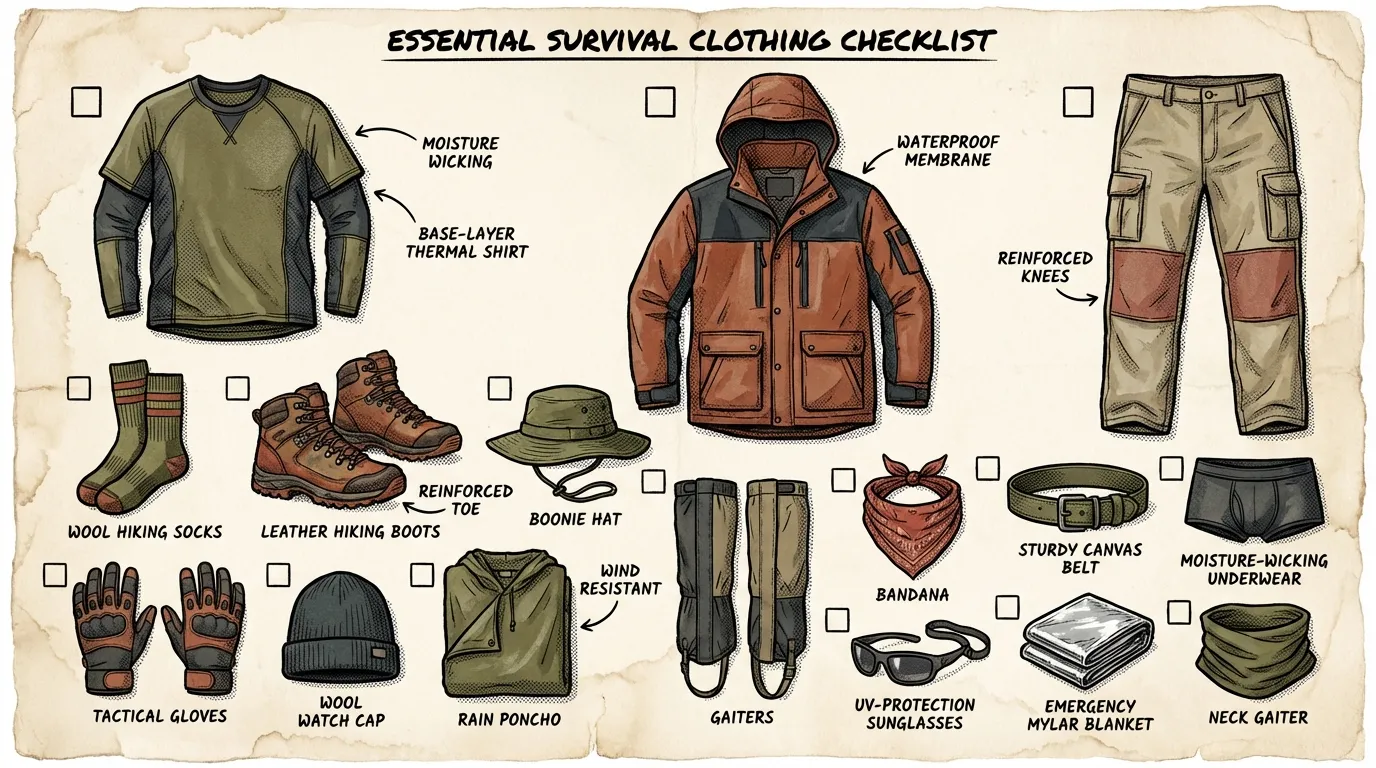
Survival Clothing: Dress for Success When Disaster Strikes
Learn how to choose survival clothing for cold, hot, and wet conditions, with practical layering tips, fabric advice, and beginner-friendly gear picks.