Everyday carry for preppers is a small set of essential items you keep on you daily to handle common problems and minor emergencies. A strong beginner EDC kit usually includes a multitool, flashlight, first-aid basics, lighter, phone charger, water access, and personal essentials tailored to your routine and local risks.
Key Takeaways
- Start with what's already in your pockets — phone, wallet, keys — then add a multitool, flashlight, and lighter to handle 80% of everyday emergencies.
- Use the 3-tier EDC layering model (pocket, bag, vehicle) to scale your preparedness without turning yourself into a walking gear store.
- Buy one quality item per month in the $30–$80 range instead of a cheap pre-made kit that'll fall apart when you need it most.
- Run a monthly maintenance check — dead batteries, expired meds, and dried-out antiseptic wipes are worse than carrying nothing because they create false confidence.
- Personalize everything around your actual routine, local hazards, and trained skills — a tourniquet you can't use is dead weight.
Everyday Carry Kit for Prepping: EDC Essentials That Actually Matter
During a winter storm response near Mount Hood in 2019, I showed up on scene 40 minutes before my full pack caught up with me. For those 40 minutes, the only tools I had were what was in my pockets — a compact flashlight, a multitool, and a lighter. That’s it. And honestly? Those three items got me through triage, scene assessment, and initial coordination just fine.
That experience cemented something I’d been telling people for years: your everyday carry kit for prepping is the most important gear you own, because it’s the gear that’s actually with you when things go sideways.
I’m Josh Baxter — FEMA-trained emergency management professional and certified Wilderness First Responder with over 12 years of field experience in the Pacific Northwest. I’ve deployed for wildfire evacuations, winter storm responses, and backcountry search-and-rescue operations. Everything in this article comes from real use, not just spec sheets and Amazon reviews.
Let me walk you through exactly how to build an EDC essentials loadout that works for your life — starting simple, staying practical, and scaling up only when it makes sense.
Quick Summary
- Your EDC is tier one of a layered preparedness system — it covers the critical gap between “something just happened” and “I can reach my larger supplies.”
- Ten core items form the foundation: phone, wallet, keys, multitool, flashlight, lighter, first-aid basics, portable charger, hydration option, and pen with notebook.
- The 3-tier layering model (pocket, bag, vehicle) lets you scale without overloading your pockets or dreading your daily carry.
- A solid starter kit runs $50–$300 — buy one quality piece per month instead of a cheap all-in-one kit.
- Monthly maintenance is non-negotiable — dead batteries and expired meds are worse than nothing because they create false confidence.
- Personalization matters more than any gear list — your commute, local hazards, workplace rules, and trained skills should shape every choice.
Why Build an Everyday Carry Kit for Prepping
FEMA recommends that individuals be prepared to be self-sufficient for at least 72 hours after a disaster. Your EDC kit is the very first tier of that self-sufficiency — it covers the gap between “something just happened” and “I can get to my larger supplies.”
But here’s the thing. Everyday carry isn’t only about disasters. In my experience, I reach for my EDC gear far more often for mundane problems than dramatic ones.
- Handle immediate problems. Flat tires, power outages, minor cuts, broken zippers, dead phones. These happen weekly to someone in your circle. A basic EDC solves most of them on the spot.
- Build preparedness as a habit. When you carry useful tools every day, readiness becomes automatic. You stop thinking about it the same way you stop thinking about grabbing your wallet in the morning.
- Bridge the gap to bigger kits. Your EDC connects directly to your bag kit and vehicle kit, which connect to your bug-out bag. It’s a system, not a single purchase.
- Reduce dependence on others. I’ve watched people stand around a parking lot waiting for someone with a flashlight or a knife. That someone should be you.
Natural disaster frequency has increased significantly over the past two decades. Daily preparedness isn’t paranoia — it’s practical thinking applied to real statistical trends.
What to Pack in an Everyday Carry Kit for Prepping
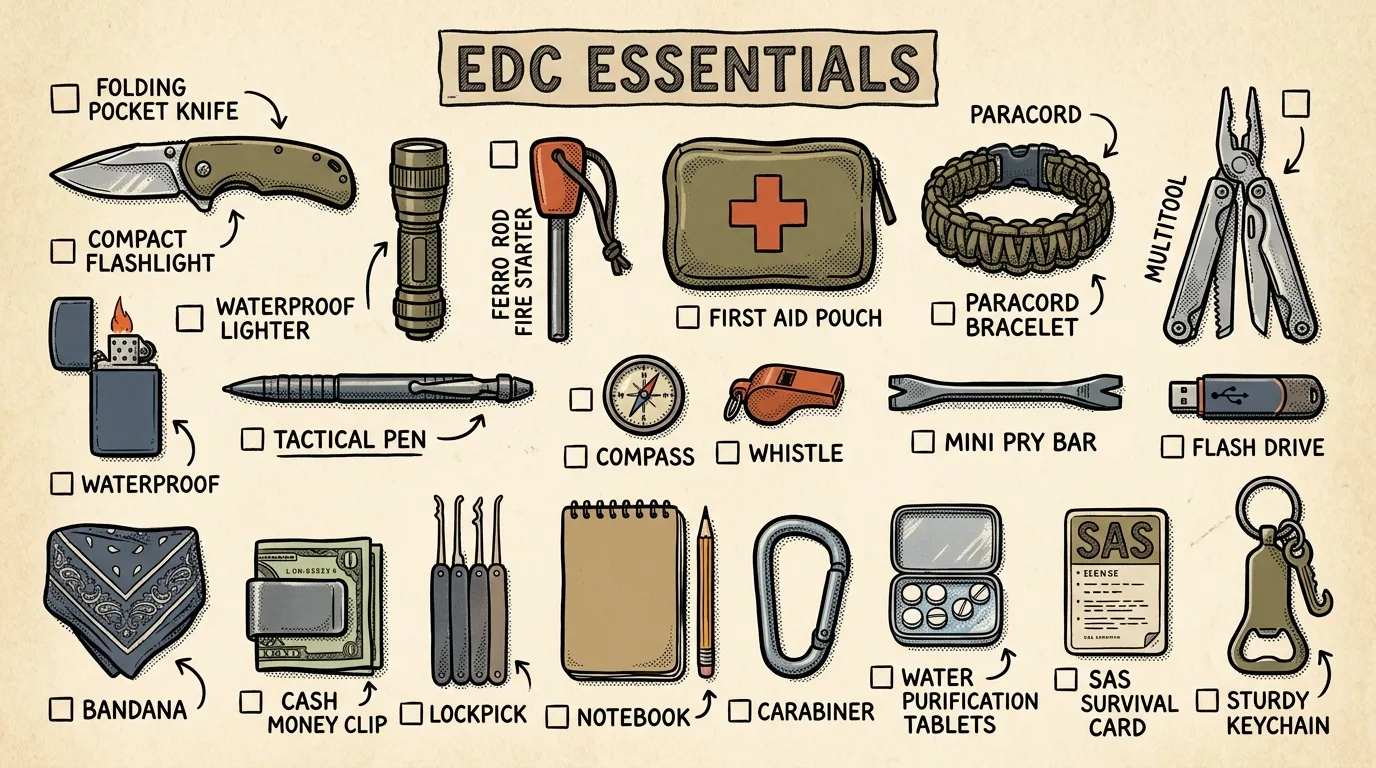
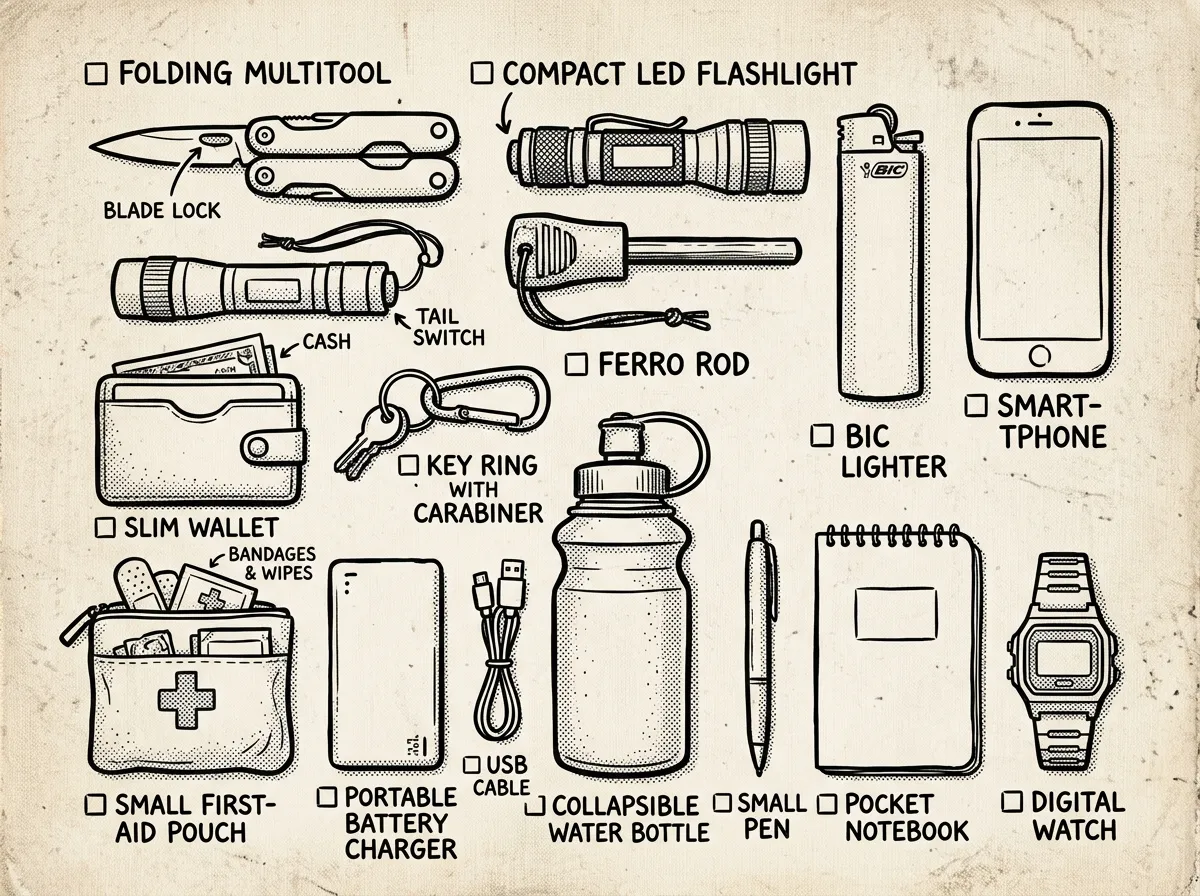 Core EDC kit essentials laid out for daily carry
An everyday carry kit for prepping includes these 10 essential items you should carry daily to handle emergencies and everyday problems:
- Phone — your primary communication, navigation, and information tool
- Wallet with ID and cash — identification, payment, and an emergency contact list
- Keys with keychain tool — access plus a small light or pill fob
- Multitool or pocket knife — cutting, repairs, and improvised problem-solving
- Compact flashlight — reliable illumination when power fails or darkness falls
- Fire source — lighter or ferro rod for warmth, light, and signaling
- Small first-aid supplies — bandages, gauze, antiseptic, and personal medications
- Portable charger with cable — backup power for your most critical device
- Hydration option — reusable bottle, compact filter, or purification tablets
- Pen and small notebook — record information when electronics fail
That’s your foundation. Now let’s dig into the items that need the most explanation.
Core EDC Items: Selection Tips and Field-Tested Guidance
Phone
Keep it charged above 50% whenever possible. Use a sturdy case — I’ve cracked screens during SAR callouts and it’s never convenient. Download offline maps of your area and store emergency contacts both in your phone and on a paper card in your wallet. Enable the emergency SOS features built into iOS and Android.
Wallet
Carry your ID, one credit card, one debit card, and at least $40 in small bills. Cash works when card readers don’t. Include your insurance card and a handwritten list of three emergency contacts with phone numbers. I also keep a folded photocopy of my medical information card — takes up almost no space and I’ve needed it twice.
Keys
Strip your keyring down to what you actually use daily. I’ve added a small keychain flashlight (under 50 lumens is fine for a backup) and a tiny waterproof pill fob for ibuprofen. Every extra key and fob adds weight and bulk that wears on you over months.
Multitool or Pocket Knife
This is the item most people overthink. Here’s what matters: choose a plier-based multitool if you want versatility, or a folding knife if cutting is your primary need. Keep the weight under 7 ounces — anything heavier and you’ll stop carrying it within a month. One-hand opening matters because your other hand will usually be occupied. Look for a solid locking mechanism and a pocket clip.
The Leatherman Wave+ — around $100 — is what I’ve carried for three years straight. It gets used for everything from cutting cordage during trail work to tightening loose screws on equipment. Some folks swear by the cheaper Leatherman Wingman (around $60), and it’s a solid choice if you’re starting out. But the Wave+‘s replaceable wire cutters and better plier geometry are worth the extra money if you’ll actually use them. Don’t buy a $200 multitool if a $60 one covers your real needs.
Follow local laws on blade length — most states restrict automatic knives over 2 to 3 inches, and some cities have stricter rules than their state.
Compact Flashlight
In my field work, a flashlight has been useful more often than any other single EDC item. More than my knife. More than my first-aid kit. Look for 200 to 1,000 lumens — anything under 200 feels weak in real darkness, and anything over 1,000 drains batteries fast without adding much practical benefit.
Choose a light that uses an 18650 rechargeable battery over AAA disposables. The 18650 gives you significantly more runtime and you can recharge it from your portable charger. A pocket clip and tail-stand capability are genuinely useful features — the tail-stand turns your flashlight into a hands-free lantern inside a tent or during a vehicle repair.
The Wurkkos FC11 — around $30 — punches way above its price point with USB-C charging, an 18650 battery, and solid build quality. It’s the flashlight I recommend to everyone who asks.
Fire Source
A standard BIC lighter is hard to beat for everyday carry. It’s cheap, reliable, and works with one hand. For a backup, I carry a small ferro rod in my bag kit. Learn how to start a fire safely before you rely on either one. Obey local fire rules — during Pacific Northwest fire season, open flame restrictions are serious and enforced.
Small First-Aid Supplies
As a certified Wilderness First Responder, I carry compressed gauze and a tourniquet in my bag EDC because I’ve used both in real field situations — these aren’t theoretical additions. Here’s what I recommend for a minimal pocket-level individual first aid kit:
- 2 adhesive bandages
- 2 gauze pads (4x4 inch)
- 1 compressed gauze or Israeli bandage
- 1 pair nitrile gloves
- 2 antiseptic wipes
- 2 doses pain reliever (ibuprofen or acetaminophen)
- Any daily personal prescriptions (inhaler, EpiPen, glucose tablets)
If you have basic first aid skills every prepper needs and specific training, add a tourniquet and chest seal to your bag kit. Don’t carry medical items you haven’t trained to use — they take up space and create a false sense of security.
Portable Charger and Cable
Match the battery capacity to your phone. A 10,000 mAh power bank gives most phones two to three full charges and weighs around 6 ounces. Keep the correct cable attached or bundled with it. Test it monthly — lithium batteries degrade over time, especially in hot vehicles.
Hydration Option
For daily carry, a reusable water bottle is the simplest option. If your routine involves outdoor exposure or rural travel, add water purification methods for emergencies to your bag kit — compact filters or purification tablets weigh almost nothing and can be critical if you’re stranded.
Pen and Small Notebook
When your phone’s dead or you need to leave a note for someone, paper works. I use a waterproof notebook that fits in a back pocket. Write down directions, license plates, names, medical details, or grid coordinates. I’ve needed this more times than I expected — especially during power outages when everyone’s trying to share information verbally and half of it gets lost.
Watch
Here’s one people overlook: a reliable analog watch. When your phone’s dead or packed away, you still need to track time for medication schedules, meetup coordination, or estimating daylight remaining. An inexpensive analog watch with decent water resistance is a genuine EDC tool, not a fashion choice.
The EDC Layering Model for Preppers
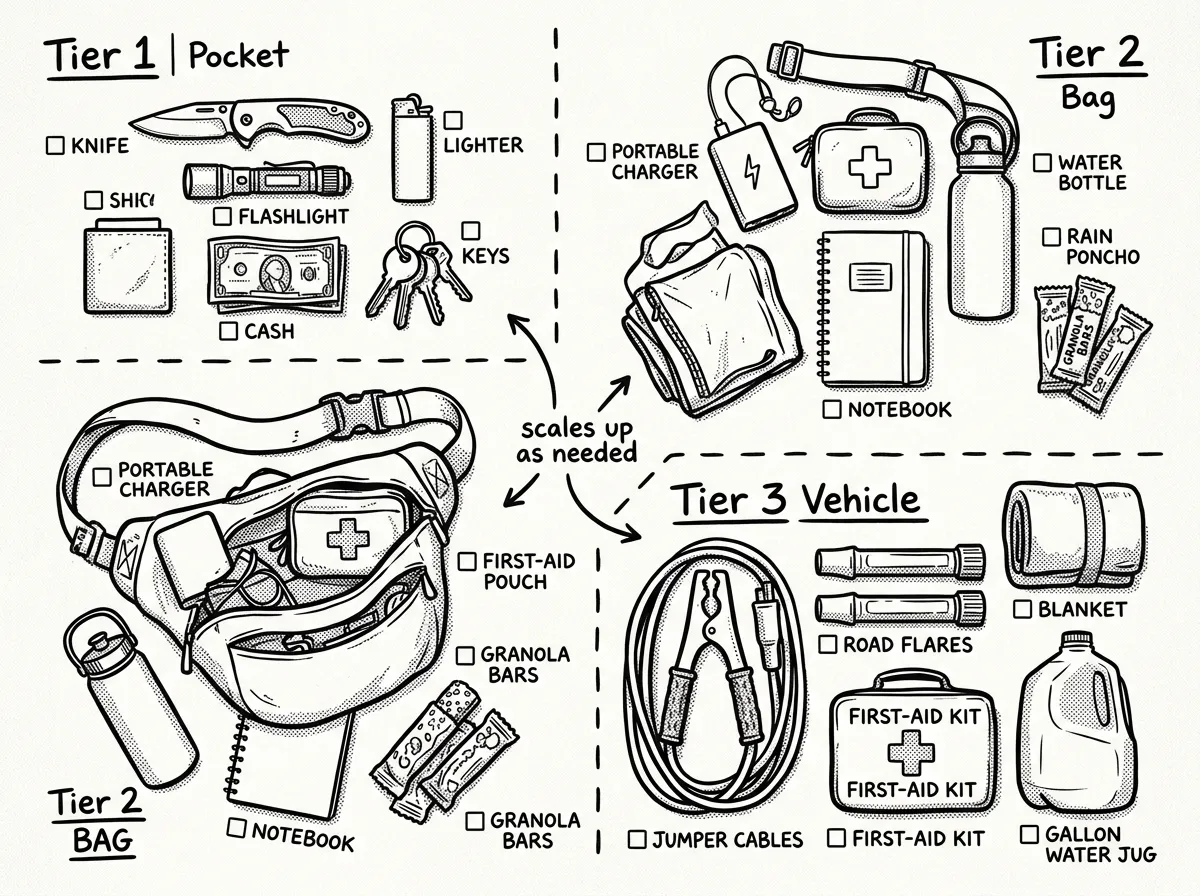 Three-tier EDC layering system: pocket, bag, and vehicle
So how do you carry all this without looking like a tactical cosplayer? The EDC layering model organizes your gear into three tiers so you’re not trying to cram everything into your pockets. Each tier builds on the last.
Tier 1: Pocket EDC
These are items on your person at all times. Target a total weight under 1 pound.
- Phone
- Wallet with ID, cash, and emergency contacts
- Keys with keychain light
- Folding knife or compact multitool
- Compact flashlight
- Lighter
- Pen
Tier 2: Bag EDC
These go in a small backpack, sling bag, or daily carry bag. Keep the total loaded weight under 5 pounds.
- Expanded first-aid kit (compressed gauze, tourniquet if trained, medications)
- Portable charger with cable
- Compact rain layer or poncho
- Water bottle or hydration option
- Snack bars (rotate every 2 to 3 months)
- Notebook
- Ferro rod backup fire source
- Seasonal items: sunscreen in summer, hand warmers in winter
- Spare phone cable
Tier 3: Vehicle Support
Larger items stored in your car that support extended situations. This is where you can afford some weight and bulk.
- Full-size first-aid kit
- 2 liters of water (rotate seasonally)
- Non-perishable snacks
- Complete change of clothes in a dry bag
- Emergency blanket (the real kind, not a mylar sheet)
- Jumper cables or a portable jump starter
- 12V tire inflator
- Roadside visibility kit (flares or LED road markers)
- Seasonal items: ice scraper and wool blanket in winter, shade screen in summer
Living in the Pacific Northwest, my vehicle tier always includes rain gear, extra wool layers, and tire chains from October through April. If you’re in a humid Gulf Coast climate, you’d swap those for extra water, electrolyte packets, and sun protection. Your local climate and hazards should shape this tier heavily.
Your EDC connects to larger systems. If you haven’t already, consider building a complete bug-out bag as the next step in your layered preparedness plan.
Best EDC Bags and Carry Methods
What should you actually carry all this stuff in? The bag you choose determines what you can bring, how comfortable it is, and whether you’ll actually grab it every morning.
Pocket-Only Carry
No bag at all — everything fits in your pockets. This works for the Tier 1 essentials and is ideal when you want zero extra bulk. The tradeoff is obvious: limited capacity.
Sling Bags
A small tactical or urban sling bag (5 to 8 liters) sits across your chest or back and gives you quick access. These are popular because they’re unobtrusive and fit most dress codes. They hold your Tier 2 essentials comfortably.
Small Backpacks
A 15 to 20 liter daypack carries everything in Tier 1 and Tier 2 with room to spare. This is my go-to for days when I’m in the field or traveling. Look for one with a water bottle pocket and an internal organizer.
Fanny Packs and Waist Bags
Carhartt-style waist bags and tactical fanny packs have become standard in the EDC community. They’re hands-free, fast to access, and hold more than you’d expect. Don’t dismiss these because of old stereotypes — they work.
Organizer Pouches
If you carry a messenger bag or briefcase for work, a small zippered organizer pouch keeps your EDC items consolidated inside it. Transfer your EDC between bags in seconds. Simple, effective.
My recommendation: start with a bag you already own. A school backpack, a laptop bag, or a gym duffel can serve as your EDC bag while you figure out what you actually carry daily. Buy a specialized bag only after you’ve dialed in your loadout — otherwise you’ll buy the wrong size.
EDC for Different Survival Scenarios
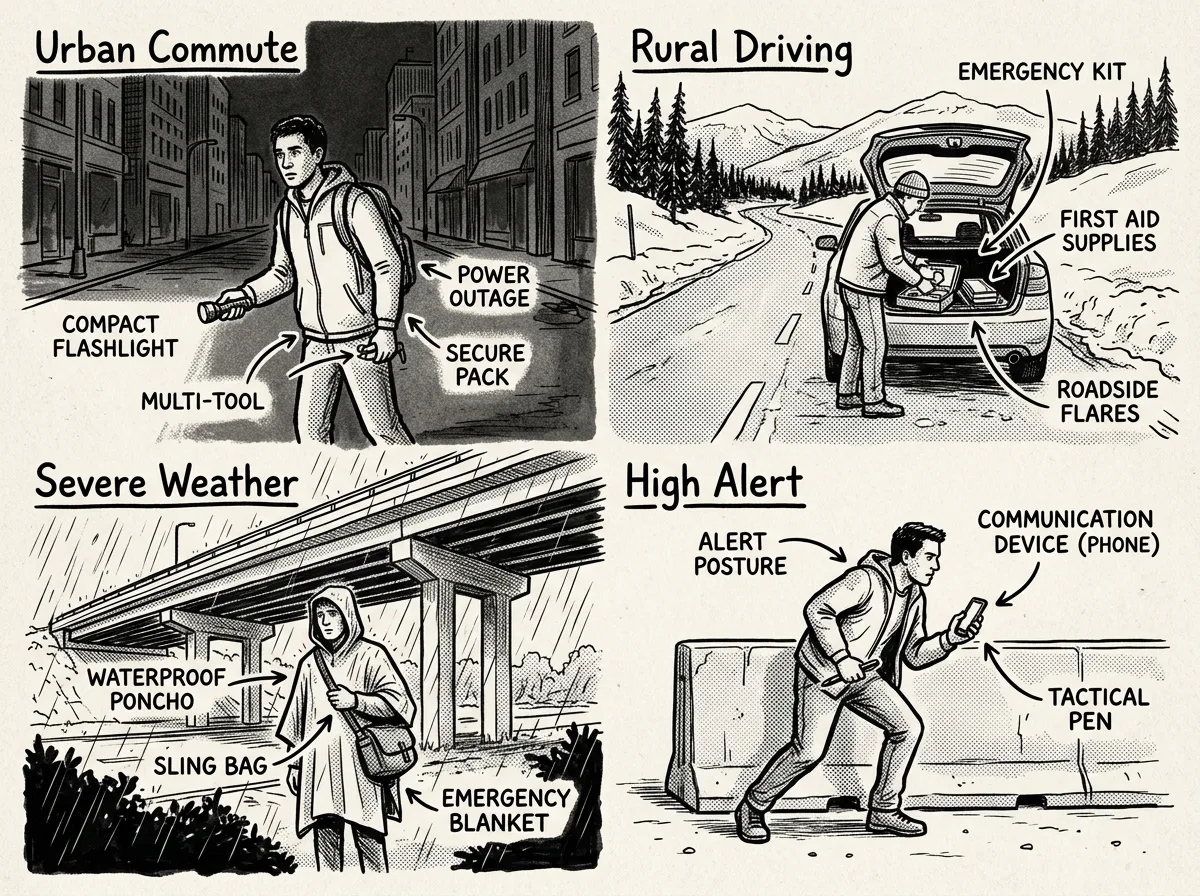 Adapting your everyday carry to match real-world scenarios
Your everyday carry essentials should shift based on what you’re doing that day. Here’s how I adjust my loadout:
Urban Commuting
When I’m heading into Portland or Seattle for meetings, my EDC emphasizes:
- Fully charged phone with transit apps and offline maps
- Extra cash in small bills (parking meters, coffee, emergencies)
- Transit card or backup ride-share app
- Compact umbrella (Pacific Northwest essential)
I drop the ferro rod and water filter from my bag because there’s less need for wilderness survival tools in an urban setting.
Rural or Wilderness Driving
When I’m driving forest service roads or heading to remote trailheads, I add:
- Ferro rod and tinder backup
- Compact water filter
- Signal mirror or whistle
- Extra food bars
- Paper map of the area
Cell service is unreliable outside metro areas. Plan accordingly.
Severe Weather Season
You’re driving home from work when freezing rain turns the highway into a parking lot. Traffic stops completely. Your engine’s running but fuel is getting low, and the radio says crews won’t clear the road for several hours. The hand warmers, emergency bivvy, and extra water in your vehicle tier are the difference between mild discomfort and a genuine cold-weather emergency.
During storm season or extreme weather watches, I swap in:
- Compact emergency poncho (not just a rain shell)
- Chemical hand warmers (2 to 4 packs)
- Emergency bivvy or space blanket in my bag
- Extra portable charger
I’ve been caught in ice storms where traffic stopped for hours. That hand warmer and bivvy aren’t luxury items — they’re the line between discomfort and a real problem.
Active Threat or High-Alert Situations
This is a personal and legal decision. What I will say is this: regardless of what you carry for self-defense, your most important assets in a threatening situation are awareness, exits, and communication. Keep your phone accessible, know where the exits are in every building you enter, and have a plan to contact emergency services quickly.
A quality tactical flashlight with a strobe function serves double duty as both a lighting tool and a disorientation device. It’s legal everywhere and doesn’t require a permit.
EDC Mistakes to Avoid
The first time I built an EDC kit, I packed way too much. My sling bag weighed close to 8 pounds. I carried it for about a week before I started “forgetting” it at home. Sound familiar? Here are the mistakes I see most often:
Carrying too much gear. If your bag weighs 10 pounds and you dread picking it up, you won’t carry it. Cut ruthlessly. Fix: Weigh your loaded bag. If it’s over 5 pounds for a daily bag, start removing items.
Buying expensive gear you never train with. A $200 knife you’ve never sharpened or practiced opening under stress is worse than a $30 knife you know inside and out. Fix: Spend 10 minutes per week practicing with your tools.
Ignoring legal restrictions. I’ve carried EDC gear through TSA checkpoints, into federal buildings, and across state lines during disaster deployments. Knowing the rules isn’t optional — it’s part of the preparation. Many offices prohibit fixed-blade knives but allow small folding blades under 3 inches. Some cities like New York City have stricter blade laws than their state. Lithium power banks over 100 watt-hours require airline approval. Fix: Research your local, state, and workplace rules before you buy.
Neglecting battery maintenance. That power bank in your bag? If you haven’t charged it in three months, it might be dead when you need it. Fix: Add a monthly reminder to charge all batteries and test all electronics.
Duplicating items already on your phone. You probably don’t need a standalone compass, calculator, or weather radio in your pocket EDC if your phone handles all three. Save that space and weight. Fix: Audit your kit against your phone’s capabilities — carry analog backups in your bag tier, not your pocket tier.
Forgetting to rotate perishable supplies. Antiseptic wipes dry out. Medications expire. Adhesive bandages lose their stick. Fix: Check all consumables during your monthly maintenance and swap anything that’s expired or degraded.
I’ve watched people at preparedness meetups pull out EDC kits with three different fire-starting methods, two flashlights, and a compass they’ve never used — all stuffed into a bag that weighs more than some bug-out bags. They’re building a museum, not a kit. The best EDC is the one you actually carry every day. If it’s too heavy or complicated, you’ll leave it at home, and then it’s worth exactly nothing.
How to Personalize Your Everyday Carry Kit
No two EDC kits should look identical. Here’s my process:
- Audit your daily routine — write down everywhere you go in a typical week, note how long you’re away from home, and whether you drive or use transit.
- Identify your local risks — earthquakes, wildfires, tornadoes, flooding, blizzards, and extreme heat all demand slightly different kit adjustments.
- Check laws and workplace policies — confirm blade length restrictions, lighter policies, and battery transportation rules for every environment you regularly enter.
- Match gear to trained skills — a tourniquet is dead weight if you haven’t taken a Stop the Bleed course, and a fire starter is pointless if you’ve never lit tinder in the rain.
- Account for family needs — if you have kids, add child-specific medications, extra snacks, and age-appropriate comfort items.
In the Pacific Northwest, I plan around earthquakes, winter storms, and wildfire smoke season. If you’re in a high desert area like eastern Oregon or Nevada, dehydration and sun exposure are your primary threats — your EDC should reflect that with extra water capacity and electrolytes. Different environment, different kit.
Monthly Maintenance Checklist
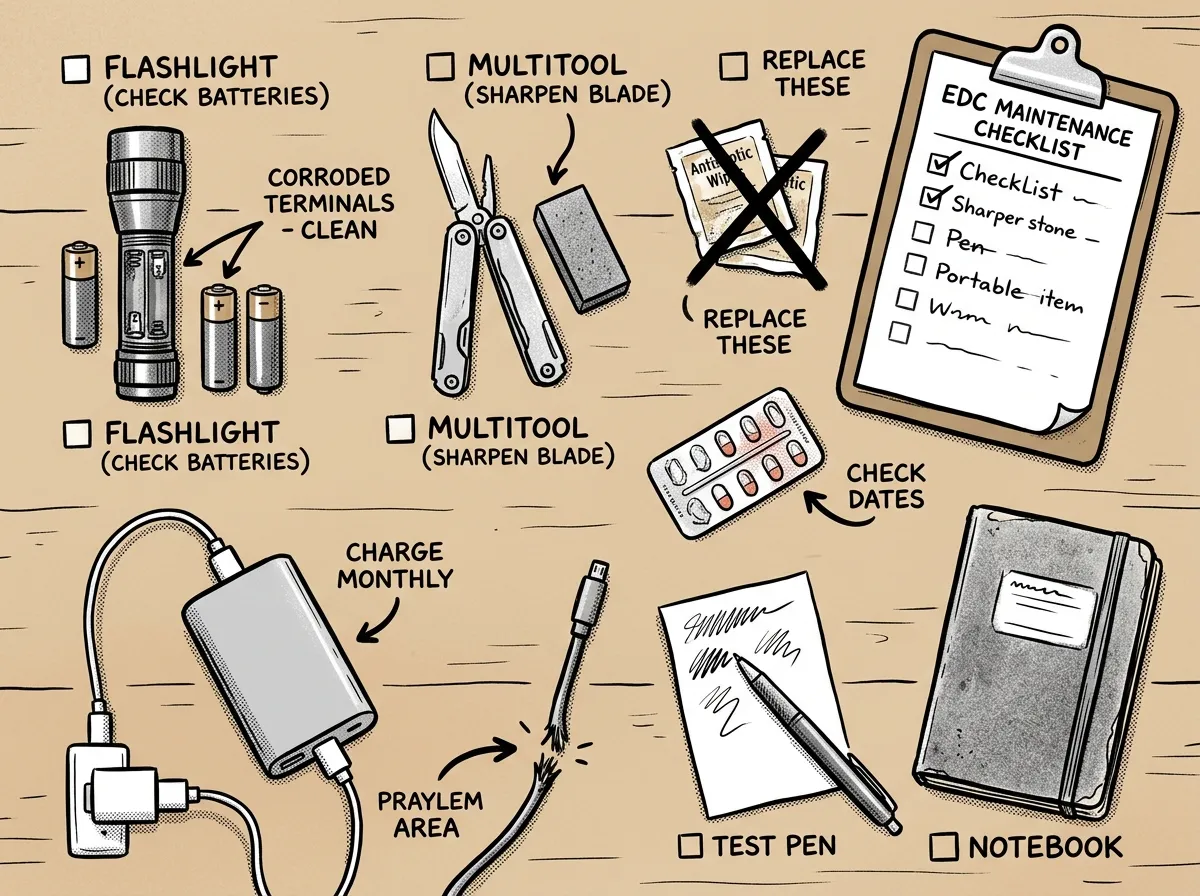 Monthly EDC gear inspection and maintenance spread
Your EDC is only as reliable as your last maintenance check. I do mine on the first of every month, and it takes about 15 minutes:
- Recharge all batteries and power banks to full
- Inspect expiration dates on medications, antiseptic wipes, and water purification tablets
- Test flashlight function on all brightness modes
- Check cable condition for fraying or bent connectors
- Clean and lightly oil multitool pivot points
- Rotate food bars and snacks in your bag kit
- Update information cards (emergency contacts, medical info) if details have changed
- Verify phone’s offline maps are current
Buying and Budgeting Guidance
How much does all this actually cost? A solid beginner EDC kit runs between $50 and $300 depending on the quality you choose and what you already own. Here’s how I recommend building up:
- Month 1 ($0–$20): Organize what you already carry. Add a BIC lighter and a pen.
- Month 2 ($30–$60): Buy a quality compact flashlight with a rechargeable battery.
- Month 3 ($30–$80): Add a multitool or folding knife in the mid-range.
- Month 4 ($20–$40): Get a 10,000 mAh portable charger and the right cable.
- Month 5 ($15–$30): Assemble a small first-aid kit from individual components.
- Month 6 ($20–$50): Fill in gaps — water bottle, notebook, seasonal items.
Buying one quality item per month is far better than buying a cheap pre-made kit that falls apart the first time you actually use it. Prioritize reliable manufacturers for critical items: lighting, first aid, and power.
Printable EDC Checklist
Use this checklist to build and audit your everyday carry kit. Organized by tier for easy reference.
Pocket EDC
- Phone (charged, sturdy case, offline maps)
- Wallet (ID, credit card, $40+ cash, emergency contacts)
- Keys (keychain light, minimal extras)
- Folding knife or compact multitool
- Compact flashlight (rechargeable)
- Lighter
- Pen
Bag EDC
- Expanded first-aid kit
- Personal medications
- Portable charger and cable
- Water bottle or compact filter
- Snack bars (rotated quarterly)
- Compact rain layer or poncho
- Small notebook
- Ferro rod backup
- Seasonal items (hand warmers or sunscreen)
Vehicle Support
- Full-size first-aid kit
- 2 liters of water
- Non-perishable snacks
- Change of clothes in dry bag
- Emergency blanket or bivvy
- Jumper cables or portable jump starter
- 12V tire inflator
- Roadside visibility kit
- Seasonal items (ice scraper, chains, shade screen)
Frequently Asked Questions
What are the most essential items for an EDC kit?
The most essential EDC items are a phone, wallet with ID and cash, keys, multitool or pocket knife, compact flashlight, fire source, small first-aid supplies, portable charger with cable, a hydration option, and a pen with small notebook. These ten items cover communication, navigation, minor medical needs, repairs, and basic survival.
What should be in a prepper kit?
A prepper kit should include items for communication, navigation, first aid, hydration, fire, lighting, and basic repair. Your everyday carry kit covers the first tier. A bug-out bag expands this with 72 hours of food, water, shelter, and clothing. FEMA recommends individuals be prepared to be self-sufficient for at least 72 hours after a disaster.
What is the difference between EDC and a bug out bag?
An EDC kit is the compact set of items you carry on your person or in a small bag every single day. A bug-out bag is a larger, pre-packed bag designed to sustain you for 72 hours or more during an evacuation. Think of EDC as tier one and a bug-out bag as tier two of a layered preparedness system.
Is EDC the same as a survival kit?
Not exactly. A survival kit is typically purpose-built for wilderness or disaster scenarios and stored until needed. An EDC kit is designed for daily carry — it handles both everyday problems and the first minutes of an emergency. There’s overlap in items like flashlights, fire starters, and first aid, but EDC prioritizes compact size and daily usability.
What knife should I carry for EDC prepping?
For EDC prepping, carry a folding knife with a blade between 2.5 and 3.5 inches. Look for one-hand opening, a reliable lock mechanism, and a pocket clip. Check your local blade length restrictions and workplace rules before carrying. A quality folding knife in the $40 to $80 range will serve you well for years.
How much does a beginner EDC kit cost?
A beginner EDC kit typically costs between $50 and $300, depending on the quality of gear you choose and what you already own. Start with items you already carry and add one or two well-chosen pieces each month to spread out the cost.
How do you personalize an everyday carry kit?
Personalize your EDC by auditing your daily routine, commute, work environment, and family needs. Identify local risks such as storms, wildfires, or long rural drives, and follow local laws and employer policies about carrying blades, lighters, and batteries. The most overlooked step: only carry items you’ve actually trained with.
Start Carrying, Not Planning
After 12 years of emergency deployments, backcountry rescues, and storm responses, I can tell you with certainty: the gear in your pockets matters more than the gear in your garage. The whole point of an everyday carry kit for prepping is that it’s with you when you need it — not sitting in a closet, not locked in a safe, not on a wishlist.
Start with the 10 essentials in this guide. Layer up to a bag kit and vehicle support as your routine demands. Maintain everything monthly. And most importantly, train with every item you carry.
Pick one item from this list you don’t currently carry. Buy it this week. Add it to your pocket or your bag tomorrow morning. That’s how preparedness becomes real — not through planning, but through doing.
The Complete
Prepper's Reference.
149 articles synthesized into one comprehensive PDF — twelve chapters covering water, food, shelter, first aid, comms, and scenario-specific preparedness. Free with your email.
Unsubscribe anytime · We never share your email
You're in. Check your inbox.
Keep Reading
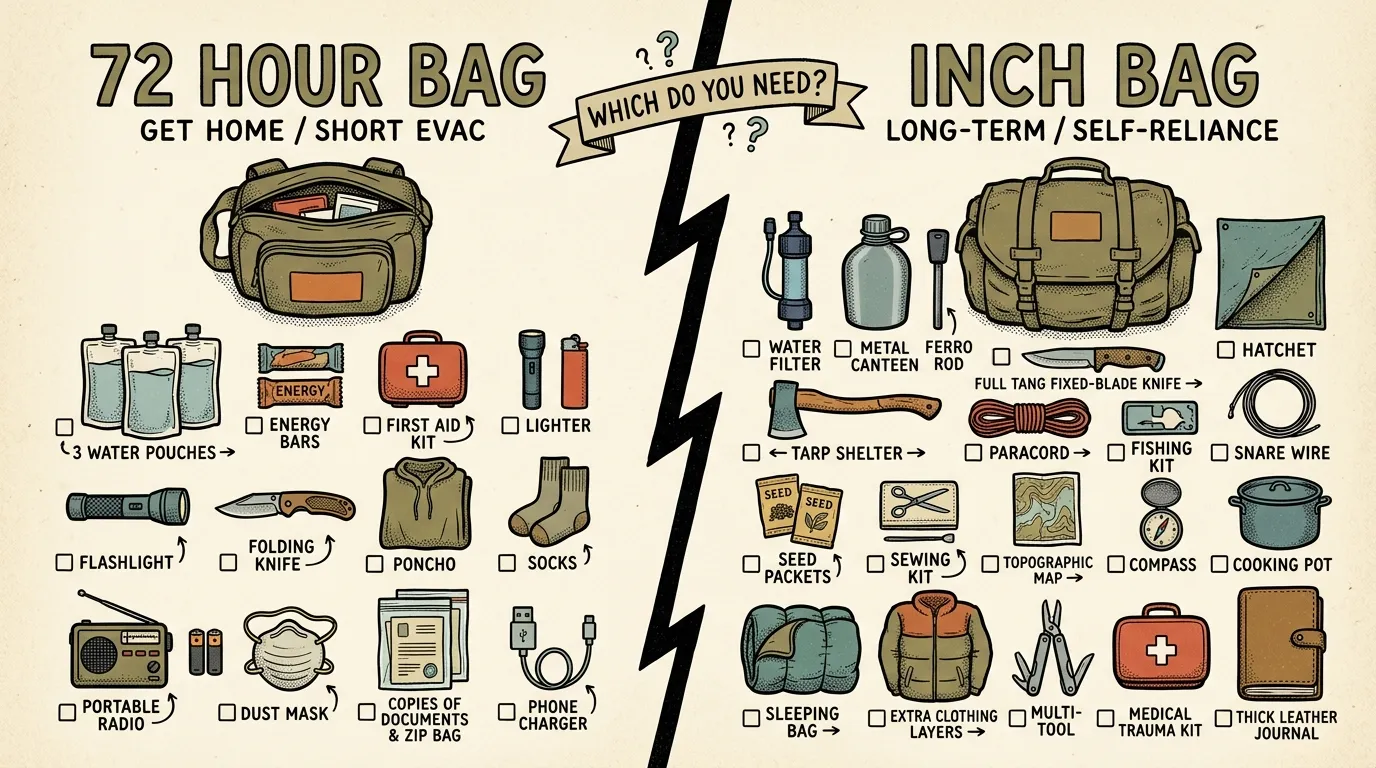
72 Hour Bag vs INCH Bag: Which Do You Need?
72 hour bag vs INCH bag — field-tested breakdown of temporary evacuation kits vs permanent bug-out setups. Find which matches your real threat profile.
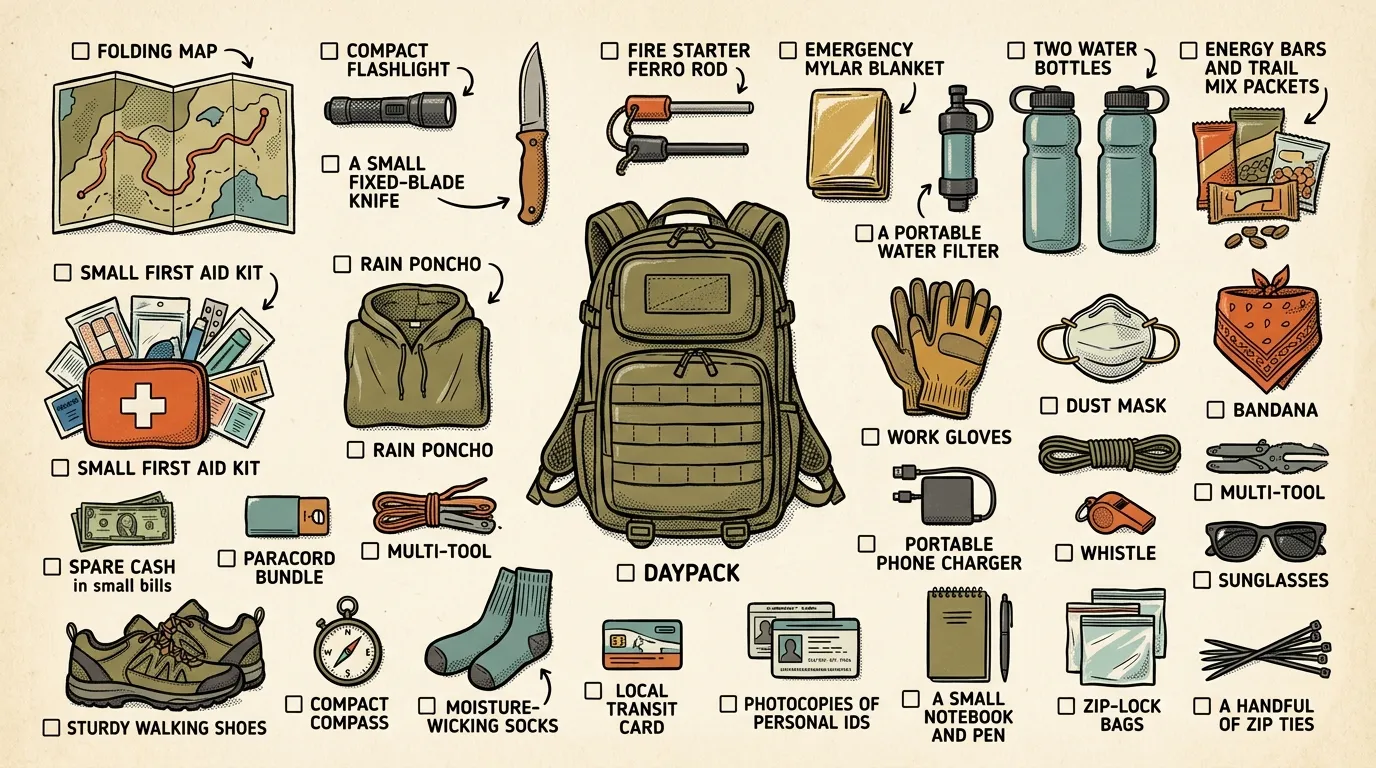
Get Home Bag Essentials: The Complete Checklist
Build your get home bag essentials list with this practical checklist from a FEMA-trained WFR. Gear that gets you from work to home in any emergency.
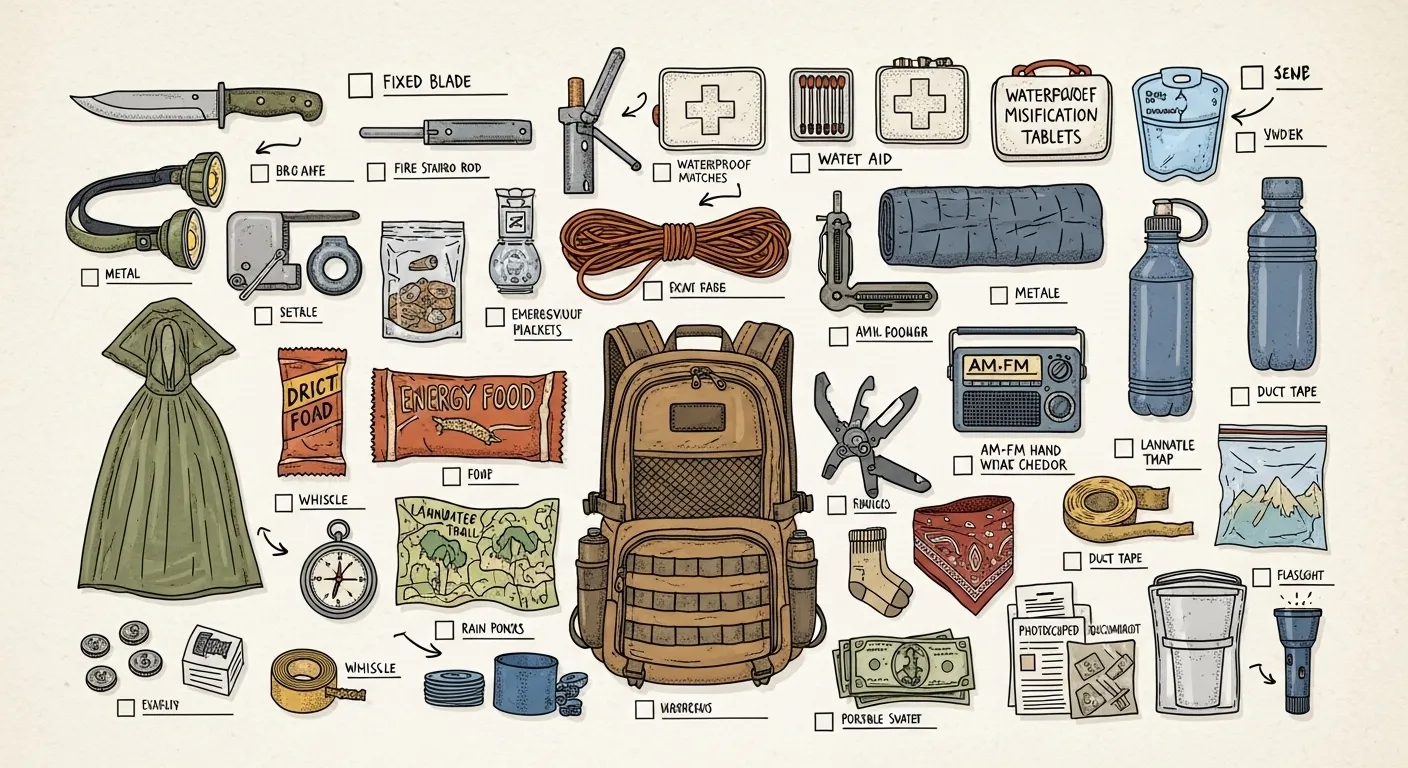
Building Your First Bug-Out Bag: A Preppers' Shopping List
New to prepping? Learn what to pack in a beginner bug-out bag, avoid common mistakes, and shop smart with practical gear suggestions.