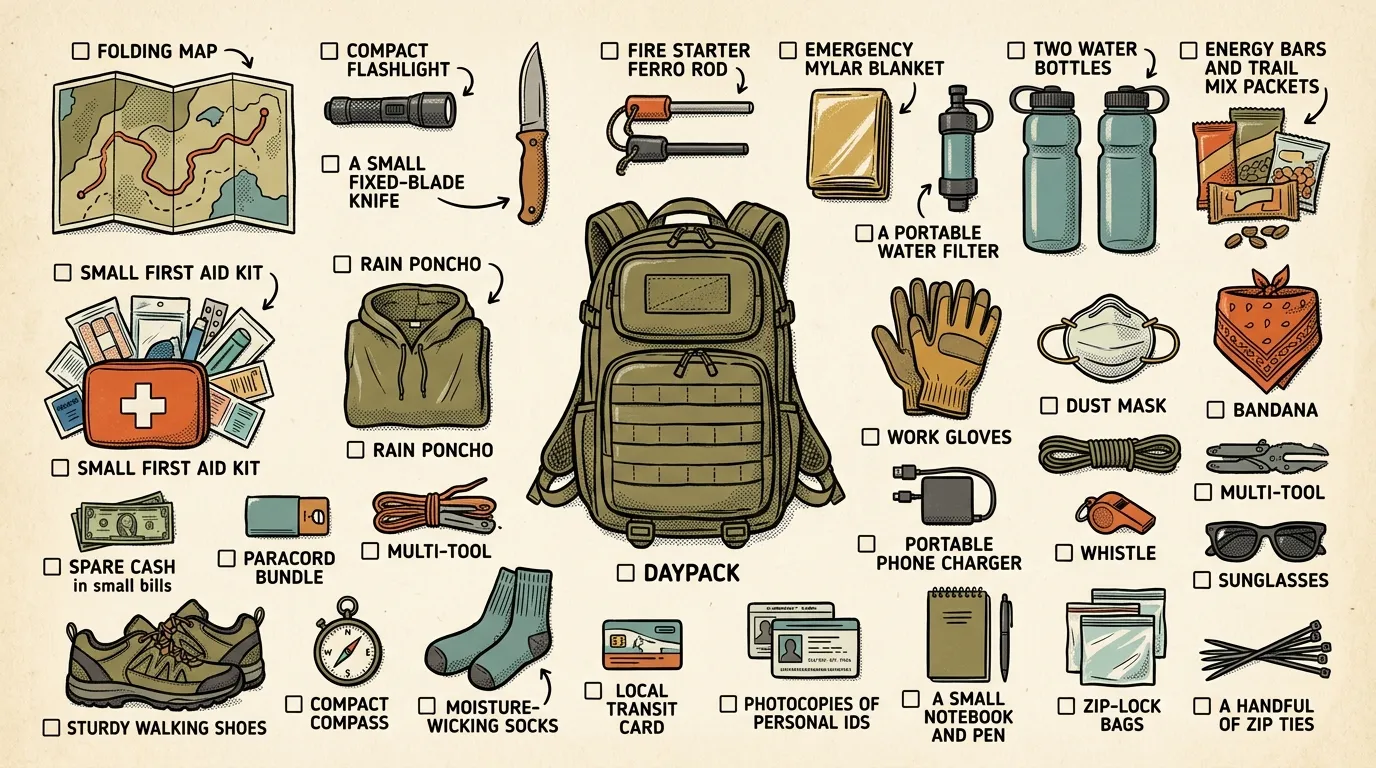
This article teaches commuters how to build a practical get home bag with essentials for traveling from work to home during emergencies, covering water, food, navigation, first aid, clothing, shelter, and power — distinct from a bug-out bag in weight, scope, and purpose.
Key Takeaways
- Keep your get home bag under 15 pounds — you're walking for hours, not surviving for days
- Walking shoes are the single most important item in your bag; test them before you need them
- Store your GHB where you actually need it — your car trunk or office, not your closet at home
- Print a physical map with 2-3 foot-friendly alternate routes marked with water sources and rest points
- Rotate all food, water, batteries, and medications every 6 months — set a calendar reminder now
- Walk at least part of your commute route on foot to test your gear, fitness, and time estimates
Picture being 22 miles from home when the power goes out across three counties. No working traffic lights. Gas stations dark. Cell service overwhelmed. In scenarios like this, plenty of people are left staring at their phones waiting for answers that aren’t coming — while others grab a bag and start walking.
That bag wasn’t a 50-pound bug-out behemoth. It’s a compact, purpose-built kit designed for one thing: getting someone from the office to their front door. That’s a get-home bag, and if you commute to work — whether it’s 5 miles or 50 — you need one packed with the right get home bag essentials. This is one of the single most overlooked pieces of practical preparedness most people never think about.
Let me walk you through exactly what belongs in this bag, why it’s not just a smaller bug-out bag, and how to build one that fits your commute.
What Is a Get Home Bag?
A get home bag (GHB) is a compact, lightweight emergency kit stored at your workplace or in your vehicle, designed to help you travel from your current location to your home during a crisis when normal transportation is unavailable. It’s not about wilderness survival — it’s about covering ground.
Here’s what distinguishes a get home bag from other emergency kits:
- Weight: Under 15 pounds — light enough to carry for hours of walking
- Duration: Designed for under 24 hours of travel, not days of survival
- Purpose: Single mission — get from point A (work) to point B (home)
- Storage location: Lives in your car trunk, office, or commuter backpack — never at home
- Contents focus: Mobility, navigation, hydration, and foot comfort over long-term sustenance
- Profile: Low-key and unremarkable — blends in, doesn’t attract attention
The get-home bag has proven itself in real-world events — from ice storms shutting down I-5 to widespread grid failures that stranded thousands of commuters. Your everyday carry covers you for minor disruptions. Your bug-out bag covers evacuation scenarios. Your GHB fills the critical gap between them.
Quick Summary
- A get-home bag is a compact kit kept at your workplace or in your vehicle — built specifically for traveling home during an emergency
- It’s not a bug-out bag — it’s lighter (under 15 lbs), simpler, and designed for less than 24 hours of travel
- Core categories: water, food, navigation, first aid, lighting, power, clothing, and basic shelter
- Your specific commute distance, terrain, and climate should drive every gear decision
- Rotate perishable items (food, water, batteries, medications) every 6 months
- The best GHB is one you actually keep with you — don’t overbuild it
Why Your Get-Home Bag Isn’t a Bug-Out Bag
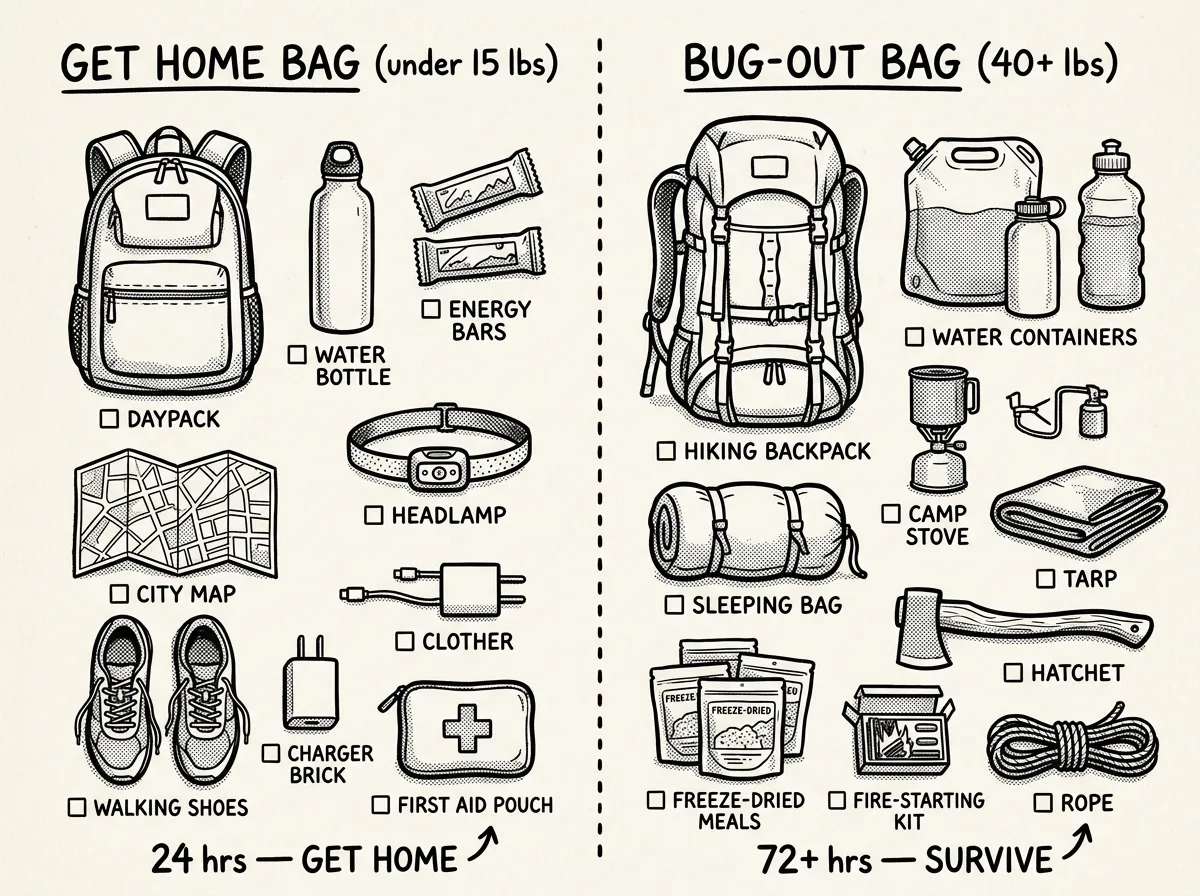 Side-by-side comparison: lightweight get-home bag vs. heavy bug-out bag
This is where most people go wrong. They see “survival bag” and start packing for the apocalypse. A bug-out bag sustains you for 72+ hours when you’re leaving home. A get-home bag has one narrow mission: bridge the gap between where you are and where your family, supplies, and real plans are waiting.
Your get-home bag isn’t about surviving in the wilderness. It’s about covering ground efficiently when normal transportation fails.
Think about your actual commute. Maybe it’s 15 miles of suburban roads. Maybe it’s a 30-mile highway stretch through rural terrain. Either way, you’re looking at a walk of roughly 5-10 hours for most commuters — not days. That reframes everything you pack.
Here’s the practical math that matters:
If your commute is 20 miles, you’re looking at roughly 7 hours of walking. That’s a long day, not a survival ordeal. Pack accordingly.
Best Get Home Bag Backpacks
Don’t overthink the bag itself, but don’t ignore it either. You need something that looks unremarkable, sits comfortably under a desk or behind a car seat, and distributes weight across your hips and shoulders for miles of walking. That means a real backpack — not a duffel, not a messenger bag, not a sling pack.
The sweet spot is 20-30 liters. Under 20L forces painful cuts to essential gear. Over 30L tempts you into overpacking, which is the fastest way to turn a manageable walk into a death march. Skip anything that screams “tactical” — MOLLE webbing and camo patterns draw attention you don’t want during a crisis.
Features that actually matter: padded shoulder straps, a sternum strap, and ideally a hip belt if your commute exceeds 15 miles. Here are three options at different price points:
Budget ($35-50): Teton Sports Oasis 1100. A solid 18L hydration pack with room for gear. Comfortable straps, low profile, and includes a 2-liter bladder. Perfect for commutes under 15 miles where you want to keep things minimal.
Mid-range ($90-120): 5.11 Rush 12 2.0. This 24-liter pack is built with bombproof construction and doesn’t look military if you grab it in black or storm gray. It offers an excellent hip belt and compartment organization.
Premium ultralight ($110-150): Mystery Ranch In and Out. At 19L, this packable daypack punches way above its weight class for comfort. If your GHB lives in your car and you want something that rides well for long distances, this is hard to beat.
One important note: if your bag lives in your car, you can go slightly larger since you’re not carrying it daily. An office-stored bag should be more compact since desk space is limited. Either way, the bag is the least important decision compared to what goes inside.
Get Home Bag Essentials: The Core Categories
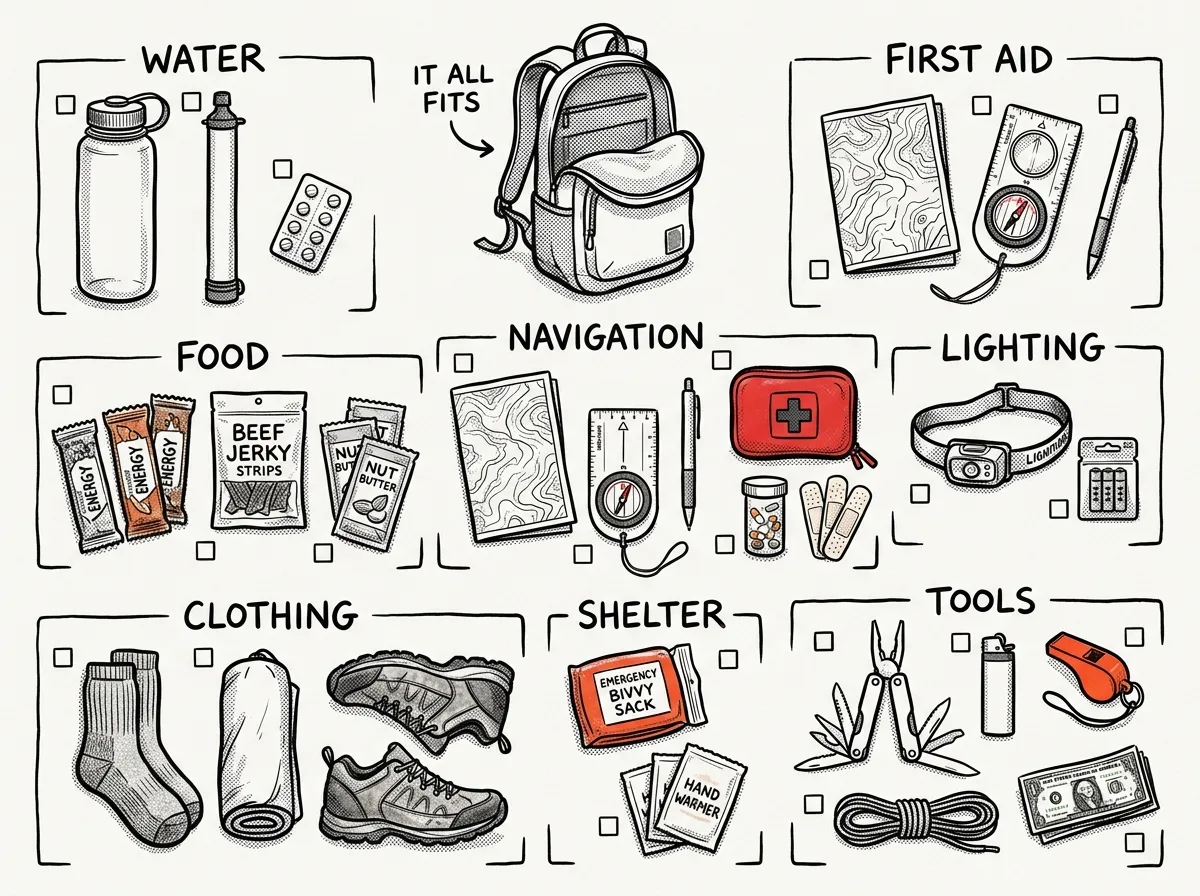 Complete get-home bag essentials organized by category
Let’s break this down by function, not by gear fantasy.
Water
You need water. Period. Don’t rationalize this one away because your commute “isn’t that far.” Dehydration crushes your decision-making long before it threatens your life, and walking 15+ miles in heat without water is genuinely dangerous.
Carry at least one liter of water. Two 500ml bottles is a practical way to split that load. If your get home bag for car storage is the plan, sealed emergency water pouches (like Datrex or SOS brand) handle temperature extremes far better than regular bottles — they’re rated for storage up to 149°F, which matters if you’re in Phoenix or Houston.
Add a few electrolyte packets (Liquid IV or LMNT) to your bag. When you’re walking miles in stress and heat, plain water isn’t enough. They weigh nothing and can prevent cramping that slows you down.
Should you carry a water filter? If your commute crosses any creeks, rivers, or parks where you could access water — yes. The Sawyer Squeeze (around $30) is a solid choice. Per the manufacturer’s specifications, it filters up to 100,000 gallons, weighs 3 ounces, and threads onto any standard water bottle. If your commute is entirely urban, a few purification tablets weigh almost nothing and serve as backup.
Food
You’re not packing meals. You’re packing fuel. The goal is enough calories to keep you moving for one hard day — roughly 1,500-2,000 calories.
Here’s what actually works:
- 3-4 energy or protein bars (Clif, Kind, or similar)
- 2 tuna or chicken foil pouches
- Individual nut butter packets (Justin’s or similar)
- Small bag of trail mix or mixed nuts
- 2-3 electrolyte packets
- Optional: instant coffee packet or caffeine pills
It’s common to overpack food and underpack water. That’s backwards. Food is secondary to hydration for a single-day effort. Pack calorie-dense, lightweight options that don’t need cooking or utensils. Tuna pouches with a small tortilla is a surprisingly solid trail meal that weighs almost nothing.
Bars stored in hot car trunks for extended periods can degrade — chocolate coatings tend to melt and separate, while options with oat- and honey-based binding generally hold up better to heat. If your bag lives in a hot car, choose bars accordingly.
Rotate your food every 6 months by setting a calendar reminder. A protein bar that’s been baking in a trunk for 18 months is a special kind of miserable.
Navigation and Communication
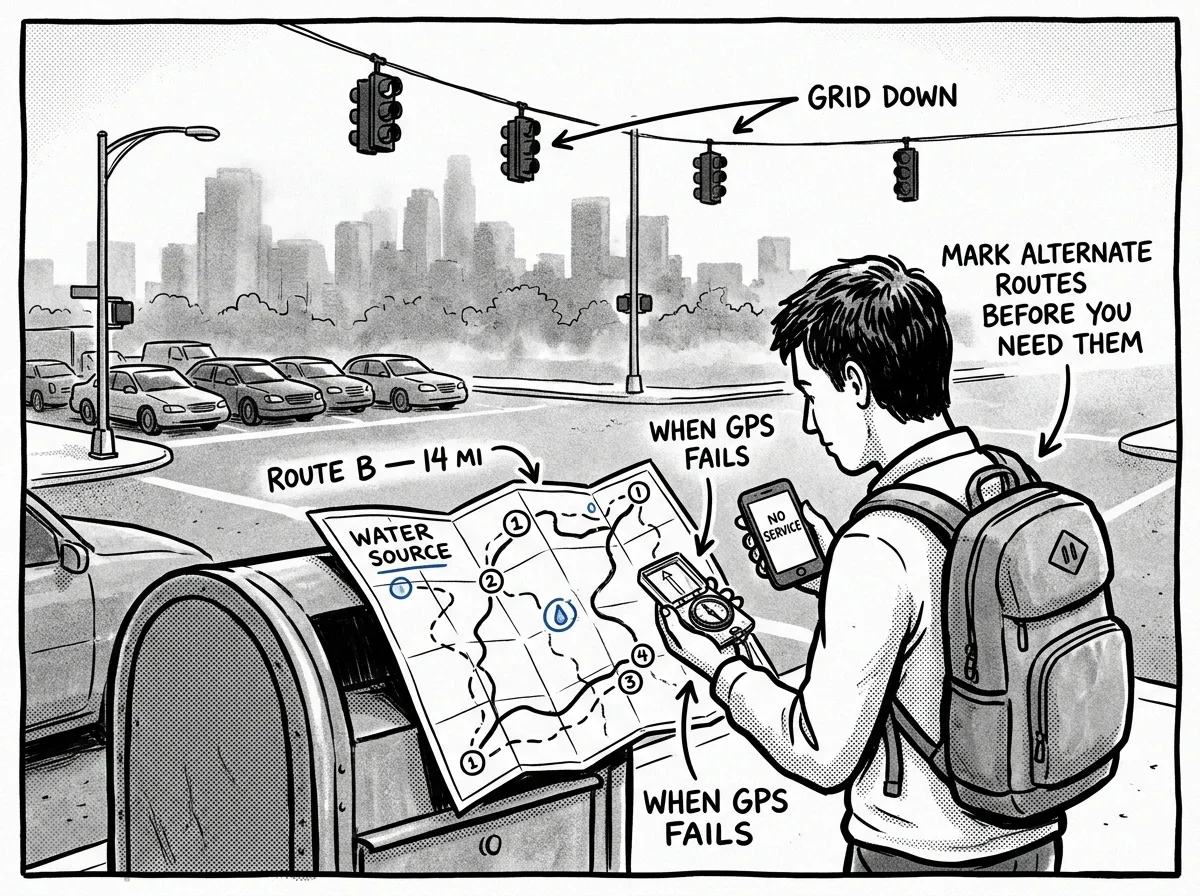 Navigating a foot route home through the city when GPS is down
Your phone might work. It also might not. Cell towers get overwhelmed during major events, and your battery won’t last if you’re using GPS navigation for 7 hours of walking.
It’s 2:30 PM on a Tuesday when a major earthquake hits your metro area. Cell service is jammed. Traffic lights are out. Your GPS app won’t load. Your usual 25-minute drive home is now a 6-hour walk through suburban streets you normally cruise past at 45 mph. Do you actually know the route on foot?
Here’s what you need:
A physical map of your route home. Print a detailed street-level map covering your commute corridor. Plan two or three alternate routes and mark them clearly. Here’s what most people miss: foot routes differ from driving routes. As a pedestrian, you can cut through parks, use bike paths, cross railroad tracks, and take shortcuts through neighborhoods that cars can’t access. Mark your paper map with safe waypoints — 24-hour businesses, public buildings, hospitals, fire stations, and known water sources like public parks with fountains. Laminate it or seal it in a ziplock.
Download offline maps. Before you need them, download offline map tiles for your commute corridor in Google Maps or OsmAnd. This gives you a middle ground between paper maps and live GPS — your phone can display your position using GPS satellites even without cell service, as long as the map data is stored locally.
A compass. Even a cheap button compass gives you directional reference when streets stop making sense. If you want to go deeper on navigation fundamentals, it’s worth learning before you need them.
A battery bank. Conserve your phone battery for communication, not navigation. An Anker 10,000mAh power bank (around $20) with a charging cable gives you 2-3 full phone charges and weighs about half a pound. Don’t worry about solar panels — you should be home before a solar charger earns its weight.
A hand-crank or battery-powered AM/FM radio. This is how you’ll get actual information during widespread emergencies. NOAA weather radio capability is a plus. Check out recommendations for emergency radios if you want specifics.
Cash. Keep $50-100 in small bills ($1s, $5s, $10s). When card readers are down, cash still works.
Radios and communication gear are a common point of debate for GHBs. Unless a group has pre-arranged radio protocols, a handheld ham radio is generally unnecessary weight in a get-home bag. A $15 AM/FM radio provides news and weather. A phone — kept charged with a battery bank — handles everything else. Handheld ham radios like the Baofeng are better suited to a bug-out bag, where there’s time to use them properly.
First Aid and Medications
You’re not building a trauma hospital. You’re preventing the small things that stop you from walking — blisters, headaches, chafing, allergic reactions — and carrying the basics to handle a serious cut or wound until you can get real help.
Blister prevention and mobility-sustaining care matter more than dramatic trauma gear in a GHB — because in real emergencies, it’s the mundane injuries that stop people. Five miles into a forced march in work clothes, your thighs and feet will tell you everything you need to know about friction.
- Adhesive bandages (assorted sizes)
- Moleskin or blister patches — critical
- Ibuprofen and acetaminophen
- Anti-diarrheal medication (Imodium)
- Antihistamine (Benadryl)
- Personal prescription medications (3-day supply)
- Gauze pads and medical tape
- Small tube of antibiotic ointment
- Chest seal or Israeli bandage (if trained to use them)
- Nitrile gloves (2 pairs)
- Anti-chafing balm or body powder
Prescription medications deserve special attention. If you take daily meds, keep a 3-day rotating supply in your bag. Check expiration dates when you do your 6-month rotation.
Lighting
You might start walking in daylight and finish in darkness. Even if your math says you’ll be home by sunset, delays happen. Detours happen.
A headlamp is non-negotiable. Both hands free, light where you look. The Petzl Tikkina (around $25) runs for 60+ hours on low and weighs 3 ounces. Throw in a small keychain flashlight as backup. That’s it — don’t overthink this one.
Clothing and Footwear
If you work in business casual, a suit, or dress shoes, you’ve got a problem. Nobody walks 15 miles in loafers.
Footwear: Keep a pair of broken-in walking shoes or lightweight hiking shoes in your bag or car. This is the single most important item in your entire get-home bag. I’m not exaggerating. Bad shoes on a long walk create blisters that turn a 6-hour walk into a 12-hour ordeal — or stop you entirely.
Socks: A pair of dry, moisture-wicking socks. Wool-blend hiking socks are ideal. Cotton kills comfort over distance.
Layers: Pack based on your climate and season. At minimum:
- A lightweight rain jacket (even a $5 frogg toggs poncho works)
- A warm mid-layer if you’re anywhere that gets cold (fleece pullover or packable down)
- If you’re in the humid Gulf Coast or Southeast, skip the heavy insulation and focus on rain protection and sun coverage
Hat and gloves: A beanie and lightweight gloves from October through April if you’re anywhere in the northern half of the country.
Keep a bandana or buff in your bag. It works as sun protection, dust mask, sweat rag, water pre-filter, sling, and tourniquet improvisation. One item, dozens of uses.
Hygiene and Personal Documents
This category gets overlooked, but it matters more than you’d think on a multi-hour walk.
- Wet wipes (individually wrapped travel packs)
- Hand sanitizer (small bottle)
- Toilet paper (half a roll, compressed in a ziplock)
- Ziplock bags for waste disposal
- Photocopies of your driver’s license, insurance cards, and emergency contact list — don’t rely on your phone having battery when you need to identify yourself
- Written family communication plan — where to meet if you can’t reach each other by phone
Basic Shelter and Warmth
You shouldn’t need to camp overnight. But “shouldn’t” isn’t “won’t.” Injuries, darkness, extreme weather, or dangerous conditions might force you to stop.
Here’s the critical decision most people never think about: if nightfall catches you 8 miles out with no safe route, sheltering until dawn is smarter than stumbling through unfamiliar territory in the dark. Plan for that possibility even if it’s unlikely.
A compact emergency bivvy (the SOL brand, around $15) and a contractor-grade trash bag cover this category without adding significant weight — the combo weighs under 8 ounces total. The trash bag doubles as a rain poncho, ground sheet, or gear cover. An emergency mylar blanket works too, but the bivvy is more wind-resistant and easier to use.
Before you rely on heavy shelter gear, identify shelter opportunities along your pre-planned routes: gas stations, churches, fire stations, hospitals, highway overpasses, and 24-hour businesses. Knowing where you can shelter means you don’t need to carry shelter for every scenario.
If you’re in the high desert or Mountain West where temperatures swing 40 degrees between afternoon and night, upgrade to a lightweight emergency sleeping bag rather than just a blanket.
Tools and Miscellaneous
Round out your get home bag essentials with a few multi-purpose items:
- Multi-tool or folding knife: A Leatherman Skeletool (around $65) handles 90% of situations. Pliers, blade, screwdriver — done.
- Lighter and/or ferrocerium rod: Fire can signal, warm, and boil water. A standard Bic lighter is reliable and weighs nothing.
- Paracord (25-50 ft): Clothesline, lashing, bootlace replacement, shelter rigging.
- Duct tape: Wrap 10 feet around a pencil or water bottle. Blister treatment, gear repair, improvised everything.
- Small notebook and pen: Write down information when your phone dies. Routes, contact numbers, observations.
- Whistle: Three blasts is universal distress. Costs a dollar. Weighs nothing.
- Sunglasses: Walking west into a setting sun for three hours without eye protection is miserable and potentially dangerous.
Situation-Specific Get Home Bag Add-Ons
Your core kit handles most scenarios, but regional hazards deserve specific additions. These are supplements to your base loadout, not replacements.
Earthquake zones (West Coast, New Madrid, etc.): An N95 mask for dust and debris, leather work gloves for moving rubble or broken glass, and a small pry bar or Wonder Bar for forcing open jammed doors. If you work in a high-rise, these three items could mean the difference between getting out of your building and being stuck.
Wildfire and smoke regions (Pacific Northwest, California, Mountain West): Sealed safety goggles, additional water beyond your baseline, and a wet bandana or proper P100 respirator. Sealed goggles and a 3M half-face respirator are worth keeping in a vehicle from June through October in wildfire-prone regions like the Pacific Northwest.
Severe winter weather (Midwest, Northeast, Mountain passes): Yaktrax or microspikes for traction on ice, chemical hand and toe warmers (4-6 pairs), and a heavier insulation layer like a packable down jacket. A GHB built for July should look different from one built for November — the colder-weather kit will typically run a few pounds heavier due to added insulation and traction gear.
Civil unrest or social disruption: Keep a low profile. Wear plain, unremarkable clothing. Avoid crowds and protest routes. Carry nothing visible that draws attention — no tactical gear, no visible knives, no camo. Your best protection is being forgettable. Plan alternate routes that avoid city centers, government buildings, and major intersections.
Building Your Bag: A Step-by-Step Process
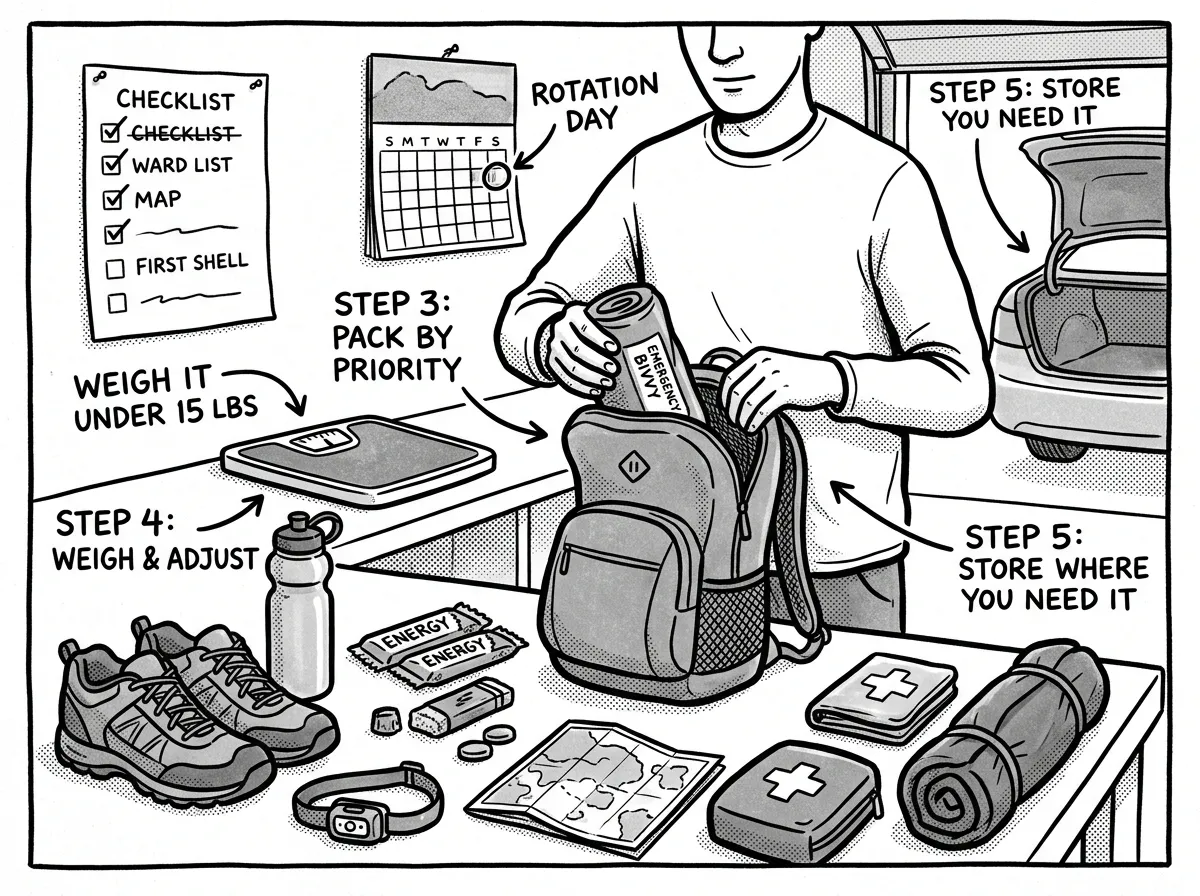 Building your get-home bag on a workbench, step by step
Don’t just throw gear into a pack and shove it under your desk. Build it deliberately.
- Map your commute route on foot — identify 2-3 alternate paths, water sources, and safe rest points
- Choose a bag that fits comfortably and doesn’t attract attention
- Pack your essentials by category, starting with water, navigation, and footwear
- Add personal documents, hygiene items, and situation-specific gear for your region
- Weigh the loaded bag — if it’s over 15 lbs, start cutting
- Walk at least a portion of your route to test the gear and your fitness
- Set a 6-month calendar reminder to rotate food, water, batteries, and medications
That test walk isn’t optional. Walking a full commute route with a loaded GHB in different seasons and conditions often reveals issues that aren’t obvious from a desk: shoes that seemed comfortable can fail well before the halfway point, a rain jacket’s hood can block too much peripheral vision, and water needs in summer heat can run well beyond initial estimates. You won’t know what works until your feet hit pavement.
A common mistake is building the perfect bag and then leaving it in a closet at home. A get-home bag needs to live where it will actually be needed — at a workplace or in a vehicle, with walking shoes stored alongside it. If you take public transit, keep a slimmed-down version in your office. The best gear in the world is useless if it’s 20 miles away at the house you’re trying to reach.
Seasonal and Regional Adjustments
A minimalist get home bag in Seattle looks different from one in Tucson. Adjust yours quarterly:
Hot climates (Southwest, Southeast, Gulf Coast): More water — bump to 2 liters minimum. Sun protection. Electrolytes. Lighter clothing layers. Watch for heat-rated water storage if the bag lives in a hot car.
Cold climates (Northeast, Midwest, Mountain West): Warmer layers. Chemical hand and toe warmers. Higher calorie food. Traction devices if ice is a factor.
Urban commuters: Focus on foot comfort, navigation through city streets, and blending in. A gray backpack draws less attention than a camo MOLLE pack. Your urban get home bag should prioritize being unremarkable.
Rural commuters: Longer distances mean more water, more food, and more attention to weather exposure. A compact emergency shelter becomes more important when there are fewer buildings to duck into.
Get Home Bag Checklist (Printable Summary)
Bookmark or print this consolidated master checklist. Every item mentioned in this article, organized by category:
- 1-2 liters of water (bottles or sealed pouches)
- Sawyer Squeeze filter or purification tablets
- 2-3 electrolyte packets
- 3-4 energy or protein bars
- 2 tuna or chicken foil pouches
- Nut butter packets
- Trail mix or mixed nuts
- Caffeine source (optional)
- Laminated physical map with marked routes
- Button compass
- Battery bank (10,000mAh) and cable
- AM/FM or NOAA weather radio
- $50-100 cash in small bills
- Offline maps downloaded to phone
- Adhesive bandages (assorted)
- Moleskin or blister patches
- Ibuprofen and acetaminophen
- Anti-diarrheal and antihistamine
- Prescription medications (3-day supply)
- Gauze, medical tape, antibiotic ointment
- Nitrile gloves (2 pairs)
- Anti-chafing balm
- Broken-in walking shoes
- Wool-blend hiking socks
- Lightweight rain jacket
- Warm mid-layer (seasonal)
- Beanie and gloves (seasonal)
- Bandana or buff
- Emergency bivvy (SOL brand)
- Contractor-grade trash bag
- Bic lighter
- Multi-tool (Leatherman Skeletool or similar)
- Paracord (25-50 ft)
- Duct tape (10 ft wrapped)
- Headlamp and backup keychain light
- Small notebook and pen
- Whistle
- Sunglasses
- Wet wipes
- Hand sanitizer
- Toilet paper (half roll in ziplock)
- Ziplock waste bags
- Photocopies of ID and insurance
- Written emergency contacts and family plan
Keep It Ready — The Rotation Schedule
Your GHB is only useful if it’s maintained. Gear degrades. Food expires. Batteries die. Medications lose potency.
Every six months — for example, in March and September — open your bag completely. Replace water, rotate food, check battery levels, verify medications haven’t expired, and swap seasonal clothing. It takes 20 minutes. Put it on your calendar right now.
Frequently Asked Questions
What do I need in my get-home bag?
At minimum, you need water (1-2 liters), high-calorie food bars or pouches, a basic first aid kit with your medications, a headlamp, a power bank, comfortable walking shoes, weather-appropriate layers, a physical map of your route home, and cash in small bills. Add a multi-tool, emergency bivvy, and hygiene items to round it out. Everything should fit in a 20-30 liter backpack weighing under 15 pounds.
What food should I pack in a get-home bag?
Focus on shelf-stable, calorie-dense foods that don’t need cooking: energy bars, protein bars, nut butter packets, beef jerky, tuna or chicken foil pouches, and trail mix. You want roughly 1,500-2,000 calories total. Avoid anything that melts, crumbles easily, or requires water to prepare. Rotate your food every 6 months — set a calendar reminder so you don’t forget.
Should I keep water in my get-home bag?
Yes, always. Carry at least one liter and replace it every few months. If your bag lives in a hot car, use sealed emergency water pouches rated for high-heat storage (Datrex or SOS brand handle up to 149°F). Supplement with a compact water filter like the Sawyer Squeeze or purification tablets in case you need to source water during a longer journey. Add electrolyte packets — plain water isn’t enough during hours of stress walking.
What are the 7 essential survival items?
The seven essentials are water, fire, shelter, first aid, navigation, a cutting tool, and signaling. In a get-home bag, these translate to: water bottles plus a filter, a Bic lighter, an emergency bivvy, a compact first aid kit, a physical map with compass, a multi-tool or folding knife, and a whistle. Everything else in your GHB builds on this foundation.
Your Get Home Bag Essentials Are Your Bridge Home
Here’s the reality that drives everything laid out above: during a major emergency, you’re on your own for the first hours. Emergency services are overwhelmed. Traffic is gridlocked or roads are impassable. Your commute — something you do on autopilot every day — suddenly becomes the most important journey of your life.
Your get home bag essentials aren’t about surviving in the wild. They’re about bridging that gap between your workplace and your front door with confidence, comfort, and speed. Keep it light. Keep it practical. Keep it where you can actually reach it.
Start building yours this weekend. Grab a bag, print a map, pack some water and food, and stash a pair of walking shoes. You don’t need to spend $500 or buy everything at once. Start with the basics, test them with an actual walk, and build from there. The day you need this bag, you’ll be walking past the people still staring at their phones — headed home.
The Complete
Prepper's Reference.
149 articles synthesized into one comprehensive PDF — twelve chapters covering water, food, shelter, first aid, comms, and scenario-specific preparedness. Free with your email.
Unsubscribe anytime · We never share your email
You're in. Check your inbox.
Keep Reading
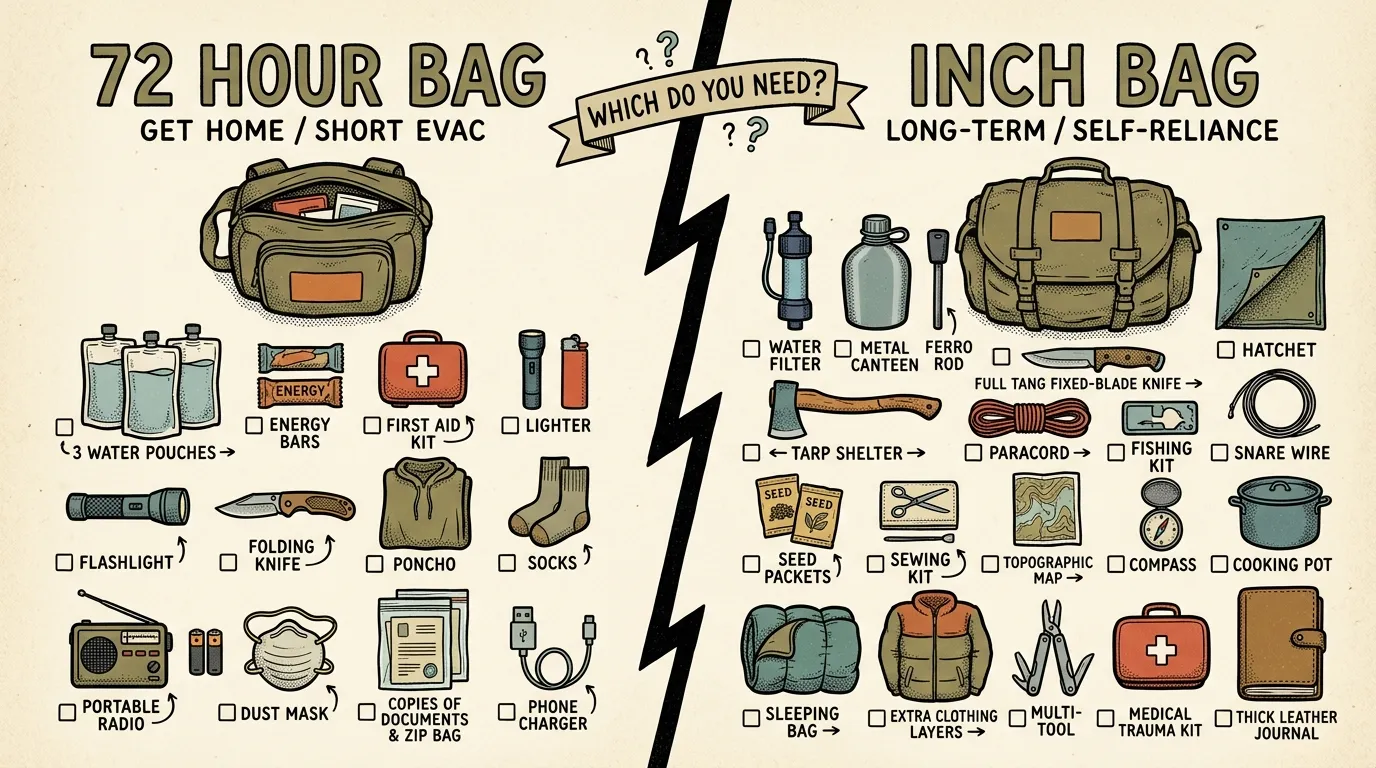
72 Hour Bag vs INCH Bag: Which Do You Need?
72 hour bag vs INCH bag — practical breakdown of temporary evacuation kits vs permanent bug-out setups. Find which matches your real threat profile.
Building Your First Bug-Out Bag: A Preppers' Shopping List
New to prepping? Learn what to pack in a beginner bug-out bag, avoid common mistakes, and shop smart with practical gear suggestions.
Get Out Fast: Bug-Out Bag Essentials
Learn the must-have bug-out bag essentials for new preppers, how to pack smart, avoid rookie mistakes, and stay prepared without overpacking.