A prepper first aid kit should include wound-care basics, medications, protective gear, trauma supplies, and personalized items like prescriptions or allergy medication. It differs from a standard first aid kit because it is designed for longer emergencies, delayed medical help, and the specific needs of your household and environment.
Key Takeaways
- Buy a CAT Gen 7 tourniquet and bleeding-control supplies first — uncontrolled hemorrhage kills in minutes, and nothing else substitutes.
- Customize every kit for your household's prescriptions, allergies, and regional hazards like earthquakes, wildfires, or extreme cold.
- Build separate kits for home, vehicle, and bug-out bag — a single kit sitting in your closet won't help you on the highway.
- Take a free Stop the Bleed course and get CPR/AED certified before you stock a single trauma item — gear without training is expensive dead weight.
- A comprehensive prepper first aid kit costs $175–$385 spread over 2–3 months, starting with just $35–$60 in non-negotiables today.
Prepper First Aid Kit: Complete Checklist & Guide
A prepper first aid kit is the single most important piece of gear you’ll ever build — and it’s the one I see done wrong the most often. After 12+ years responding to emergencies across the Pacific Northwest as a FEMA-trained Wilderness First Responder, I can tell you that the gap between a pharmacy grab-and-go kit and a purpose-built survival first aid kit isn’t subtle. It’s the gap between hoping for the best and actually being ready.
This guide covers everything: what to include, what to leave out, how to budget it in stages, and how to keep it maintained so it works when your hands are shaking.
Quick Summary
- A prepper first aid kit differs from a store-bought kit by emphasizing trauma control, extended supply depth, and personalization for your household’s medical needs.
- Follow the MARCH protocol (Massive hemorrhage → Airway → Respiration → Circulation → Hypothermia) to prioritize what goes in first.
- Build in budget tiers starting at $35–$60 for life-saving non-negotiables, scaling to $175–$385 over 2–3 months.
- Build separate kits for home, vehicle, and bug-out bag — they serve different purposes and live in different places.
- Training matters more than gear. Take a free Stop the Bleed course and get CPR/AED certified before you rely on any trauma item.
- Inspect every 3–6 months and replace expired items the same week — not “eventually.”
What Is a Prepper First Aid Kit?
A prepper first aid kit is a purpose-built emergency medical kit designed for prolonged or austere scenarios where professional medical care may be hours, days, or weeks away. It emphasizes redundancy, trauma-control tools, and personalization for your household’s prescriptions and allergies.
I’ve responded to enough PNW emergencies to see what happens when people crack open those pre-packaged kits from the drugstore. They’re fine for a paper cut at the office. They’re completely inadequate when someone’s bleeding through a gauze pad during a windstorm that’s knocked out roads for three days.
The organizing philosophy behind a real prepper first aid kit is the MARCH protocol — Massive hemorrhage, Airway, Respiration, Circulation, Hypothermia. That’s what FEMA and wilderness medicine courses teach as the framework for layered kit building. Address what kills fastest first, then work your way down to comfort items.
Address what kills fastest first, then work down to comfort items. That’s the entire philosophy.
You’ll want to build kits for different roles: a large home kit, a weather-appropriate car kit, and a lightweight bug-out bag medical kit. Each serves a different purpose and lives in a different place.
Why a Prepper First Aid Kit Matters
During the February 2021 ice storms that hammered the Pacific Northwest, pharmacies in some areas were inaccessible for three to five days. Roads were impassable. Power was out. Hospitals were overwhelmed with hypothermia and fall injuries. The people who fared best had medical supplies already staged at home.
FEMA has long recommended self-sufficiency for at least 72 hours. But in 2024, that recommendation was extended to two weeks for catastrophic events — including the Cascadia Subduction Zone earthquake scenario that seismologists have warned about for decades. If a 9.0 earthquake hits the Pacific Northwest, hospitals in the impact zone won’t function. Period.
A solid first aid kit checklist ensures you can treat common injuries fast and cut the chance of infection. It provides extra medication and supplies when pharmacies are closed or unreachable. And it gives you the tools to stabilize major bleeding, broken bones, and chest trauma until advanced care arrives — if it arrives at all.
How It Differs From a Basic First Aid Kit
A basic kit covers scrapes and headaches. A prepper kit assumes the world outside your door isn’t working normally. Here’s what that means in practice:
- Larger quantities and redundancy for resupply delays measured in days or weeks, not hours.
- Trauma-focused items like a commercial tourniquet, hemostatic dressings, and chest seals.
- Personalized prescriptions and chronic-care supplies for every household member.
- Multiple kits optimized for home, vehicle, and bug-out situations rather than a single general-purpose box.
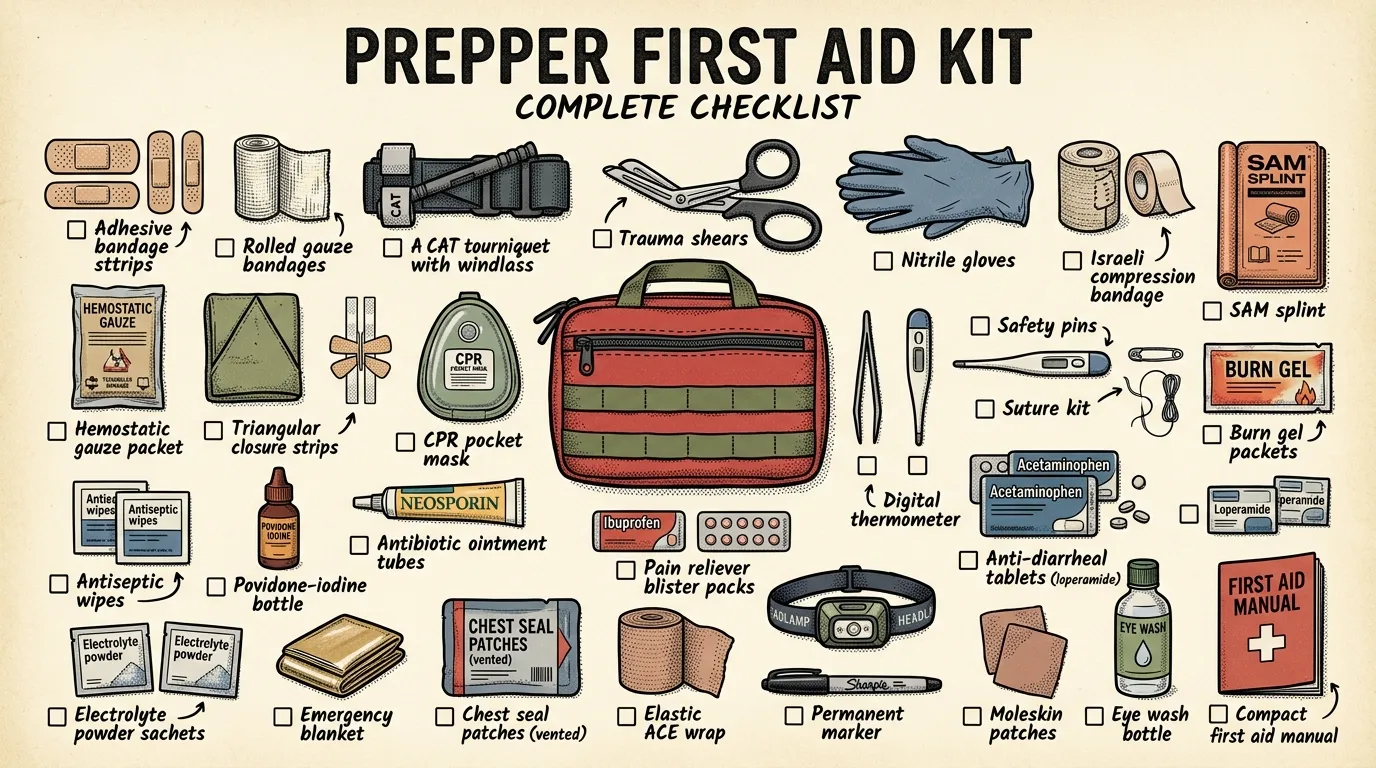
20 Essential Items and Their Uses
 The 20 essential items every prepper first aid kit needs
So what actually goes in this kit? Here are the 20 core items I recommend, listed roughly in MARCH protocol priority:
- CAT Gen 7 tourniquet — stops life-threatening extremity bleeding in seconds when applied correctly.
- Hemostatic gauze (QuikClot Combat Gauze) — packs deep wounds and promotes rapid clotting where a tourniquet can’t be placed.
- Israeli pressure bandage (6-inch) — applies direct pressure to large wounds and secures dressings without extra hands.
- Chest seals (HyFin Vent twin pack) — treats penetrating chest wounds that can cause collapsed lungs.
- Nitrile gloves (box of 100) — protects you and the patient from bloodborne pathogens during any treatment.
- Sterile gauze pads (4×4, pack of 25) — covers and protects wounds during cleaning and dressing.
- Rolled gauze (3-inch, 6 rolls) — secures dressings in place and provides compression for bleeding wounds.
- Medical tape (1-inch cloth) — holds bandages, secures splints, and labels items when needed.
- Adhesive bandages (assorted 50-pack) — covers minor cuts, blisters, and abrasions to prevent infection.
- Antiseptic wipes (BZK-based, 30-pack) — cleans wound edges and surrounding skin to reduce infection risk.
- Antibiotic ointment (triple antibiotic, 1 oz) — provides a protective antimicrobial barrier on minor wounds.
- Trauma shears (7.25-inch) — cuts through clothing, seatbelts, tape, and splinting material quickly.
- SAM splint (36-inch) — immobilizes suspected fractures and joint injuries using a moldable aluminum frame.
- Triangular bandages (pack of 4) — creates slings, secures splints, and serves as improvised wound dressings.
- CPR barrier mask with one-way valve — enables rescue breathing while protecting against fluid transmission.
- Digital thermometer — detects fever indicating infection, a critical early warning sign in austere settings.
- Acetaminophen (100-count, 500 mg) — reduces fever and manages mild to moderate pain without blood-thinning effects.
- Ibuprofen (100-count, 200 mg) — manages pain and inflammation from sprains, strains, and soft-tissue injuries.
- Oral rehydration salts (12-pack) — restores electrolyte balance during dehydration from illness, heat, or exertion.
- Laminated quick-reference first aid cards — provides step-by-step instructions for critical procedures when stress impairs recall.
The CAT Gen 7 tourniquet — around $25–$30 from North American Rescue — is what I carry and what I train with. I’ve tested knockoffs that cost $8 on marketplace sites, and I’ve watched the windlass bend under pressure during training scenarios. This isn’t the place to save money. Buy from a verified seller, learn to apply it one-handed, and practice until you can do it in under 30 seconds with your eyes closed. I’ve watched trained responders freeze on tourniquet application after just 18 months without a refresher.
What NOT to Put in Your Kit
This section might save you more money — and prevent more harm — than any gear list. I’ve personally opened donated prepper kits containing suction snakebite devices, expired epinephrine, and tourniquets that snapped during testing. These aren’t edge cases. They’re common.
Expired Medications
Medications lose efficacy past their expiration dates, and some — like tetracycline antibiotics — can become actively harmful. I’ve seen kits with ibuprofen bottles dated four years prior. If you wouldn’t take it at home, don’t trust it in an emergency.
Suction-Type Snakebite Kits
The evidence is clear and has been for over a decade: mechanical suction devices don’t extract clinically meaningful amounts of venom. The Annals of Emergency Medicine published definitive research showing they’re ineffective. Worse, they delay the only treatment that matters — immobilization and evacuation. Leave them at the store.
Cheap Knockoff Tourniquets
In my WFR training and field deployments, I’ve seen improvised and knockoff tourniquets fail under real bleeding pressure. The windlass bends. The strap slips. The buckle breaks. A CAT Gen 7 or SOF-T Wide is the minimum standard. If it costs $8 on a marketplace site, it’s counterfeit.
Surgical Instruments Beyond Your Training
Scalpels, suture kits, and needle decompression supplies look impressive in a kit. But without proper training, they cause more damage than they prevent. A suture placed incorrectly seals bacteria inside a wound. A needle decompression performed on the wrong intercostal space can lacerate a lung. Stock to your skill level, not your ambition.
Items That Waste Space
Single-use instant hand warmers expire faster than you’d think and take up significant volume. Tiny alcohol prep pads — the ones that come in pre-built kits by the dozen — evaporate on contact and don’t clean anything meaningfully. Carry BZK-based antiseptic wipes instead. Butterfly closures sound useful but perform poorly on anything beyond the most superficial cuts; wound closure strips like Steri-Strips do the job better.
Scenario-Specific Kit Modifications
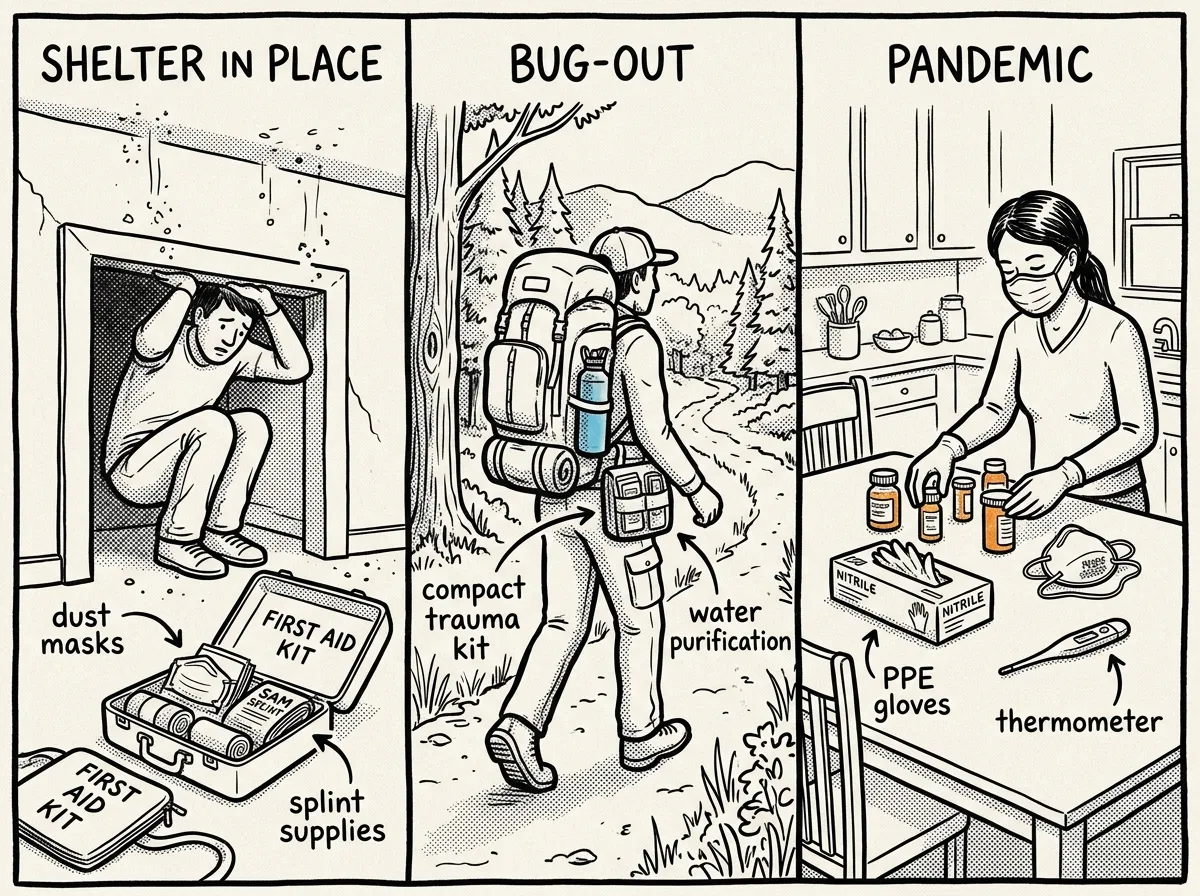 Three different emergency scenarios require three different kit loadouts
Your base kit handles the fundamentals. But specific scenarios demand specific additions. Here are three I plan for regularly in the Pacific Northwest.
Natural Disaster: Earthquake and Sheltering in Place
The Cascadia Subduction Zone is my regional reality. If a major earthquake hits, I’m planning for structural collapse injuries, severed utilities, and no hospital access for one to two weeks.
- Extra wound irrigation supplies — at least 1 liter of sterile saline plus a 60 mL syringe, because dust and debris contamination makes infection almost guaranteed.
- Heavy-duty splinting materials — additional SAM splints and cravats for crush injuries and fractures from falling structures.
- Dust masks (N95 or KN95, 10-pack) — concrete dust and particulate matter after building collapse causes significant respiratory damage.
- Large-volume hemostatic gauze — additional packs beyond your base kit, because crush injuries and lacerations from debris generate heavy bleeding.
- Written triage reference cards — when multiple people are injured simultaneously, you need a system to prioritize care.
Wilderness Evacuation and Bug-Out
When I’m building a bug-out bag first aid kit, every ounce matters. I strip my base kit to the essentials and add items specific to movement over rough terrain.
- Moleskin and blister care — foot problems end evacuations. A $7 pack prevents a mission-ending problem.
- Compressed gauze instead of standard rolls — same material, half the volume.
- Hypothermia management — emergency mylar blankets and chemical hand warmers, because PNW nights drop fast even in summer.
- Water purification tablets — clean water doubles as wound irrigation when saline isn’t available.
- SAM splint (full 36-inch) — worth the weight for ankle and wrist immobilization on uneven terrain. Check our guide on wildfire evacuation preparedness for more on PNW-specific planning.
Pandemic and Extended Quarantine
COVID taught everyone this lesson. A pandemic scenario shifts your kit from trauma-heavy to infection-control and chronic care.
- Extended PPE supply — 50+ surgical masks, additional boxes of nitrile gloves, and eye protection (safety glasses or face shields).
- Pulse oximeter — monitors blood oxygen levels to detect respiratory decline before it becomes critical.
- Expanded OTC medication stock — fever reducers, decongestants, and throat lozenges for a full household over two to four weeks.
- Thermometer with backup — temperature screening becomes a daily routine; have a spare.
- Sanitation supplies — hand sanitizer (60%+ alcohol), disinfectant wipes, and knowledge of DIY natural disinfectants when commercial products run out.
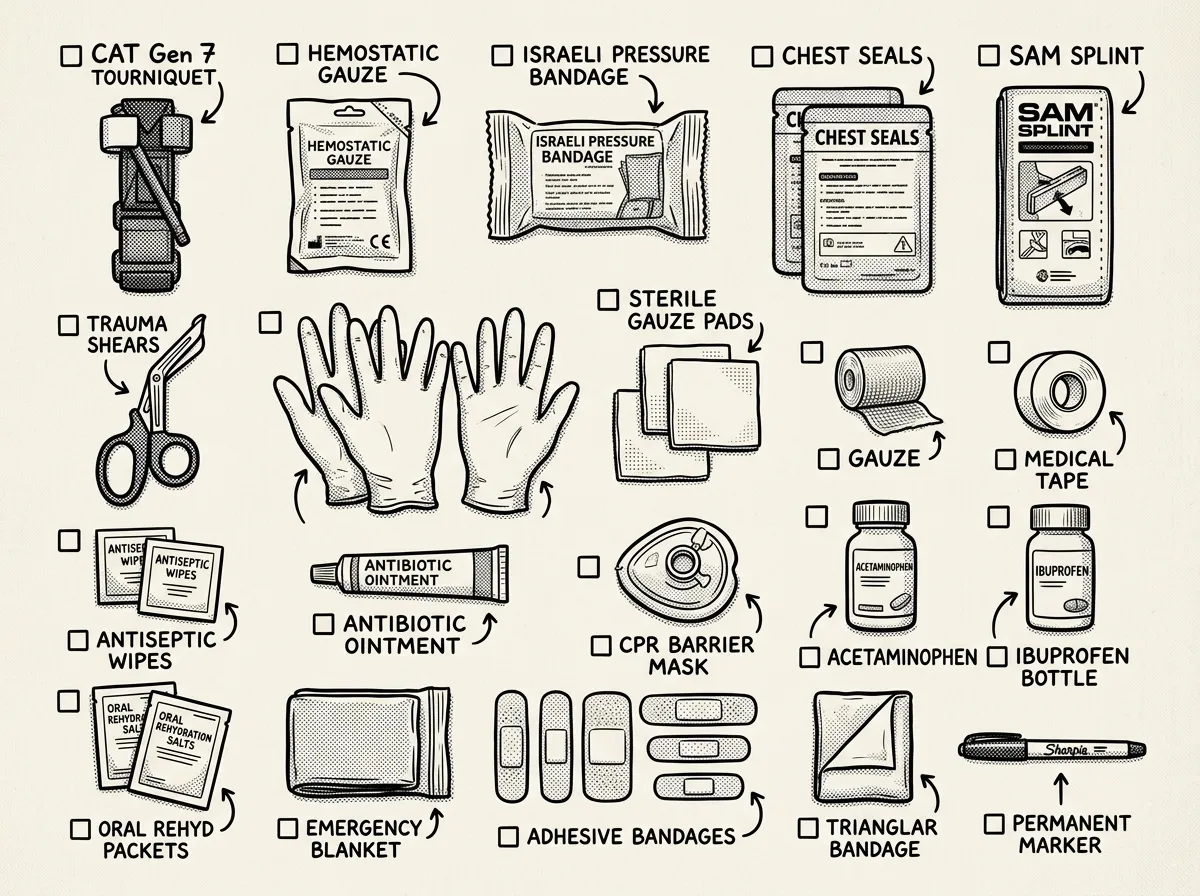
The Complete Checklist
- CAT Gen 7 or SOF-T Wide tourniquet (x2)
- Hemostatic gauze, vacuum-sealed (x2 packs)
- Israeli pressure bandage, 6-inch (x2)
- HyFin Vent chest seals, twin pack
- Adhesive bandages, assorted (50-pack)
- Sterile gauze pads, 4×4 (25-pack)
- Rolled gauze, 3-inch (6 rolls)
- Elastic (ACE) bandages, 4-inch (x2)
- Medical tape, 1-inch cloth (x2 rolls)
- Antiseptic wipes, BZK-based (30-pack)
- Antibiotic ointment, 1 oz tube
- Burn dressings or hydrogel (x3)
- Wound closure strips (Steri-Strips)
- Nitrile gloves, box of 100
- CPR barrier mask with one-way valve
- Trauma shears, 7.25-inch
- Tweezers, splinter-grade
- SAM splint, 36-inch
- Triangular bandages (4-pack)
- Digital thermometer
- Instant cold packs (x4)
- Acetaminophen, 500 mg (100-count)
- Ibuprofen, 200 mg (100-count)
- Oral antihistamines — diphenhydramine (50-count)
- Anti-diarrheal — loperamide (24-count)
- Oral rehydration salts (12-pack)
- Saline solution for irrigation (500 mL)
- Personal prescriptions (minimum 14-day supply)
- Pediatric dosing tools and medications (if applicable)
- Emergency contact list and medication information
- Laminated quick-reference first aid cards
- Flashlight or headlamp with spare batteries
- Waterproof storage container or bag
For flashlight recommendations, see our guide on best survival flashlights for your emergency kit.
Customize Your Kit for Your Household
Personal and Family Medical Needs
A prepper first aid kit for a family of four looks very different from a solo kit. Include spare prescription medications, inhalers, EpiPens if prescribed, and diabetic supplies for every member who needs them. Pack pediatric dosing syringes and child-appropriate formulations of acetaminophen and ibuprofen.
Don’t forget mobility aids or extra supplies for elderly household members. Talk with your pharmacist about emergency refill options — many will authorize a 90-day supply for documented preparedness planning.
Allergies, Sensitivities, and Environment
Use latex-free gloves and hypoallergenic tape when anyone in the household has sensitivities. Adjust meds and supplies for your specific environment. If you’re in a hot, humid Gulf Coast climate, prioritize hydration, sunburn care, and heat-illness treatment. In cold climates — the PNW gets brutally cold at elevation — add emergency blankets and supplies for cold-exposure management. In areas with venomous snakes or insects, carry extra oral antihistamines and know that immobilization — not suction — is the correct snakebite protocol.
Build Kits by Location and Purpose
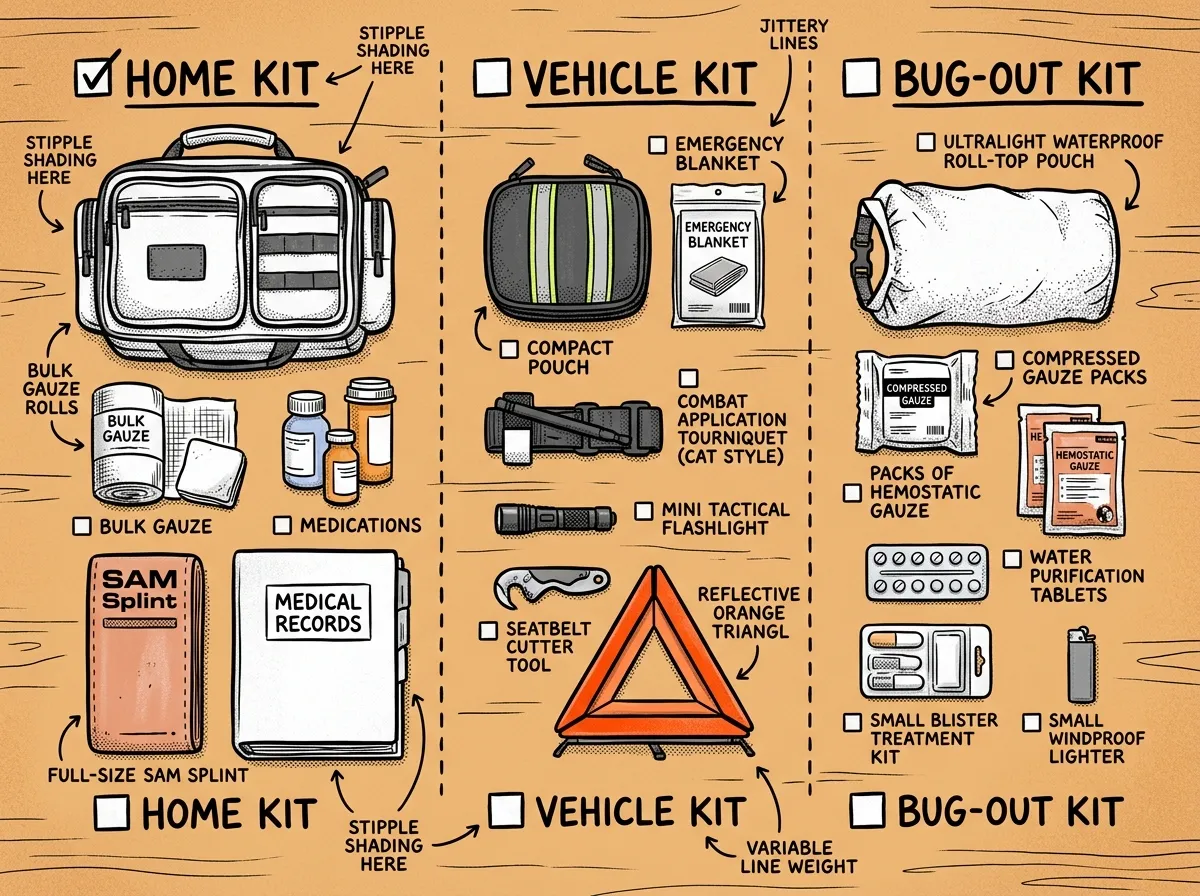 Home, vehicle, and bug-out kits serve different purposes
- Home: Most complete and largest. This is your primary medical station.
- Car: Compact, weather-resistant container. Account for temperature extremes that degrade medications.
- Bug-out bag: Lightweight, prioritized for portability and the MARCH protocol.
- Workplace or school: Match local policies and occupant needs. Keep it locked but accessible.
Urban vs. Rural: Tailoring Your Kit by Location
Your location changes your kit fundamentally. Here’s how I think about it.
Urban-specific priorities:
- Glass and crush injuries from structural damage. Stock extra burn dressings, eye wash (minimum 4 oz), and heavy-duty trauma shears that cut denim.
- Space constraints are real. Use stackable, labeled containers — I like the Plano 3700 series, around $8–$15 per tray — and keep your primary kit under 14” × 10” × 8”.
- Sanitation in compromised water systems. Double your antiseptic wipe stock, add extra nitrile gloves, and learn to make your own disinfectants as backup.
- Crowd-related injuries. Pepper spray exposure treatment (saline flush), blunt-force trauma supplies, and extra cold packs.
Rural-specific priorities:
- Extended time to definitive care. When the nearest hospital is 60+ minutes by car, your kit needs to sustain care over days. Stock wound irrigation supplies in volume, extra splinting material, and enough gauze to re-dress wounds repeatedly.
- Environmental and animal injuries. Deep lacerations from tools and barbed wire, puncture wounds from livestock. Extra hemostatic gauze, wound closure strips, and large abdominal pads.
- Space advantage. Build a comprehensive home medical station with a dedicated cabinet and clearly zoned sections for trauma, wound care, medications, and PPE.
Budget Breakdown: Build in Stages
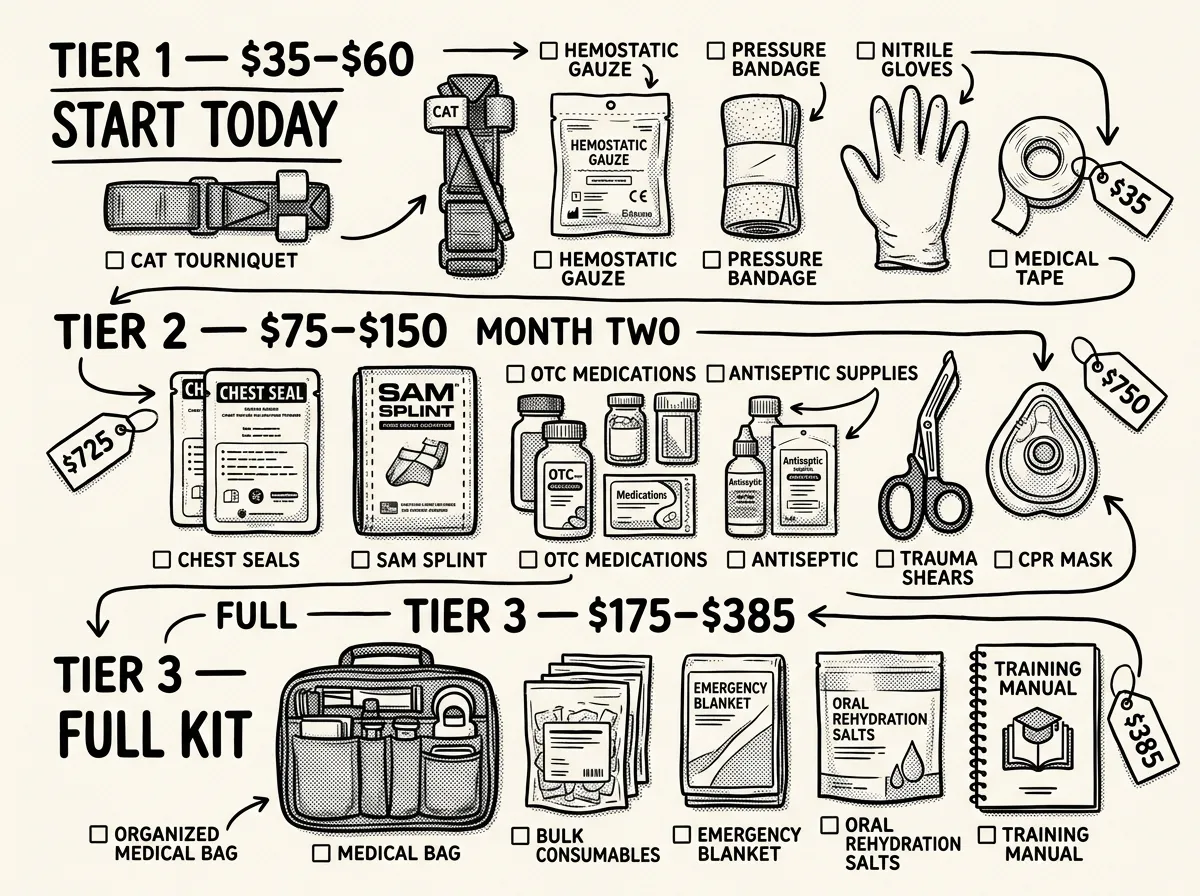 Build your kit in three budget tiers from $35 to $385
How much does this actually cost? Preparedness content loves to recommend $500 kits. Most people can’t swing that all at once. Here’s how I recommend building in priority tiers.
Tier 1: Non-Negotiables ($35–$60) — Buy these today.
- CAT Gen 7 or SOF-T Wide tourniquet: $25–$30
- Nitrile gloves, box of 100: $7–$10
- Basic wound care bundle (bandages, gauze, tape, antiseptic wipes): $10–$15
- Acetaminophen and ibuprofen: $5–$8
The tourniquet comes first because uncontrolled bleeding kills in minutes and nothing else substitutes for it.
Tier 2: Functional Depth ($40–$75) — Add within the first month.
- Hemostatic gauze (QuikClot or Celox): $12–$18
- Pressure dressing (Israeli bandage or OLAES): $8–$12
- Trauma shears: $6–$10
- SAM splint: $8–$12
- Oral rehydration salts (10-pack): $6–$8
- Antihistamines and anti-diarrheal: $8–$12
- CPR barrier mask: $5–$8
Tier 3: Resilience and Redundancy ($50–$100) — Months two and three.
- Chest seal (twin pack, vented): $12–$16
- Second tourniquet: $25–$30
- Digital thermometer: $6–$10
- Burn dressings or hydrogel: $8–$12
- Triangular bandages (pack of 4): $5–$8
- Waterproof storage container: $10–$20
Tier 4: Customization ($50–$150+) — Ongoing.
- Extra prescription medications (90-day supply)
- Pediatric-specific tools and medications
- Regional additions (wildfire smoke N95s, hypothermia wraps, altitude meds)
- Training courses (Stop the Bleed: often free; Wilderness First Aid: around $200–$350)
Total for a comprehensive emergency first aid kit: $175–$385 spread over two to three months. That’s less than most households spend on streaming subscriptions in the same period.
Buy gauze, gloves, and OTC meds from warehouse clubs or bulk medical suppliers like Dynarex. Avoid “tactical” branding on commodity items — black-packaged gauze isn’t better gauze. But never cheap out on tourniquets or hemostatic agents.
A Decision Framework for Every Purchase
Without a framework, you’ll either overbuy junk or underbuy what matters. Here are five criteria I use for every purchase, in order of priority:
- Skill match. Every item should correspond to a skill you possess or are actively learning. A $25 tourniquet in trained hands beats a $300 suture set you watched a YouTube video about.
- Likelihood of use. Sprained ankles, cuts, burns, and GI distress happen far more often than gunshot wounds. Stock deep on the boring stuff first.
- Failure consequences. A missing tourniquet during arterial bleeding is fatal. A missing blister pad is uncomfortable. Prioritize where absence means permanent harm.
- Shelf life and durability. When choosing between equivalents, pick longer shelf life and better packaging. SAM splints last essentially forever; hemostatic gauze expires.
- Weight and volume trade-offs. Matters less for a home kit, enormously for a bug-out bag. Compressed gauze does the same job in half the volume.
My rule of thumb: if an item fails three or more of these criteria, it stays on the shelf.
Pre-built vs. custom build? Buy a mid-range pre-built kit (around $30–$80) as a foundation, then supplement with quality trauma gear and personal medications. You’ll spend roughly 30% less than buying every component individually while still getting a tailored result. For deeper context on foundational skills, check out our emergency first aid basics guide.
Maintenance, Storage, and Training
A kit’s only useful when it’s maintained and its users are trained. I rotate my own kits quarterly and tag each item with the date opened. The first time I did a full audit after letting a kit sit for about 18 months, I found the antibiotic ointment had separated, two OTC bottles were six months expired, and the flashlight batteries were dead. That was the last time I let an inspection slide.
Maintenance Schedule
- Open every kit and check each item against your master checklist — note anything used, damaged, or missing.
- Check expiration dates on all medications, hemostatic gauze, and ointments — replace that same week, not “eventually.”
- Inspect packaging for moisture damage, especially in vehicle kits exposed to temperature swings.
- Test flashlights and headlamps — replace batteries on a fixed schedule regardless of whether they “still work.”
- Update the kit for any changes in your household — new prescriptions, a new family member, or a change in your regional risk profile.
Smart Storage and Organization
Store kits in an accessible, cool, dry location. Label containers and use clear pouches or color-coded compartments — red for trauma, blue for medications, green for wound care. Keep medications out of children’s reach but accessible to trained adults. Avoid long-term storage of temperature-sensitive medications in vehicles, especially in summer. If you’re in the high desert Southwest, your car kit needs extra attention — interior temperatures can hit 150°F and destroy medications in hours.
Training: The Most Important Supply You Own
Gear without training is just expensive dead weight. Here are the specific courses I recommend:
- CPR/AED certification — American Red Cross or American Heart Association. Recertify every 2 years. Cost: around $25–$80.
- Stop the Bleed — stopthebleed.org. Often completely free, offered at hospitals and fire stations. This teaches tourniquet application, wound packing, and pressure dressings. Take it annually.
- Wilderness First Aid (WFA) — NOLS or similar providers. A 16-hour course that dramatically expands your capability for around $200–$350.
- Wilderness First Responder (WFR) — For serious preppers. An 80-hour intensive that I hold and recertify every two years. It’s the gold standard for non-physician emergency care in austere environments.
I recertify my WFR credential every two years and retake Stop the Bleed annually. Skills degrade without practice. Schedule the training before you need it.
Beyond 72 Hours: Extending Your Kit for 1–2 Weeks
Most preparedness advice fixates on the 72-hour window. FEMA’s updated guidance for catastrophic events now recommends two weeks of self-sufficiency. If you’re planning for a Cascadia earthquake or prolonged infrastructure failure, your prepper medical supplies need to scale accordingly.
The Math Changes Dramatically
Think about it this way. A wound managed for 10 days needs 20–30 gauze pads, fresh tape daily, and ongoing antiseptic supplies. Multiply by people and simultaneous injuries. OTC medication for one person with moderate fever burns through 12–16 doses of acetaminophen in four days. A family of four over two weeks needs 200+ tablets of combined pain relievers. Nitrile gloves at 2–4 pairs per day of active wound care: 28–56 pairs per patient over two weeks. The numbers add up fast.
Supplies That Become Critical After Day Three
Power’s been out for five days. A family member cut their forearm on broken glass during the initial shaking, and you’ve been redressing the wound twice daily. You’re down to your last three gauze pads, the saline bottle is empty, and the wound edges are looking red and warm. The nearest open pharmacy is a 90-minute drive through roads you’re not sure are passable. This is exactly the scenario a 2-week kit is designed to handle.
- Wound irrigation in volume. Stock at least 1 liter of sterile saline plus a 60 mL irrigation syringe. Pair with a long-term water storage system for backup. Wound infection is the number-one threat in extended scenarios.
- Oral rehydration at scale. Budget 2–3 ORS packets per person per day of illness. For a two-week window, 40–50 packets for a family of four isn’t excessive.
- Expanded medication supply. Full courses of any prescribed antibiotics your doctor will authorize, antifungal cream, and electrolyte supplements. Nutrition directly affects immune function and wound healing.
- Moleskin and foot care. Blisters become infected. Infected feet become immobilizing. A $7 pack of moleskin is worth its weight by day five.
One thing I see constantly in prepper communities: people stockpile trauma gear but completely ignore the boring stuff that actually matters past day three. I’ve run multi-day field exercises where the number-one medical complaint wasn’t lacerations or fractures — it was blisters, GI distress, and headaches from dehydration. Stock deep on gauze, ORS packets, ibuprofen, and moleskin. The mundane stuff keeps you functional when the adrenaline’s long gone.
Mental Health Support
This isn’t soft — it’s survival medicine. Two weeks of sustained crisis breaks people psychologically, and prolonged stress suppresses immune response, making wound care even more critical. Include a familiar comfort item for each child (a small toy, a favorite book). Pack a laminated card with basic grounding techniques: 5-4-3-2-1 sensory exercise, box breathing instructions, and a simple journaling prompt. For adults, a deck of cards or a paperback book provides normalcy that keeps people functional.
A 2-week kit requires more frequent rotation of consumables than a standard 72-hour setup. Set quarterly calendar reminders rather than semi-annual ones, and tag every item with its open date so nothing slips through.
Your Action Plan: Start This Week
Preparedness is competence, not panic. Every item in your prepper first aid kit exists to buy time, reduce suffering, and keep a manageable situation from becoming a fatal one. Here’s what to do right now:
- Inventory what you have today. Open every kit in your house and check expiration dates. You’ll probably be surprised by what’s expired or missing.
- Buy Tier 1 non-negotiables this week — a quality tourniquet, gloves, basic wound care, and OTC pain relievers. That’s $35–$60 and it covers the items that save lives.
- Register for a free Stop the Bleed course at stopthebleed.org. Many hospitals and fire stations offer them monthly.
- Build Tiers 2–4 over the next 60–90 days. Spread the cost. Set calendar reminders.
- Set a recurring quarterly inspection on your calendar — not a vague intention, an actual appointment with a reminder.
I’ve been building, testing, and deploying these kits for over a decade across the Pacific Northwest. The people who do well in emergencies aren’t the ones with the most gear — they’re the ones who built the right kit, trained on it, and maintained it. That’s the whole secret. Start today.
The Complete
Prepper's Reference.
149 articles synthesized into one comprehensive PDF — twelve chapters covering water, food, shelter, first aid, comms, and scenario-specific preparedness. Free with your email.
Unsubscribe anytime · We never share your email
You're in. Check your inbox.
Keep Reading
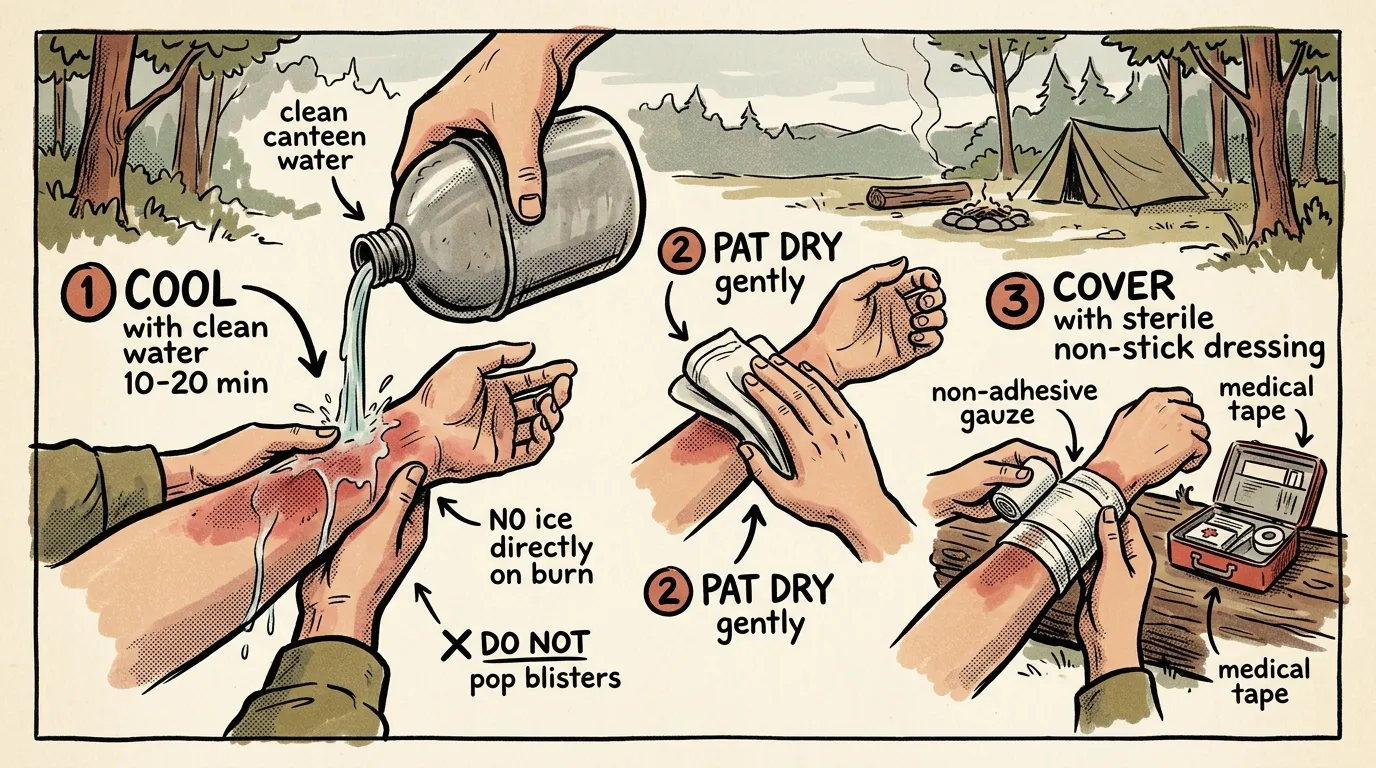
How to Treat Burns in the Field: Step-by-Step Guide
Learn how to treat burns in the field with this WFR-tested protocol. Cool, clean, cover — plus when to evacuate. Step-by-step guide from 12 years of fieldwork.
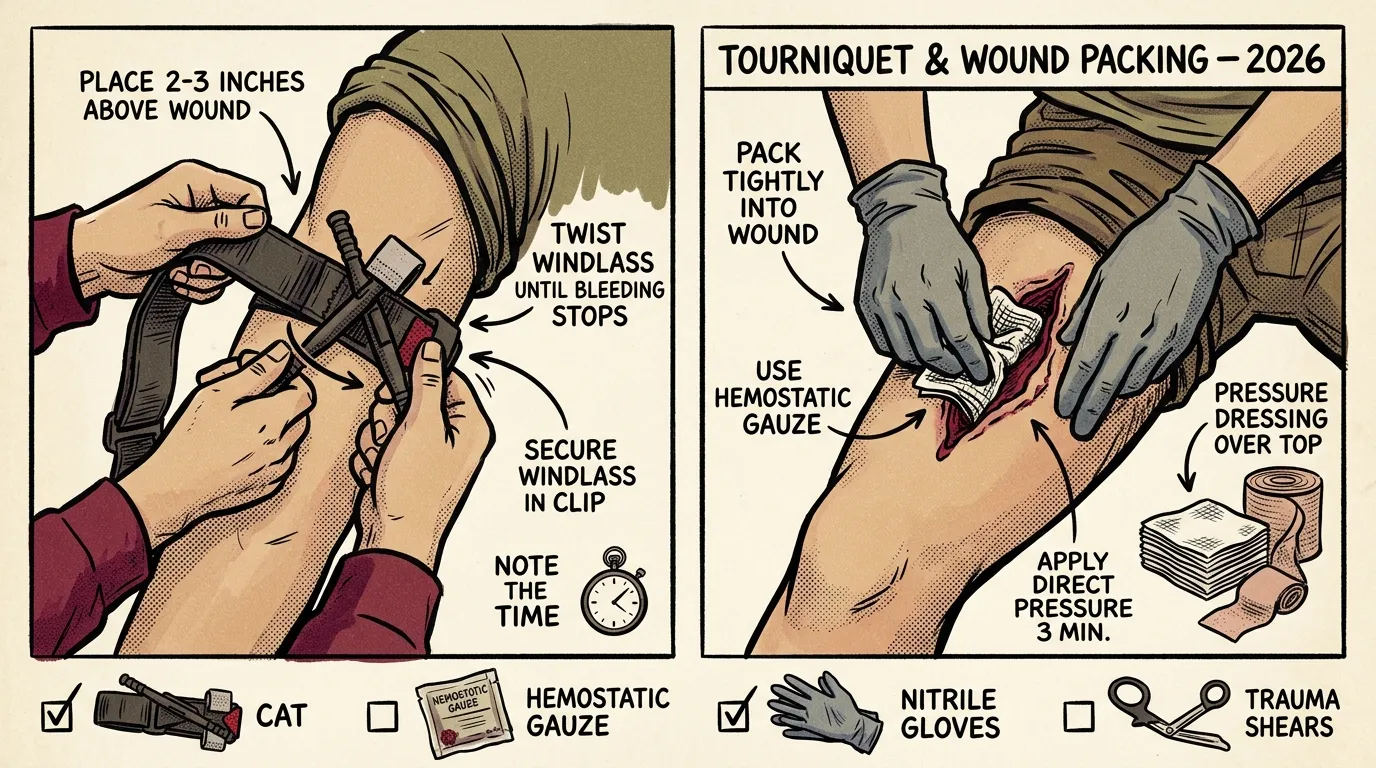
How to Use a Tourniquet and Pack a Wound (2026)
Learn how to use a tourniquet and pack a wound step by step. Field-tested techniques from a Wilderness First Responder with 12+ years of experience.
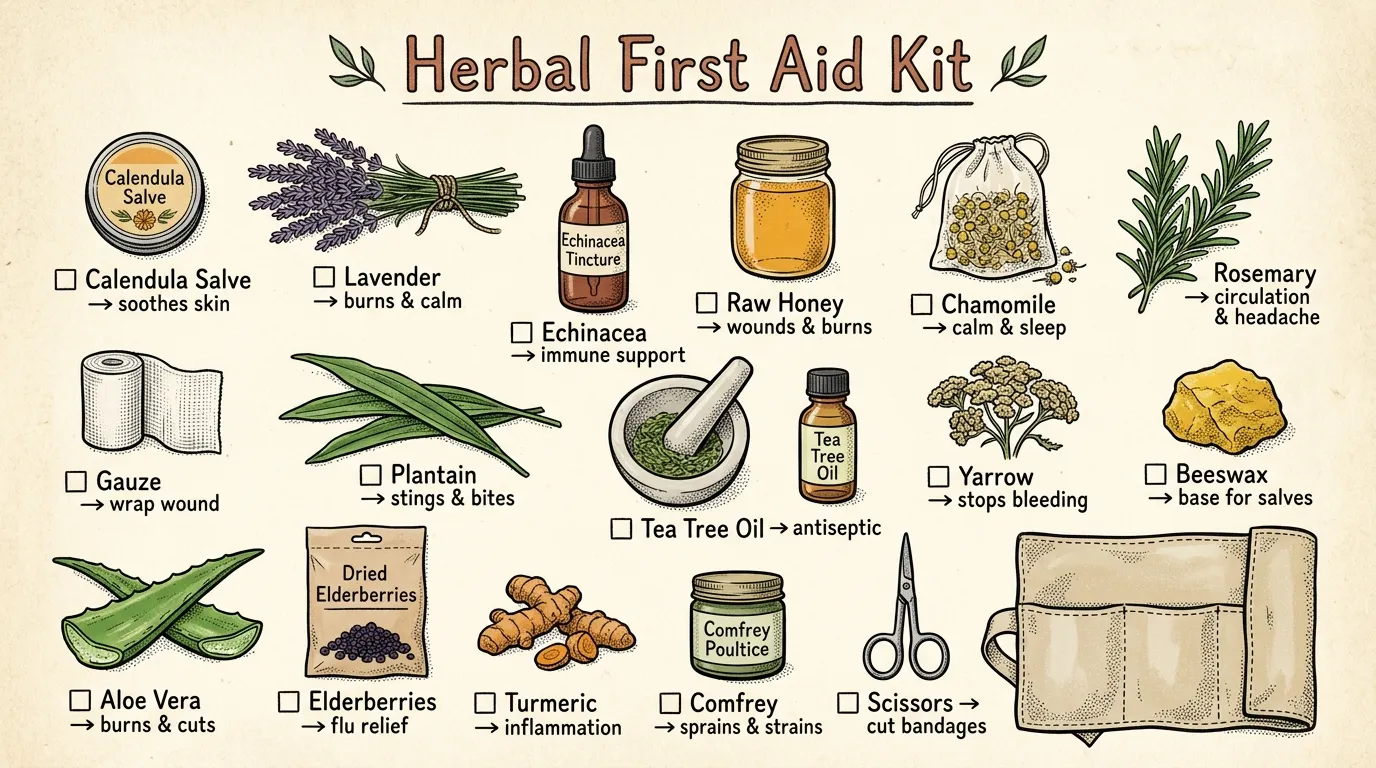
Herbal Medicine for Preppers: Build a Natural First Aid Kit
Herbal medicine for preppers covers the best herbs to stock, safe use guidelines, and how to build a natural first aid kit for emergencies. Start here.