New preppers can prepare on a budget by starting with a 72-hour emergency kit focused on water, shelf-stable food, light, first aid, hygiene, and backup power. The most affordable strategy is to use what you already own, buy multi-use essentials first, add supplies gradually, and avoid overpriced tactical gear and panic purchases.
Key Takeaways
- Audit your home before spending a dime — most people already own half a starter kit and don't realize it.
- Build a 72-hour kit for $75–$150 first, then scale to two weeks by adding a few items per grocery trip at $20–$50/month.
- Skills beat stuff every time — free first aid classes, water purification knowledge, and basic fire-starting outperform expensive gear.
- Buy multi-use items like headlamps, multitools, and tarps instead of single-purpose tactical gadgets that collect dust.
- Rotate supplies every 6 months using the 'eat what you store, store what you eat' method so nothing expires unused.
Prepping on a Budget: Affordable Gear & Strategies That Actually Work
Over 12 years of Pacific Northwest emergency response, the best-prepared people I’ve worked alongside weren’t the ones with fat wallets. They were the ones who started with a plan and built gradually. Prepping on a budget isn’t a compromise — it’s how most genuinely ready families got there in the first place.
I’ve watched people blow $500 in a single panic-fueled Amazon spree and wind up with half a kit and zero idea how to use any of it. Then I’ve watched a single mom with a $25-per-month plan coast through a five-day power outage without breaking a sweat. The difference isn’t money. It’s priorities.
A $12 headlamp you’ve tested beats a $90 tactical flashlight still sealed in its box. Every. Single. Time.
Quick Summary
- Start by auditing what you already own — most households have half a starter kit hiding in closets, kitchen drawers, and bathroom cabinets.
- Build a 72-hour kit first for $75–$150, then scale to two weeks by spending $20–$50 per month over six months.
- Water comes first, always. Three days of stored water costs under $5 if you use cleaned containers and tap water.
- Buy multi-use items like headlamps, tarps, and multitools instead of single-purpose tactical gadgets.
- Free skills outperform expensive gear — first aid classes, water purification knowledge, and fire-starting practice replace hundreds of dollars in equipment.
- Rotate supplies every six months so nothing expires unused — eat what you store, store what you eat.
Your First Seven Steps to Budget Preparedness
Don’t overthink the starting point. These steps work whether you’ve got $20 or $200 to spare right now.
- Assess your local risks — check your county’s hazard map and identify the two or three most likely disruptions (power outages, storms, earthquakes, flooding) so every dollar targets a real threat
- Audit what you already own — walk through your home and gather flashlights, batteries, first aid supplies, blankets, and shelf-stable food sitting in your pantry and closets
- Build a 72-hour kit from household items — fill a backpack or bin with what you gathered and note only the gaps
- Set a small monthly budget of $20–$50 — consistency beats panic buying every time
- Buy multi-use items first — a headlamp, a quality multitool, tarps, and duct tape each solve dozens of problems
- Add food and water gradually — toss one or two extra shelf-stable items into your cart each grocery trip and fill cleaned containers with tap water at home for free
- Learn one new skill each month — free first aid classes, fire-starting practice, and water purification knowledge replace hundreds of dollars in gear
The first time I tried skipping step two — the home audit — I ended up buying duplicates of things I already owned. Three flashlights. Two rolls of duct tape. An entire second first aid kit. Don’t be me. Spend 20 minutes walking through your house with a notepad before you spend a single dollar.
Life-Safety Priorities: What to Buy First
You’re probably wondering where to start spending when everything feels urgent. Here’s the order that matters most, based on what I’ve seen in actual emergencies — not what looks cool on a YouTube gear review.
1. Water (drinking and basic sanitation) — Dehydration degrades your decision-making within hours and becomes dangerous within days. Storing three days of water costs under $5 if you use cleaned bottles and tap water. Target at least 1 gallon per person per day. For more detail, check out our guide on water storage and purification methods.
2. Food (shelf-stable, rotated) — You need 1,800–2,000 calories per adult per day minimum during an emergency. Three days of rice, canned goods, and peanut butter runs $15–$25 per person. Stock best non-perishable foods for your emergency pantry that your household actually eats — not survival rations nobody wants to touch.
3. Shelter and warmth — Hypothermia can set in at surprisingly moderate temperatures, especially when you’re wet or stressed. A wool blanket from a thrift store ($5–$10) and a pack of emergency Mylar blankets ($8 for a 10-pack) cover this category on the cheap.
4. First aid and essential medications — I teach wilderness first aid, and I tell every student the same thing: a $12 kit you’ve practiced with beats a $60 kit you’ve never opened. Build yours from bulk supplies. For a comprehensive list, see first aid kit essentials for emergencies.
5. Light and communication — A dead phone and a dark house create panic fast. An LED headlamp ($12–$15) and a charged power bank ($15–$20) solve both problems for under $35.
6. Hygiene and sanitation — This becomes critical after day three. Soap, trash bags, toilet paper, and a gallon of bleach cost under $10 total.
7. Documents, cash, and a plan — Printed emergency contacts, copies of IDs, $50–$100 in small bills, and a basic household plan with meeting places and evacuation routes. Start creating a family emergency plan today — it’s free and it matters more than most gear.
Tailor your priorities to your region. Here in the Pacific Northwest, I weight earthquake and extended power outage supplies higher than hurricane gear. If you’re on the Gulf Coast, flip that completely.
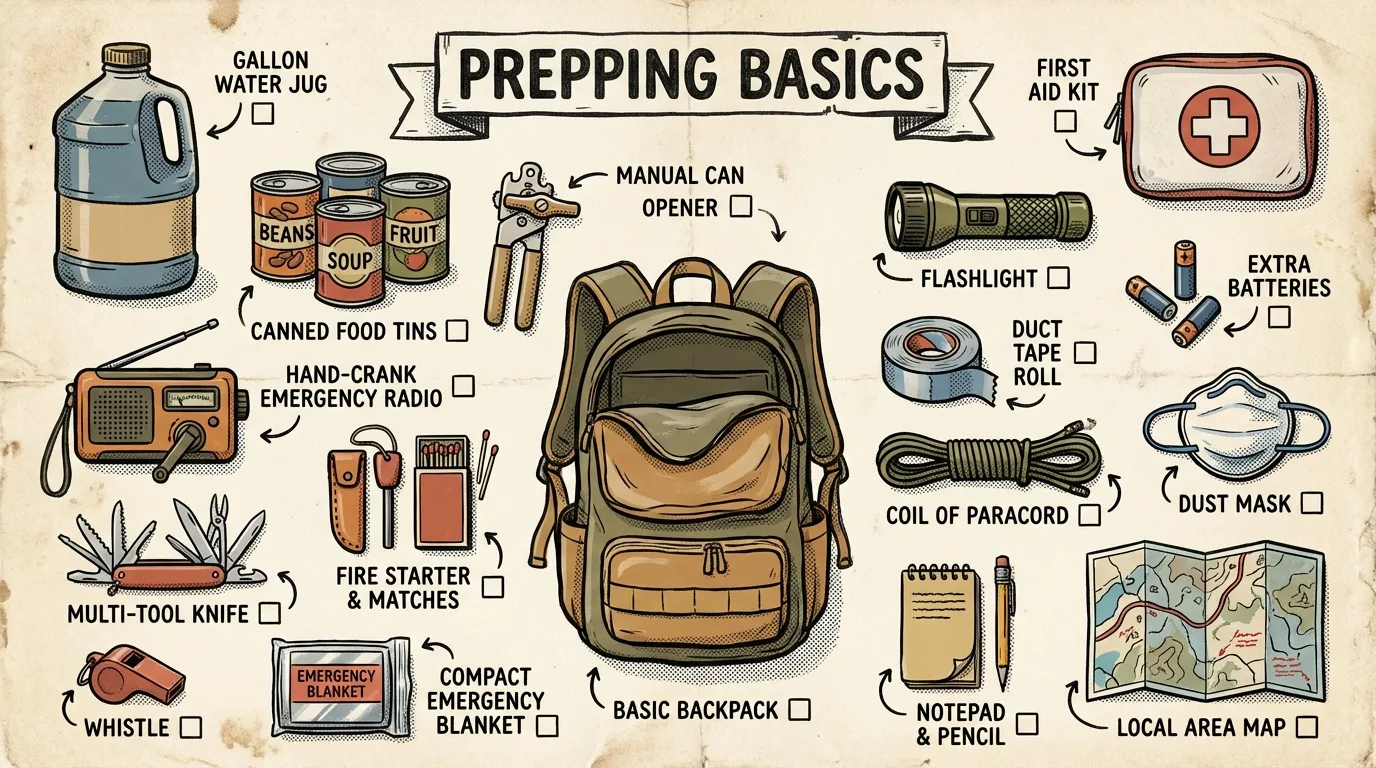
The 72-Hour Budget Emergency Kit
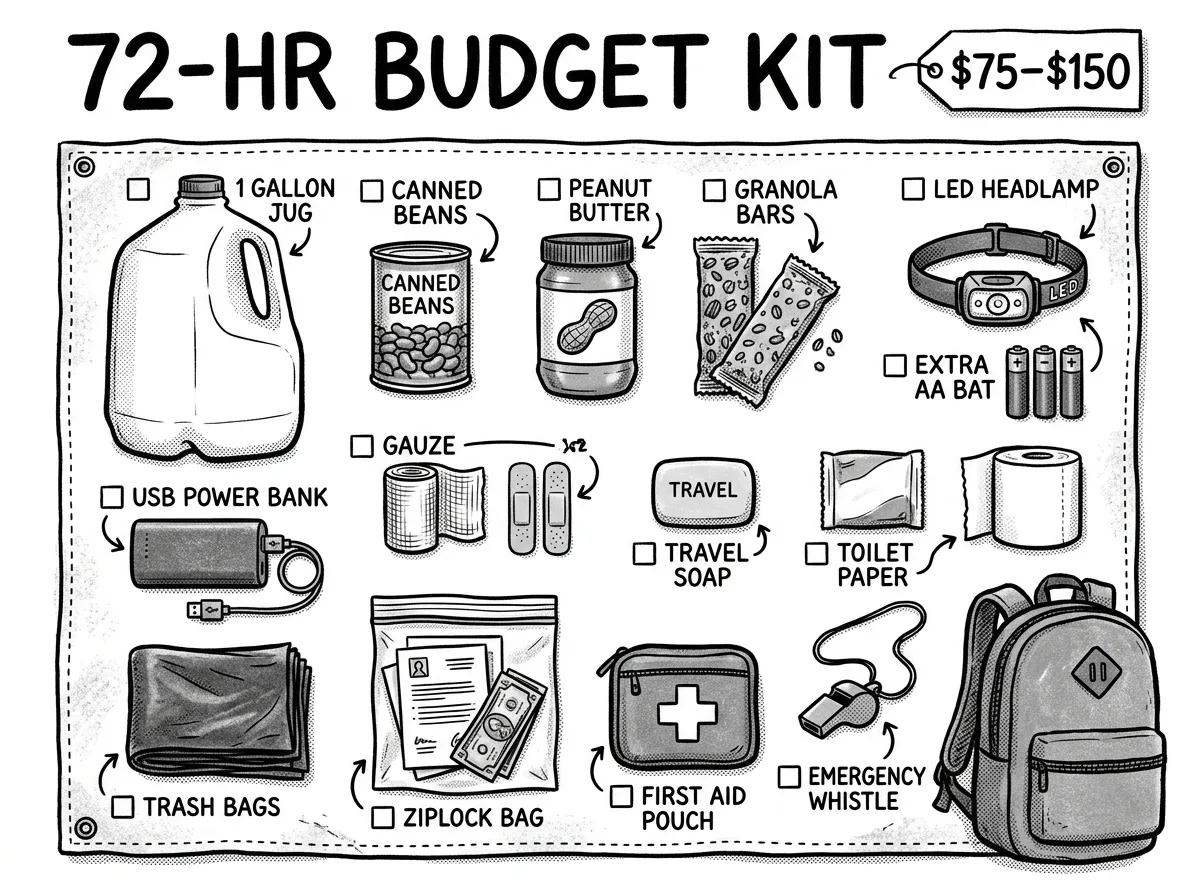 Complete 72-hour budget emergency kit — every item under $50 total
This is your foundation. Everything here can be assembled for $75–$150, and you’ll cut that further using items you already own. For a deeper dive, see our full guide to building a beginner emergency kit.
- Water: 1 gallon per person per day for three days (store-brand gallons or cleaned containers from the tap)
- Food: three days of shelf-stable items — canned soup, tuna, peanut butter, crackers, oats, dried fruit
- Light: LED headlamp or flashlight plus extra batteries
- Power: phone power bank (at least 10,000 mAh) and a car charger
- First aid: bandages, gauze, medical tape, antiseptic wipes, pain relievers, tweezers, disposable gloves
- Hygiene: soap, toothbrush, toothpaste, toilet paper, trash bags
- Documents and cash: printed IDs, emergency contacts, insurance info, $50–$100 in small bills
- Shelter: emergency Mylar blankets, a compact tarp, extra warm layer of clothing
Monthly Spending Plan: $20–$50 Over Six Months
How do you actually spread this out without it feeling overwhelming? Here’s a six-month plan at roughly $25–$50 per month that builds a solid two-week supply.
Month 1 — Water and Basic Food ($30–$45)
- 7–14 gallons of water storage (cleaned bottles or store-brand gallons): $5–$15
- Rice (10 lbs), beans (5 lbs), oats, canned vegetables, peanut butter: $25–$30
Month 2 — Lighting and Power ($30–$45)
- LED headlamp (Energizer or similar): $12–$15
- Compact flashlight: $8–$10
- Phone power bank (10,000+ mAh): $15–$20
Month 3 — First Aid and Medications ($25–$40)
- Build-your-own first aid kit from bulk supplies: $15–$25
- 30-day supply of any essential OTC medications: $5–$10
- Prescription medication buffer (ask your doctor): $0–$5 copay
Month 4 — Hygiene, Sanitation, and Documents ($20–$30)
- Toilet paper, soap, toothpaste, feminine products: $10–$15
- Heavy-duty trash bags and bleach: $5
- Document copies, cash envelope: $5–$10
Month 5 — Cooking Gear and Fuel ($25–$40)
- Single-burner butane stove: $20–$30
- 4 extra fuel canisters: $8–$12
- Manual can opener, metal pot, lighter: $5–$8 (check your kitchen first)
Month 6 — Tools, Shelter, and Comfort ($25–$50)
- Multitool or quality knife: $15–$35
- Tarp and paracord: $10–$15
- Deck of cards, comfort snacks, journal: $5–$10
After six months, you’ve got a comprehensive two-week supply for one adult at $155–$250 total. Scale quantities for your household and keep building from there.
Budget Food Storage That Actually Sustains You
A lot of budget food lists miss the most critical number: calories. You need 1,800–2,000 per adult per day minimum in an emergency, and more if you’re physically active, stressed, or dealing with cold weather. Hit that target wrong and you’re running on fumes by day three.
The good news? You can reach those numbers for roughly $3–$5 per adult per day using basic shelf-stable groceries.
Sample 3-day menu (one adult):
| Meal | Day 1 | Day 2 | Day 3 |
|---|---|---|---|
| Breakfast | Oatmeal with peanut butter, dried fruit | Rice with canned peaches | Oatmeal with honey, crackers |
| Lunch | Canned tuna on crackers, canned corn | Peanut butter on crackers, canned fruit | Bean and rice mix, canned vegetables |
| Dinner | Rice and canned chili | Pasta with canned tomato sauce | Canned soup with crackers, tuna |
| Snacks | Trail mix, hard candy | Granola bar, dried fruit | Peanut butter crackers, hard candy |
Two-week cost breakdown per adult:
- 10 lbs rice: $6–$9
- 5 lbs dried beans or lentils: $5–$8
- 12 cans assorted vegetables and fruit: $8–$12
- 6 cans protein (tuna, chicken, chili): $8–$12
- 2 jars peanut butter: $5–$7
- Oats, pasta, salt, cooking oil: $8–$12
- Total: approximately $40–$60 per adult
Stock what your household actually eats. The cheapest supplies in the world are worthless if nobody touches them. And don’t skip comfort foods — coffee, tea, hot chocolate, and hard candy cost a few dollars and make a massive psychological difference during a multi-day disruption.
The deep pantry method works beautifully here. Toss one or two extra shelf-stable items into your cart each grocery trip. Use the oldest items first, rotate new purchases to the back. In three months of normal shopping, most people build a two-week buffer without really noticing the extra cost.
Gear I’ve Actually Field-Tested on a Budget
I’ve tested cheap gear and expensive gear side by side for over a decade. Here are the specific budget picks I trust with my own safety — and a few I don’t.
Water Filtration and Storage
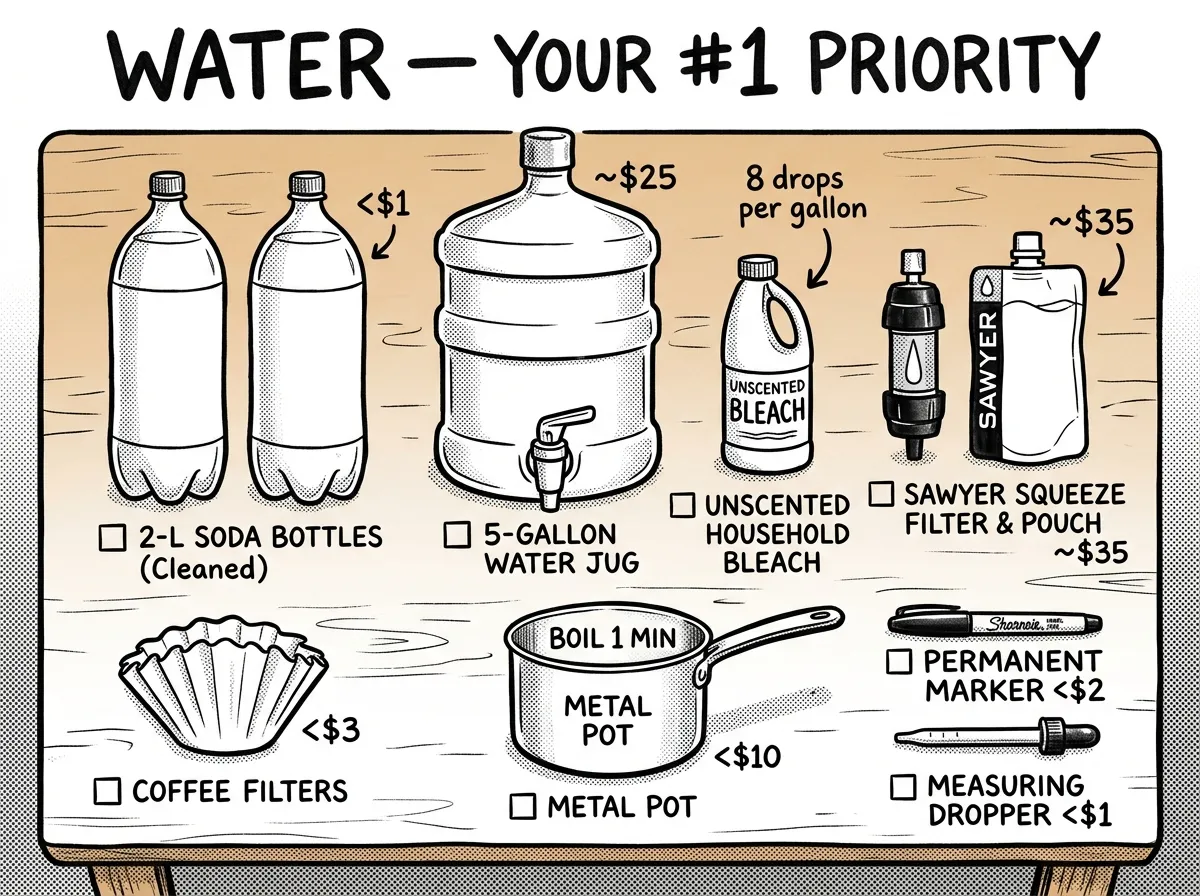 Budget water filtration and storage options laid out
- Store-brand gallon jugs ($1 each) for bulk storage
- Cleaned 2-liter soda bottles (free) for portable storage
- MSR Aquatabs purification tablets ($8–$12 for 30 tablets) — lightweight backup that works
- Sawyer Squeeze filter ($25–$35) — I’ve used mine on backcountry responses and it filters up to 100,000 gallons
The Sawyer Squeeze — around $30 — is what I reach for every time over the LifeStraw. The LifeStraw’s fine for drinking directly from a stream, but the Squeeze lets you fill bottles, filter for multiple people, and process serious volume. For budget prepping, that versatility matters way more than the LifeStraw’s slightly lower price tag. I’ve filtered genuinely questionable creek water through mine during a search-and-rescue operation in the Oregon Cascades and didn’t hesitate to drink it.
Knives and Tools
- Morakniv Companion fixed-blade knife ($15–$18) — I’ve carried one on every backcountry response for six years. At that price, it outperforms knives costing five times more.
- Victorinox Swiss Army Knife Classic SD ($18–$25) for everyday carry
- Stanley FatMax tape measure and utility knife combo ($12–$15)
Lighting
- Energizer Vision LED headlamp ($12–$15) — bright, reliable, runs on standard AAAs
- Nebo Poppy lantern/flashlight combo ($15–$20) — dual-function saves buying two separate items
- Rechargeable AA/AAA batteries with charger ($15–$20 for an 8-pack set) — pays for itself within a year
Shelter and Warmth
- Emergency Mylar blankets ($8 for a 10-pack) — genuinely life-saving in hypothermia situations
- Thrift store wool blankets ($5–$10 each) — warmer than fleece when wet
- 8x10 poly tarp with paracord ($10–$15) — shelter, ground cover, rain catch, privacy screen
Cooking
- Single-burner butane stove ($20–$30) — I’ve relied on these during three extended power outages
- Manual can opener (P-38 military style, around $2) — indestructible, weighs nothing
- GSI Glacier stainless steel pot ($15–$20) — boils water, cooks food, virtually indestructible
Where to Find Affordable Gear
Big-box and warehouse stores: Walmart consistently has the lowest prices on batteries, canned goods, water, and basic camping gear. Costco and Sam’s Club offer bulk rice, beans, canned goods, and batteries at significant per-unit savings. Don’t overlook Harbor Freight — their Pittsburgh multitool ($8–$12) and tarps are solid for the price.
Secondhand sources: Goodwill and Salvation Army are gold mines for wool blankets, backpacks, cookware, and storage containers. Habitat for Humanity ReStore carries buckets, bins, and household tools at 50–70% off retail. Facebook Marketplace and Craigslist work well for used camping gear, generators, and packs — just inspect before buying. Military surplus stores sell durable packs, wool blankets, canteens, and mess kits at a fraction of retail.
Timing your purchases saves 30–60%:
- End-of-season clearance on camping gear (September–October)
- Amazon Prime Day and Black Friday for electronics: power banks, radios, headlamps
- Post-holiday sales in January for batteries, flashlights, and storage containers
- Grocery store BOGO sales for building your deep pantry faster
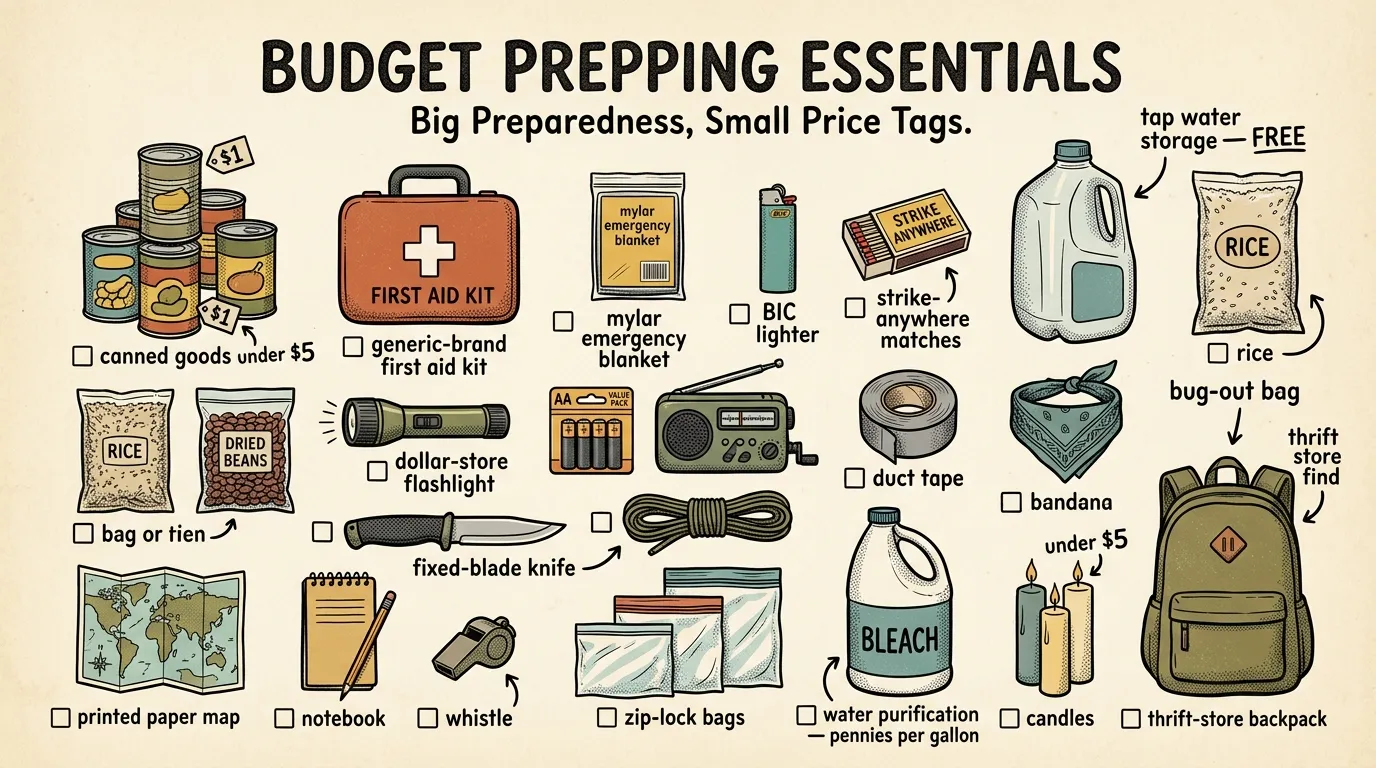
Dollar Store Prepping: What’s Worth It (and What Isn’t)
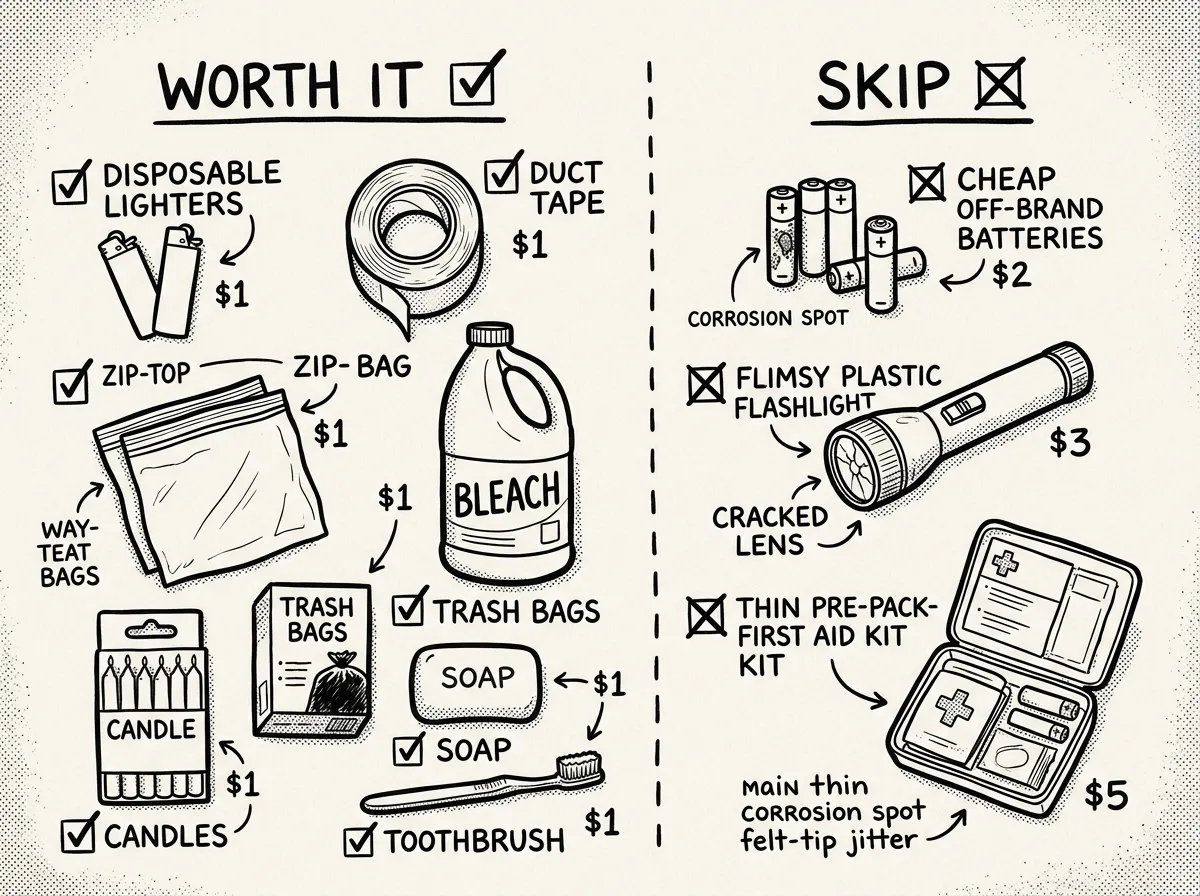 Dollar store prepping haul — smart buys vs. items to skip
Dollar stores are a legitimate budget resource — if you know what to grab and what to leave on the shelf. A focused $15–$20 haul can fill real gaps in your kit.
Worth buying: Lighters and matches, duct tape, zip-top bags in multiple sizes, unscented bleach (same active ingredient as the expensive stuff), heavy-duty trash bags, basic bandages and gauze, unscented candles, hand sanitizer and soap, sewing kits, and rubber gloves. All of these perform as well as their name-brand counterparts for a fraction of the cost.
Skip these without hesitation:
- Off-brand batteries — they leak, corrode, and die fast
- Flimsy flashlights — the LED dies or the switch fails within weeks
- Low-quality tools — screwdrivers that strip and pliers that flex are a safety issue, not a bargain
- Pre-packaged first aid kits — absolute minimum of low-quality items
- Thin “emergency” blankets — much thinner than standard Mylar blankets and they tear easily
A sample $18 dollar store haul: 2 lighters, duct tape, 2 boxes zip-top bags, bleach, trash bags, bandages, gauze, hand sanitizer, soap, candles, sewing kit, rubber gloves. That’s a meaningful supplement to any starter kit.
Free Skills That Replace Expensive Gear
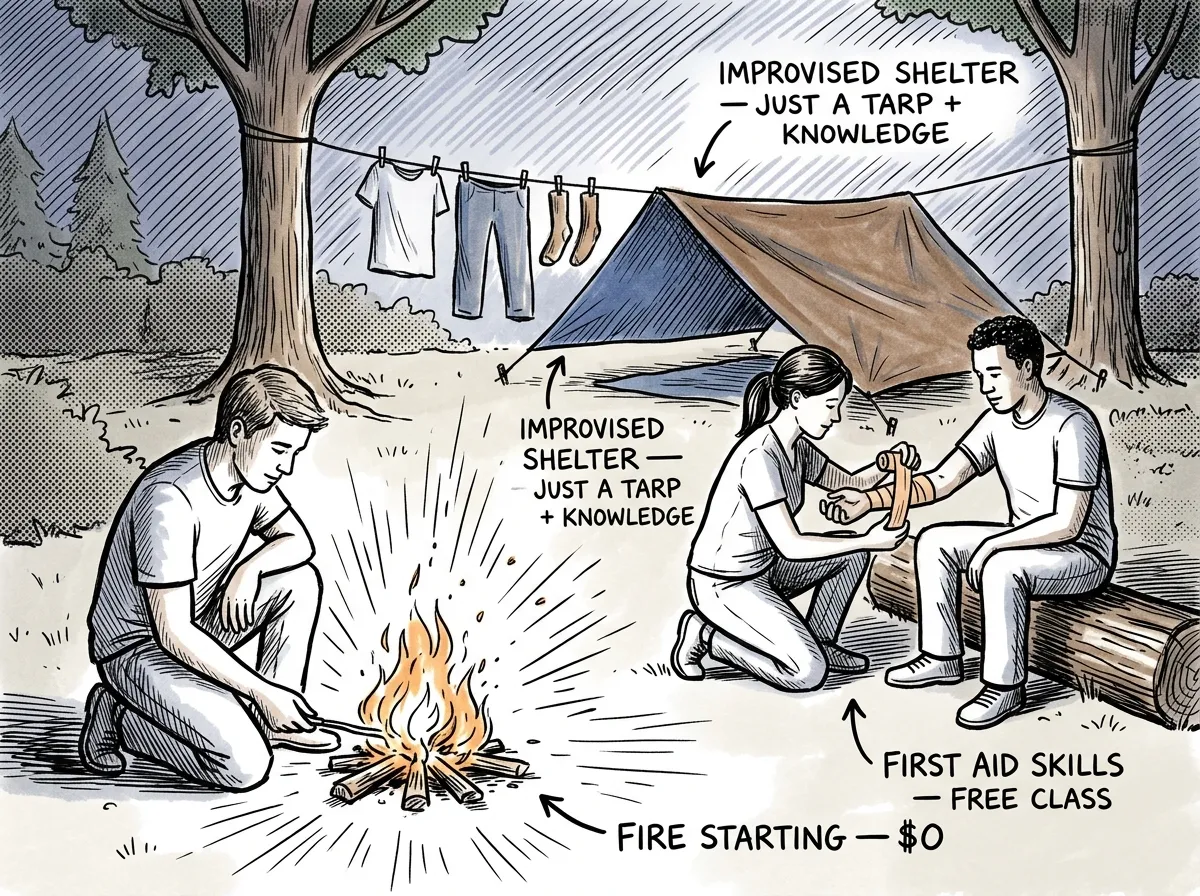 Free skills outperform expensive gear — practice beats purchases
Here’s something I’ve learned after 12 years as a FEMA-trained responder and Wilderness First Responder: the most prepared person in any group is rarely the one with the most gear. It’s the person who knows the most. Skills weigh nothing, never expire, and can’t be lost in an evacuation.
The most prepared person in any group is rarely the one with the most gear — it’s the one with the most knowledge.
Basic first aid and CPR — Many local fire departments and Red Cross chapters offer free or low-cost classes. As someone who teaches wilderness first aid, I can tell you that knowing how to control bleeding, stabilize a sprain, and recognize shock is worth more than any piece of gear in your kit.
Water purification methods — Learn at least three ways to make water safe: boiling (the most reliable), chemical treatment (bleach or tablets), and filtration. During a multi-day boil-water advisory in rural Oregon, the families who fared best had simple stored tap water in cleaned soda bottles — not expensive filtration systems.
Fire starting with common materials — Practice lighting a fire with a lighter, with matches, and with a ferro rod. Learn what tinder actually works (dryer lint, cotton balls with petroleum jelly, fine wood shavings). Do this in your backyard on a rainy afternoon — that’s the realistic condition, not the sunny YouTube demo.
Pantry cooking and food preservation — Learn to make complete meals from shelf-stable ingredients. Practice cooking with a camp stove or over a fire. Water bath canning lets you preserve garden produce and sale-priced fruit for pennies per jar — check your local library’s tool-lending program for equipment.
Navigation with paper maps — Download and print USGS topographic maps of your area for free at usgs.gov. When GPS is down, this knowledge is irreplaceable.
Knot tying — Five knots handle 90% of emergency tasks: bowline, clove hitch, taut-line hitch, trucker’s hitch, and figure-eight. Free tutorials are everywhere online. Practice until they’re muscle memory.
Mistakes That’ll Drain Your Budget Fast
I’ve responded to three extended power outages where families had spent hundreds on freeze-dried food but had no way to heat water. A $25 butane stove would’ve changed everything for them.
- Buying gear before making a plan. Without knowing your local risks and household needs, you’re shopping blind. Spend 30 minutes identifying your top three most likely emergencies before spending a dollar.
- Ignoring skills in favor of stuff. A garage full of gear you don’t know how to use is expensive dead weight. For every $50 you spend on gear, spend one hour learning a related skill.
- Panic buying at premium prices. When a storm’s forecast, bottled water triples in price and shelves empty. Build supplies slowly during calm periods when prices are normal.
- Storing food you won’t eat. I’ve seen people stockpile MREs, wheat berries, and freeze-dried meals they’ve never tasted. Only store foods your household already eats.
- Neglecting water storage. People spend $300 on food and $0 on water. You’ll die of dehydration long before you starve.
- Skipping rotation. Expired food, dead batteries, and degraded medications help no one. Check supplies every six months, use the oldest items first, replace what you consume.
- Prepping for doomsday before covering Tuesday. Worrying about societal collapse while you don’t have a flashlight for a power outage is backwards. Prepare for common, likely events first.
Think in Layers, Not Lump Sums
This is how I structure every kit I build, whether it’s for my own family or for a community workshop I’m running:
Layer 1 — Stay alive: Water, food, shelter, first aid. This is your 72-hour kit and it covers 90% of emergencies you’ll actually face.
Layer 2 — Stay informed: Headlamp, flashlight, battery or hand-crank radio, phone power bank and car charger. Good information drives better decisions.
Layer 3 — Stay clean and functional: Hygiene supplies, sanitation gear, prescription and OTC medications. Illness during a disruption compounds every other problem you’re dealing with.
Layer 4 — Stay organized: Printed documents, cash in small bills, household emergency plan, basic tools. This layer turns survival into stability.
Work through layers in order. Don’t jump to Layer 4 tools and gadgets until Layers 1–3 are solid. I’ve watched people make this mistake constantly — they’ve got a $200 survival knife and a ham radio but no stored water. That’s not preparedness. That’s shopping.
Urban vs. Rural: Where Budget Prepping Changes
The core advice applies everywhere, but the how changes dramatically based on where you live. I’ve helped people prep in 600-square-foot apartments and on 40-acre homesteads, and the approach can’t be identical.
Urban-Specific Considerations
Space is your bottleneck. A two-week water supply for a family of four is roughly 56 gallons — that’s a lot of floor space in a small apartment. Use stackable slim-profile containers, under-bed storage, and a WaterBOB bathtub bladder ($25–$35) for last-minute fill capacity. Evacuation is more likely than sheltering in place, so invest in a quality 40L grab-and-go pack ($30–$60 at surplus stores) before investing in a month of freeze-dried food. Keep broken-in walking shoes at your workplace and a paper map of routes home. Cost: $0.
Rural-Specific Considerations
You’ve got storage space — use it. Buy water in bulk (store-brand gallons at around $1 each) and stack them in a basement or outbuilding. Two weeks for two people costs $15–$20. Power outages last longer in rural areas, so prioritize a propane camp stove ($25–$40) and extra fuel. Self-rescue is the default — EMS response times in rural counties can exceed 20–30 minutes, which means a more advanced first aid kit and training matter more here than almost any piece of gear you could buy.
I’ve done emergency response in both downtown Portland and tiny rural communities in central Oregon, and the difference is staggering. In the city, someone’s always within shouting distance. In rural areas, you might be completely on your own for an hour or more. If you’re rural, put your extra dollars into a solid first aid kit and a WFR or Wilderness First Aid course rather than another bag of freeze-dried meals. That training gap is the single biggest vulnerability I see out there, and it’s the cheapest to close relative to its impact.
Extending Beyond 72 Hours to Two Weeks
A 72-hour kit handles common disruptions. But recent events — extended grid failures, prolonged supply chain disruptions, multi-week boil-water advisories — have shown that three days isn’t always enough. FEMA has shifted its messaging toward recommending supplies beyond the old 72-hour minimum, and I think that shift is long overdue.
Scaling water: Fill cleaned 2-liter soda bottles with tap water — free containers, free water. Label with the fill date, store in a cool dark spot, replace every six months. Add a Sawyer Squeeze filter ($25–$35) or Aquatabs ($8–$12 for 50 tablets) so you can process secondary water sources if your stored supply runs out.
Scaling food: Use the per-adult cost framework above ($40–$60 for two weeks). Add two or three extra items per grocery trip. Three months of normal shopping gets most people to a comfortable two-week buffer.
Cooking without power: A single-burner butane stove ($20–$30) with 4–6 extra fuel canisters ($2–$3 each) covers two weeks of twice-daily cooking. Never use these indoors without ventilation. Carbon monoxide is silent and kills fast.
Sanitation beyond day three: A 5-gallon bucket with a snap-on toilet seat lid ($10–$15), heavy-duty garbage bags, and kitty litter for odor control ($5). Add a gallon of unscented bleach ($4) for general disinfection. This isn’t glamorous, but it’s essential — sanitation problems compound fast after 72 hours.
Morale items: Don’t skip these. A deck of cards ($2), paperback books ($0 if you own them), comfort snacks like coffee and hot chocolate packets ($5–$8). Two weeks of disruption grinds on people psychologically. These small investments pay outsized returns in keeping your household functional and calm.
Gear That Wastes Your Money
Before buying any piece of gear, I ask three questions: Have I actually needed this in a past disruption? Can something I already own do this job? Will this still work after sitting in a bag for two years? If I can’t answer yes to at least two, the money goes toward water or food instead.
Skip these:
- Cheap “20-in-1 survival kits” in a tin ($15–$25) — filled with miniature tools that barely function. Build your own for the same money and get items that actually work.
- Off-brand “tactical” multitools ($7) — blades that won’t hold an edge, pliers that flex under pressure. Buy a Victorinox or Leatherman Wingman instead.
- Bulk MREs as primary food storage — at $8–$12 each, two weeks for a family of four costs $672–$1,008. Rice, beans, and canned goods cover the same period for $80–$120.
- Oversized survival knives — heavy, hard to control, often restricted in urban areas. A Morakniv Companion ($15–$18) handles 95% of real tasks.
- Single-use gadgets — hand-crank phone chargers that take 45 minutes for 3% battery, solar ovens in cloudy Pacific Northwest weather, survival straws with no backup plan.
Maintenance and Rotation: Keeping Your Kit Alive
Gear you don’t maintain is gear that fails when you need it. Here’s the schedule I follow:
Monthly (5 minutes): Check your power bank charge level. Confirm your kit’s accessible and nothing’s been borrowed out of it.
Every 3 months (20 minutes): Test all stored batteries. Check medication expiration dates. Verify flashlights and radio work. Replace any damaged first aid supplies.
Every 6 months (30 minutes): Rotate stored water — empty and refill containers, mark new dates. Pull food closest to expiration into your regular kitchen rotation and replace with fresh stock. Update emergency contact lists and your household plan.
Annually (1–2 hours): Full kit audit. Lay everything out against your master checklist. Replace worn items. Reassess based on any changes in your household or local risk profile. This is also a great time to refresh skills — take a first aid refresher or practice your fire-starting setup.
It’s 8 PM on a Tuesday in November. An ice storm knocks out power across your county. The utility company’s estimate: four to seven days for restoration. Your furnace won’t run. Your fridge is warming. Your phone’s at 38%. The families who weather this without crisis aren’t the ones who spent thousands — they’re the ones who spent $25 a month for the last six months building a kit they actually know how to use.
Start Small, Start Right Now
Prepping on a budget isn’t about buying a bunker’s worth of supplies in one shopping trip. It’s about small, consistent decisions that stack up over weeks and months. The families I’ve seen weather real emergencies best — the extended outages, the ice storms, the infrastructure failures — didn’t spend thousands. They spent $20 here, $30 there, and they practiced using what they had.
Audit your home today. Fill a few bottles with tap water. Print your emergency contacts. Set aside $25 for next week’s first purchase. That’s how affordable emergency preparedness actually starts — not with a credit card and a doomsday shopping list, but with a plan and a single step.
Every dollar you spend intentionally on preparedness buys your family time, safety, and options when the unexpected hits. In my experience, the unexpected always hits eventually. The only question is whether you’ll be ready.
The Complete
Prepper's Reference.
149 articles synthesized into one comprehensive PDF — twelve chapters covering water, food, shelter, first aid, comms, and scenario-specific preparedness. Free with your email.
Unsubscribe anytime · We never share your email
You're in. Check your inbox.
Keep Reading
Beginner Prepping Basics: Start Survivalism the Right Way
Learn beginner prepping basics from a FEMA-trained responder. Practical steps, budget-friendly gear, and common mistakes to avoid. Start prepping today.

Beginner Prepper Guide: Mindset, Supplies & Skills
New to prepping? This beginner prepper guide covers the preparedness mindset, essential supplies, skills, and mistakes to avoid. Start building readiness today.
The Science of Prepping: What Studies Say About Preparedness
Scientific research shows prepping works: plans, kits, and mental resilience improve disaster response. Here’s how beginners can prep smarter.