Survivalism for beginners means preparing for likely emergencies with basic supplies, simple plans, and practical skills. Start with water, food, first aid, lighting, and an emergency plan, then build gradually while avoiding common mistakes like buying flashy gear before essentials.
Key Takeaways
- Store 1 gallon of water per person per day — start with a 3-day supply this week, then add a jug per paycheck until you hit 14 days.
- Write a one-page family emergency plan before buying any gear — it's free and outperforms every $500 Amazon haul.
- Build a solid two-week kit for $200–$400 total by buying proven basics during regular shopping trips, not overpriced survival bundles.
- Stockpile foods your family already eats and rotate them through your pantry so nothing expires forgotten on a shelf.
- Take a free Red Cross first aid class or local CERT course — six hours of hands-on training changes your confidence more than any gadget.
Beginner Prepping Basics: Start Survivalism the Right Way
Why trust this guide: I’m Josh Baxter — a FEMA-trained Wilderness First Responder with 12+ years of field experience in Pacific Northwest emergency preparedness, including CERT team leadership and community disaster response training. This guide was last updated April 2026 to reflect current pricing, FEMA guidelines, and lessons from recent PNW winter storm responses.
If you’re looking to learn beginner prepping basics, you’re already ahead of most people. You don’t need a bunker. You don’t need $10,000 in freeze-dried food. What you need is a clear plan, a few proven supplies, and the willingness to spend a couple of weekends getting your household ready for the emergencies that actually happen — power outages, winter storms, earthquakes, supply chain disruptions.
Survivalism is the practice of proactively preparing for emergencies by storing essential supplies, developing practical skills, and creating actionable plans to meet basic needs — water, food, shelter, first aid, and communication — when normal infrastructure goes down. That’s it. No tinfoil hats required.
I’ve spent over a decade responding to ice storms, wildfires, and earthquake preparedness drills across the Pacific Northwest. The families who fare best aren’t the ones with the most gear. They’re the ones who wrote a plan, stored water, and practiced once or twice. This guide walks you through exactly how to start prepping with no experience, on any budget, at whatever pace works for your life.
Quick Summary
- Water first: Store 1 gallon per person per day, starting with 3 days and building to 14 days over the next few months.
- Write a plan this week: A one-page family emergency plan — listing hazards, evacuation routes, meeting points, and contacts — costs nothing and is the single highest-impact prep you can do.
- Build your kit gradually: You’ll spend $200–$400 total by picking up proven basics during regular shopping trips instead of panic-buying expensive survival bundles.
- Rotate what you store: Stockpile foods your family already eats so nothing expires unused on a shelf.
- Skills beat gear: A free Red Cross first aid class or local CERT course gives you more real-world capability than another $100 gadget.
- Your location shapes your plan: Urban preppers prioritize compact storage and shelter-in-place readiness; rural preppers focus on self-sufficiency and isolation resilience.
The 6 Steps to Get Started
Step 1: Assess Your Health and Finances First
Get your physical and financial foundation stable before buying a single piece of gear.
This step surprises most beginners, but it’s where I always start in my CERT training sessions. If you’ve got untreated medical conditions, no health insurance, or zero emergency savings, those are your biggest vulnerabilities — not a missing water filter. Aim for a small emergency cash fund ($500–$1,000), review your insurance policies, and make sure prescriptions are current. A $20 co-pay for a doctor visit today beats a medical crisis during a power outage.
Step 2: Create a Written Emergency Plan
A one-page family emergency plan is the single highest-impact prep you can do this week — and it’s free.
Write down your top three local hazards, two evacuation routes, two meeting places (one near home, one outside your neighborhood), emergency contacts, and where you keep critical documents. Include medical info for every household member. Tape it inside a kitchen cabinet where everyone can find it. I’ve seen people with $2,000 in gear who couldn’t tell me where their family would meet after an earthquake. Don’t be that person.
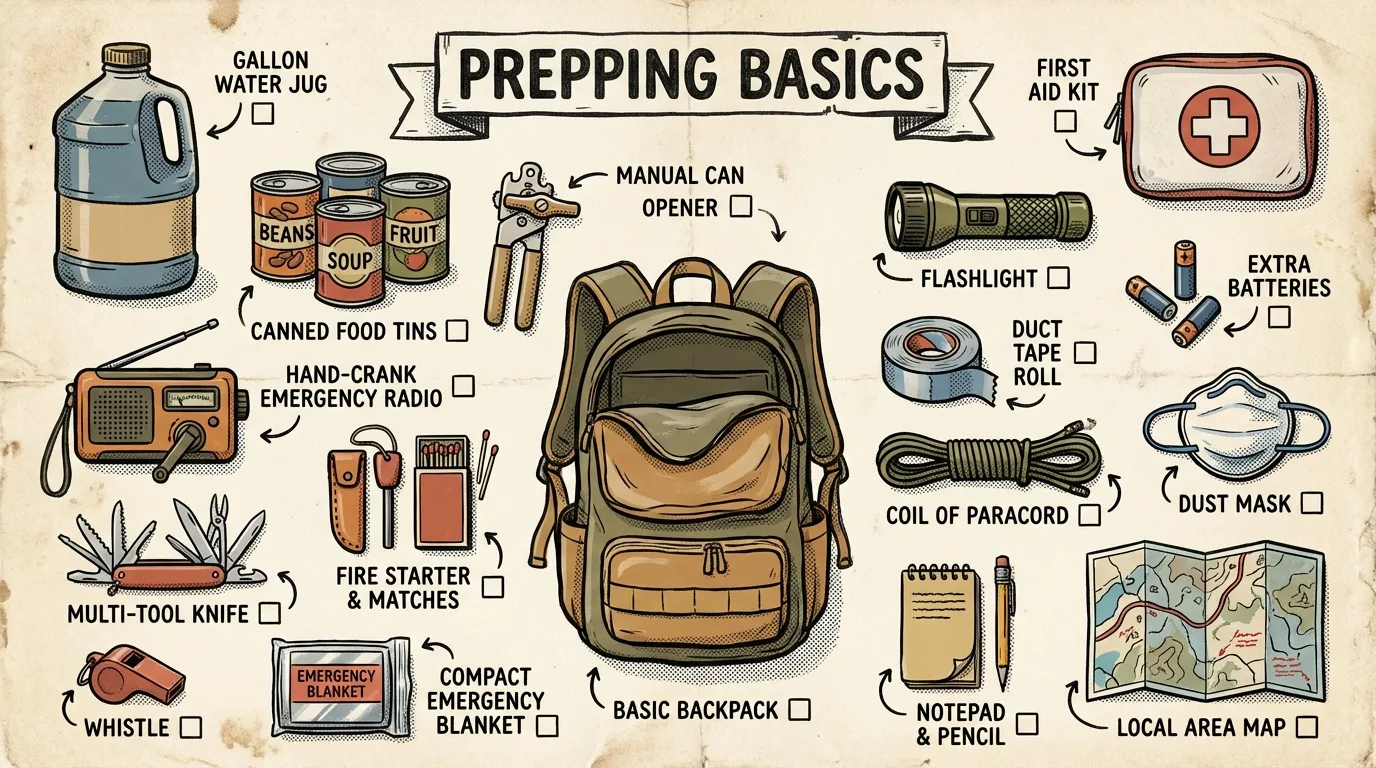
Step 3: Build a Basic Emergency Kit
 Everything in a starter emergency kit, laid out and labeled
Assemble a home kit and a small grab-and-go bag using proven, affordable basics.
Your home kit covers sheltering in place: flashlight with spare batteries, first-aid kit, manual can opener, multi-tool, backup phone charger, hygiene items, waterproof matches, blankets, copies of important documents, and cash in small bills. Your grab-and-go bag covers the first 24–48 hours if you need to leave: compact water, one to two days of food, weather-appropriate clothing, medications, and a power bank. More details on building your first bug-out bag.
Step 4: Secure Water and Food for 3–14 Days
Water is non-negotiable. Per Red Cross guidelines, water stored in clean food-grade containers with proper treatment stays safe for 6 months before you need to rotate it. For food, stockpile what your family already eats — canned vegetables, canned protein, rice, pasta, oats, peanut butter. Rotate regularly so nothing expires forgotten on a shelf. For deeper guidance, see food preservation and stockpiling basics.
Step 5: Learn Essential Survival Skills
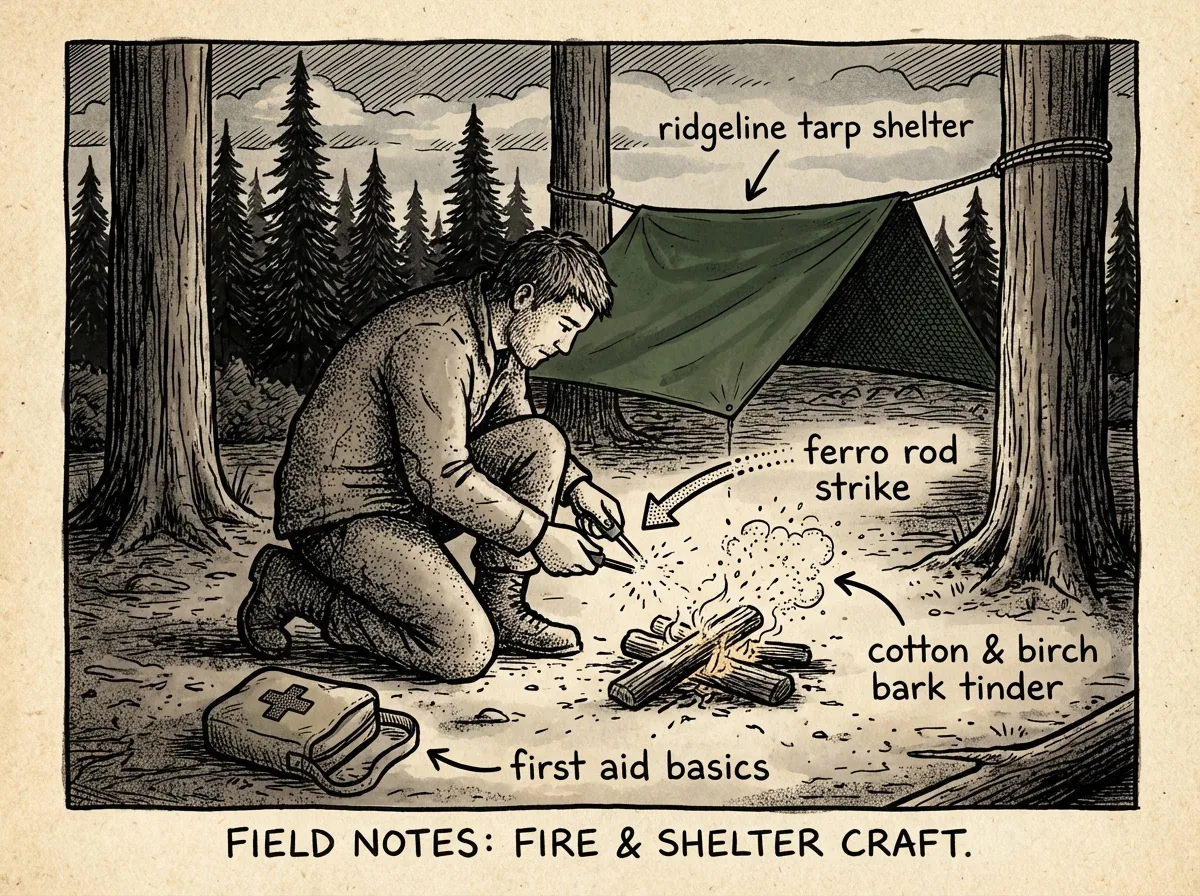 Practicing core survival skills before you need them
Skills outlast gear. Take a free first aid class before buying another gadget.
Priorities: basic first aid and CPR (free through many Red Cross chapters), water purification, cooking without grid power, and basic navigation. Take a local CERT course if your community offers one — it’s free, practical, and connects you with neighbors who are also preparing. I can tell you from years of teaching these courses that six hours of hands-on training changes your confidence level more than $500 in Amazon purchases ever will.
Step 6: Stay Informed and Review Regularly
Set a quarterly calendar reminder to audit supplies, update plans, and rotate expired items.
Preparedness isn’t a one-time purchase; it’s an ongoing habit. Review your plan every three months. Check expiration dates. Replace batteries. Update contact numbers. After any real event or drill, write down what worked and what didn’t in a small notebook you keep in your kit. Conditions change — new family members, new medications, a move to a different region — and your preps need to keep pace.
How to Assess Your Regional Risks
Before you spend a dollar on supplies, you need to know what you’re actually preparing for. A prepper in coastal Florida faces hurricanes and storm surge. A family in Oklahoma needs tornado readiness. Here in the Pacific Northwest, my top three are Cascadia Subduction Zone earthquakes, winter ice storms, and wildfire smoke seasons.
- Check FEMA’s risk map at hazards.fema.gov — enter your zip code to see flood zones, seismic risk, and wildfire probability in about five minutes
- Identify your top three natural hazards based on what’s actually happened in your county in the last 20 years — check your county emergency management website for historical disaster declarations
- Evaluate infrastructure vulnerabilities like aging power grids, flood plains, or single-road access to your neighborhood
- Factor in personal risks: household members with chronic conditions, mobility limitations, or medication dependencies need different plans
- Honestly assess your evacuation reality — can you leave, or should you plan to shelter in place for days or weeks?
Why infrastructure matters more than most people think: During the 2024 PNW ice storm, rural households I work with were isolated for 8–12 days — their well pumps were useless without backup power. That’s an infrastructure vulnerability you can plan around, but only if you’ve identified it ahead of time.
My PNW-specific examples as illustration:
- Cascadia Subduction Zone: potential magnitude 9.0 earthquake with weeks of disrupted infrastructure. I plan for 30 days of water and food minimum.
- Winter ice storms: 5–12 days without power is common in rural areas. Backup heating and cooking are essential.
- Wildfire smoke: multiple weeks of hazardous air quality. N95 masks, air purifiers, and the ability to seal living spaces matter.
Your hazards will differ, but the framework’s the same: identify, prioritize, and plan specifically for what’s most likely to affect your household.
Why Prepping Makes Sense for Most Households
Is it worth being a prepper? I’ll put it this way: in 12 years of emergency response work, I’ve never once met someone who regretted being prepared. I’ve met plenty who regretted assuming it wouldn’t happen to them.
Prepared homes handle short outages and weather events with less stress and fewer calls to 911. Power and water interruptions happen everywhere, and they’re becoming more frequent. When fewer people need emergency help, first responders can focus on the most critical situations. Preparedness gives you options when everyone else is scrambling.
Prepping isn’t about fear — it’s about quiet confidence. It’s the difference between riding out a four-day power outage with warm meals and a plan, versus sitting in the dark wondering when help is coming.
Scaling Supplies for a Family of Four
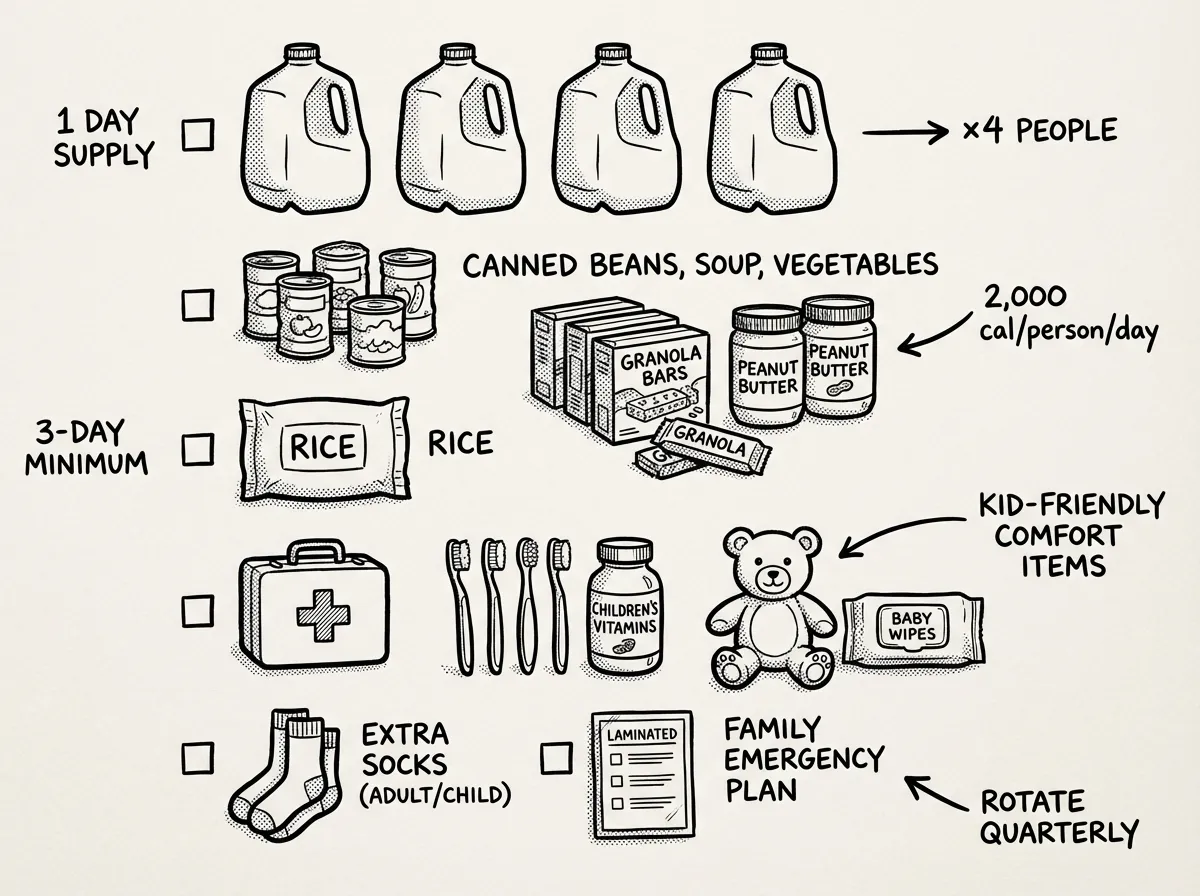 Family-of-four supply quantities at a glance
One of the most common questions I get in my CERT trainings is “how much do I actually need for my family?” The math is straightforward once you know the formula.
Water — 1 Gallon Per Person Per Day
| Timeframe | Per Person | Family of 4 Total |
|---|---|---|
| 3 days | 3 gallons | 12 gallons |
| 7 days | 7 gallons | 28 gallons |
| 14 days | 14 gallons | 56 gallons |
That 14-day number — 56 gallons — sounds intimidating, but it’s only eleven 5-gallon jugs. They fit in a closet, a garage corner, or under beds. Start with the 12-gallon 3-day target and add a jug per paycheck. Also invest in a quality filter for backup — see top water filtration systems for new preppers.
Food — Approximately 2,000 Calories Per Person Per Day
How much food does a family of 4 need for 2 weeks? Roughly 112,000 calories. That sounds like a lot until you break it down: 25 lbs of rice (~45,000 cal), 10 lbs of dried beans (~15,000 cal), 24 cans of vegetables and protein (~20,000 cal), peanut butter, oats, pasta, and cooking oil fill the rest. Total cost: $75–$120 bought gradually.
Age-Specific Adjustments
- Children under 12 need fewer calories (1,200–1,800/day depending on age) but may need specific comfort foods to maintain morale and cooperation.
- Infants require formula, diapers, wipes, and medications that aren’t interchangeable. Stock a minimum 14-day supply of formula — this isn’t something you can improvise.
- Teenagers may eat as much as or more than adults. Plan for adult portions.
- Pets are the most commonly overlooked household member. Store 14 days of pet food and any medications. A 40-lb dog needs roughly 2–3 lbs of food per day.
Don’t forget to multiply sanitation supplies accordingly — more people means more waste bags, more hygiene products, more garbage. And entertainment scales too. Kids need age-appropriate activities during extended shelter-in-place situations. Coloring books, card games, and a few favorite toys take up almost no space and save your sanity.
Emergency Communication: Staying Connected When Cell Towers Go Down
During the first 24 hours of any significant regional emergency, cell towers are either overloaded or down. I’ve seen this firsthand during PNW storm responses — people standing outside in freezing rain, holding phones overhead, trying to get a single bar. Having a communication plan before towers go silent is critical.
The communication hierarchy you should build:
-
Designate an out-of-area contact. Pick someone who lives at least 200 miles away — a relative in another state works perfectly. After a regional disaster, local calls jam, but long-distance lines often stay open. Every family member knows to call or text this one person to check in.
-
Text before you call. Texts use far less bandwidth than voice calls and can queue until towers have capacity. During the 2024 PNW ice storm, texts were getting through 6–8 hours before voice calls reconnected in some areas.
-
Get a NOAA weather radio. A battery and hand-crank weather radio from Midland or Eton ($20–$35) receives emergency broadcasts regardless of cell or internet service. Keep one at home and consider a smaller one for your bug-out bag.
-
FRS walkie-talkies for neighborhood communication. A pair of quality FRS radios (Motorola T800 or similar, around $50–$70 for a pair) lets you communicate with nearby family members or neighbors within a 1–2 mile radius in real conditions. No license needed for FRS channels. Agree on a channel and check-in time with neighbors before anything happens.
-
HAM radio as a next-level skill. A Technician-class license requires passing a 35-question exam (study materials are free online). A basic handheld like the Baofeng UV-5R costs under $30. This is intermediate-level prepping, but knowing the path exists helps you plan your progression.
-
Use the FEMA family communication plan template. FEMA publishes a free, fillable family communication plan card at ready.gov. Print two copies — one for the fridge, one in your emergency kit.
In my years leading CERT sessions, the most frequent issue I see is people who spent $500 on gear but never wrote down their family’s meeting point or practiced an evacuation route. A $0 communication plan outperforms a $500 radio you haven’t learned to use. Every single time. Write the plan first — buy the radio later.
Common Mistakes New Preppers Make
I’ve been teaching beginner prepping basics for over a decade, and I see the same mistakes on repeat. Here’s what trips people up — and what to do instead.
Buying fancy gadgets before securing water, food, shelter, and first aid. This is the number-one mistake, period. I once watched a new CERT volunteer proudly show me his $200 tactical flashlight and $150 survival knife. When I asked about his water supply, he had two bottles of Dasani in his pantry. Flashlights don’t keep you alive for a week. Water does. Secure the boring stuff first.
Stockpiling foods your household won’t eat. If your kids won’t touch canned sardines on a normal Tuesday, they won’t eat them during a power outage either — and now you’ve got wasted money and a hungry, cranky family. Buy extra of what you already eat. It’s the simplest food storage advice that exists, and people still ignore it.
Ignoring hazards specific to your region. I’ve talked to people in earthquake country whose entire prep was a hurricane kit they copied from a blog written by someone in Florida. An earthquake kit includes securing heavy furniture and knowing how to shut off your gas line. A hurricane kit prioritizes water intrusion and evacuation. They’re different plans.
Forgetting medications, pet supplies, and documents. In a real evacuation, you can’t replace your child’s prescription inhaler at a shelter. A waterproof folder with copies of IDs, insurance cards, medical records, and prescriptions costs $5 to prepare and is worth more than half the gear in your bag.
Prepping alone instead of involving your household. Your partner and kids need to know where the supplies are, where the meeting points are, and what to do if you’re not home. I run a quick drill with my family twice a year — it takes 20 minutes and reveals gaps every single time.
Letting anxiety drive purchases. Fear-based buying leads to closets full of gadgets you don’t know how to use and food you won’t eat. One step per week beats a $1,000 panic purchase every time.
What to Avoid Buying
So what gear should you skip? The prepping market is full of products designed to separate you from your money rather than keep you alive. I’ve personally field-tested over 40 survival kits and budget tools during wilderness response training — here’s what actually holds up and what doesn’t.
All-in-one “survival kits” from unknown brands. Those 250-piece emergency kits on Amazon for $39.99? Most contain junk — flimsy wire saws that snap on the second pull, compasses that point wherever they feel like, and “emergency blankets” thinner than deli wrap. Build your own kit piece by piece with gear you’ve actually tested.
Cheap knock-off water filters. The Sawyer Squeeze — around $30 — is what I reach for every time. The LifeStraw is fine but the Squeeze filters more volume per squeeze and works as a gravity system too. That $8 mystery-brand filter with five-star reviews from accounts that also reviewed discount yoga pants? Hard pass. Your water filtration isn’t the place to bargain hunt. See top water filtration systems for new preppers for field-tested recommendations.
Massive fixed-blade “Rambo” knives. A 12-inch bowie knife looks impressive on a wall. In practice, a quality 4–5 inch fixed blade (like a Morakniv Companion at around $15) handles 95% of camp and emergency tasks better. Big knives are heavy, awkward, and largely unnecessary.
MREs as your primary food storage. Military MREs are fine for a 72-hour bag, but they’re expensive ($8–$12 per meal), heavy, and have a shorter shelf life than people assume — roughly 3–5 years depending on storage temperature. Canned goods and dry staples cost a fraction and rotate naturally through your pantry.
Hand-crank phone chargers. You’ll crank for 20 minutes to get 3% battery. Spend the money on a decent solar power bank instead — 20,000mAh from Anker or Nekteck runs $25–$40 and actually works.
“Tactical” medical gear you haven’t trained with. Tourniquets and chest seals save lives — in the hands of someone trained. Without training, they can cause harm. Master emergency first aid basics every prepper needs first, then level up your medical kit alongside your skills.
If a product promises to do ten things, it probably does zero of them well. Buy single-purpose, proven gear and learn to use it before an emergency forces the lesson.
For a deeper dive into spotting overpriced and overhyped products, check out how to identify and avoid prepper scams.
Urban vs. Rural: How Your Location Changes the Plan
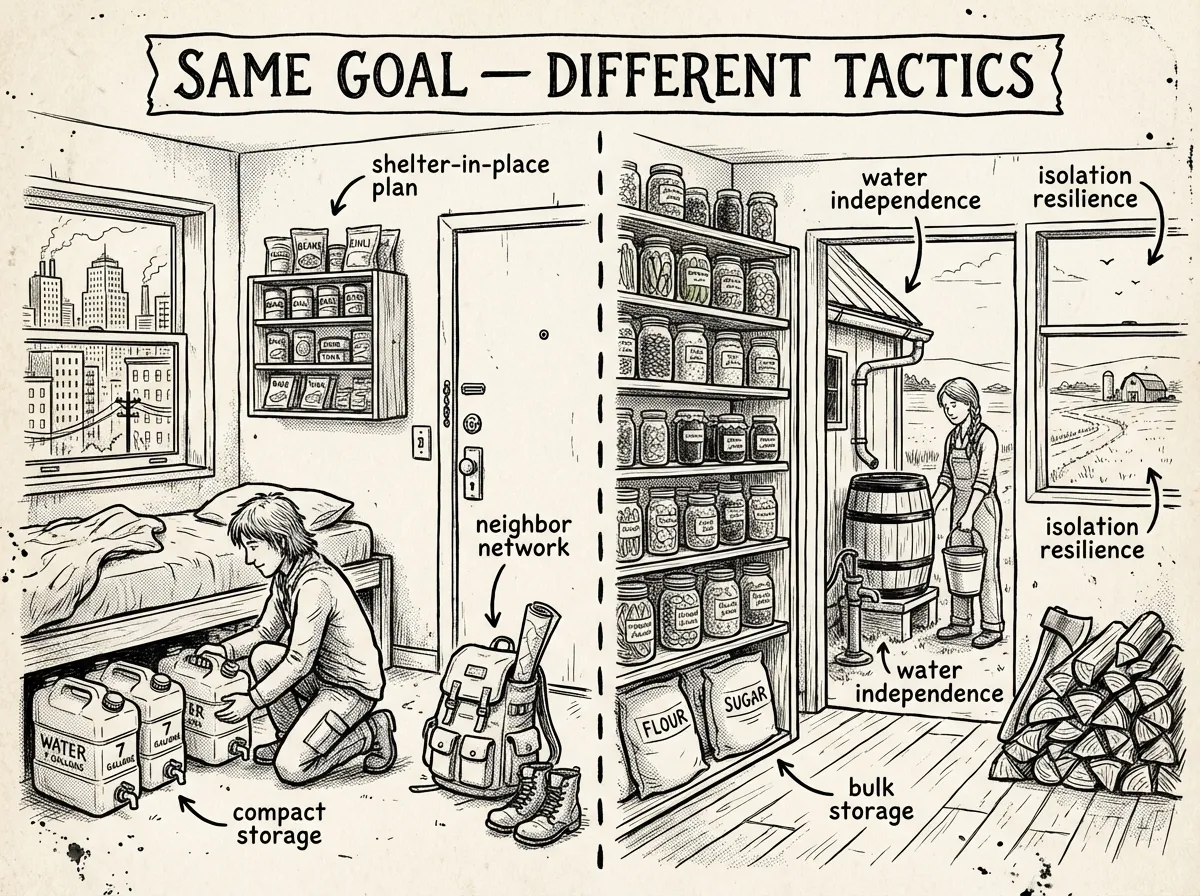 Two different realities, two different preps
One of the biggest oversights in beginner prepping basics is treating all preppers the same. A family in a Phoenix apartment and a family on five acres in Vermont face very different challenges.
Space and Storage
- Urban: You’re working with closets, not basements. Prioritize compact, calorie-dense foods (nut butters, freeze-dried pouches, energy bars). Use under-bed space for flat water containers — the WaterBOB bathtub bladder (65 gallons, around $35) is an urban prepper’s best friend when you have warning of an incoming event.
- Rural: You likely have garage or basement space. Take advantage: 55-gallon water barrels, bulk rice and beans in 5-gallon Mylar-lined buckets, and a chest freezer backed by a generator are all reasonable options.
Evacuation Realities
- Urban: Traffic gridlock during a regional emergency is nearly guaranteed. Have a bug-out bag ready, but also prepare seriously for sheltering in place — that may be your only realistic option for the first 24–48 hours. Know multiple routes out of your city on foot, not just by car.
- Rural: Evacuation routes are fewer but less congested. Your bigger risk is being cut off — downed trees, washed-out roads, or snowdrifts. Keep a chainsaw with fuel, a come-along winch, and extra vehicle fuel stored safely.
Water Access
- Urban: You’re 100% dependent on municipal water unless you store your own. Have purification methods ready in case tap water becomes unsafe — boil advisories are more common than people think.
- Rural: Wells, creeks, ponds, and rainwater collection give you options — but all require filtration or treatment. A well without power needs a hand pump or solar pump backup. Don’t assume your rural water source is automatically safe.
If you’re in a humid Gulf Coast climate, mold and moisture damage to stored supplies is a real concern — seal everything in waterproof containers and use desiccant packs. High desert is a different problem: extreme heat degrades food and water storage faster, so temperature-controlled spaces matter more.
The overlap is simple: regardless of location, everyone needs water, food, light, first aid, communication, and a plan. The how just changes based on your zip code.
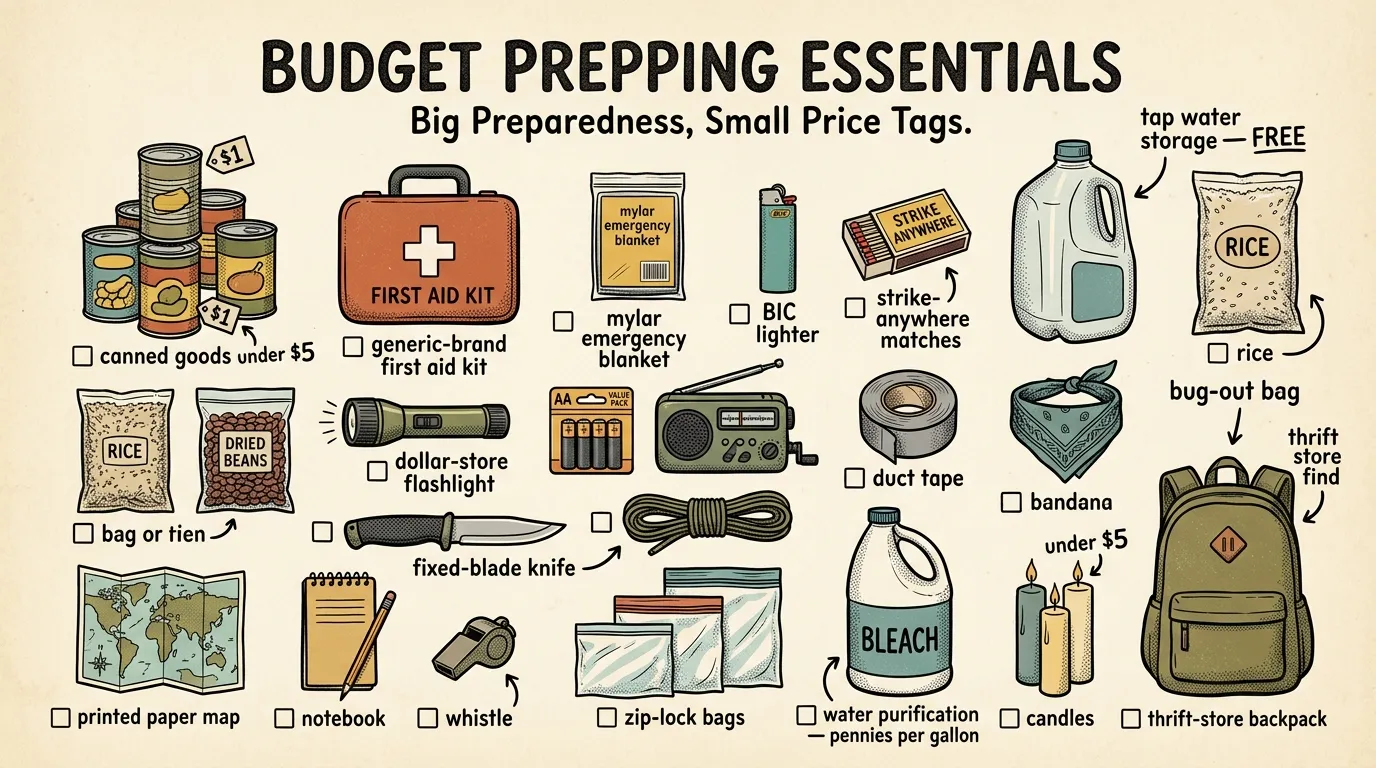
Budget Breakdown: Priority Order When Money Is Tight
What if you can barely spare $20 this month? That’s fine. Meaningful preparedness starts cheap.
Tier 1: The Non-Negotiable Foundation ($0–$50)
- Written emergency plan — $0. Paper, pen, 30 minutes. Refer to the essential prepper’s checklist for a solid framework.
- Water storage for 3 days — $4–$10. A case of bottled water per person, or fill clean 2-liter soda bottles with tap water and a drop of unscented bleach.
- 3 days of shelf-stable food — $15–$30. Canned beans, canned chicken, peanut butter, crackers, oats. Buy extras during your normal grocery run.
- Basic lighting — $5–$10. A decent LED flashlight and a pack of batteries.
- Manual can opener — $3–$8. I’ve watched a grown adult try to open a can of chili with a rock during a power outage. Don’t be that person.
Tier 2: Expanding to 7 Days ($50–$150)
- More water storage — $15–$30. Add a 5-gallon jug or two plus purification tablets ($7–$12 for a bottle of 50).
- Portable water filter — $20–$35. Sawyer Squeeze or LifeStraw. Proven, lightweight, long-lasting.
- First-aid kit — $15–$30. Buy a pre-made kit and supplement with your own medications, extra gauze, and nitrile gloves.
- Power bank — $20–$35. A 20,000mAh charger handles multiple full phone charges.
- Cash reserve — $50–$100 in small bills. ATMs don’t work without power.
Tier 3: Two-Week Readiness ($150–$400)
- Deeper food stores — $50–$100. Bulk rice, dried beans, pasta, canned vegetables and fruit, cooking oil, salt.
- Camp stove and fuel — $30–$60. A basic butane or propane single-burner stove with 4–8 fuel canisters.
- NOAA weather radio — $20–$35. Battery and hand-crank models from Midland or Eton.
- Sanitation supplies — $15–$25. Heavy-duty garbage bags, bucket with snap-on toilet seat, kitty litter or enzyme waste treatment.
- Document copies — $5–$10. Photocopy IDs, insurance cards, and medical records. Store in a waterproof bag plus an encrypted USB drive.
For roughly $200–$400 spread over a few months, you go from completely unprepared to comfortably supplied for two weeks. That’s less than most people spend on streaming subscriptions in a year.
Where to save money without cutting corners: Dollar stores carry surprisingly good candles, lighters, duct tape, and hygiene items. Grocery store loss leaders and bulk bins are your best friends for food rotation. Thrift stores often have camping gear, sturdy backpacks, and wool blankets for a fraction of retail. And avoid “prepper premium” pricing — a bag of rice doesn’t cost more just because it’s marketed as “survival food.”
Prepping Beyond 72 Hours: Extended Scenarios
Understanding the 72-hour rule for emergency preparedness is a great starting point, but many real-world emergencies last longer. Hurricane Katrina displaced people for weeks. The 2021 Texas freeze left millions without power for 4–7 days with compromised water for over two weeks. Ice storms in rural PNW areas routinely isolate homes for 10+ days.
Once you’ve nailed the 72-hour basics, extending to 1–2 weeks means thinking about problems that don’t show up in the first three days.
Food Fatigue Is Real
By day four, eating cold canned beans out of a tin gets psychologically draining. Plan for variety and morale. Include comfort items: instant coffee, tea, hot chocolate, hard candy, shelf-stable snacks your family actually enjoys. A camp stove transforms your food situation — hot meals matter enormously for morale and digestion. Don’t forget cooking oil, salt, pepper, and a few spice packets. They weigh nothing and make rice and beans actually palatable for two straight weeks.
For more on building a resilient food supply, read about starting a prepper garden for long-term food security.
Sanitation Becomes the Real Challenge
Without running water, a flush toilet is useless after the tank empties. A 5-gallon bucket with a snap-on seat, heavy-duty trash bags, and kitty litter or enzyme powder is the standard field solution. Plan on one bag per person per day. Stock baby wipes for full-body cleanup, hand sanitizer, extra garbage bags, menstrual products, diapers if applicable, and prescription medications. With no trash pickup, waste piles fast — have extra contractor-grade bags and a plan for storing waste away from your living area.
Power Beyond 72 Hours
Portable power stations in the $200–$400 range (Jackery 300, Bluetti EB3A) can run LED lights, charge phones and medical devices, and power small fans. Pair with a 100W foldable solar panel ($100–$150) and you’ve got indefinite recharging capability for essential electronics.
Generators work well but require serious carbon monoxide safety awareness — never run one indoors, in a garage, or within 20 feet of windows. A basic 2,000W inverter generator runs $400–$600 and powers essentials.
Can’t afford either? Even a $25 solar power bank and a battery-powered lantern keep you functional. Don’t let the cost of a generator stop you from solving the power problem at a basic level.
Medication Management Beyond 7 Days
Most pharmacies will fill a 30-day prescription early by 7–10 days. Use this to build a rolling buffer. Talk to your doctor about getting an emergency backup prescription for critical medications. Temperature-sensitive medications like insulin need a plan: a small cooler with frozen water bottles buys you 24–48 hours, and medication-specific cooling cases with phase-change technology extend this further.
Keep an updated written list of every medication, dosage, prescribing doctor, and pharmacy in your emergency kit. If you’re evacuated to a shelter with medical support, this list is invaluable.
Mental health during extended power outages is the topic nobody preps for, and it’s one of the hardest parts. By day five without power, routine, or outside contact, stress and boredom compound — especially with kids. Maintain daily routines, get physical activity even if it’s just walking laps around your yard, and pack board games and card decks. They aren’t luxuries — they’re mental health tools. I’ve seen families fall apart on day three not because they ran out of food, but because they ran out of patience. Prep for that too.
Keeping Prepping Approachable
Prepping should feel like a practical life skill, not a second job. Here’s how to keep it manageable.
Involve your kids in age-appropriate ways. Let them choose their own snack items for the emergency kit — it gives them ownership and means they’ll actually eat what’s stored. My neighbor’s kids look forward to their quarterly “power out night” where the family practices using lanterns and the camp stove for dinner. Those kids will be more prepared at age 10 than most adults.
Keep a small notebook in your kit. After drills or real events, log what worked, what was missing, and what needs changing. During a community earthquake drill I helped organize last fall, three families discovered their flashlight batteries were dead and two realized their water supply had expired six months earlier. The families who wrote it down fixed it. The ones who said “I’ll remember” didn’t.
Start conversations with neighbors. You don’t have to reveal your entire supply list. Just saying “Hey, have you thought about what we’d do if power was out for a week?” opens a door. Neighborhoods that communicate before an emergency respond better during one — some of the best-prepared communities I work with started with exactly that kind of casual conversation over a fence.
- Write a one-page emergency plan and tape it inside a cabinet
- Buy a case of bottled water per household member
- Pick up three extra cans of food your family already eats during your next grocery trip
- Test your flashlight batteries and replace if needed
- Text your out-of-area emergency contact to confirm they’re willing to be your hub
You don’t have to do everything at once. One step this week, one step next week, and within a month you’ll be more prepared than the vast majority of households around you. That’s not a sales pitch — it’s just how the math works out when you start moving.
The Complete
Prepper's Reference.
149 articles synthesized into one comprehensive PDF — twelve chapters covering water, food, shelter, first aid, comms, and scenario-specific preparedness. Free with your email.
Unsubscribe anytime · We never share your email
You're in. Check your inbox.
Keep Reading
Prepping on a Budget: Affordable Gear & Strategies
Start prepping on a budget with a $75-$150 starter kit. Get affordable gear picks, DIY hacks, and a layered buying plan from a FEMA-trained responder.

Beginner Prepper Guide: Mindset, Supplies & Skills
New to prepping? This beginner prepper guide covers the preparedness mindset, essential supplies, skills, and mistakes to avoid. Start building readiness today.
The Science of Prepping: What Studies Say About Preparedness
Scientific research shows prepping works: plans, kits, and mental resilience improve disaster response. Here’s how beginners can prep smarter.