This article provides a comprehensive bug-out bag list organized into survival categories (water, food, shelter, first aid, navigation, tools, documents, clothing) with specific weight budgets per category, a three-tier priority system, named product recommendations, and printable checklist formatting for building a 72-hour evacuation kit.
Key Takeaways
- Keep your loaded bug-out bag under 20% of your body weight — 25-35 lbs is the sweet spot for most adults
- Pack all Tier 1 items across 8 survival categories first, then add Tier 2 and 3 only if weight allows
- Carry some water plus filtration capability — don't try to carry 3 days of water (it's 24+ lbs alone)
- Do a quarterly audit: rotate food, recharge batteries, update medications, and test-walk with your loaded pack
- Customize for your climate, family size, and most likely evacuation scenario — no universal list fits everyone
- A printed checklist taped inside your closet door beats a perfectly curated list saved on a phone that's dead
I’ve packed, unpacked, repacked, and field-tested bug-out bags for over twelve years — first as a Wilderness First Responder running backcountry scenarios in the Cascades, then as a FEMA-trained emergency management professional advising real families on evacuation readiness. And here’s what I’ve learned: most bug-out bag lists floating around online are either way too vague or absurdly overloaded. A list that tells you to pack “food and water” without weight limits isn’t a plan. It’s a grocery reminder.
This is the bug-out bag list I actually use. It’s organized by survival category, each section has a weight budget, and every item gets a tier priority so you know what goes in first and what’s optional. My current loadout weighs 28.4 lbs on my bathroom scale as of April 2026. Print this. Tape it inside your closet door. Use it.
Last updated: May 2026. Gear picks and prices verified May 2026.
Quick Summary
- Total target weight: 25–35 lbs for most adults (never exceed 20% of your body weight)
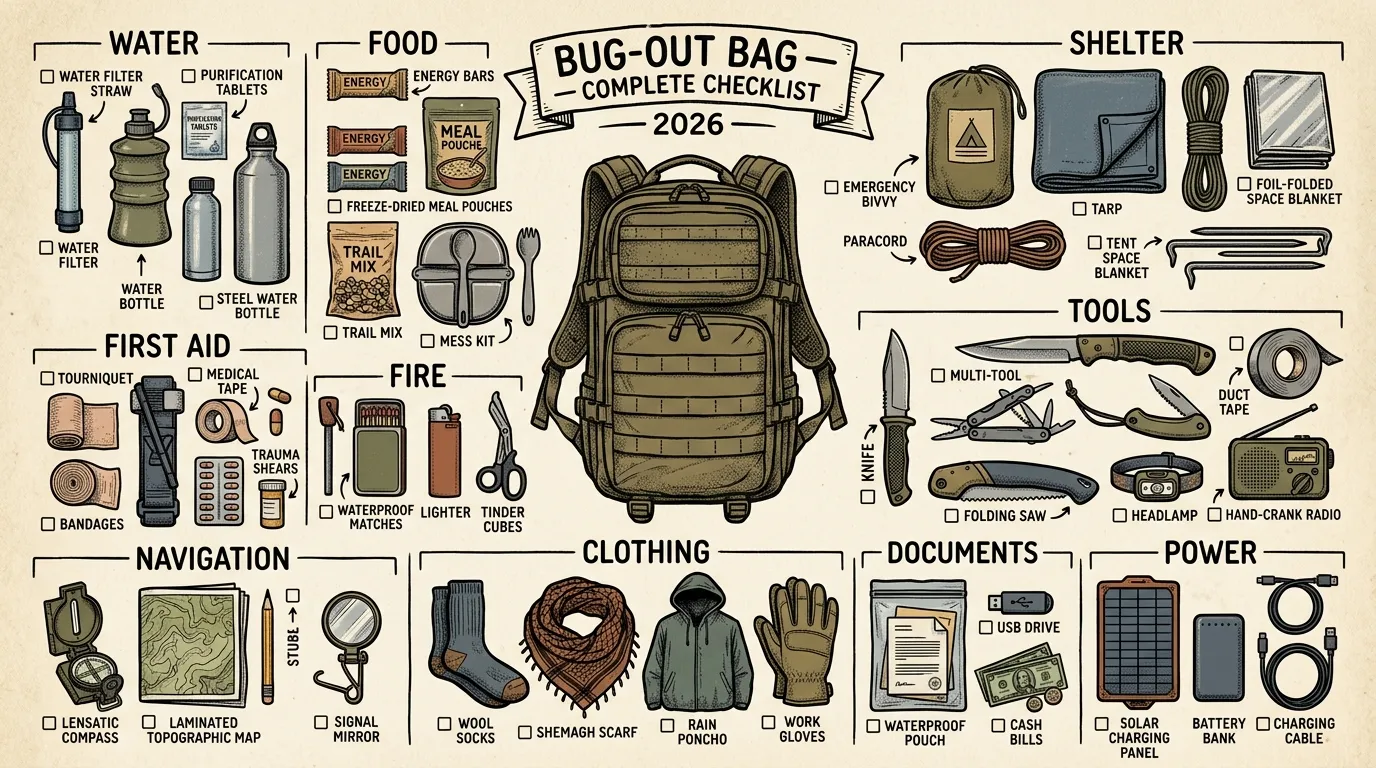
- Organized into 8 survival categories: Water, Food, Shelter & Warmth, First Aid, Navigation & Communication, Tools & Gear, Documents & Cash, Clothing
- Three-tier priority system: Tier 1 (critical — pack first), Tier 2 (important — pack if weight allows), Tier 3 (nice-to-have — only if you’re under budget)
- 72-hour baseline aligned with FEMA disaster supply recommendations (specifically FEMA’s Ready.gov emergency supply list and FEMA P-1094), extended to cover realistic evacuation timelines
- Named gear picks I’ve actually used in the field, not affiliate-link stuffing
- Printable checklist format at the end of each category
What Should Every Bug-Out Bag Contain?
Every bug-out bag should contain these 10 core items:
- Water bottles and filter — carry water plus the ability to purify more
- Calorie-dense food — 72 hours of shelf-stable, no-cook nutrition
- Tarp or emergency bivy — wind, rain, and ground protection
- Fire-starting kit — two ignition sources plus prepared tinder
- First aid kit — blister care, wound management, personal medications
- Fixed-blade knife — your most versatile single tool
- Headlamp with spare batteries — hands-free illumination for night movement
- Compass and printed map — navigation that never needs charging
- Critical documents and cash — ID copies, insurance, $200+ in small bills
- Weather-appropriate clothing layers — base layer, insulation, rain shell, extra socks
These ten items span the eight survival categories I break down in detail below. Get these in your pack first, and you’ve covered the threats most likely to actually harm you during a 72-hour evacuation.
The Weight Budget That Makes Everything Else Work
Before you touch a single piece of gear, you need a number. Your number. Take your body weight, multiply by 0.20, and that’s your absolute ceiling. A 160-pound person? Thirty-two pounds max. A 200-pound person? Forty pounds — but honestly, I’d still aim for 35.
Why does this matter so much? Because I’ve watched people load 50-pound packs for “weekend readiness tests” and tap out in under three miles. Blisters. Knee pain. Shoulder numbness. An evacuation isn’t a leisurely backpacking trip. You might be moving fast, moving stressed, moving with kids in tow.
Here’s how I break down the weight budget across categories:
| Category | Weight Budget | % of Total |
|---|---|---|
| Water & Filtration | 5–7 lbs | 20% |
| Food | 4–6 lbs | 16% |
| Shelter & Warmth | 4–6 lbs | 16% |
| First Aid | 2–3 lbs | 8% |
| Navigation & Comms | 1–2 lbs | 5% |
| Tools & Gear | 3–5 lbs | 14% |
| Documents & Cash | 0.5–1 lb | 3% |
| Clothing | 4–6 lbs | 18% |
These aren’t arbitrary. They’re based on what actually keeps you alive, in priority order, while staying mobile enough to move 10–15 miles in a day if you have to.
Understanding the Three-Tier Priority System
Not every item on a bug-out bag essentials list deserves the same real estate in your pack. I use a three-tier system that’s saved me from chronic overpacking:
- Tier 1 — Critical: You die or face serious risk without it. These go in first, no exceptions.
- Tier 2 — Important: Significantly improves comfort, efficiency, or capability. Pack these if you’re within weight budget.
- Tier 3 — Enhancement: Useful in specific scenarios but not worth the weight if you’re near your limit.
When you’re building your bag, pack all Tier 1 items first across every category. Weigh the bag. Then add Tier 2. Weigh again. Tier 3 only fills whatever gap remains.
A 30-pound bag you can actually carry beats a 55-pound bag you abandon at mile two.
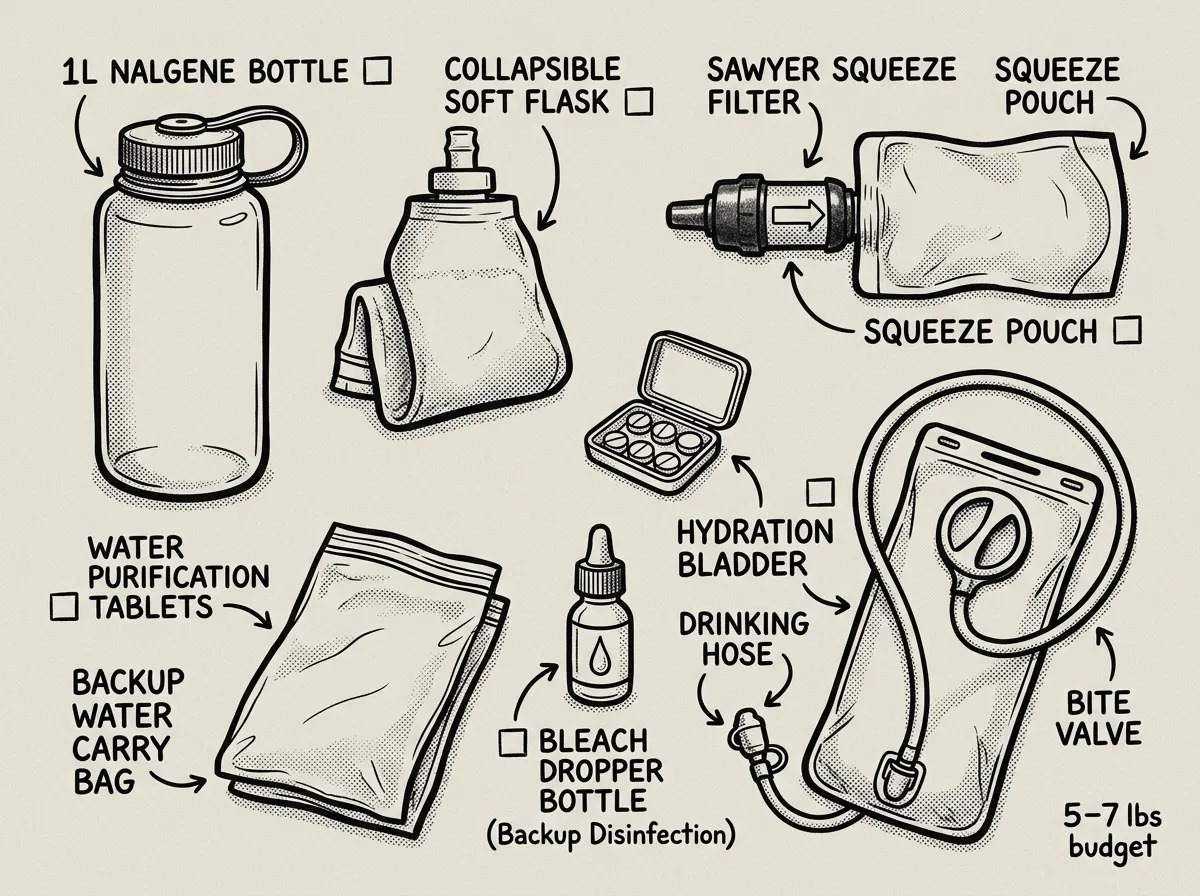
Water & Filtration (Budget: 5–7 lbs)
 Water and filtration essentials laid out for a 72-hour bug-out bag
Water’s the heaviest thing in your pack and the one you can’t skip. One gallon per person per day is the FEMA standard, but carrying three gallons (24+ pounds of water alone) is insane. You carry some water and the ability to make more.
- Tier 1: Water bottles — 2 durable bottles, 32 oz each (carried full = 4 lbs)
- Tier 1: Water filter — Sawyer Squeeze or similar pump/squeeze filter
- Tier 1: Purification tablets — Aquatabs or Potable Aqua, minimum 20 tablets
- Tier 2: Collapsible water container — 2L Platypus or CNOC bag for camp use
- Tier 2: Metal single-wall bottle — doubles as boiling vessel
- Tier 3: Coffee filters or bandana — pre-filter sediment before purifying
The Sawyer Squeeze — around $30 — is what I reach for every single time. I’ve pushed thousands of liters through mine over the years and it’s still going. The LifeStraw gets all the marketing buzz, but it can’t gravity-feed, can’t attach to a bottle for storage, and drinking from a puddle on your hands and knees isn’t a real plan. Get the Squeeze. Pair it with a CNOC Vecto dirty bag ($16) and you’ve got a gravity system that weighs almost nothing.
Start with both bottles full. That’s 64 ounces — enough for roughly half a day of moderate activity. Your filter and tablets handle everything after that, assuming you’re near any water source. If you’re in high desert terrain — say eastern Oregon or the Southwest — you may need to bump your carried water to three liters and cut weight elsewhere. For a deeper dive on filtration options, check out my guide on the best portable water filters.
Food (Budget: 4–6 lbs)
You’re not cooking gourmet meals during an evacuation. You need calorie-dense, shelf-stable food that requires minimal or zero preparation. The goal is 2,000+ calories per day for 72 hours.
- Tier 1: Calorie-dense bars — 6-9 bars (Clif, Datrex, SOS rations), ~400 cal each
- Tier 1: Electrolyte packets — 6 individual packets (Liquid IV, LMNT, or store brand)
- Tier 2: Freeze-dried meals — 2-3 pouches (just add boiling water)
- Tier 2: Trail mix or nuts — 2 resealable bags, ~600 cal each
- Tier 2: Peanut butter packets — 4-6 individual squeeze packs
- Tier 3: Instant coffee or tea bags — morale matters more than you think
- Tier 3: Hard candy — quick sugar boost, nearly weightless
Rotate your food every 12 months. I mark the “packed on” date with a Sharpie directly on each item. The first time I cracked open a two-year-old Clif Bar, it tasted like flavored cardboard — technically edible, but morale-crushing.
Calorie bars alone can handle your minimum. Freeze-dried meals are a Tier 2 luxury that requires your stove and fuel (see Tools section), so only pack them if the weight math works. Nine 400-calorie bars weigh about 2.5 pounds and cover 3,600 calories per day — more than enough.
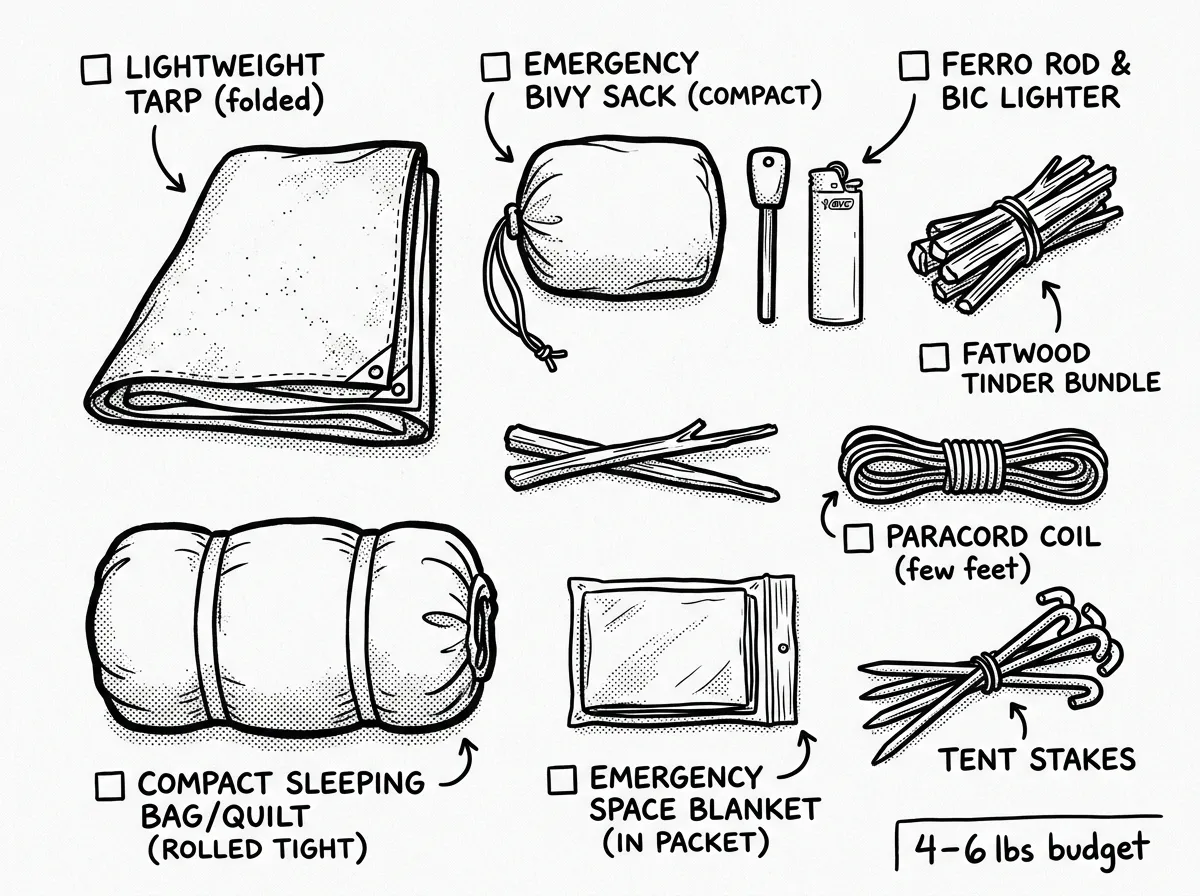
Shelter & Warmth (Budget: 4–6 lbs)
 Shelter and warmth gear spread for weight-conscious packing
Exposure kills faster than dehydration. Hypothermia can set in at 50°F with wind and rain — you don’t need a blizzard to be in trouble. Your shelter setup needs to block wind, shed rain, and retain body heat.
- Tier 1: Tarp — 8x10 or 10x10 silnylon, with guylines pre-attached
- Tier 1: Emergency bivy or space blanket — SOL Escape Bivvy for reflective warmth
- Tier 1: Fire starter — BIC lighter (2) PLUS ferro rod with striker
- Tier 1: Tinder — cotton balls with petroleum jelly in a small waterproof bag
- Tier 2: Sleeping bag or compact quilt — rated to expected low temps, compressed
- Tier 2: Sleeping pad — closed-cell foam (Therm-a-Rest Z Lite, cut to torso length)
- Tier 3: Hand warmers — 4-6 packets, useful in cold climates
If you’re in the Pacific Northwest like me, rain is the primary threat nine months out of the year. A good tarp pitched correctly beats a tent for weight and versatility. The SOL Escape Bivvy — about $40 — is breathable enough to actually sleep in, unlike those crinkly mylar sheets that trap all your sweat. For more on fire-starting redundancy, I’ve got a detailed breakdown in my guide on the best fire starters for wet conditions.
It’s January. An ice storm takes out power across three counties and road crews can’t keep up. Your neighborhood is told to evacuate to a warming shelter seven miles away. Temperatures are hovering at 28°F with freezing rain. Your shelter and warmth category is the difference between walking in miserable but functional, or becoming a hypothermia case yourself.
If you’re in a humid Gulf Coast climate, swap the heavy sleeping bag for a lighter option and add a bug net instead. Climate dictates gear. There’s no universal shelter loadout.
First Aid (Budget: 2–3 lbs)
Your first aid kit isn’t a mini hospital. It’s built to handle the injuries most likely during an evacuation on foot: blisters, cuts, sprains, allergic reactions, and GI problems. If you have a specific medical condition, that gets added on top.
- Tier 1: Adhesive bandages — assorted sizes, 20+
- Tier 1: Gauze pads and medical tape — 4x4 pads, 1 roll of tape
- Tier 1: Tourniquet — CAT tourniquet, know how to use it
- Tier 1: Ibuprofen and acetaminophen — travel bottles of each
- Tier 1: Personal medications — 7-day supply minimum, rotated regularly
- Tier 1: Moleskin or blister patches — you’ll need these, trust me
- Tier 2: Antibiotic ointment — small tube of Neosporin or equivalent
- Tier 2: Diphenhydramine (Benadryl) — allergic reactions and sleep aid
- Tier 2: Anti-diarrheal (Imodium) — stress + unfamiliar water = stomach trouble
- Tier 2: SAM splint — moldable, lightweight, handles sprains and fractures
- Tier 2: Nitrile gloves — 4 pairs
- Tier 3: Triangular bandage — sling, tourniquet backup, bandage, a dozen other uses
- Tier 3: Irrigation syringe — wound cleaning when clean water is available
As a certified Wilderness First Responder — recertified every two years through NOLS Wilderness Medicine — I build my medical kit around the injuries I’ve actually treated in the field, not theoretical scenarios. And the number one thing I see people skip is blister care. You’ve never walked 10 miles in boots you haven’t broken in while carrying 30 pounds. That single overlooked hot spot at mile two becomes a debilitating blood blister by mile six. Moleskin weighs almost nothing. Pack it.
Store your Tier 1 first aid items in a separate, clearly marked pouch that you can grab without digging through your whole pack. In a real emergency, fumbling through ziplock bags costs time you might not have. For a comprehensive medical kit guide, see my full prepper first aid kit checklist.
Navigation & Communication (Budget: 1–2 lbs)
Your phone might work. It also might not. Cell towers go down in disasters. Batteries die. This category is your insurance policy — and in my experience, it’s the most overlooked category in the average bug-out bag gear list.
- Tier 1: Compass — baseplate compass (Suunto A-10 or similar), learn to use it before you need it
- Tier 1: Local/regional maps — printed, laminated or in a waterproof bag
- Tier 1: Whistle — plastic pea-less whistle attached to your pack strap
- Tier 1: Emergency contact card — laminated, with out-of-state contacts, meeting points
- Tier 2: Hand-crank or battery AM/FM radio — NOAA weather capable
- Tier 2: Headlamp with spare batteries — Black Diamond Spot, 300+ lumens
- Tier 2: Backup battery bank — 10,000 mAh, kept charged
- Tier 3: Signal mirror — lightweight, effective for line-of-sight rescue signaling
- Tier 3: FRS/GMRS handheld radio — useful if your group has multiple units
You don’t need to be a land navigation expert, but you need the basics: orient your map to north using the compass, identify two landmarks you can see, and triangulate your approximate position. That’s enough to stay on route during an evacuation. If you want to go deeper, June Fleming’s Staying Found is the best beginner-friendly resource I’ve found, and my basic orienteering guide covers the fundamentals.
Write your local NOAA Weather Radio frequencies on an index card and keep it in your bag. Don’t just save them on a device. If you carry an FRS/GMRS radio, pre-program local emergency frequencies and your family’s agreed-upon channel before you need it.
So what about GPS? Sure, keep your phone charged and download offline maps ahead of time. But don’t rely on it. I’ve seen GPS apps drain a full battery in three hours with constant screen-on navigation. Your phone’s primary job during an evacuation is communication, not navigation. Use the compass and map, check the phone sparingly.
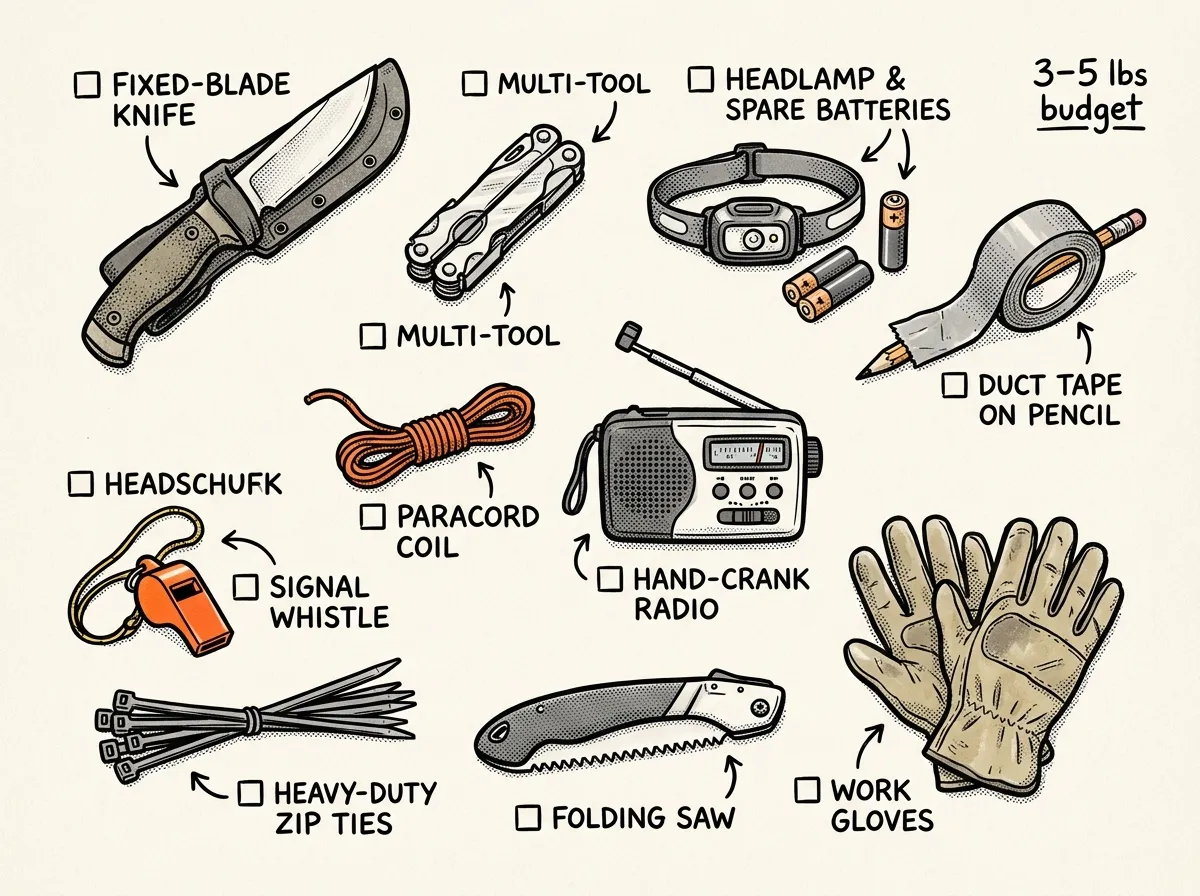
Tools & Gear (Budget: 3–5 lbs)
 Core tools and utility gear for a complete bug-out loadout
This is where people go off the rails. I’ve seen bug-out bag packing lists recommending hatchets, folding saws, full-size shovels, and fishing kits. Unless you’re planning a weeks-long wilderness stay — and if you are, that’s a different bag — you need a handful of versatile tools that solve the most problems.
- Tier 1: Fixed-blade knife — 4-5 inch blade, full tang (Morakniv Companion, ~$15, is excellent)
- Tier 1: Paracord — 50 feet, 550-lb test
- Tier 1: Duct tape — wrap 10-15 feet around a pencil or water bottle
- Tier 2: Multitool — Leatherman Wave+ or Gerber Suspension
- Tier 2: Heavy-duty work gloves — leather palm, protects hands during debris navigation
- Tier 2: Compact stove — Esbit pocket stove with 6 fuel tabs, or BRS ultralight canister stove
- Tier 2: N95 masks — 2 individually wrapped, useful in smoke, dust, ash scenarios
- Tier 3: Zip ties — assorted sizes, 10-15 count
- Tier 3: Sewing kit — needle, thread, safety pins for gear repair
- Tier 3: Fishing line and hooks — only if you’re near fishable water AND know what you’re doing
I carry the Morakniv Companion — it’s around $15 — and it outperforms knives costing five times as much for the tasks you’ll actually do: cutting cordage, preparing tinder, food prep, light batoning. I’ve seen guys strap $200 tactical knives to their packs that they’ve never used outside of a YouTube unboxing. Don’t be that person. Get a knife you’ll actually practice with.
Documents & Cash (Budget: 0.5–1 lb)
This is the category everyone forgets until they’re standing in front of a FEMA disaster assistance desk with nothing to prove who they are. During the 2020 Oregon wildfire evacuations, I helped three families in Clackamas County grab their bags and move within 15 minutes of a Level 3 notice. The families who had pre-packed bags with this system were out the door in under 10 minutes. The one family who tried to pack on the spot forgot medications, IDs, and water filtration. Don’t be that family.
- Tier 1: Cash — $200-500 in small bills ($5s, $10s, $20s), ATMs won’t work
- Tier 1: Photo ID copies — driver’s license, passport (laminated copies)
- Tier 1: Insurance documents — home, auto, health (copies or USB drive)
- Tier 1: Emergency contact list — printed, not just saved in your phone
- Tier 2: USB drive — encrypted, containing scans of all important documents
- Tier 2: Proof of address — utility bill copy, lease, or mortgage statement
- Tier 2: Medical records summary — allergies, medications, blood type, conditions
- Tier 3: Spare house/car keys — in a sealed, labeled envelope
Store everything in a waterproof document bag or dry bag. I use a Sea to Summit Lightweight Dry Sack (the 2L size works perfectly) that cost me about $12. All my paper docs are laminated. The USB drive has encrypted PDFs of everything — insurance policies, mortgage documents, birth certificates, medication lists.
Keep a second copy of your critical documents at a trusted family member’s house in another city. If your home and your bag are both compromised, you still have a path to proving your identity and filing insurance claims.
Clothing (Budget: 4–6 lbs)
You’re not packing a full wardrobe. You’re packing one change of weather-appropriate clothing that layers effectively. The key word is layers — they give you the most thermal versatility for the least weight.
- Tier 1: Moisture-wicking base layer — top and bottom, synthetic or merino wool
- Tier 1: Insulating mid-layer — fleece pullover or lightweight down jacket
- Tier 1: Rain jacket — waterproof, packable (Frogg Toggs at ~$20 works surprisingly well)
- Tier 1: Extra socks — 2 pairs of wool-blend hiking socks, this is non-negotiable
- Tier 1: Sturdy footwear — worn on your feet, not packed (broken in!)
- Tier 2: Watch cap or beanie — you lose enormous heat through your head
- Tier 2: Sun hat with brim — critical in exposed terrain
- Tier 2: Bandana or buff — dust protection, sun coverage, water pre-filter, sling
- Tier 2: Underwear — 1 spare pair, moisture-wicking
- Tier 3: Rain pants — if you’re in a consistently wet climate
- Tier 3: Sunglasses — UV protection, especially at elevation or snow glare
Cotton kills. I don’t say that to be dramatic — it’s a core principle in wilderness medicine. Cotton holds moisture, loses all insulating value when wet, and accelerates heat loss. Merino wool and synthetics dry fast, insulate when damp, and manage odor better over multi-day wear.
The Bag Itself: What to Actually Carry All This In
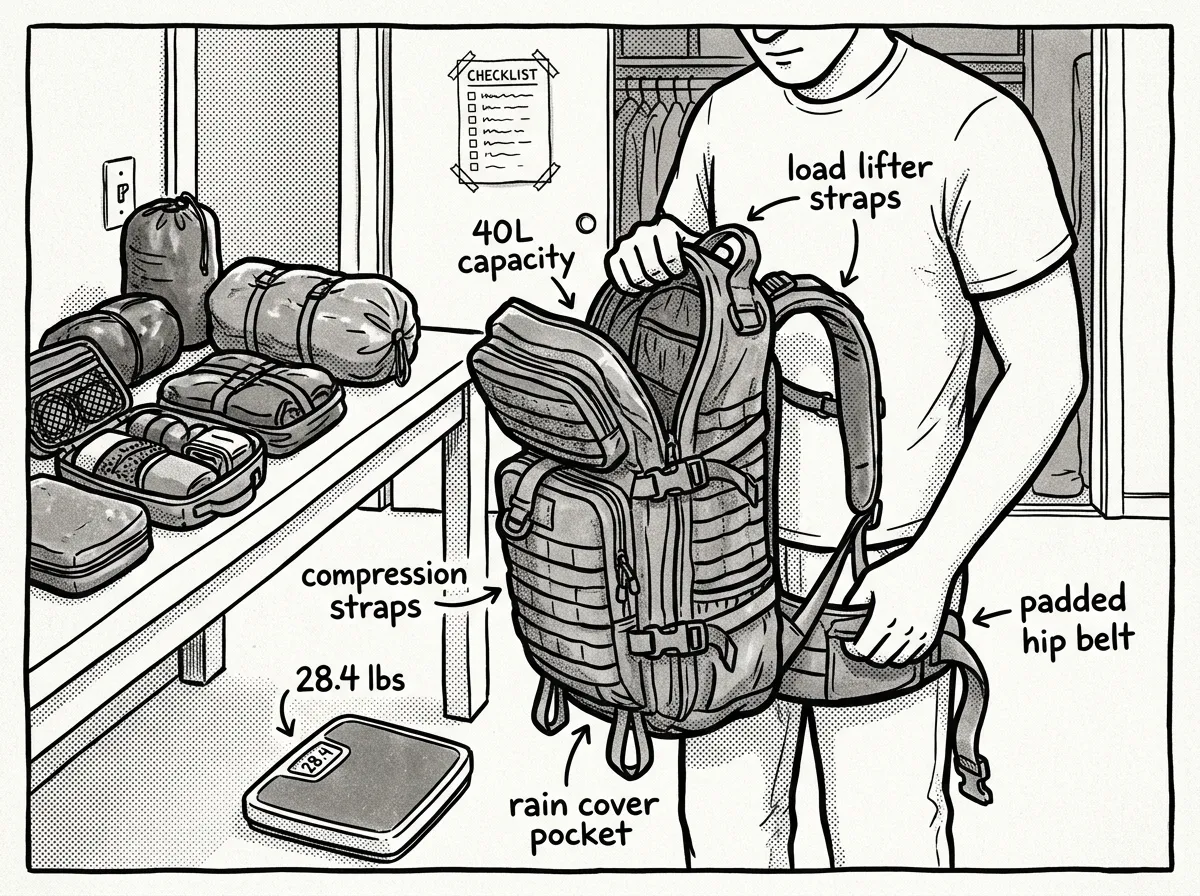 Choosing and loading the right pack for your bug-out bag build
Your pack matters more than people realize. It doesn’t need to be tactical-looking. It doesn’t need MOLLE webbing. It needs to fit your torso, distribute weight to your hips, and have a hip belt worthy of the name.
For most adults, a 40–50 liter pack hits the sweet spot. Too small and you’re strapping things to the outside (snag risk, poor balance). Too big and you’ll fill it with stuff you don’t need. At the budget end, the Teton Sports Scout 3400 (~$60) is solid. For a step up, the Osprey Talon 44 or REI Trail 40 give you better suspension, ventilation, and load transfer for $120–$160. If you want a bombproof option, the GORUCK GR2 40L is overbuilt in the best way — heavy-duty, no-nonsense, made for abuse — but at $400+ it’s an investment.
- Measure your torso length from C7 vertebra (base of neck) to the top of your hip bones — most packs come in sizes based on this measurement
- Load your packed bag and put it on — tighten the hip belt FIRST so it sits on your iliac crest (top of hip bones), then adjust shoulder straps
- The shoulder straps should wrap over your shoulders and connect to load lifters that angle back toward the pack at about 45 degrees — if the weight is all on your shoulders, the hip belt isn’t doing its job
- Walk around your house for 20 minutes and adjust until nothing pinches, shifts, or creates pressure points
The first time I tested my first real bug-out bag, I used an old school backpack with no hip belt. Four miles in and my shoulders were screaming. Lesson learned permanently. A proper pack makes a night-and-day difference.
Bug-Out Bag vs. Get-Home Bag vs. INCH Bag: Which Do You Need?
Before you start adding every item from this bug-out bag supplies list, it helps to know exactly what type of bag you’re building. People conflate three very different kits, and the confusion leads to overpacking or building the wrong thing entirely.
Bug-Out Bag (BOB): This is what this article covers — a 72-hour evacuation kit that gets you from your home to a safer location. It assumes you’re leaving when told to, you have a destination in mind, and basic infrastructure (roads, shelters, stores) may still partially function. This is the right starting point for 95% of people.
Get-Home Bag (GHB): A lighter, more compact kit you keep at your office or in your car. Its only job is getting you home safely during an emergency — think earthquake during work hours, civil unrest blocking your normal commute, or a sudden grid failure. Typically 10–15 lbs, focused on water, walking shoes, a rain layer, basic first aid, a phone charger, and a map of your commute route. No shelter, no multi-day food.
INCH Bag (“I’m Never Coming Home”): A long-term survival loadout for catastrophic scenarios where you don’t expect to return. Think heavy-duty gear: larger shelter system, tools for foraging and trapping, comprehensive medical kit, seeds, more robust water purification, significant food supply. These bags often exceed 50 lbs and require serious physical conditioning to carry. Unless you live in an extremely high-risk area with no nearby infrastructure, a BOB should be your first build.
Start with the BOB. It covers the scenarios you’re statistically most likely to face. If you want to build a get-home bag for your commute after that, it’s a natural second step.
What Are the 14 Basic Disaster Supplies?
FEMA’s Ready.gov emergency supply list identifies 14 basic disaster supplies every household should have. If you’ve been building your bag using the categories above, here’s the good news: you already exceed this baseline. But it’s worth mapping them to make sure nothing slipped through.
- Water — one gallon per person per day (covered in Water & Filtration)
- Food — three-day supply of non-perishable food (covered in Food)
- Battery-powered or hand-crank radio — NOAA Weather Radio capable (covered in Navigation & Comms)
- Flashlight — headlamp preferred for hands-free use (covered in Navigation & Comms)
- First aid kit (covered in First Aid)
- Extra batteries — for radio, headlamp, and other devices (covered in Navigation & Comms)
- Whistle — to signal for help (covered in Navigation & Comms)
- Dust mask — N95 rated for filtering contaminated air (covered in Tools & Gear)
- Plastic sheeting and duct tape — shelter-in-place materials (tarp covers this in Shelter; duct tape in Tools)
- Moist towelettes, garbage bags, and plastic ties — personal sanitation (add a few wipes and 2 bags to your kit if you haven’t)
- Wrench or pliers — to turn off utilities (your multitool handles this)
- Manual can opener — for canned food (your multitool or a P-38 can opener weighing 0.3 oz)
- Local maps (covered in Navigation & Comms)
- Cell phone with chargers and a backup battery (covered in Navigation & Comms)
The two items people most commonly miss from this list are the sanitation supplies (garbage bags and moist towelettes — weigh almost nothing, add them) and the manual can opener if you’re packing any canned food. A military P-38 can opener costs about $2 and weighs less than a quarter.
The Complete
Prepper's Reference.
149 articles synthesized into one comprehensive PDF — twelve chapters covering water, food, shelter, first aid, comms, and scenario-specific preparedness. Free with your email.
Unsubscribe anytime · We never share your email
You're in. Check your inbox.
Keep Reading
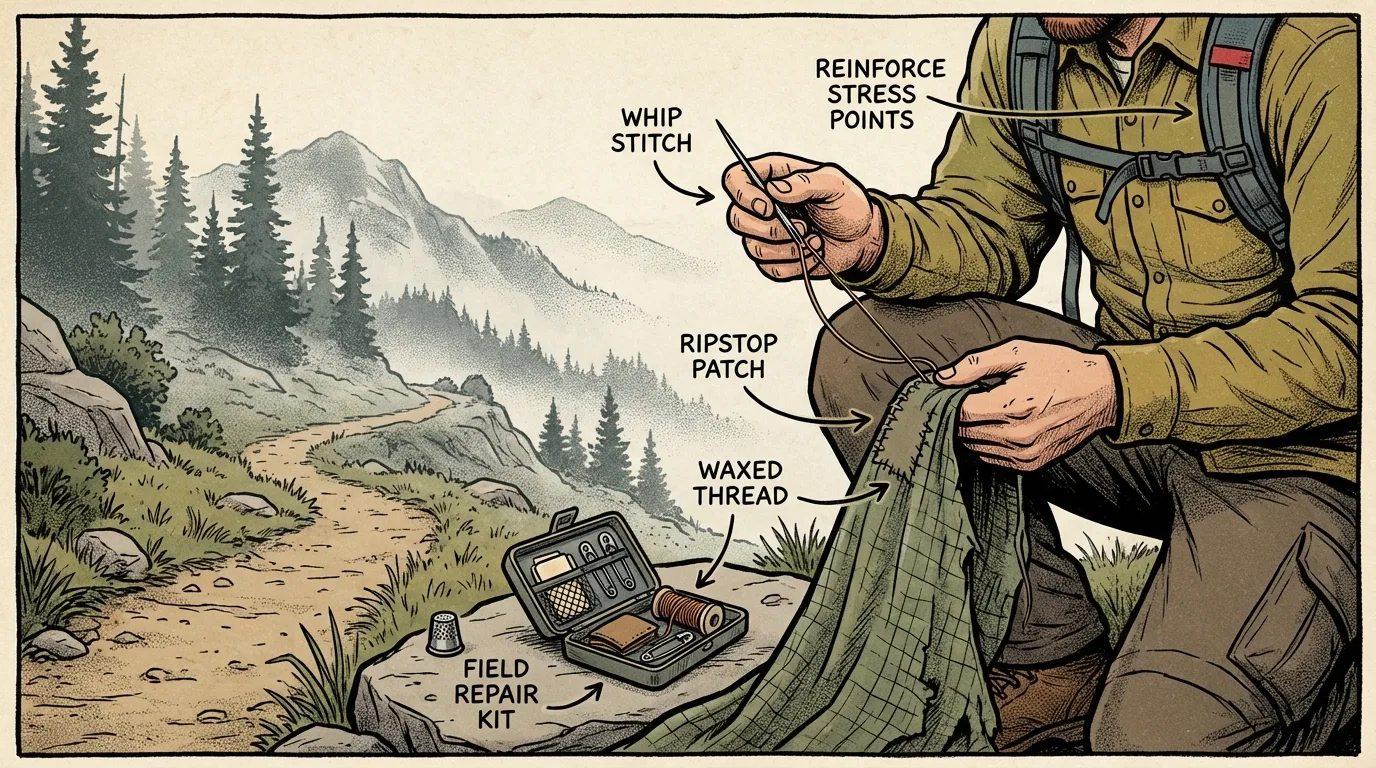
Survival Sewing: How to Repair Your Gear on the Go
Learn essential survival sewing skills to repair backpacks, tents, and clothing fast with beginner-friendly tools, stitches, and field-ready fixes.
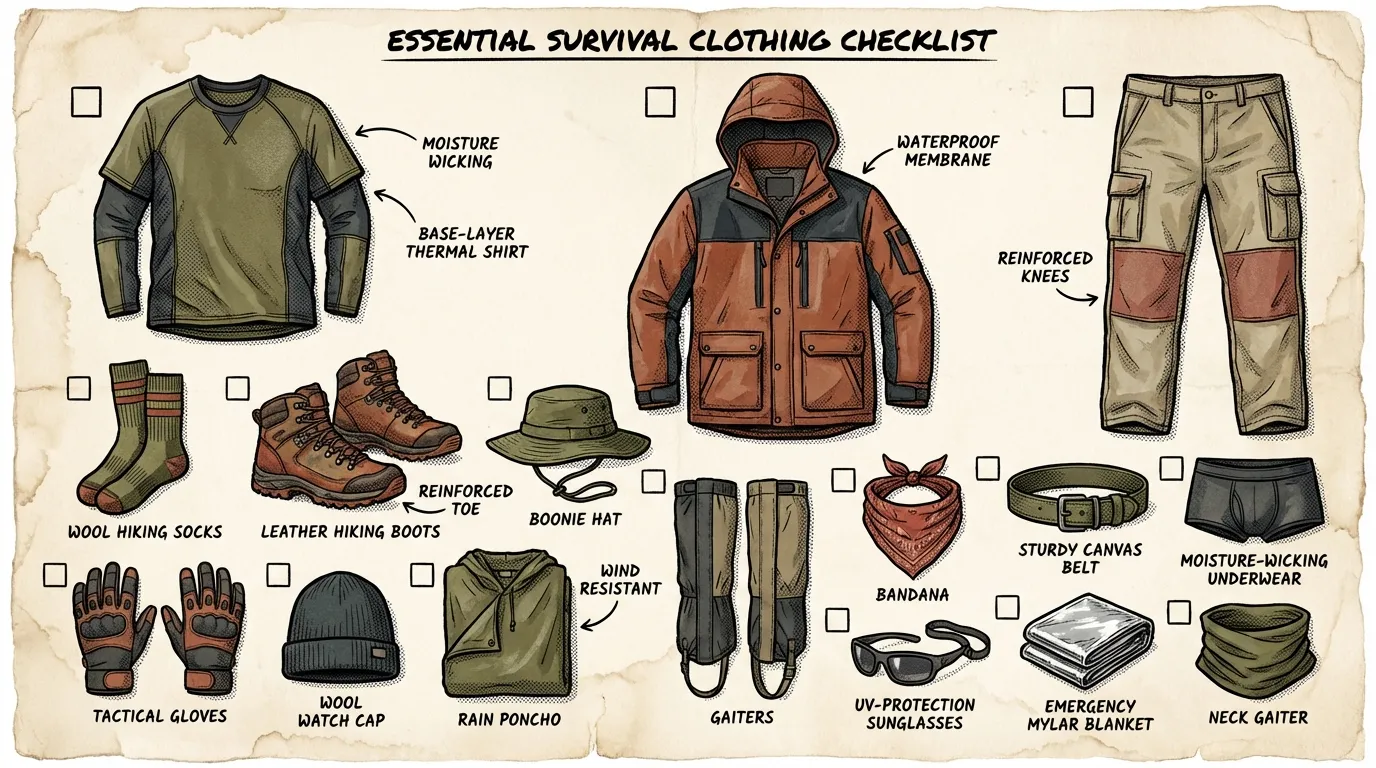
Survival Clothing: Dress for Success When Disaster Strikes
Learn how to choose survival clothing for cold, hot, and wet conditions, with practical layering tips, fabric advice, and beginner-friendly gear picks.
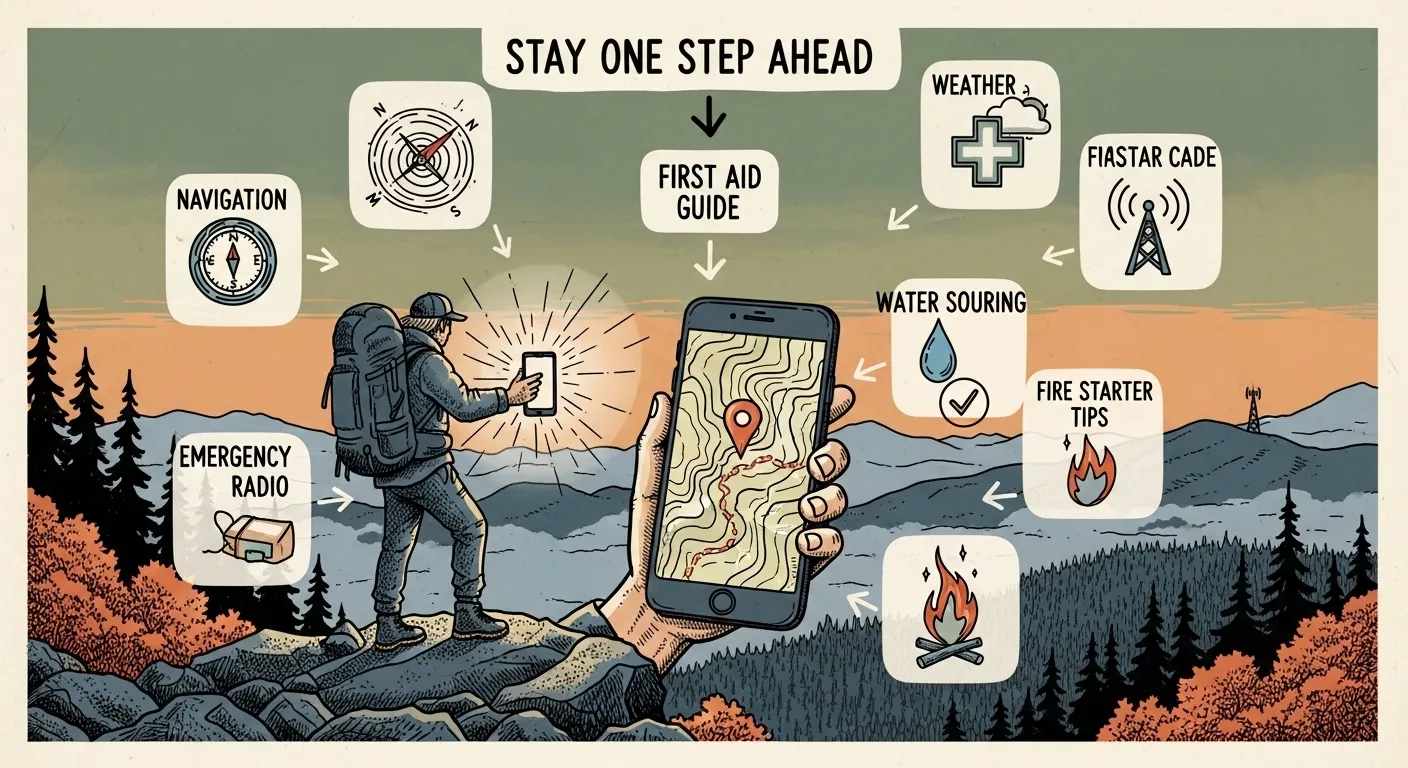
The Best Prepper Apps to Keep You One Step Ahead
Discover the best prepper apps for alerts, navigation, first aid, food, water, and communication so beginners can prepare smarter.