The most essential survival skills for new preppers are water purification, shelter building, fire starting, navigation, first aid, and basic food sourcing. Beginners should practice these skills in simple, controlled settings and avoid common mistakes like relying too much on gear, skipping repetition, and overcomplicating the basics.
Key Takeaways
- Start with water, shelter, and fire — dehydration and exposure kill long before hunger becomes a real threat
- Always carry two methods for each critical skill (fire starting, water purification, shelter) so a single failure doesn't cascade
- Practice in your backyard first, then graduate to day trips and overnights — controlled repetition builds the muscle memory that works under stress
- Tailor every skill to your actual environment — a fifth-floor apartment and a rural homestead need very different implementations
- Extend your baseline plan to 7–14 days — recent disasters consistently blow past the 72-hour window
Survival Skills for Beginners: What Every New Prepper Needs
TL;DR: The most essential survival skills for beginners come down to seven core areas: water, shelter, fire, first aid, navigation, food, and signaling. Learn them in priority order based on the Rule of 3s, practice in low-risk settings, and build competence before you build a gear collection. This guide — drawn from 12+ years of field experience as a FEMA-trained Wilderness First Responder in the Pacific Northwest — gives you the exact steps to get started.
Quick Summary
- Water, shelter, and fire come first. The Rule of 3s dictates that dehydration and exposure kill far faster than hunger — prioritize accordingly.
- Know at least two methods for every critical skill. One fire-starting method, one water purification option, one nav tool — that’s three single points of failure waiting to ruin your day.
- Practice at home before you need it in the field. A single Saturday afternoon covering shelter, fire, and water purification builds more real competence than a month of YouTube watching.
- Your location changes everything. Urban and rural preppers need the same skill categories but wildly different implementations.
- Plan for 7–14 days, not 72 hours. Recent disasters routinely blow past the three-day window. Build your supplies and skills to match.
- Skills beat gear every time. A $300 survival kit in untrained hands is worth less than a BIC lighter and a tarp in practiced ones.
If your emergency plan right now is “panic, but with determination,” you’re not alone. Most folks start prepping with good intentions and zero structure. They buy a bunch of gear, watch a few YouTube videos, and call it prepared. That’s not preparedness — that’s shopping with anxiety.
I’ve spent over a decade responding to emergencies in the Cascades and training people in wilderness survival. The single biggest lesson I’ve learned? Skills beat gear every time. A $300 kit in the hands of someone who’s never practiced is worth less than a BIC lighter and a tarp in the hands of someone who’s drilled the basics.
A $300 survival kit you’ve never opened is just an expensive paperweight. A BIC lighter you’ve practiced with is a survival tool.
What Are the 7 Basic Survival Skills?
These are the seven foundational survival skills every new prepper should know, listed in the order you’re most likely to need them:
- Water procurement and purification — Dehydration degrades your thinking and physical ability within hours. Finding and treating water is your top priority.
- Shelter building — Exposure to wind, rain, and cold kills faster than almost anything else. A basic shelter preserves your core body temperature.
- Fire starting — Fire provides warmth, water purification, cooking, light, and a psychological boost that keeps you making good decisions.
- First aid — Knowing how to stop bleeding, manage hypothermia, and stabilize injuries prevents survivable situations from becoming fatal ones.
- Navigation — The ability to determine where you are and move toward safety keeps you from wandering deeper into trouble.
- Food sourcing — While hunger’s manageable for days, understanding basic calorie management and safe foraging prevents dangerous mistakes.
- Signaling for rescue — Most beginners are more likely to need rescue than to self-extract. Knowing how to get found is a critical skill, not a sign of failure.
These seven skills map directly to the Rule of 3s — the decision-making framework I’ll break down next.
The Rule of 3s: Why Survival Priorities Matter
Every survival decision you make should filter through the Rule of 3s. This framework determines what’ll kill you first and therefore what you address first:
This isn’t abstract theory — it’s the framework I use every time I’m assessing a real situation in the field. In the Pacific Northwest, the Rule of 3s plays out in a very specific way: hypothermia dominates. I’ve seen people in serious trouble on 50°F days — not because it was “cold” by anyone’s definition, but because they were wet, the wind was blowing, and they had no shelter or dry layers. In those conditions, you can be hypothermic in under two hours.
That’s why shelter and fire outrank food in every survival scenario. Your body can tolerate hunger for weeks. It can’t tolerate a 95°F core temperature for more than a few hours.
When you’re learning survival techniques, use the Rule of 3s to decide what to practice first. Water purification before foraging. Shelter before navigation. It keeps your training grounded in reality instead of fantasy.
Finding and Purifying Water
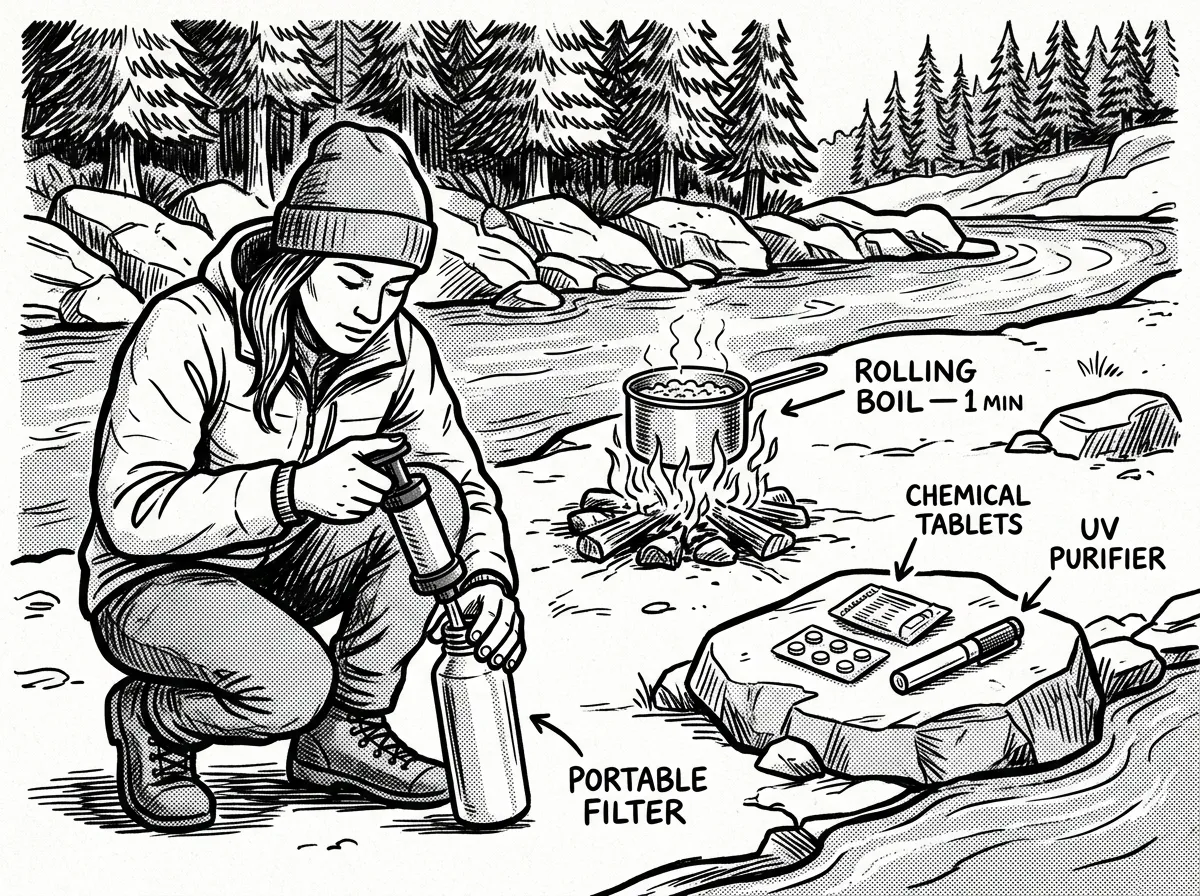 Three methods for purifying water in the field
Water is your number one priority. In my experience, most people underestimate how quickly dehydration impairs judgment — you don’t feel dangerously dehydrated until you’re already making bad decisions.
Where to look: Flowing sources like streams and springs are your best bet — moving water’s generally safer than still water, though it still needs treatment. Still water from lakes and ponds works but carries higher contamination risk. Rainwater collection, dew, and snowmelt are viable alternatives, but always treat them.
Know at least two purification methods:
- Boiling — Rolling boil for one minute (three minutes above 6,500 feet). This is the gold standard. All you need is a metal container and fire.
- Portable filters — Look for filters rated for protozoa and bacteria.
- Chemical treatment — Chlorine dioxide tablets or iodine drops. Follow the directions exactly — undertreating is worse than not treating.
- UV purifiers — Effective but limited by turbidity and battery life. I treat these as a backup, not a primary.
The Sawyer Squeeze — around $30 — is what I reach for every single time in the field. It filters up to 100,000 gallons, backflushes easily, and weighs almost nothing. The LifeStraw is fine for what it is, but it’s a sip-through straw — you can’t filter water into a bottle for later. That’s a real limitation when you’re trying to stay hydrated over multiple days. The Squeeze gives you flexibility the LifeStraw just doesn’t.
For a deeper dive, check out our full guide on water purification methods for emergencies.
Practice this at home: Boil a liter of local water and note the timing and taste. Run water through your filter and practice cleaning it afterward. Try chemical treatment to learn the wait times and flavor differences.
Safety rule: Always treat water unless you have absolute certainty about the source. “It looks clean” has put more people in the hospital than dirty-looking water ever has.
Building Shelter: Thermoregulation, Not Comfort
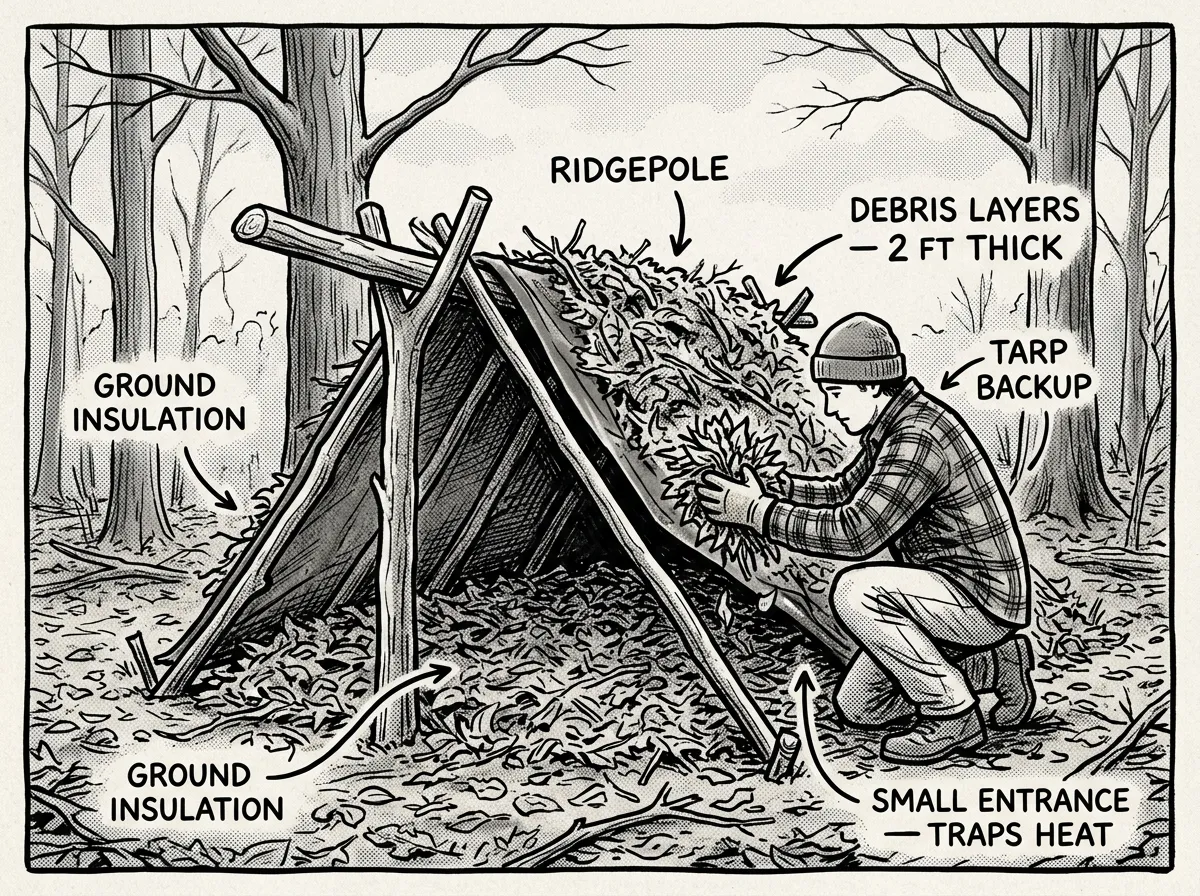 A-frame debris shelter built for warmth, not looks
Shelter isn’t about comfort — it’s about thermoregulation. Your body loses heat through convection (wind), conduction (ground contact), radiation, and evaporation (wet clothing). A good shelter addresses all four.
The first time I built a debris shelter in the Oregon Coast Range rain, I learned something the hard way: without a ground pad and proper leaf thickness — arm-length minimum — you lose more heat to the ground than to the air. I woke up shivering at 3 AM, not because of cold air but because the ground was stealing heat through my back. That’s something you learn by doing, not reading.
Simple shelter options:
- Tarps — Lean-to, A-frame, or plow-point configurations. Fast to set up, versatile, and my first recommendation for you if you’re just starting out.
- Debris shelters — Insulating layers of leaves and branches when gear’s absent. Effective but labor-intensive.
- Emergency blankets — Reflective and lightweight, but combine them with insulation. A mylar blanket alone won’t save you on cold ground.
Where to set up: Pick high, dry ground away from dead limbs (“widowmakers”) and flood lines. Stay near water and firewood but not directly on a waterway. Use natural windbreaks like rock faces or dense tree lines.
- Pitch a tarp at home in under 10 minutes — time yourself and repeat until it’s automatic
- Build a debris shelter at least once to understand real insulation needs
- Practice three basic knots — bowline, taut-line hitch, and clove hitch — until you can tie them with cold fingers
- Test your shelter in rain and note every leak and draft point
Fire Starting 101
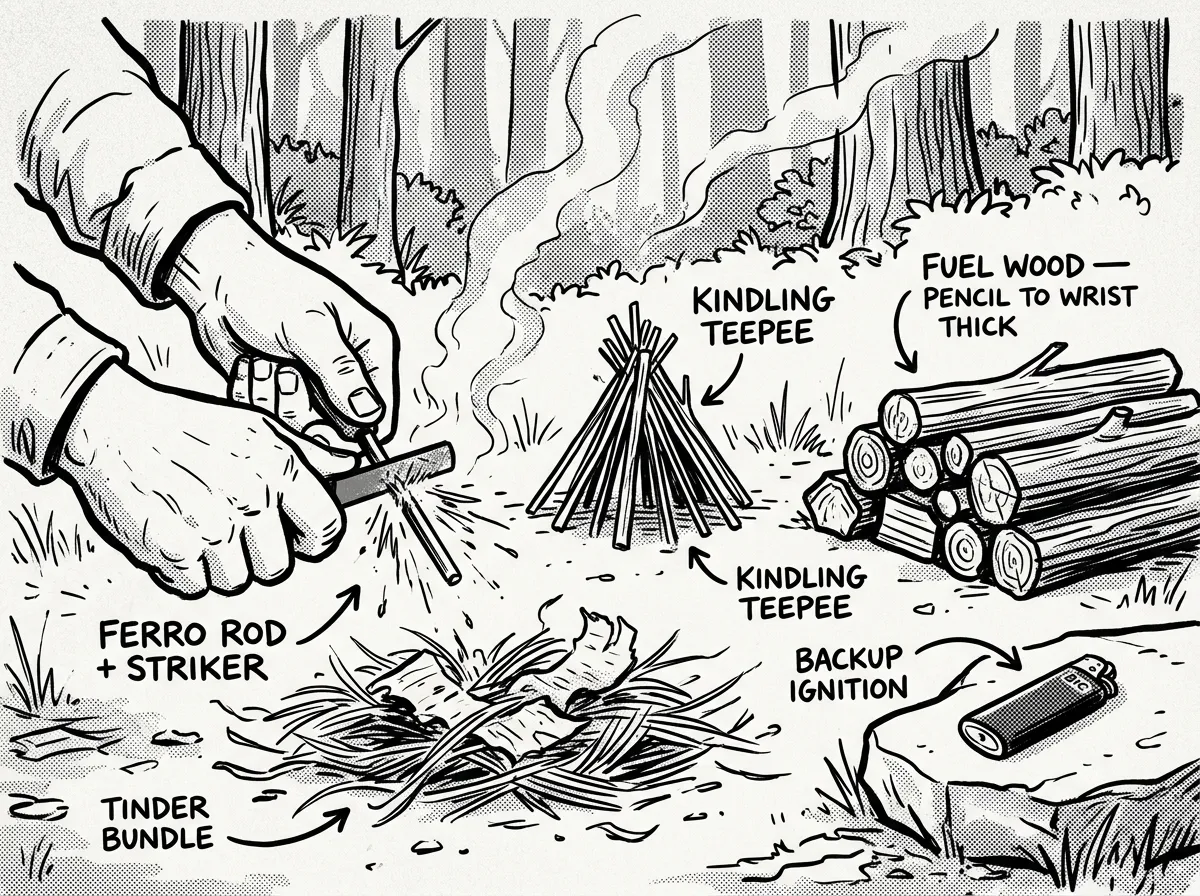 Building a fire from tinder bundle to sustainable flame
Fire solves multiple problems simultaneously — warmth, water purification, cooking, signaling, and morale. In a survival situation, fire can be the difference between a scary night and a dangerous one.
Fire fundamentals: Heat, fuel, and oxygen — remove one and the fire dies. Beginners almost always fail at the tinder stage, not the ignition stage. I’ve watched people click a lighter perfectly fine but have nothing dry to catch the flame. That’s the gap.
If you’re in the Pacific Northwest, finding dry tinder is the real challenge. I carry petroleum jelly cotton balls year-round because natural tinder’s damp nine months out of twelve. A handful of these in a small ziplock weighs almost nothing and ignites instantly even with a ferro rod. If you’re in a humid Gulf Coast climate, you’ll face similar challenges — always carry prepared tinder regardless of the forecast.
Ignition methods (carry two):
- BIC lighter — Still works after getting wet if you dry and flick it. The simplest, most reliable option.
- Ferro rod — Produces sparks in any weather, lasts thousands of strikes. Requires practice with tinder.
- Waterproof matches — Functional backup, but short burn time limits usefulness.
For tested recommendations and techniques, see our beginner’s guide to starting a fire.
Fuel hierarchy:
- Tinder — Very fine, dry material (cotton balls, birch bark, dry grass).
- Kindling — Pencil-to-thumb-sized sticks.
- Fuel wood — Wrist-sized and larger, added once the fire’s established.
Practice steps: Practice each ignition method separately until you can start a fire in under five minutes. Make tinder bundles at home and test them. Practice safe extinguishing: drown, stir, feel for heat, repeat.
First Aid Fundamentals
So what happens when someone gets hurt and the ambulance isn’t coming? As a certified Wilderness First Responder, this is where I see the biggest gap between what people think they know and what they can actually do under pressure. Basic first aid isn’t complicated. But it must be practiced until it’s automatic.
In my WFR work across the Cascades, the injuries I treat most often aren’t dramatic — they’re rolled ankles on wet trails, early-stage hypothermia from rain-soaked cotton clothing, and allergic reactions with no epinephrine on hand. Basic skills handle 90% of real emergencies.
The critical difference for you as a prepper: Standard first aid assumes an ambulance is 10 minutes away. Wilderness first aid assumes it might be hours or days. When advanced help isn’t coming quickly, your ability to stabilize, monitor, and make evacuation decisions becomes far more important.
- Stop bleeding with direct pressure, wound packing, and proper dressing — know when and how to apply a tourniquet
- Clean wounds thoroughly, dress them, and monitor for infection over hours and days
- Treat burns by cooling with water and covering with clean non-stick dressing
- Immobilize sprains and fractures using improvised splints (trekking poles, sticks, padded clothing)
- Recognize and treat hypothermia, heat exhaustion, and heat stroke
- Maintain current CPR certification and refresh annually
Recommended certifications:
- Red Cross First Aid/CPR — The baseline. Take this first.
- NOLS Wilderness First Aid (WFA) — A 16-hour course that covers backcountry-specific scenarios. Worth every hour.
- Wilderness First Responder (WFR) — An 80-hour deep dive for serious practitioners.
Build and train with a basic first aid kit. Know what’s in it and how to use every item. Practice bandaging and splinting on a willing partner. Take a certified course — qualified instructors catch bad habits that YouTube can’t see.
For a more detailed walkthrough, see our emergency first aid basics guide.
Navigation and Orienteering
Getting lost is one of the most common ways a manageable situation turns into an emergency. And the first thing most people do when they realize they’re lost? They keep walking. That’s almost always the wrong move.
The STOP Protocol — do this first when lost:
- S — Sit down. Stop moving immediately.
- T — Think. When did you last know where you were?
- O — Observe. Look at landmarks, listen for water or roads, check your compass.
- P — Plan. Make a deliberate decision about your next move instead of reacting emotionally.
I teach the STOP protocol in every course I run because panic-walking is responsible for more backcountry rescues than any other single behavior. It sounds simple sitting here reading it. In the moment, with adrenaline pumping and daylight fading, it takes discipline.
Core navigation skills: Learn to read topo maps — understand contour lines, scale, and map symbols. Use a compass to find north, set a bearing, and follow it. Practice terrain association by matching what you see — ridges, drainages, landmarks — to what’s on the map.
Natural navigation cues: In PNW forests, I rely heavily on drainage patterns. Water flows downhill, creeks merge into streams, streams lead to rivers, and rivers lead to roads and towns. Sun tracking works when you can see sky, but in dense canopy, drainage’s more reliable. And yes — the “moss grows on the north side” rule is unreliable in our wet forests. Moss grows everywhere when everything’s damp.
Digital backup: Before any outing, download offline maps on your phone (Google Maps, Gaia GPS, or onX). Your phone’s GPS chip works without cell service. This doesn’t replace a compass and waterproof paper map, but it’s a strong backup layer.
For a complete walkthrough, read our guide to basic orienteering for new preppers.
Practice steps: Navigate short routes with map and compass in familiar terrain. Learn your pace count for distance estimation. Practice the STOP protocol mentally — visualize being lost and run through the steps.
Foraging and Food Basics
Here’s something most survival guides won’t tell you plainly: food is your lowest immediate priority. The Rule of 3s gives you three weeks. You won’t enjoy those three weeks, but you’ll survive them.
What matters more is understanding how hunger affects your decision-making. I’ve seen people in the field make increasingly poor choices as calorie deficit builds — shortcuts on trail selection, skipping water treatment to save time, pushing through injuries. After about 48 hours without adequate calories, your risk assessment degrades noticeably. Knowing this is itself a survival skill.
Calorie awareness: An average adult needs 2,000+ calories per day under normal conditions — more under exertion, cold, or stress. Hunger’s manageable for days, but calorie deficit impairs decision-making well before it threatens your life. Ration what you have deliberately. Don’t eat everything on day one because you’re stressed.
Foraging safety rules: Never eat a plant unless you’re 100% certain of the identification. Avoid mushrooms unless you have expert-level confidence — the consequences of misidentification are severe. Learn local contaminants and avoid foraging near roadsides, industrial sites, or chemically treated areas.
Starter plants (region-dependent): Dandelion, plantain, chickweed, and positively identified berries. Confirm species locally with a regional field guide.
More accessible protein: Basic fishing is far more practical for beginners than hunting or trapping. A compact fishing kit — hooks, line, and a few lures — weighs ounces and can provide real calories with minimal skill. Practice at a local pond before you need it in the field.
Practical preparedness: Keep a reliable food stockpile at home (see the “Beyond 72 Hours” section below). Treat foraging as a supplement, not a primary food strategy. Join a guided foraging walk to learn from someone who knows your region’s plants firsthand.
Signaling and Rescue: How to Get Found
Here’s a truth that experienced folks understand but beginners often resist: getting rescued is a survival skill, not a failure. If you’re lost, injured, or in over your head, your best outcome is being found quickly. Pride doesn’t keep you warm.
Audible — the whistle is king. Three blasts on a whistle is the universal distress signal. A $5 pea-less whistle carries further than the strongest human voice, works when you’re exhausted, and functions in fog, darkness, and dense forest where visual signals fail. Every member of your group should carry one — on their person, not buried in a pack.
Visual — make yourself visible. A signal mirror can reflect sunlight for miles — practice aiming it using the sighting hole. Wear or display bright colors. Rescue teams are scanning for things that don’t belong in the environment. A blaze orange bandana draped over a branch is visible from a helicopter. For ground-to-air signals, a large “X” made from logs or rocks in a clearing signals distress to aircraft. Make it at least 10 feet across to be visible from altitude.
Electronic — your modern advantage. A Personal Locator Beacon (PLB) sends your GPS coordinates to search and rescue via satellite. No subscription required. One button, global coverage. They run around $150–250 and could save your life. Your cell phone, even without service, may connect to emergency networks. Keep it charged, carry a power bank, and download offline maps before your trip. A NOAA weather radio keeps you informed about conditions even when cell towers are down.
Before any outing, tell someone your plan — where you’re going, your route, and when you expect to return. If you don’t check in, they alert authorities. This simple habit has saved more lives than any piece of gear ever made.
Common Mistakes New Preppers Should Avoid
I’ve watched people make these same mistakes for over a decade. Here’s what to sidestep:
- Buying gear before learning skills. Your first investment should be practice hours, not Amazon orders.
- Practicing only in ideal conditions. A sunny afternoon in your backyard teaches you 30% of what a rainy evening teaches you. Train progressively.
- Ignoring the Rule of 3s. Don’t spend weeks researching freeze-dried food while you’ve got zero ability to purify water.
- Not having backups. One ignition method, one water treatment option, one navigation tool — that’s a single point of failure on each critical need. Always carry two.
- Trying to learn everything at once. Focus on one skill, build competence, then add the next. Overwhelm leads to paralysis.
- Overestimating foraging knowledge. A weekend workshop doesn’t make you qualified to eat wild mushrooms. Be conservative.
How to Practice Survival Skills at Home
You don’t need a wilderness expedition to build real competence. Most essential survival skills can be developed in your backyard or living room.
Create specific drills: Pitch a tarp shelter in under 10 minutes — time it, then do it in the rain. Purify a liter of water three different ways in a single session. Start a fire using only a ferro rod and natural tinder — no cheating with paper. Blindfold-navigate a compass bearing across your yard.
Stack skills together: Build a shelter, start a fire in front of it, boil water on that fire. A single Saturday afternoon covers three critical skills and shows you how they interact.
Graduate difficulty:
- Kitchen table — Handle the gear, understand the steps.
- Backyard — Execute with no consequences for failure.
- Day trip — Practice during a hike where failure’s inconvenient, not dangerous.
- Overnight challenge — Rely on the skill for real, with a backup plan.
Keep a prepper journal. Log what worked, what failed, and how gear performed. Review it before your next practice session. Written reflection accelerates learning faster than repetition alone.
Choosing the Right Skill to Learn Next
One of the most common mistakes with survival skills for beginners is trying to learn everything at once, burning out, and then learning nothing. Sound familiar?
Step 1: Assess your most likely threat. Not your fantasy scenario — your most likely scenario. What emergencies have actually happened in your area in the last 10 years?
Step 2: Rate each skill against three criteria:
| Criteria | Question to Ask |
|---|---|
| Immediacy | How fast would I need this skill in my most likely scenario? |
| Difficulty curve | How long does it take to become minimally competent? |
| Gear dependency | Can I perform this skill with little or no equipment? |
Skills that score high on immediacy, have a short learning curve, and work without specialized gear should come first.
Step 3: Stack skills that share practice time. When you go out to practice fire, also collect and purify water. Build a shelter, then build a fire in front of it. One session, multiple skills.
Rule of thumb: If you can’t explain the basics of a skill to someone else in under two minutes, you haven’t practiced it enough.
Urban vs. Rural: Your Location Changes Everything
Most guides on survival skills for beginners assume you’re bugging out to the woods. But roughly 80% of Americans live in urban or suburban areas, and the skills that matter most shift based on your environment.
Water sourcing looks completely different. In an urban setting, your hot water heater holds 30–80 gallons already — know how to drain it safely. Toilet tanks (not bowls) are another emergency reserve. If you’re rural, you’re looking at well water, nearby creeks, and rainwater collection, but you need to know your local contamination risks — agricultural runoff, mine drainage, septic proximity.
Shelter priorities diverge. Urban preparedness means staying in place effectively — insulating windows, sealing a single room for heating efficiency, managing ventilation. Plastic sheeting and duct tape outperform a tarp and paracord here. Rural dwellers need traditional shelter building skills because your home may become uninhabitable.
Fire is a different equation. Open flame indoors is a carbon monoxide and fire hazard. Your urban “firecraft” is safe indoor heating alternatives and knowing how to cook with a camp stove outdoors. Rural? You can actually use fire, and firewood processing — splitting, drying, storing — becomes genuinely critical.
The skill that bridges both worlds? Bartering and people skills. In urban environments, neighbors are your most immediate resource and potential threat. In rural settings, distance creates isolation, and trading labor or goods with nearby homesteads can mean the difference between struggling and stabilizing.
Don’t let generic advice override your actual environment. A fifth-floor apartment dweller and a homesteader on 20 acres need the same categories of preparation but very different implementations.
What NOT to Buy: Gear That Underperforms
Part of building prepper skills is recognizing marketing dressed up as preparedness. I’ve field-tested a lot of gear, and some of the most popular items are genuinely disappointing when it matters.
“Survival credit cards” and multi-tool cards. Those flat, stamped-metal tools with a tiny knife and decorative compass? Novelty items. Pure and simple. Buy an actual Mora Companion — around $15 — and a real ferro rod for about $10 instead. You’ll have tools that actually work.
Cheap all-in-one survival kits. The $25 Amazon tin with a wire saw, tiny compass, and a few bandages. The components are universally the lowest quality available. Wire saws break within minutes of real use. Build your own kit piece by piece with components you’ve tested.
Gimmick fire starters. Fire pistons and magnesium blocks require more skill than they save. For beginners: a BIC lighter, a quality ferro rod, and petroleum jelly cotton balls. Total cost under $15. Success rate near 100%. See our breakdown of the best fire starters for emergencies for tested picks.
The real rule: If you can’t demonstrate a piece of gear’s function right now, from memory, it’s not part of your preparedness — it’s a purchase you made to feel better.
Beyond 72 Hours: Extending Your Plan to 1–2 Weeks
The classic advice is to prepare for 72 hours. That’s a fine starting point — and if you haven’t built one yet, start with our guide to building a 72-hour emergency kit. But recent events — Hurricane Katrina, the Texas ice storm, the Maui wildfires — have shown that disruptions routinely exceed three days. Think in terms of 7–14 days.
Water math: At one gallon per person per day, a family of four needs 28–56 gallons for one to two weeks. Stored water’s your first line. A gravity-fed filter system is your second.
Food — calories over cuisine:
- Rice and beans — A 25-lb bag of white rice costs around $12–18 and provides roughly 40,000 calories.
- Canned goods — Rotate what you already eat. No special “survival food” required.
- Peanut butter — Shelf-stable, calorie-dense, zero preparation.
- Oats — Cook with just boiled water. A large canister covers breakfast for a family for a week.
- Multivitamins — Cover nutritional gaps when your diet’s simplified.
Budget benchmark: A two-week food supply for a family of four costs roughly $75–120 in staples — far less than a single freeze-dried emergency bucket.
Power and communication: A 20–30 watt solar panel paired with a USB power bank keeps a phone and weather radio alive. A hand-crank NOAA weather radio — around $20–35 — is essential when cell towers fail.
Sanitation — the overlooked crisis: After a week without running water, waste management becomes a health emergency. Stock heavy-duty trash bags, kitty litter, a five-gallon bucket with a snap-on toilet seat, and hand sanitizer.
Here’s what catches people off guard at the one-week mark: the psychological shift. Days 1–3 are adrenaline and problem-solving. Days 4–14 introduce boredom, routine fatigue, hygiene frustration, and stress management — especially with kids. I’ve managed multi-day incidents where the biggest threat after day five wasn’t physical at all. It was people making increasingly poor decisions because they were mentally done. Mental preparedness isn’t a soft skill — it’s a survival skill.
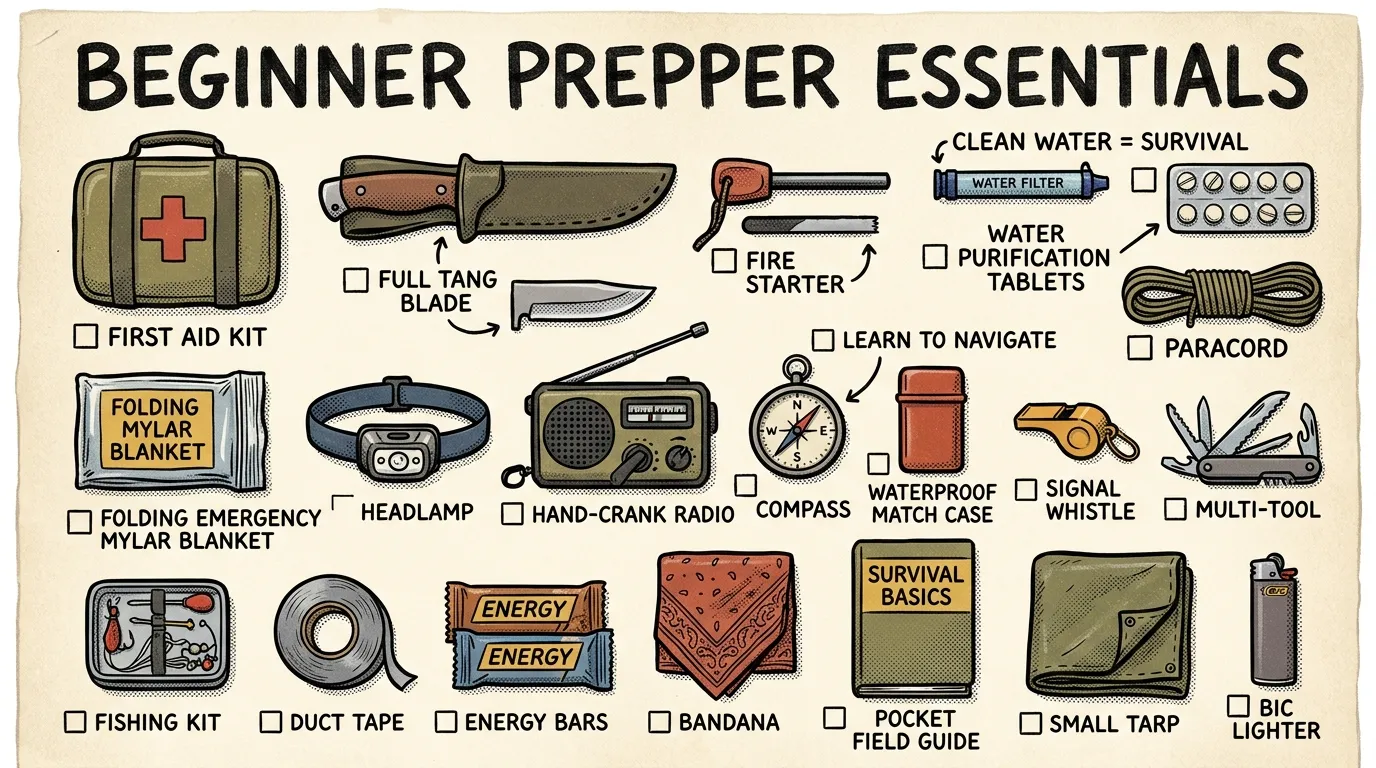
Starter Gear Checklist
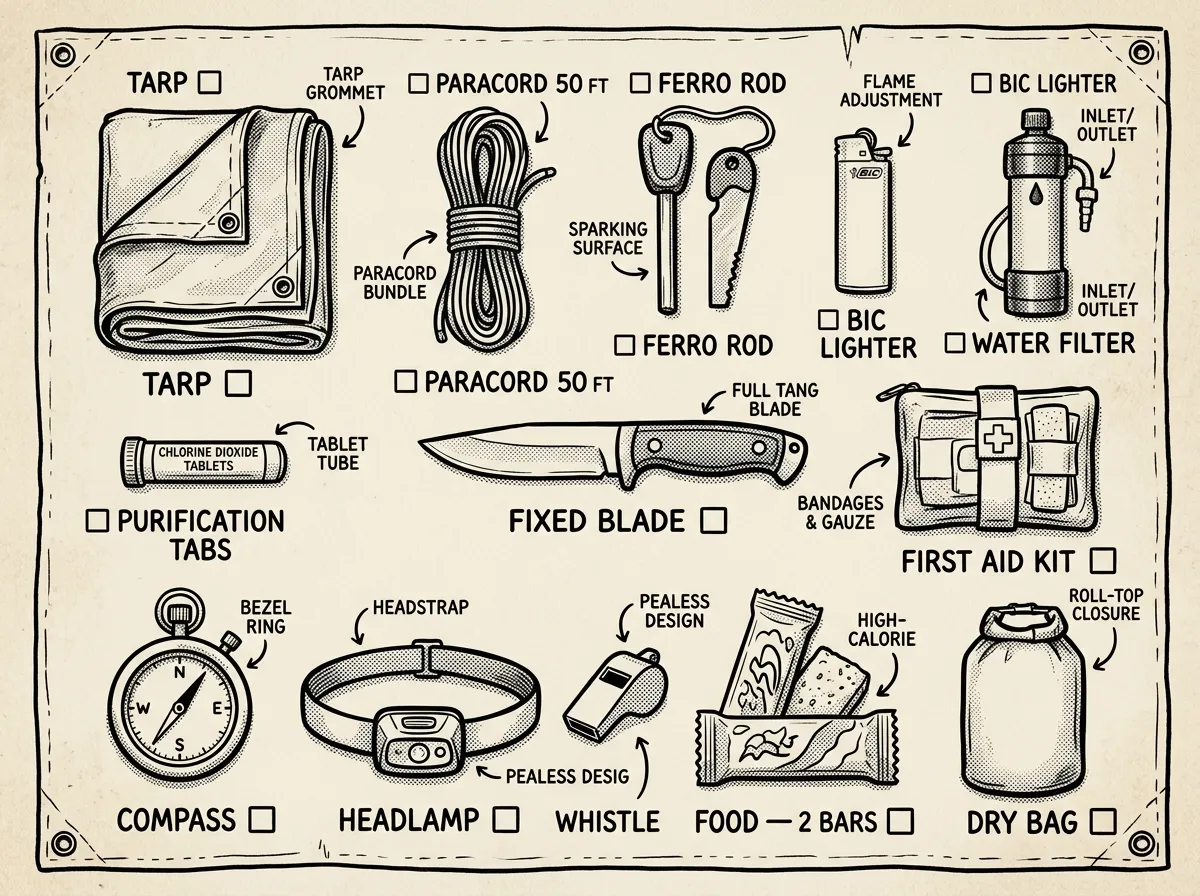 Beginner prepper essentials laid out and labeled
- Durable water container + purification method (filter, tablets, or metal pot for boiling)
- Metal cooking pot (multi-use: boiling, cooking, water collection)
- Tarp + 50 feet of cordage
- Reliable ignition + backup (BIC lighter and ferro rod)
- Basic first aid kit (built and tested, not shrink-wrapped)
- Fixed-blade knife
- Pea-less whistle (on your person, not in your pack)
- Flashlight with spare batteries or USB charging
- Simple compass + waterproof paper map of your area
- Petroleum jelly cotton balls in a ziplock (fire tinder)
Buy gear to support repeated practice rather than collecting gadgets you’ll never test. Every item on this list should be something you’ve used at least once before you’d need to rely on it.
Build Skills, Not Myths
Learning survival skills for beginners isn’t about preparing for the apocalypse — it’s about building competence for the emergencies that actually happen. Power outages that last a week. Getting turned around on a day hike. A winter storm that knocks out your heat for three days.
The skills in this guide — water, shelter, fire, first aid, navigation, food, and signaling — cover the vast majority of real-world emergencies. They work because they’re based on the Rule of 3s: address what kills fastest first, build redundancy into every critical system, and practice until execution’s automatic.
After 12 years of field work and FEMA emergency management training, the pattern I see is consistent: the people who come through emergencies well aren’t the ones with the most gear. They’re the ones who practiced basic skills until those skills became second nature. They made their mistakes in the backyard on a Saturday, not in the backcountry on a Tuesday.
Start with one skill this week. Practice it until you can teach it to someone else. Then add the next. That’s not just how to start prepping — that’s how to build genuine resilience that holds up when it matters.
The Complete
Prepper's Reference.
149 articles synthesized into one comprehensive PDF — twelve chapters covering water, food, shelter, first aid, comms, and scenario-specific preparedness. Free with your email.
Unsubscribe anytime · We never share your email
You're in. Check your inbox.
Keep Reading
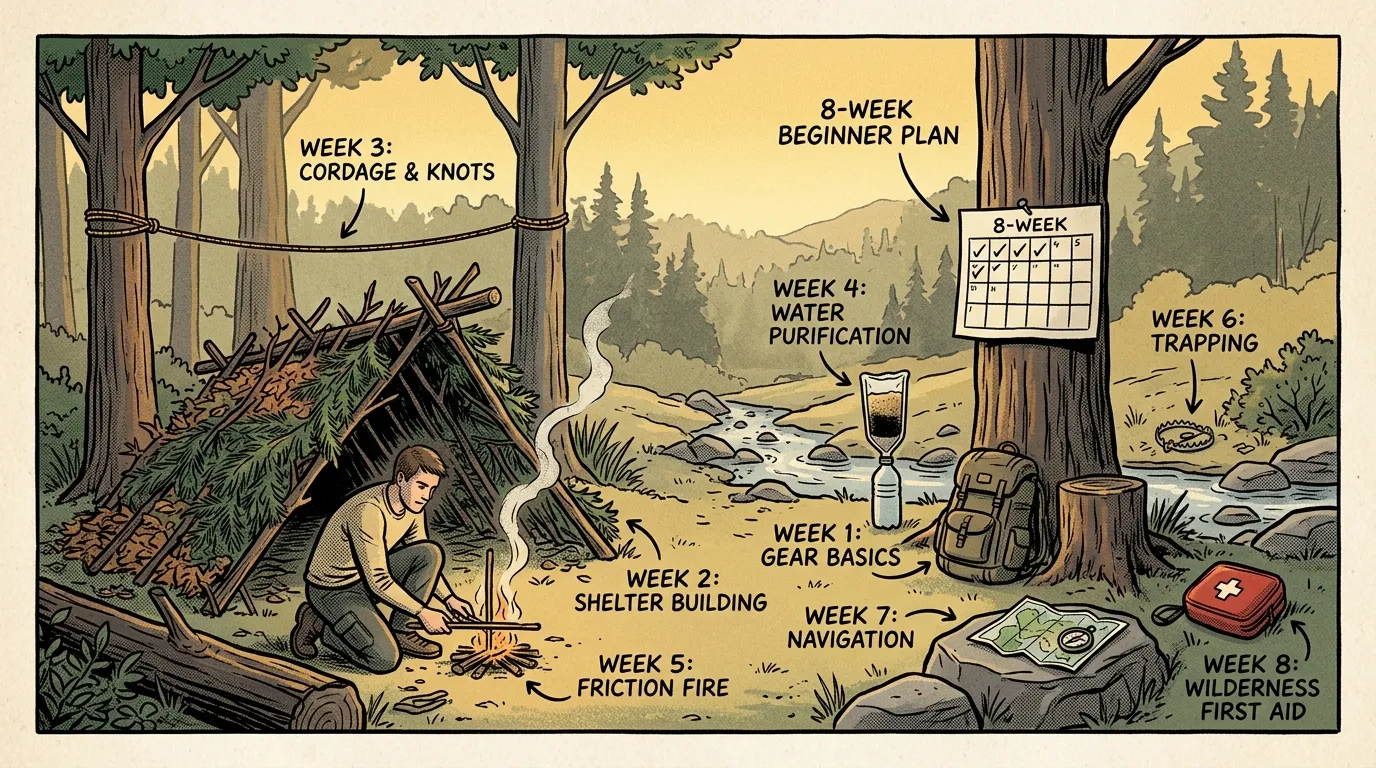
Survival Skills Training: 8-Week Plan for Beginners
Follow this 8-week survival skills training plan to master shelter, fire, water, navigation & first aid. Built by a FEMA-trained WFR. Start this weekend.

Primitive Survival Skills: Zero-Gear Techniques That Work
Master 10+ primitive survival skills for fire, shelter, water, and tools with zero gear. Field-tested by a FEMA-trained WFR with 12 years of experience.
How to Build a Survival Shelter That Stays Warm
Learn how to build a survival shelter that stays warm and dry using natural materials. Step-by-step lean-to guide from a Wilderness First Responder.