To start a prepper garden, choose a sunny, manageable space, improve the soil, and grow practical crops like potatoes, beans, squash, onions, and greens. A prepper garden improves food security, reduces grocery dependence, and builds self-sufficiency by using sustainable practices such as composting, water conservation, and seed saving.
Key Takeaways
- Start with one 4x8 raised bed or a few containers — prove you can maintain a small plot before expanding.
- Grow calorie-dense, storable crops your family actually eats: potatoes, beans, squash, onions, garlic, and hardy greens.
- Invest in soil quality first — compost, mulch, and cover crops produce bigger returns than any tool or gadget.
- Learn one preservation method well (canning, dehydrating, or root-cellaring) before your first harvest comes in.
- Save open-pollinated seed from your strongest plants each season to build a free, locally adapted seed bank.
How to Start a Prepper Garden: A Complete Guide
If you’re figuring out how to start a prepper garden, here’s the honest truth: the best time to start was last year. The second best time is right now. I’ve maintained a survival garden in western Washington for over a decade — through ice storms, summer droughts, and a few spectacular failures that taught me more than any book ever could.
A prepper garden isn’t about doomsday fantasies. It’s a practical, purpose-built food plot designed to provide reliable calories, nutrition, seed stock, and preserved goods when grocery supply chains hiccup — or worse. It pairs naturally with long-term food storage for emergencies and a solid 72-hour emergency kit, but unlike canned goods sitting on a shelf, a garden is a renewable system that improves every year you work it.
Let’s get into the specifics.
Quick Summary
- Start small — one 4x8 raised bed or a few containers is enough to learn the fundamentals and produce real food your first season.
- Grow calorie-dense, storable crops your family already eats: potatoes, beans, winter squash, onions, garlic, and hardy greens.
- Build soil first with compost, mulch, and cover crops — it’s the single highest-return investment you’ll make.
- Learn one preservation method (canning, dehydrating, or root-cellaring) before your harvest comes in, not after.
- Save seed from open-pollinated varieties to build a free, locally adapted seed bank that gets better every year.
- Keep a garden journal — your second season will be dramatically better because of the data from your first.
What Is a Prepper Garden and Why Does It Matter?
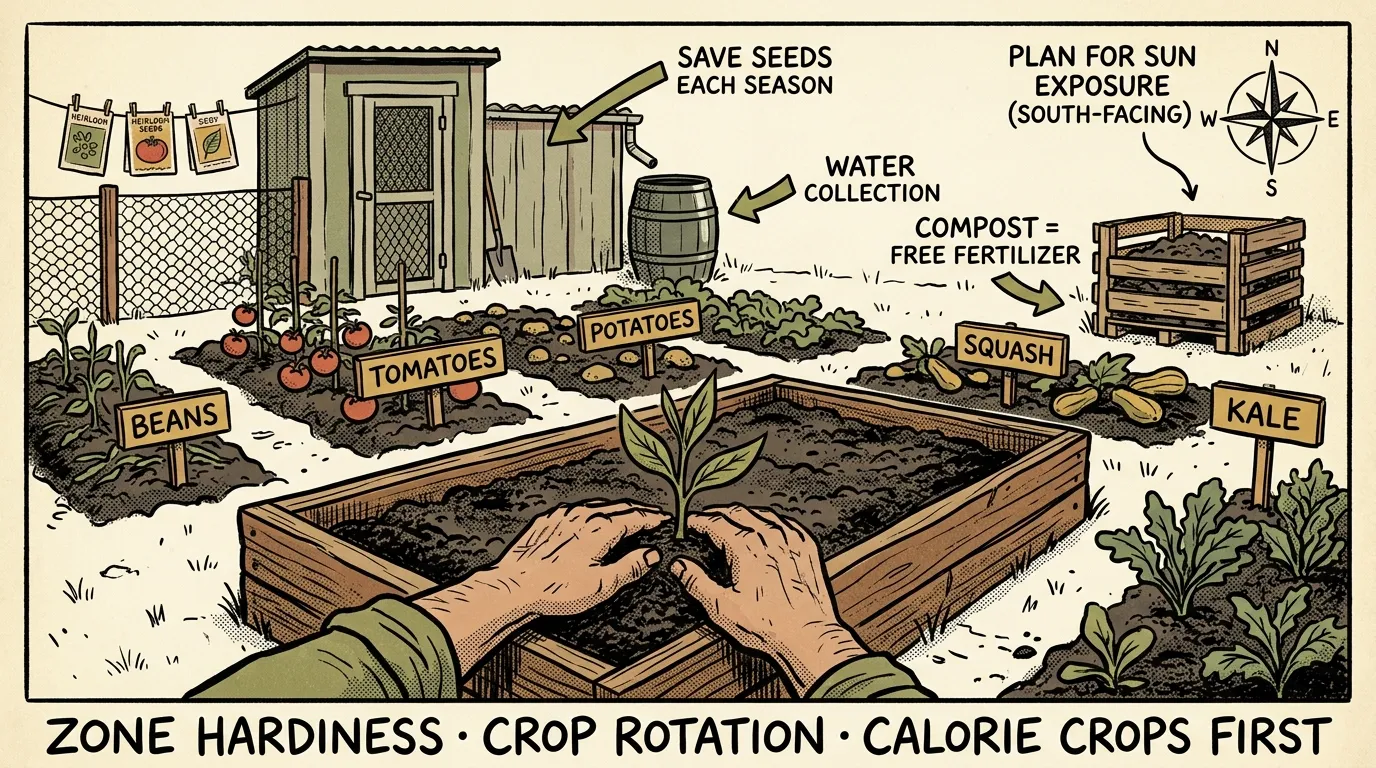
A prepper garden grows food with a clear goal: reliable calories, nutrition, and preserved goods during disruptions. Unlike a regular backyard garden planted for summer tomatoes and fresh herbs, a food security garden emphasizes low-input techniques — composting, heavy mulch, water conservation, and repeatable skills like seed saving and canning. Every bed has a job.
Why does this matter? Grocery store shelves can empty fast during a regional emergency. I’ve seen it happen after snowstorms here in the Pacific Northwest, and I’ve seen it happen nationally during supply chain disruptions. A self-sufficiency garden doesn’t replace stored food, but it provides something no pantry can: a system that keeps producing.
A garden is the only item in your emergency plan that gets stronger every year instead of expiring on a shelf.
Here’s what a prepper garden gives you:
- Fresh food access during shortages when stores are bare or delivery’s disrupted
- Reduced grocery dependence and lower long-term food costs
- Practical, transferable skills — saving seed, drying produce, canning, and soil building
- A living seed bank that adapts to your local conditions over successive seasons
- Physical and mental well-being — there’s real value in productive outdoor work during stressful times
A small, well-managed plot can supply meaningful supplemental food for a household if you choose the right crops and preservation methods.
How to Start a Prepper Garden Step by Step
Here’s exactly how to get going, broken into seven steps that work regardless of space or budget.
- Assess your situation — note your available sunlight (minimum 6 hours), water access, budget, and the realistic hours per week you can commit
- Learn your climate — look up your USDA hardiness zone and local last/first frost dates through your county extension office
- Start small — pick one 4x8 raised bed, a 10x10 in-ground plot, or a collection of containers
- Build your soil first — test pH and nutrients with a basic kit, then amend with compost, aged manure, or leaf mold (aim for pH 6.0–7.0)
- Select crops strategically — choose calorie-dense, storable crops your household already eats
- Plan for water and preservation — set up rain collection or drip irrigation and choose at least one preservation method before your first harvest
- Document and improve — keep a simple garden journal with planting dates, varieties, yields, and problems
Don’t overcomplicate this. Your first season is about learning, not feeding your family for a year. The data you collect now is what makes season two actually productive.
Know Your Hardiness Zone and Microclimate
This is the single most important planning step that survival gardening beginners skip. Your USDA hardiness zone tells you the average minimum winter temperature for your area, which determines which perennials — fruit trees, berry bushes, asparagus — will survive your winters. You can look yours up on the USDA Plant Hardiness Zone Map.
But here’s what the zone map doesn’t tell you: your frost dates. These are what actually govern when you plant annuals like tomatoes, beans, and squash. Your county Cooperative Extension office publishes precise average last-spring and first-fall frost dates. Those two numbers define your growing season.
Then there’s your microclimate — the specific conditions in your exact yard. A south-facing wall absorbs heat and can extend your season by two to three weeks. A low spot collects cold air and frosts earlier than a nearby hillside. Urban gardens benefit from heat island effects. In my Zone 8b garden in western Washington, I’ve got one bed against a dark fence that runs about five degrees warmer than an open bed fifteen feet away. That’s the difference between starting tomatoes in April versus May.
Spend your first season observing where frost settles, where water pools, and where sun hits longest. That information’s worth more than any garden gadget you’ll ever buy.
Prepper Garden Layout: Planning Your Space
 Three layout options for any living situation
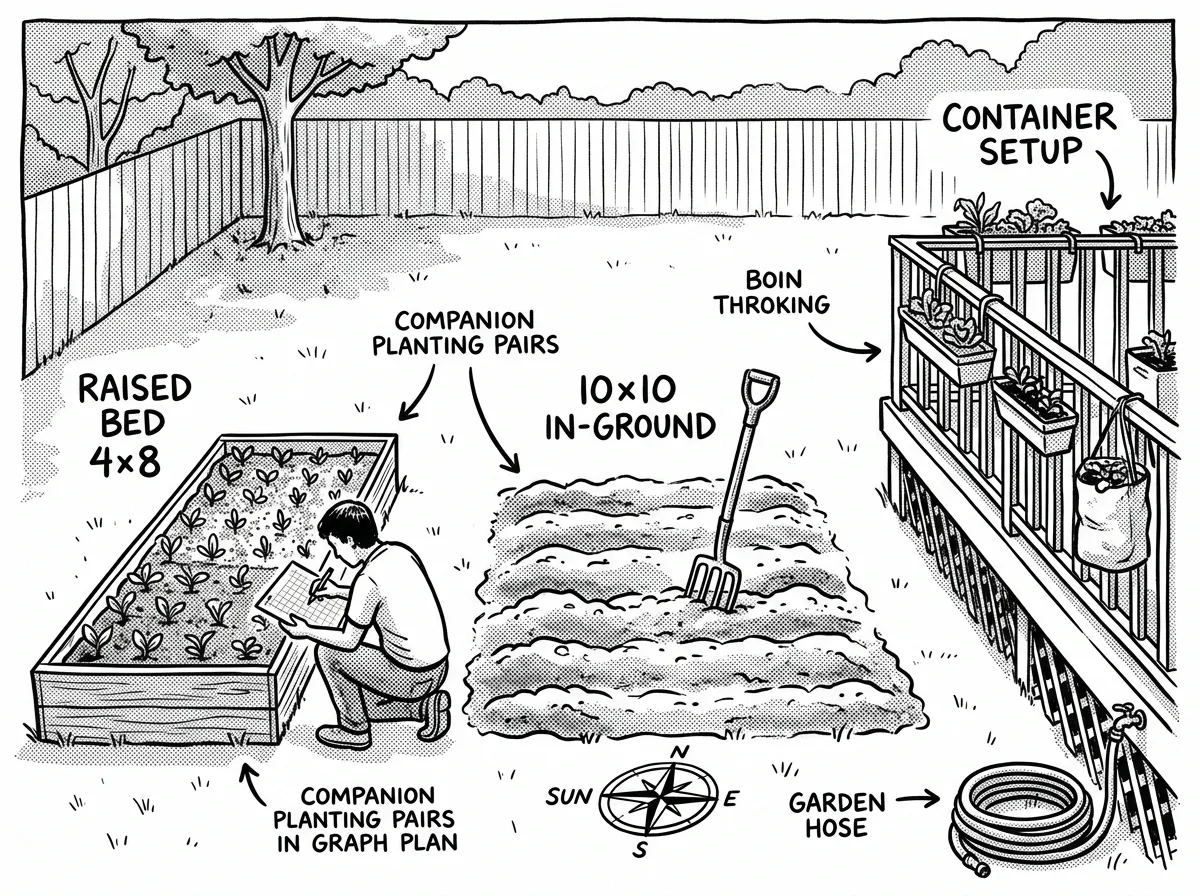
Your survival garden layout depends entirely on what you’re working with. Here are three setups I’ve used or helped others build.
Single 4x8 Raised Bed
This is my go-to for beginners. Divide it using square-foot gardening principles: dedicate half to calorie crops (potatoes in grow bags beside the bed, bush beans), a quarter to greens (kale, lettuce, spinach), and a quarter to storage crops (onions, garlic). Train pole beans or cucumbers vertically on a trellis at one end to maximize output.
10x10 In-Ground Plot
With 100 square feet, you can grow a meaningful amount of food. I’d split it: two 4-foot rows of potatoes, one row of bush beans, one row of winter squash trained outward along the edge, and the remaining space for onions, garlic, carrots, and a succession of greens. Add a three sisters planting (corn, beans, squash) in one corner if you want a classic companion planting setup — the corn provides a trellis for beans, and squash shades the ground to suppress weeds.
Container and Balcony Setup
Apartment preppers aren’t out of luck. Use 5-gallon buckets (drill drainage holes) for potatoes, tomatoes, and peppers. Window boxes handle herbs and lettuce. A single grow bag can produce 5–10 pounds of potatoes. I’ve helped renters produce surprising amounts of food on a south-facing balcony with eight to ten containers.
General layout principles:
- Group plants by water needs — drought-tolerant herbs away from thirsty tomatoes
- Designate at least one area for seed-saving isolation (keep different squash varieties 500+ feet apart, or hand-pollinate)
- Sketch a seasonal planting calendar so you know what goes in when, including succession plantings of greens every 2–3 weeks
- Assign bed sections by purpose: calories, vitamins, storage, and seed production
Top Prepper Garden Crops: What to Grow and Why
 High-yield survival crops for your first prepper garden
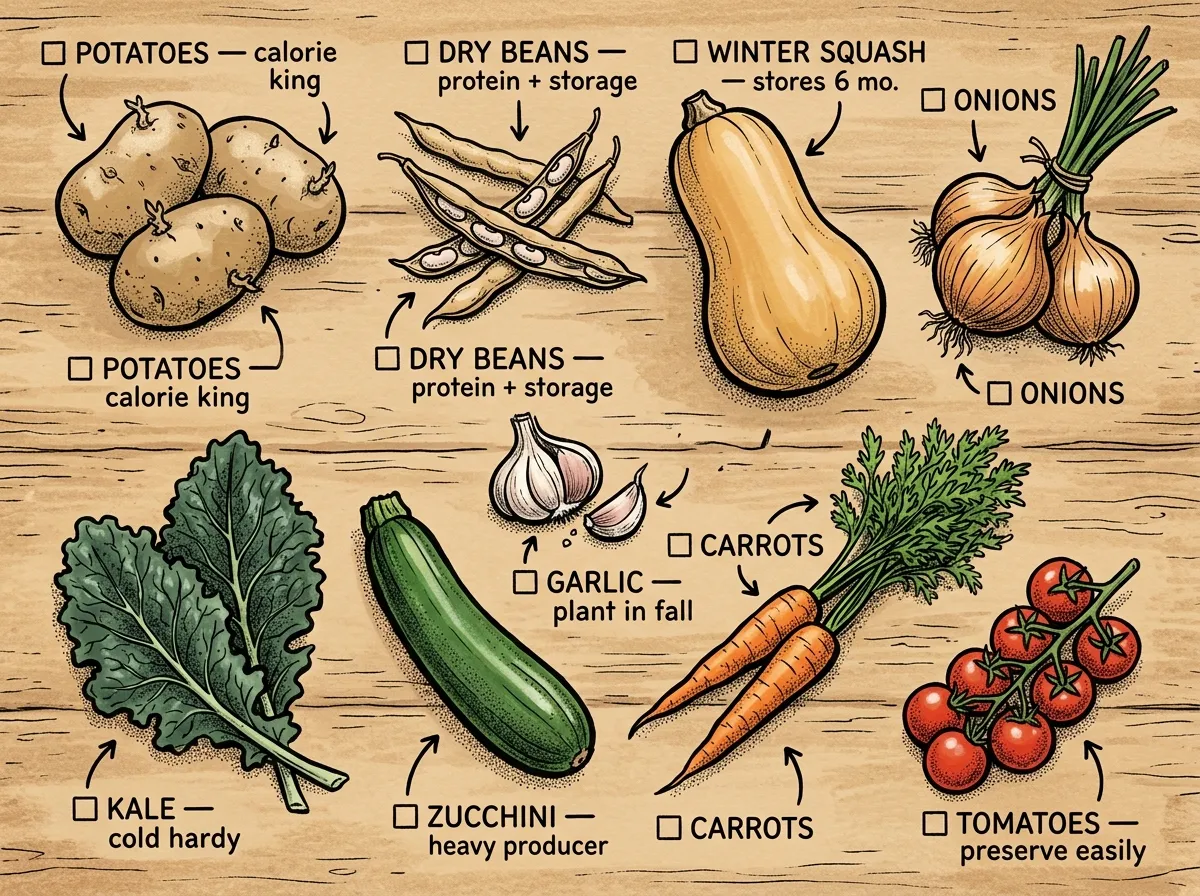
So what should you actually plant? This is where gardening for preppers diverges from regular hobby gardening. You’re optimizing for calories, storage life, nutritional coverage, and seed-saving potential — not just summer flavor.
Here’s my tested lineup with real performance data from over a decade of growing:
| Crop | Calories/lb | Days to Harvest | Storage Life | Seed Saving | Difficulty |
|---|---|---|---|---|---|
| Potatoes (Yukon Gold) | 350 | 70–120 | 4–6 months (root cellar) | Moderate | Easy |
| Bush Beans (Provider) | 150 (fresh) / 600 (dried) | 50–60 | 1+ years (dried) | Easy | Easy |
| Winter Squash (Waltham Butternut) | 200 | 85–110 | 3–6 months | Easy | Easy |
| Corn (Golden Bantam) | 390 | 70–90 | 1+ years (dried) | Moderate | Moderate |
| Sweet Potatoes (Beauregard) | 390 | 90–120 | 4–6 months (cured) | Moderate | Moderate |
| Tomatoes (Roma) | 80 | 70–85 | 1+ years (canned) | Easy | Moderate |
| Onions (Yellow Storage) | 180 | 90–120 | 6–9 months | Biennial | Easy |
| Garlic (Hardneck) | 600 | 240 (fall-planted) | 6–9 months | Easy | Easy |
| Kale (Winterbor) | 220 | 50–70 | Harvest fresh through frost | Easy | Easy |
| Carrots (Danvers) | 190 | 65–80 | 4–6 months (root cellar) | Biennial | Easy |
Provider bush beans have been my most consistent producer over ten-plus seasons — they germinate in cool soil and resist common bean mosaic virus when other varieties fold. Waltham Butternut squash stores six months in my unheated garage without any special setup. And Winterbor kale? I’ve watched it survive 18°F in my garden without protection. These aren’t theoretical picks from a seed catalog — they’re what’s actually worked year after year in Zone 8b.
Grow what your household actually eats. The most calorie-dense garden in the world is useless if your family won’t touch the food.
How to Start a Prepper Garden on a Budget
You don’t need to spend hundreds of dollars to grow emergency food. The biggest waste of money in gardening is buying things you don’t need yet.
A starter 4x8 raised bed for under $50:
- Bed frame: Free pallets or reclaimed lumber — I’ve never paid for pallet wood. Alternatively, cinderblocks stacked two high run about $15–20.
- Soil: Contact local tree services for free wood chip mulch (they often need places to dump it). Mix with compost from a community program. One bag of garden soil from a hardware store ($5–8) stretched with free compost gets you started.
- Seeds: A packet of beans, squash, and kale from a dollar store costs $3 total. Seed swaps at local gardening clubs are free. Many libraries now have seed lending programs.
- Water: A food-grade 55-gallon drum from a local bottling company ($10–15) with a spigot makes a basic rain barrel. Learn more about rainwater harvesting for preppers.
Free food from kitchen scraps: Sprout potatoes from your pantry, regrow green onion roots in a glass of water, and plant garlic cloves from a grocery store bulb. These are legitimate starts.
Where to actually spend money: Invest in soil quality. A $20 bag of quality compost produces more food than $20 worth of tools. You can dig with a stick, but you can’t grow in dead dirt.
Starting from seed costs about 90% less than buying transplants, and you learn a critical skill. A single $3 packet of Provider beans contains 100+ seeds — enough for several seasons if you save seed from your harvest.
Preservation and Storage: Making Your Harvest Last
 Core preservation tools and methods for garden surplus
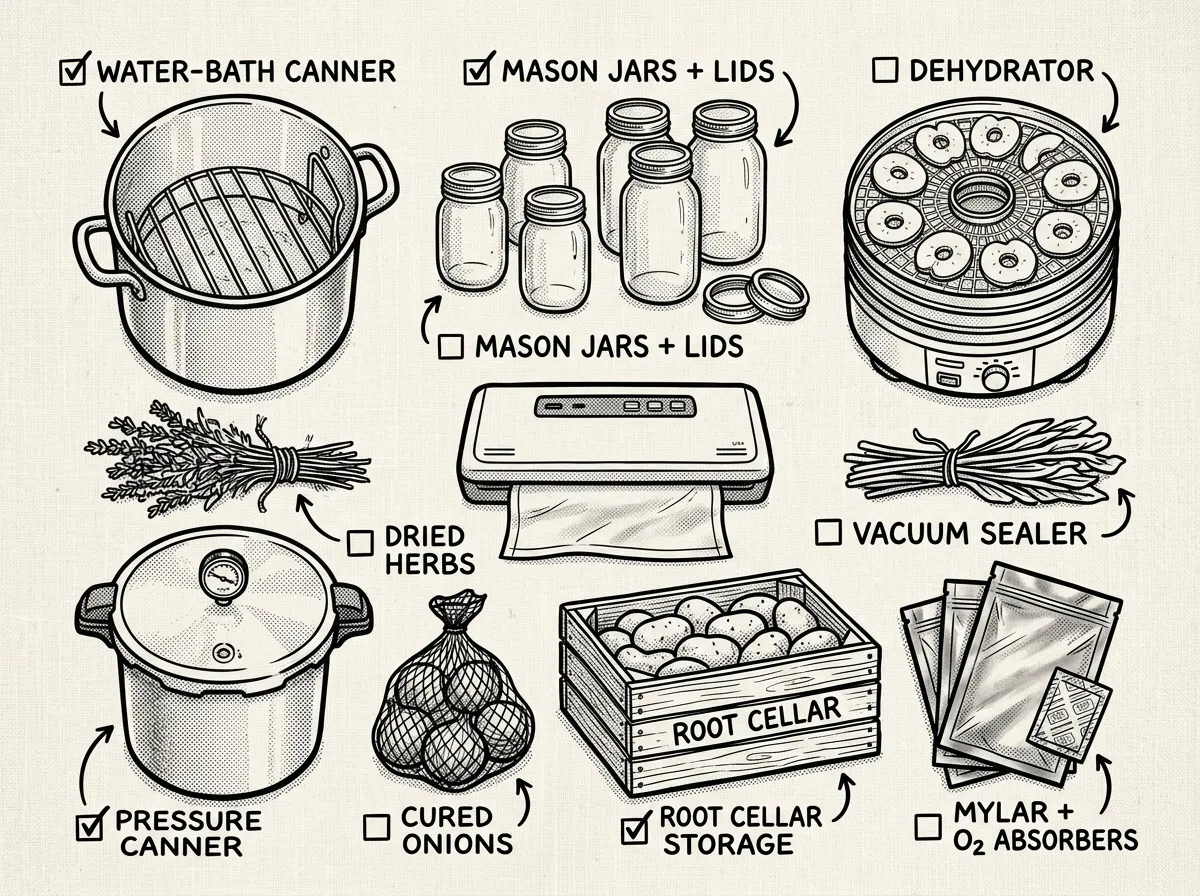
Growing food is only half the equation. A prepper garden without preservation is just a summer hobby.
Water-Bath Canning — Best for tomatoes (sauces, salsa, whole canned), pickled vegetables, and fruit preserves. Shelf life: 1–2 years when sealed properly. Starter equipment: a basic water-bath canner kit ($25–40), mason jars, and lids.
Pressure Canning — Required for low-acid foods: green beans, corn, carrots, soups, and stocks. Shelf life: 1–3 years. A quality pressure canner runs $80–150 and is the single most important preservation tool for preppers. The Presto 23-Quart — around $80–100 — is what I’ve used for years. It’s not fancy, but it’s USDA-approved and I’ve never had a seal fail.
Dehydrating — Ideal for herbs, tomatoes, peppers, kale chips, beans, and fruit. Shelf life: 6 months to 2+ years depending on moisture content and storage. An entry-level dehydrator costs $40–60.
Root-Cellaring — The easiest method for potatoes, onions, garlic, carrots, beets, and winter squash. No equipment needed beyond a cool, dark, humid space. Learn how to build a DIY root cellar for long-term storage. Shelf life: 3–9 months depending on the crop and conditions.
Freezing — Blanch vegetables (beans, corn, greens) before freezing to preserve texture and nutrients. Shelf life: 8–12 months. The catch: freezing depends on electricity, which makes it the least resilient option for emergency preparedness.
A critical safety note: Unsafe canning methods circulate widely on social media — oven canning, open-kettle canning, and unapproved recipes for low-acid foods. These can cause botulism. The USDA Complete Guide to Home Canning is free online and is the only authoritative source I trust. Follow tested recipes. No exceptions.
The first time I tried canning, I used a random recipe from Pinterest for salsa verde. The jars sealed fine, but I later learned the recipe hadn’t been tested for safe acidity levels. Nothing bad happened, but I got lucky. Now I don’t deviate from USDA-approved recipes — not even a little.
Seed Saving for Preppers: Building a Free Seed Bank
 Harvesting and storing open-pollinated seed for next season
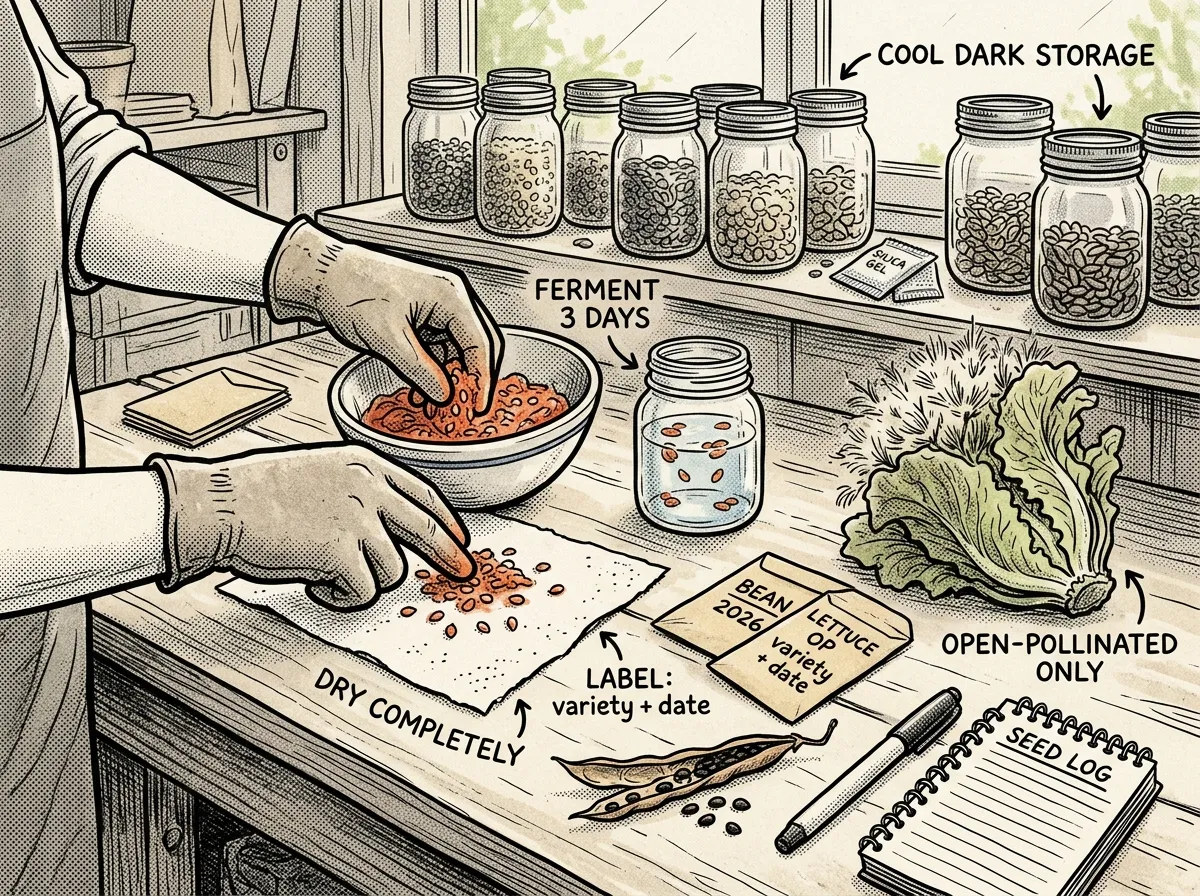
Seed saving transforms your garden from a one-season project into a self-sustaining system. When you save seed from open-pollinated (OP) and heirloom varieties, you’re building a locally adapted seed bank that costs nothing after the initial purchase.
Start with the easiest crops:
- Beans and peas: Let pods dry on the plant until they rattle. Shell and store. Almost foolproof.
- Tomatoes: Scoop seeds into a jar with water, ferment for 2–3 days, rinse, and dry on a paper plate.
- Lettuce: Let one plant bolt and flower. Collect the fluffy seed heads when dry.
- Winter squash: Scoop seeds at harvest, rinse, and dry thoroughly.
The hybrid vs. open-pollinated distinction matters here. Open-pollinated varieties breed true — the seeds produce plants like the parent. Hybrid seeds (marked F1) may not reproduce reliably. For your seed-saving crops, always choose OP or heirloom varieties. Use hybrids when you need specific disease resistance, but don’t plan to save from them.
Isolation matters for some crops. Squash varieties cross-pollinate readily — if you’re growing both zucchini and butternut, only save seed from one unless you separate them by 500+ feet or hand-pollinate. Beans and tomatoes are largely self-pollinating and rarely cross, making them ideal for beginners.
Storage: Dry seeds thoroughly, store in airtight containers (mason jars work) with a small silica gel packet, label clearly with variety and date, and keep in a cool, dark location. Most vegetable seeds remain viable for 3–5 years when stored properly.
After three to four seasons of selecting seed from your strongest, most productive plants, you’ll have varieties uniquely adapted to your soil, climate, and growing conditions. That’s worth more than any seed catalog.
Most Common Mistakes First-Time Prepper Gardeners Make
In my years of helping people get started with survival gardening — and from my own early failures — I’ve found that most gardens fail from overcommitment, not lack of knowledge.
1. Starting too large and burning out. A 200-square-foot garden sounds manageable in March. By July, when it needs daily attention in the heat, it’s overwhelming. Fix: Start with a 4x8 bed. Expand only after you’ve proven you can maintain what you have.
2. Ignoring soil health. Planting in poor, compacted, or depleted soil guarantees disappointing yields. Fix: Invest your first dollars in compost and organic matter. A soil test costs about $15 and tells you exactly what’s needed.
3. Planting crops you don’t eat. I’ve watched people grow rows of beets their family won’t touch because a blog said beets are great survival food. Fix: Grow what you already eat. Preparedness food nobody consumes is waste.
4. Not accounting for preservation time. Twenty pounds of tomatoes ripening simultaneously is a crisis if you don’t have canning jars, lids, and a free afternoon. Fix: Plan your preservation supplies and schedule before planting.
5. Skipping succession planting. Planting all your lettuce on the same day gives you three weeks of abundance followed by nothing. Fix: Plant greens and quick crops every 2–3 weeks through the season.
6. Underestimating water needs. A raised bed in full sun during a July heat wave can dry out in a single day. If you’re in the high desert Southwest, this goes double — your watering schedule in Tucson looks nothing like mine in the Pacific Northwest. Fix: Mulch 3–4 inches deep, install drip irrigation, and water in the morning.
7. Relying solely on hybrid seeds. Hybrids perform well, but they tie you to purchasing new seed every year. In an extended emergency, seed catalogs aren’t shipping. Fix: Grow at least a few open-pollinated varieties and practice saving seed starting in your first season.
Common Challenges and Practical Responses
Every garden has problems. Here’s what I’ve dealt with in the Pacific Northwest specifically, plus solutions that apply more broadly.
[SCENARIO]The Overnight Slug Massacre|You transplant a flat of lettuce seedlings on a cool, damp evening. The next morning, every single one has been chewed to stubs. If you’re gardening anywhere in the Pacific Northwest — or any humid, mild climate — this will happen to you eventually.|]
Slugs are the bane of western Oregon and Washington gardens. I’ve lost entire beds of seedlings overnight. Iron phosphate bait (Sluggo — around $8–10 for a box) is effective and safe around food crops and pets. Copper tape around raised beds provides a real barrier. Hand-picking at dusk with a headlamp is tedious but free.
Late-spring cold snaps will humble you. In 2019, a late May frost wiped out my tomato transplants — but my cold-hardy kale and garlic were untouched. That’s why I now stagger plantings and diversify. Keep frost cloth or old bedsheets ready through May, and don’t transplant warm-season crops until nighttime temps consistently stay above 50°F.
Excess moisture and fungal issues plague western PNW gardens. Space plants for air circulation, water at soil level (never overhead), remove affected foliage immediately, and choose disease-resistant varieties. My Roma tomatoes handle moisture better than most heirloom slicers.
Poor or clay soil is common out here. Don’t fight it — build on top of it. Raised beds filled with a mix of compost, topsoil, and aged bark work immediately while you improve the native soil underneath over years. If you’re in a humid Gulf Coast climate, you’ve got the opposite problem — sandy soil that drains too fast and needs heavy organic matter to hold moisture and nutrients.
Limited space just means you get creative. Train beans and cucumbers up trellises. Grow potatoes in tall grow bags. Convert ornamental beds to edibles — nobody needs a fourth azalea bush more than they need food security.
Is It Too Late to Start a Prepper Garden?
Short answer: it’s almost never too late to start something productive.
If you’re reading this in fall or winter, you haven’t missed your chance — you’ve actually gained a strategic advantage.
Fall planting (September–November): Garlic goes in the ground 4–6 weeks before your first hard frost and overwinters for a summer harvest. Cool-season crops like kale, spinach, radishes, and lettuce thrive in fall temperatures and can produce well into December with minimal frost protection in milder zones.
Winter planning (December–February): Start a compost pile — it’ll be ready by spring. Order seeds early for the best selection. Sketch your garden layout and planting calendar. Build or repair raised beds.
Late winter seed starting (February–March): Start tomatoes, peppers, and brassicas indoors 6–8 weeks before your last frost date. A sunny south-facing window and basic seed trays are all you need.
Cover cropping: If you have empty beds going into fall, plant crimson clover or winter rye. These protect the soil from erosion, suppress weeds, and add organic matter when you turn them under in spring. It’s the single best thing you can do for next year’s garden with minimal effort.
Even if you truly can’t plant anything today, building soil and planning now means a dramatically stronger spring garden.
Community Resilience: Sharing Skills and Surplus
Here’s something my FEMA Community Emergency Response Team training reinforced that most prepper content ignores: individual preparedness has limits. Community resilience multiplies everything.
A backyard survival garden becomes far more powerful when connected to neighbors and local networks:
- Seed swaps — trade your surplus Provider bean seeds for someone else’s heirloom tomato starts. Local gardening clubs and libraries host these, and they’re the cheapest way to diversify your seed bank.
- Shared tool libraries — a pressure canner, rototiller, or soil tester doesn’t need to sit in every garage. If your neighborhood doesn’t have one, organizing a shared tool system among five or six neighbors costs nothing.
- Teaching skills — show a neighbor how to can tomatoes. Teach a kid how to plant potatoes. These skills spread through communities and create redundancy.
- Bartering surplus — in a good year, you’ll have more zucchini than any family can eat. Trade it for eggs, firewood, or someone else’s surplus crop.
- Community garden plots — if you don’t have yard space, community gardens provide land, water, and often shared tools. Many have waiting lists, so sign up now.
FEMA’s community resilience framework explicitly encourages local food production networks because they reduce pressure on emergency response systems during disasters. I’ve seen this play out firsthand — during a multi-day ice storm in 2020, the neighbors who’d been swapping gardening tips and surplus produce for years were the ones who organized meal-sharing without anyone having to ask. The lone-wolf prepper mentality has real tactical limits that most people don’t acknowledge until they need help.
Sustainable Practices That Build Long-Term Resilience
A prepper garden isn’t a one-season project — it’s a system that should compound over time. These practices make that happen:
- Composting and vermicomposting turn kitchen and yard waste into the best soil amendment money can’t buy. A basic compost bin pays for itself in one season of reduced soil purchases.
- Crop rotation prevents nutrient depletion and breaks pest and disease cycles. Move your plant families to different beds each year — nightshades (tomatoes, peppers, potatoes) in one spot this year, legumes next year.
- Cover crops like clover and winter rye rebuild nitrogen, prevent erosion, and add organic matter. Plant them in any bed that would otherwise sit empty.
- Pollinator habitat increases yields on fruiting crops. Leave a small patch of wildflowers, and resist the urge to keep everything manicured — native bees need bare soil and dead stems for nesting.
- Heavy mulching with wood chips, straw, or leaves conserves moisture, suppresses weeds, regulates soil temperature, and feeds soil biology as it breaks down. I mulch 3–4 inches deep on every bed and it’s cut my watering needs by roughly a third.
Recommended Tools and Resources
- Hand trowel, garden fork, and pruning shears
- Soaker hose or drip tubing with a timer
- Soil test kit for pH and basic nutrients
- 3–4 inch layer of mulch material (free wood chips from tree services)
- Simple garden journal or notebook
Preservation equipment (buy as needed):
- Pressure canner ($80–150) — the most important preservation tool
- Water-bath canner ($20–30) or use any large stockpot with a rack
- Dehydrator ($40–60 for a reliable entry model)
- Mason jars, lids, and rings — buy in bulk during off-season sales
Water collection:
- Rain barrels where permitted by local law
- Drip irrigation kit ($15–30) with a battery-powered timer
Learning resources:
- Your state Cooperative Extension Master Gardener program (free or low-cost, region-specific)
- USDA Plant Hardiness Zone Map
- USDA Complete Guide to Home Canning — free, authoritative, and the only canning reference I recommend
- Local gardening books specific to your region and climate
For water purification methods for emergencies, keep in mind that garden water sources like rain barrels need treatment before drinking.
Frequently Asked Questions
How big should my prepper garden be?
Start with what you can realistically maintain — one 4x8 raised bed, several containers, or a 10x10 in-ground plot. A well-managed 100 square feet can yield roughly 300 pounds of food in a good season, though results vary significantly by climate, soil, and experience. Add space only after you’ve proven you can handle what you have.
Is October too late to start a prepper garden?
Not at all. October’s ideal for planting garlic (which overwinters and harvests the following summer), cool-season greens like kale and spinach, and cover crops that build soil for spring. If the ground’s frozen, start a compost pile, order seeds, plan your layout, and build raised beds. There’s productive garden work in every month of the year.
What is the most common mistake of first-time gardeners?
Starting too large. In my experience, more gardens fail from overcommitment than from lack of knowledge. A 200-square-foot plot that goes untended produces less than a single 4x8 bed that gets consistent attention. Start small, build good habits, and expand when your routines are solid — not before.
What varieties should I choose for seed saving?
Open-pollinated (OP) and heirloom varieties. These breed true from saved seed, meaning the next generation matches the parent plant. Hybrids (marked F1) don’t reproduce reliably. Good starter crops for seed saving are beans, tomatoes, lettuce, and winter squash. Keep records, select from your healthiest plants, and store dried seeds in airtight containers in a cool, dark place.
Can a prepper garden really help during an emergency?
Yes. A garden supplies fresh food, builds practical skills, and supplements stored provisions — especially when combined with preservation. It won’t replace a full pantry overnight, but a household that can grow, preserve, and save seed has a renewable food system that no amount of stored cans can match over time.
How much food can you grow in a small garden?
A single 4x8 raised bed (32 square feet) can produce 50–100+ pounds of food per season depending on crop selection and management. Potatoes, beans, and squash are the highest-yield choices for small spaces. Vertical growing with trellised beans and cucumbers effectively doubles your usable area.
Start Growing Today
Learning how to start a prepper garden is one of the highest-return investments in your overall preparedness — and it’s one you can begin today regardless of season, space, or budget. A single raised bed, a few packets of open-pollinated seeds, and a commitment to building soil will produce real food and real skills within a single growing season.
Don’t wait for the perfect setup. My first prepper garden was four mismatched containers on a rental patio. It produced enough beans and greens to teach me the basics of succession planting and seed saving — and that ugly little container garden was the foundation for the system I run now. A system that produces hundreds of pounds of food annually and has never once let me down during a supply disruption.
Start small. Build soil. Grow what you eat. Preserve what you grow. Save seed from your best performers. Track everything in a simple journal.
A prepper garden is one piece of a broader preparedness strategy. Pair it with a solid beginner prepper checklist, reliable water systems, and practiced preservation skills, and you’ll have a self-sufficiency foundation that strengthens with every season.
The seeds are cheap. The skills are free. The time to start is now.
The Complete
Prepper's Reference.
149 articles synthesized into one comprehensive PDF — twelve chapters covering water, food, shelter, first aid, comms, and scenario-specific preparedness. Free with your email.
Unsubscribe anytime · We never share your email
You're in. Check your inbox.
Keep Reading
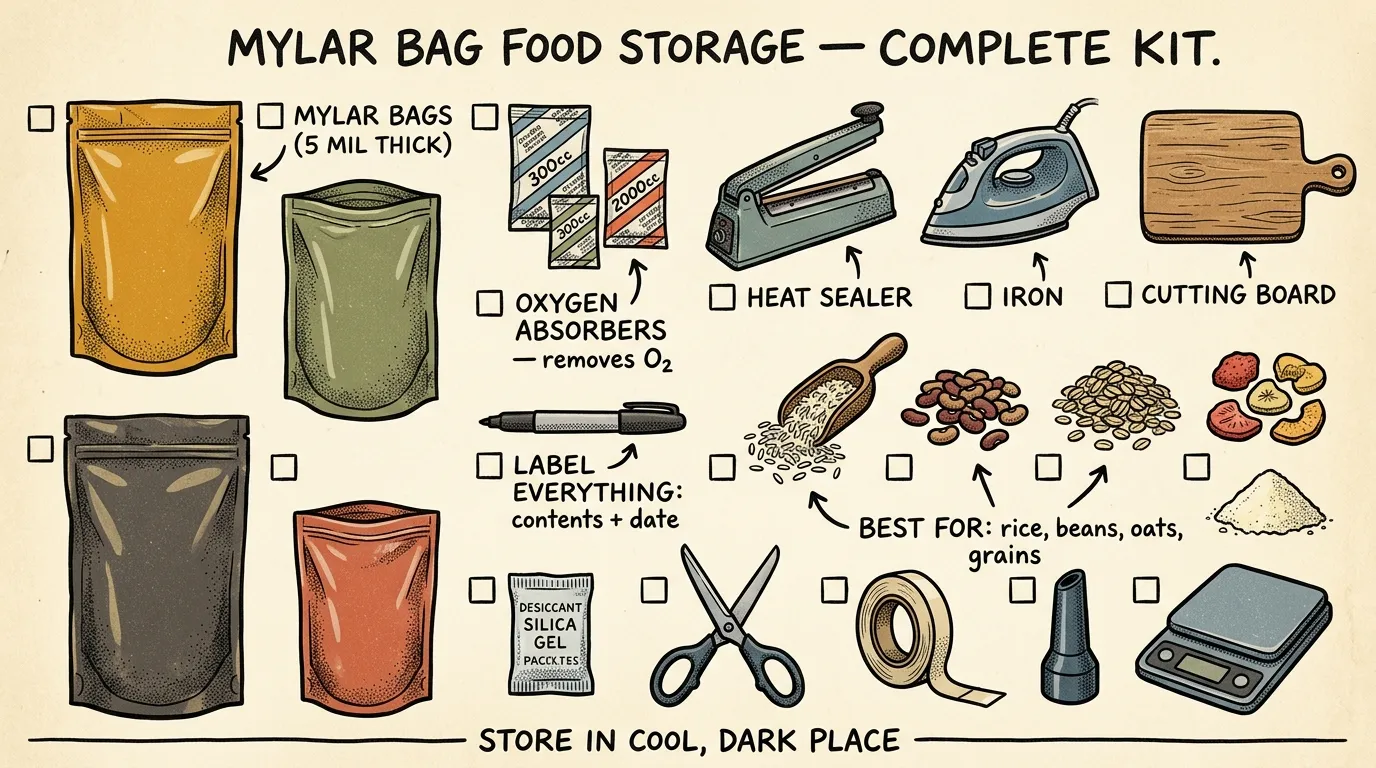
Mylar Bags for Food Storage: Complete Guide (2026)
Learn how to use mylar bags for food storage to preserve dry goods 25+ years. Expert guide covers thickness, sealing, oxygen absorbers & mistakes to avoid.
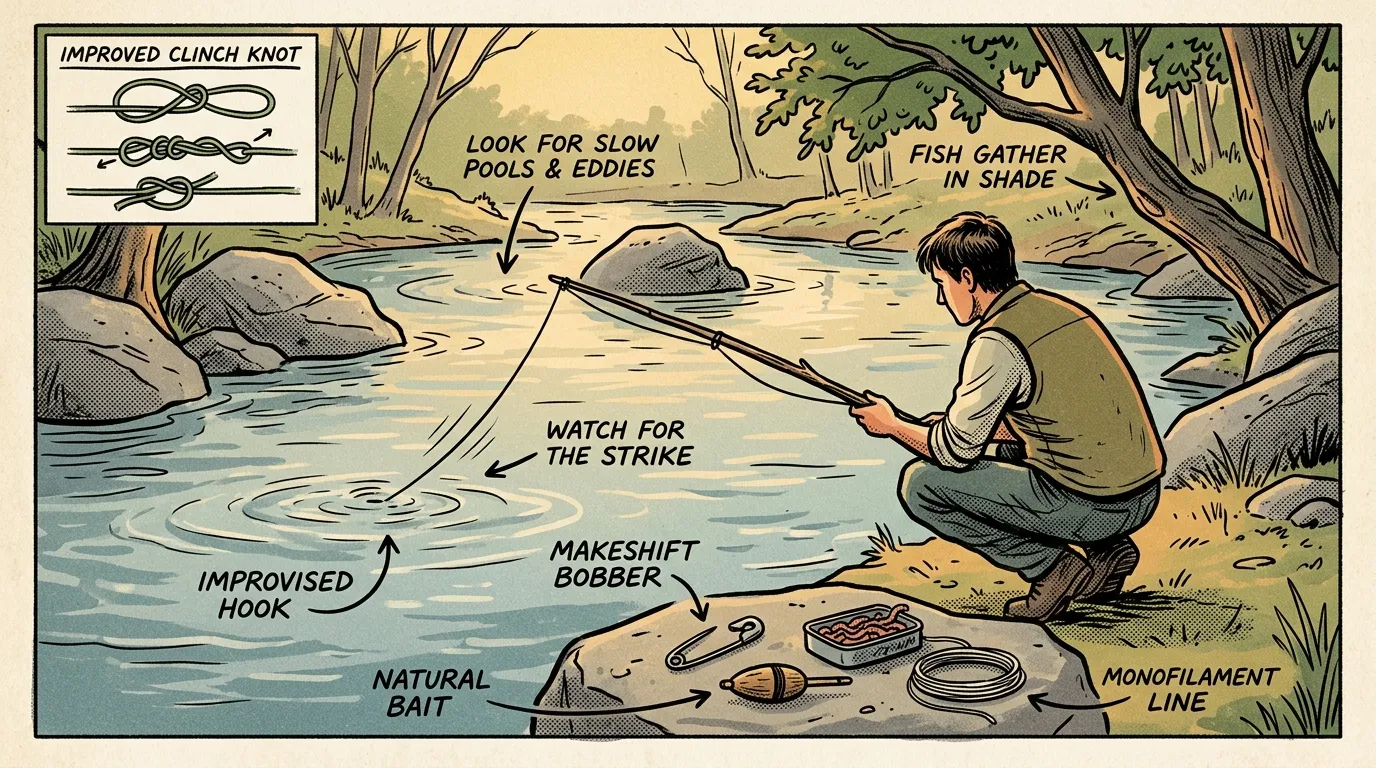
Survival Fishing: Beginner's Guide to Catching Fish
Learn survival fishing basics — gear, improvised techniques, where to find fish, and how to cook your catch. Built by a Wilderness First Responder.
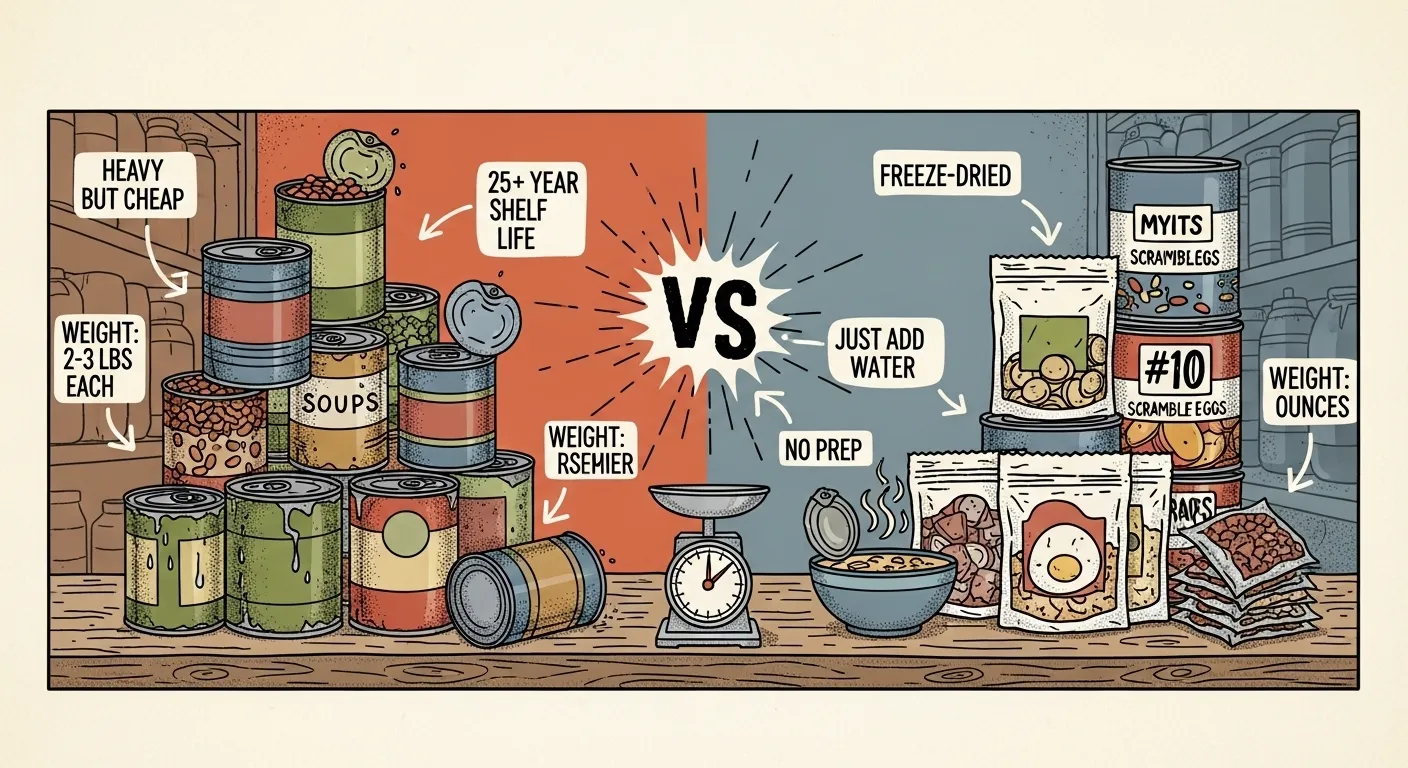
Canned vs. Freeze-Dried: The Ultimate Prepper Showdown
Canned vs. freeze-dried food: compare shelf life, cost, nutrition, storage, and convenience so beginner preppers can build smarter emergency supplies.