The best prepper storage solutions for beginners include vertical shelving, airtight containers, stackable bins, under-bed storage, and labeled grab-and-go kits. To maximize space, assess your home layout, store items by priority and environment, and use an inventory system to avoid clutter, waste, and expired supplies.
Key Takeaways
- Measure and map every potential storage zone before buying a single container or shelf unit.
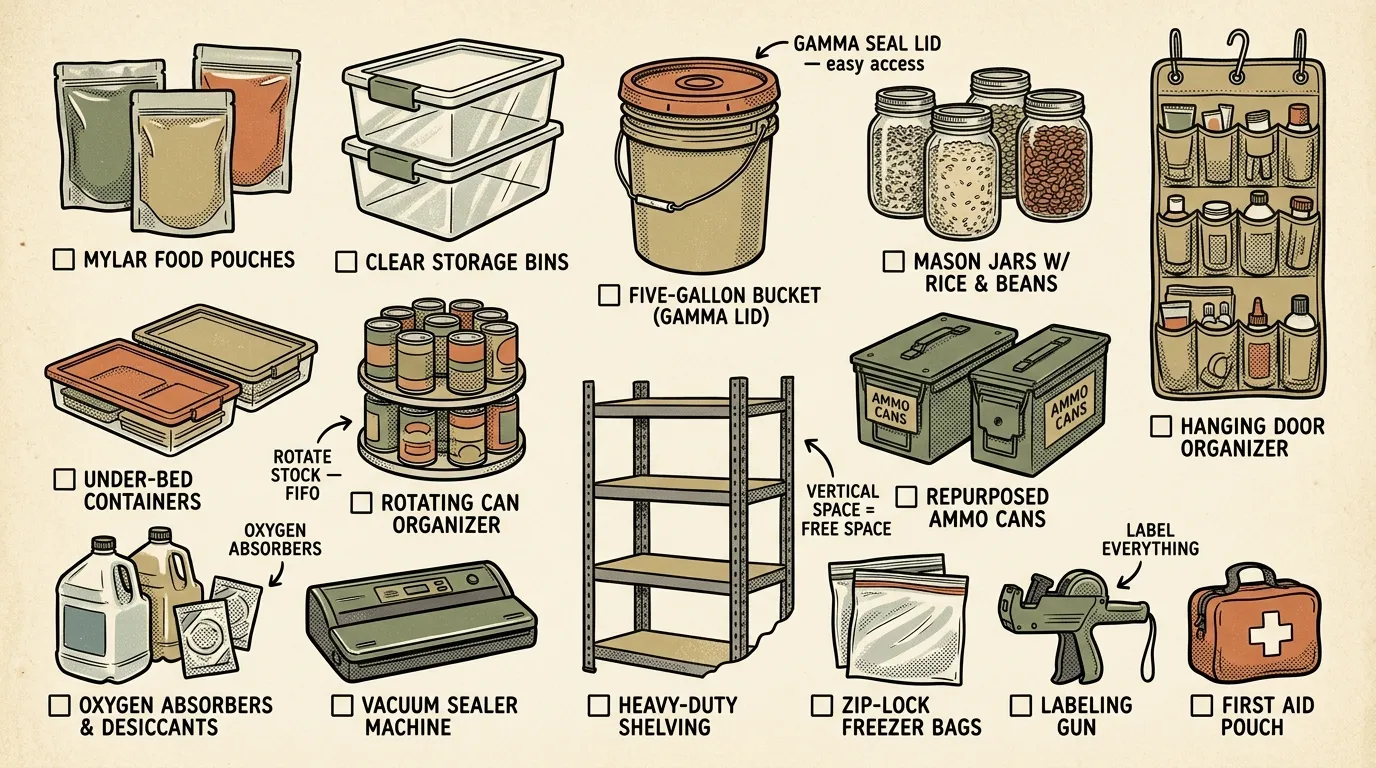
- Use food-grade buckets, Mylar bags with oxygen absorbers, and gasket-sealed bins — never cardboard or dollar-store containers that fail under real conditions.
- Anchor vertical shelving to wall studs and stack supplies to reclaim dead wall space in any size home.
- Rotate supplies every 3–6 months using FIFO and color-coded date labels to catch expirations before they become waste.
- Start with a $30–$75 Tier 1 investment: free bakery buckets, Mylar bags, a marker, and one shelf unit — then build up as budget allows.
Prepper Storage Solutions: Save Space & Stay Ready
During a 2019 ice storm in the Cascades, I watched a family lose an entire season of stored food to a flooded garage. Their canned goods sat directly on concrete. Dry goods lived in cardboard boxes. Water jugs were wedged behind a lawnmower where nobody could reach them. Everything that could go wrong did — and that experience shaped every prepper storage solutions recommendation you’ll find here. It’s why I’m convinced that how you store matters just as much as what you store.
The principles don’t change whether you’re working with a 500-square-foot apartment or a full basement: measure your space, choose durable containers, label everything, and rotate consistently. If you’re brand new to all of this, start with our beginner’s guide to survival readiness first, then come back here for the storage deep dive.
Quick Summary
- Map your space first. Grab a tape measure before you grab a credit card — knowing your dimensions prevents buying containers that don’t fit and gear you can’t place.
- Choose the right containers. Food-grade buckets with gamma lids, Mylar bags with oxygen absorbers, and gasket-sealed bins are the foundation. Cardboard and dollar-store tubs fail.
- Go vertical. One five-tier wire shelving unit anchored to the wall can reclaim 20+ square feet of storage from dead wall space.
- Rotate religiously. FIFO and color-coded date labels turn rotation from a dreaded chore into a 15-minute quarterly habit.
- Start cheap. Tier 1 costs $30–$75 — free bakery buckets, a pack of Mylar bags, a marker, and one shelf unit. That’s a weekend project, not a lifestyle overhaul.
- Distribute supplies. Never put everything in one room. One fallen tree, one flood, one burst pipe can wipe out a single-location cache.
Why Prepper Storage Solutions Matter
Good storage prevents lost supplies. It’s that straightforward. Moisture ruins dry goods. Rodents chew through poor packaging. Heat shortens the shelf life of medicines, batteries, and food. Without a system, you end up with forgotten cans shoved behind Christmas decorations and a first aid kit you can’t find when you actually need it.
A pile of supplies isn’t a plan. A system you can find, access, and rotate — that’s a plan.
The goal of any emergency supply storage system is simple: protect supplies from damage, make them easy to find, and keep them rotated so nothing expires unused. These small choices turn a disorganized pile into something you can actually rely on when the power goes out or the roads close.
Assess Your Home Before You Buy
Before you spend a dollar on containers or shelving, grab a tape measure. I’ve watched people drop $500 on food and gear, then realize they’ve got nowhere to put any of it. The result is bags piled on the floor, exposed to every hazard they’re trying to avoid.
- Measure height, width, depth, door clearances, and estimated weight capacity for every potential spot — closets, under beds, garage walls, basement corners.
- Match items to environment: food goes cool, dry, and dark; water stays out of sunlight and away from chemicals; medications need stable temps; tools belong near exits.
- Organize by access level: daily-use items up front, 72-hour kits near exits, long-term reserves in deeper storage.
- Note environmental risks: temperature swings, humidity, pest entry points, and flood history. These dictate which containers you need and where you place them.
Best Prepper Storage Solutions: What to Use and Where
Here’s what actually works — and where each solution fits best.
Vertical Shelving and Racking
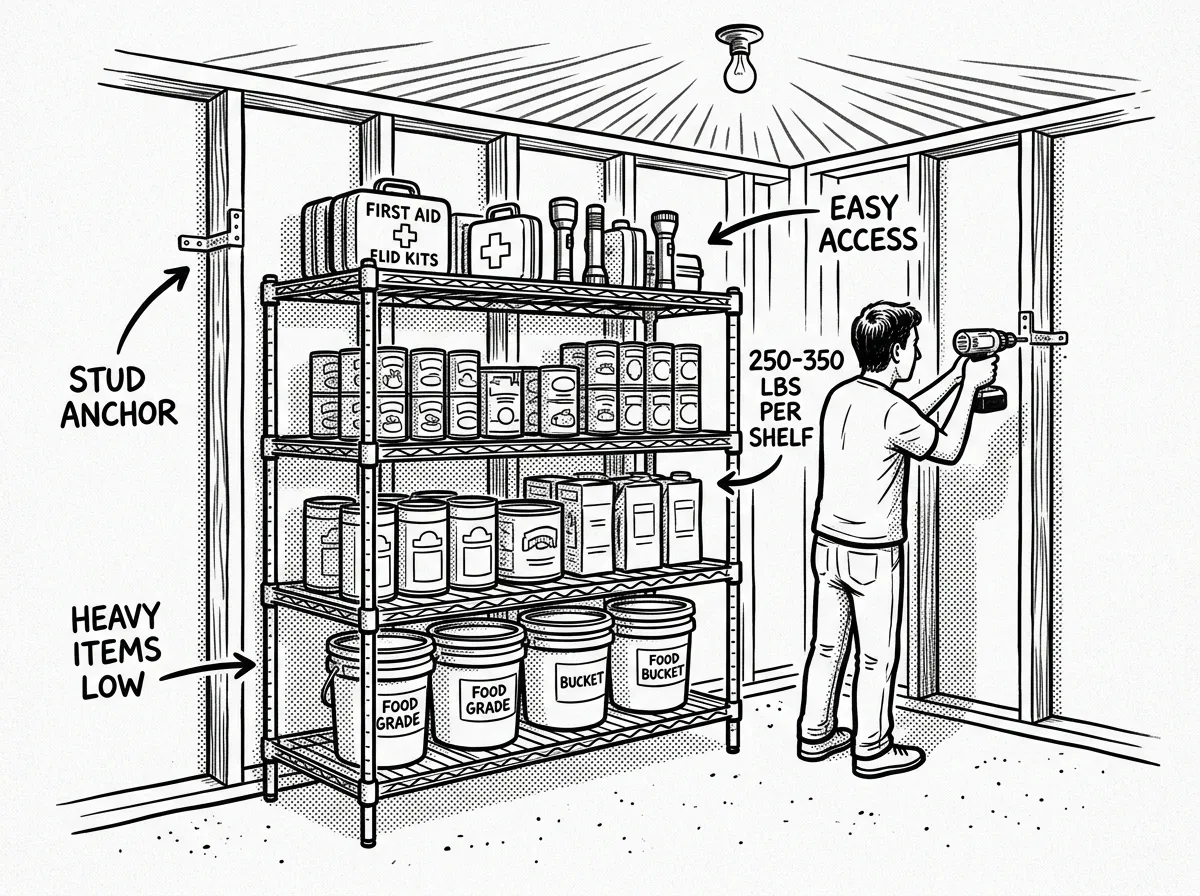 A garage wall transformed with anchored wire shelving loaded with organized supplies
Vertical shelving is the single highest-impact upgrade for most homes. You’re converting dead wall space into organized, accessible storage, and the difference is dramatic.
Wire chrome shelving (the kind you see in restaurant kitchens) supports 250–350 lbs per shelf, ventilates well, and assembles without tools. It’s ideal for garages and basements. Heavy-duty plastic resin shelving is lighter, won’t rust, and works better in humid environments where metal corrodes. Wall-mounted track shelving is your best bet if you’re renting — you’ll leave a few screw holes to patch when you move out, but you gain adjustable shelf heights without a freestanding footprint.
Space shelves 14–16 inches apart to optimize for 5-gallon bucket height. This also fits standard 64-quart storage totes perfectly.
In the Pacific Northwest, I anchor every shelf to wall studs with L-brackets or anti-tip straps — a lesson reinforced after the 2001 Nisqually earthquake shook unsecured shelving off walls across western Washington. If you’re in any seismic zone, earthquake strapping isn’t optional. It takes five minutes and costs under $10.
Airtight, Stackable Food Storage
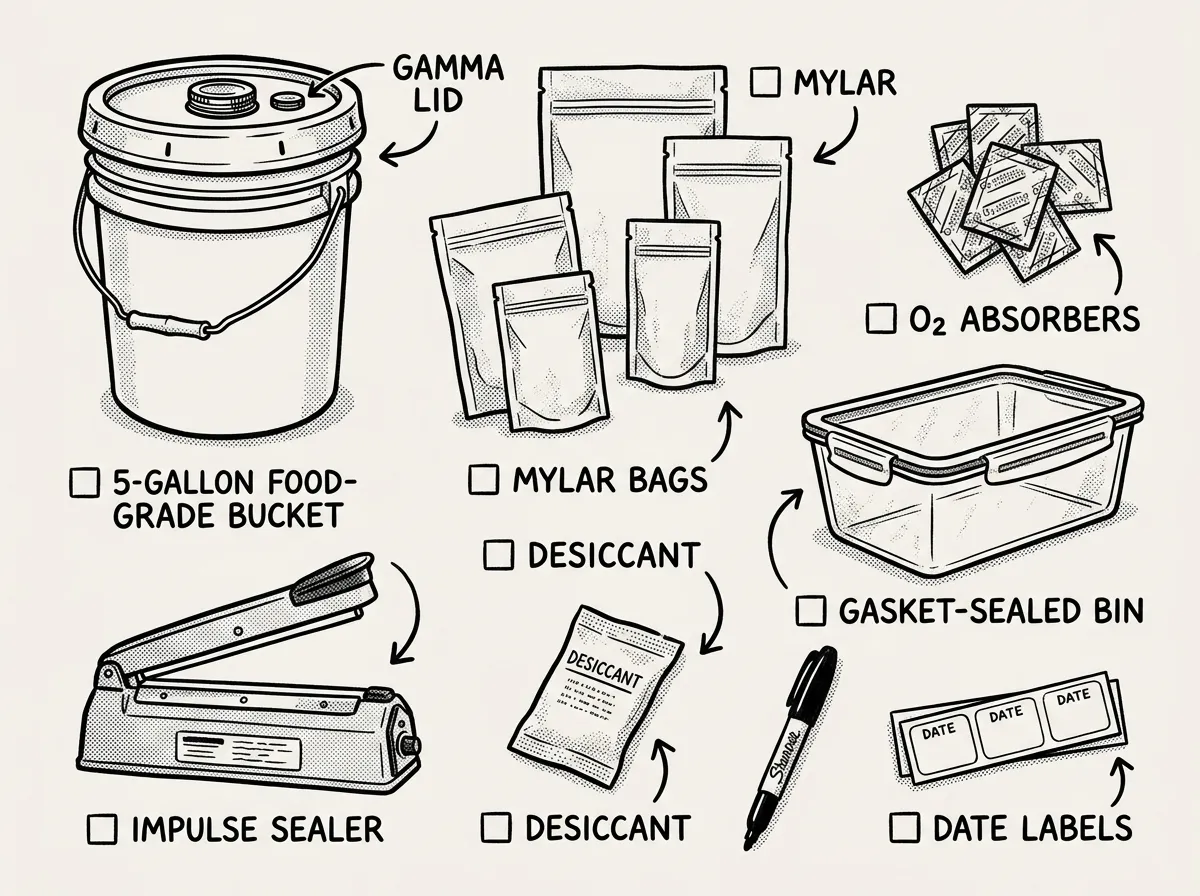 Core food storage containers and sealing supplies laid out for inspection
Your core food storage containers are:
- Food-grade buckets with gamma lids for bulk rice, beans, oats, and flour
- Mylar bags with oxygen absorbers inside those buckets for maximum shelf life
- Airtight glass or BPA-free pantry jars for items you rotate frequently
- Desiccant packets added to any container stored in humidity above 50%
Label every container on at least two sides: contents, pack date, and expiration date. I use a fat permanent marker and clear packing tape over the label to prevent smudging. For a deeper look at what to put inside these containers, check out first steps to stockpiling food.
The first time I sealed Mylar bags, I didn’t press out enough air before dropping in the oxygen absorbers. Half the bags never pulled tight, and I had to redo the entire batch three months later when I noticed they hadn’t vacuum-sealed properly. Now I lay each bag flat on a table, press from the bottom up like I’m squeezing a toothpaste tube, then hit it with the iron. Takes an extra thirty seconds per bag and saves you from discovering failures months down the line.
Under-Bed and Hidden Storage
Low-profile bins (4–6 inches tall) fit under most bed frames and hold freeze-dried pouches, spare blankets, document copies, and flat medical kits. If your bed frame’s too low, $15 bed risers add 3–5 inches of clearance and instantly create 12–16 cubic feet of hidden storage space.
Beyond the bed, think about storage ottomans that double as seating, hollow headboards with shelf cavities, and decorative trunks used as coffee tables. The goal is dual-purpose furniture that doesn’t announce “prepper” to every guest who walks in.
Closet Conversion and Over-the-Door Organizers
A single closet can become a complete prepper organization system. Use hanging fabric shelves for categorized bins, over-the-door pocket organizers for small items like headlamps, lighters, and water purification tablets, and reserve the top shelf for lightweight, infrequently accessed items like spare tarps or seasonal gear.
Wall-Mounted Organizers and Pegboards
Pegboards, hooks, and shallow labeled bins keep tools, radios, and gear visible and reachable without eating floor space. Mount them in garages, utility rooms, or the inside of closet doors. Simple, cheap, and shockingly effective.
Discreet and Secure Storage
Locked cabinets, small safes, or false-bottom drawers protect cash, sensitive documents, and medications. Record secure locations in your inventory so you’re not guessing during an emergency.
How to Store Prepper Supplies in an Apartment or Small Space
So what if you’re working with 600 square feet and a landlord who doesn’t want holes in the walls? Small space prepping is the most common challenge I hear about, and it’s completely solvable. I’ve helped friends in Portland studios organize a full two-week supply for two adults — it just requires thinking room by room.
Kitchen
Use shelf risers inside cabinets to double your vertical capacity. Magnetic spice racks on the side of the fridge hold small items like electrolyte packets, bouillon cubes, and vitamins. That gap between your upper cabinets and the ceiling? It fits flat bins or a row of #10 cans perfectly.
Bedroom
Bed risers create 3–5 inches of additional under-bed clearance. A headboard with built-in shelving holds flashlights, a radio, and a small medical kit — items you want within arm’s reach at night. The top shelf of a bedroom closet can hold a full 5-gallon bucket of rice without anyone noticing.
Bathroom
An over-toilet shelving unit stores hygiene and sanitation supplies: wet wipes, hand sanitizer, soap bars, a two-week supply of any daily medications, and a small first aid kit.
Entryway
A single grab-and-go bin that doubles as a bench seat near the front door. Inside: your 72-hour kit or bug-out bag, a flashlight, copies of critical documents, and a set of house keys.
Realistic Capacity Estimates
- Studio apartment (400–500 sq ft): Two-week supply for one adult using under-bed, one closet, and kitchen cabinet space — roughly 20–25 cubic feet of storage.
- One-bedroom apartment (600–800 sq ft): Two-week supply for two adults using the same zones plus a dedicated hallway closet — roughly 35–45 cubic feet.
Here’s the constraint most people miss in apartments: weight. A full 7-gallon water jug weighs about 58 lbs. Don’t store all your water on upper floors. Distribute it — some in the kitchen, some in a ground-floor closet or storage unit if available.
Climate Control and Environmental Monitoring
“Cool, dry, and dark” is the standard advice. But I’ve found that most people don’t know what those numbers actually look like — or how to hit them.
Temperature swings — not just high temperatures — accelerate food degradation. A garage that’s 45°F at night and 90°F in the afternoon is worse for your supplies than a consistent 75°F closet. That’s a distinction most guides skip.
Monitoring is cheap and essential. Place a $10–15 digital hygrometer in each storage zone and check it monthly. My basement in the Willamette Valley runs 65–70% relative humidity without intervention. A $140 dehumidifier dropped it to 48% and eliminated condensation on my storage bins within a week. That one purchase probably saved hundreds of dollars in supplies.
Simple fixes by location:
- Basements: Run a dehumidifier, especially spring through fall. Keep containers off concrete floors using wooden pallets or plastic shelf risers — concrete wicks moisture upward through direct contact.
- Garages: Reflective insulation panels (radiant barrier) on the ceiling and walls reduce temperature swings dramatically. A 4x25-foot roll costs under $50 and installs with a staple gun. If you’re in a humid Gulf Coast climate, you’ll likely need both radiant barrier and a dehumidifier.
- Interior closets: Usually the most stable environment in any home. If you only have one optimal zone, prioritize food and medications here.
Does Survival Food Really Last 25 Years?
The short answer: sometimes, under very specific conditions. The long answer matters more.
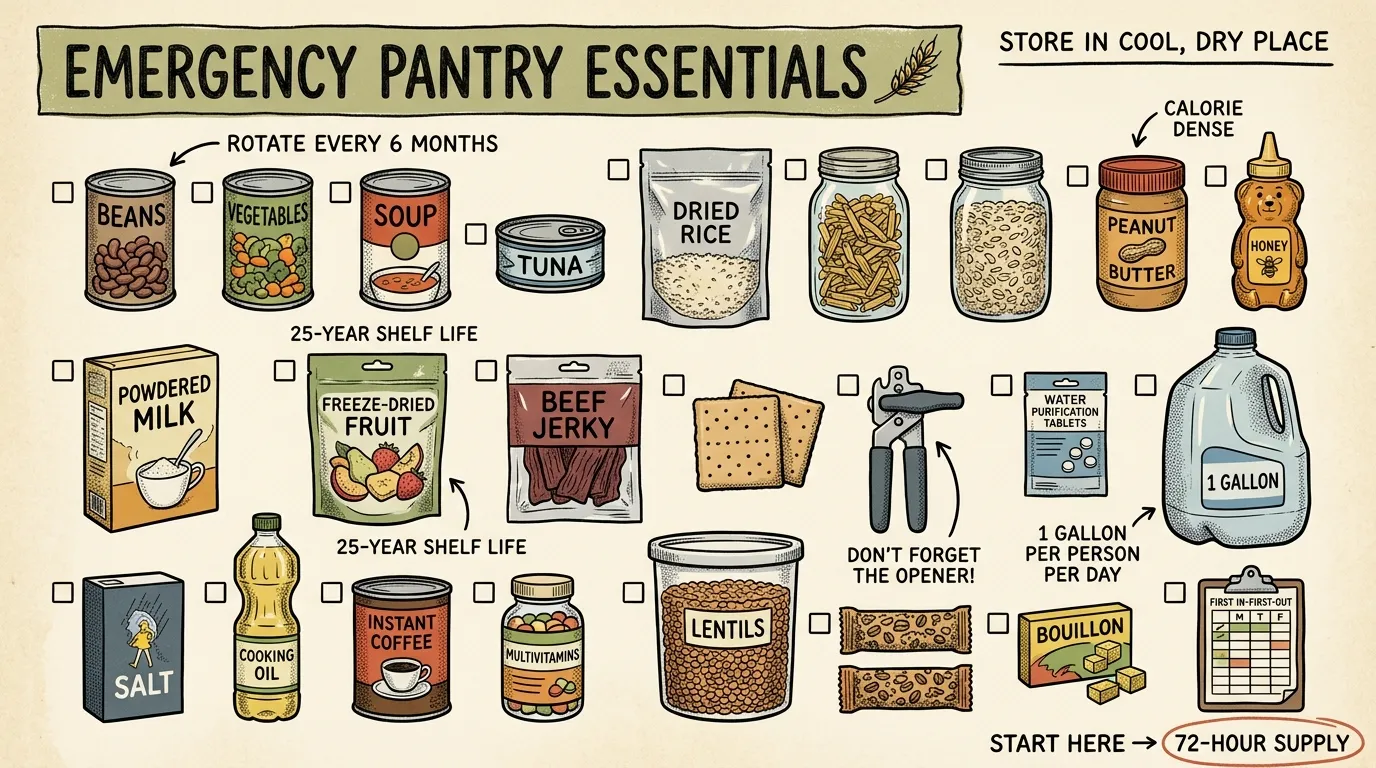
Those 25-year shelf life claims apply to freeze-dried foods stored in factory-sealed #10 cans or high-quality Mylar bags with oxygen absorbers, kept at stable temperatures below 75°F. Under those conditions, reputable brands like Mountain House have tested and verified multi-decade viability.
But here’s where reality diverges from marketing. Most home-stored canned goods have a realistic shelf life of 3–5 years. MREs last 5–7 years at moderate temperatures and much less in heat. Dehydrated foods in imperfect packaging — think ziplock bags or poorly sealed Mylar — degrade significantly faster.
Freeze-dried food earns its reputation for good reason: it’s the most calorie-dense option per cubic foot. A single #10 can of freeze-dried chicken contains roughly 2,000 calories and takes up less space than the equivalent in canned chicken. For small-space preppers, that calorie density is a real advantage.
My advice: trust manufacturer dates as guidelines, not guarantees. Always inspect food before eating regardless of printed dates — look for off smells, unusual color, compromised seals, or swelling. For a deeper breakdown, read our guide on understanding food expiration dates.
How to Organize and Maintain Your Supplies
Categorize by Function
Group supplies into clear categories: water, food, cooking and fuel, medical, lighting, sanitation, shelter and warmth, tools and repair, communications, security, and bug-out gear. Don’t mix categories in the same bin. When you’re stressed and it’s dark, you need to grab one labeled container and know exactly what’s inside.
Labeling and Inventory
Label bins on multiple sides: Category | Contents | Date Packed | Use-by Date.
For tracking, you don’t need special software. A free Google Sheets template works perfectly — create columns for item name, quantity, location, pack date, expiry date, reorder threshold, and notes. If you prefer paper, print a simple checklist organized by category and pin it to the inside of your storage closet door.
Here’s a sample row:
Rice (5kg) | 2 | Basement Shelf A | 2025-02-01 | 2030-02-01 | Reorder at 1 | Mylar + OA sealed
Keep both a digital and paper copy. Electronics fail. Paper gets wet. Having both means you always have a backup.
Rotation with FIFO
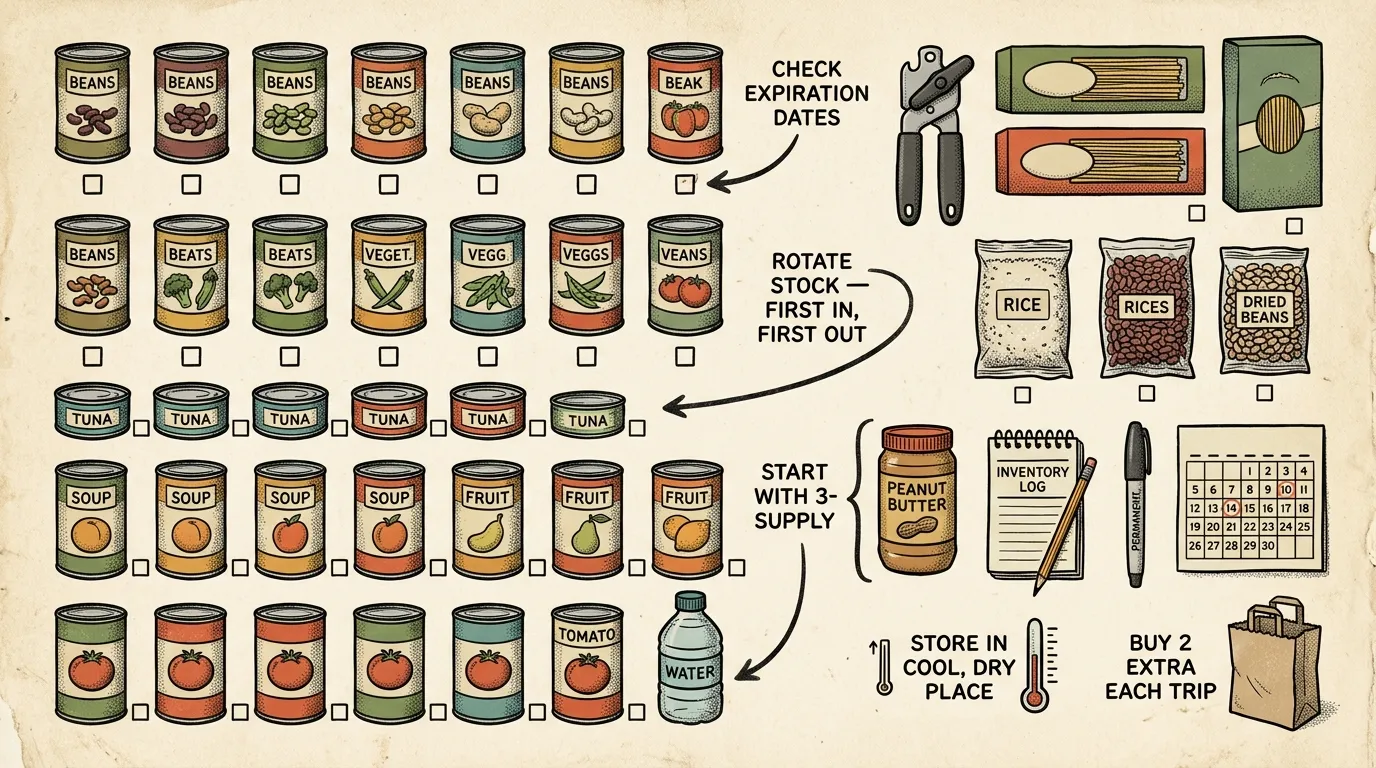
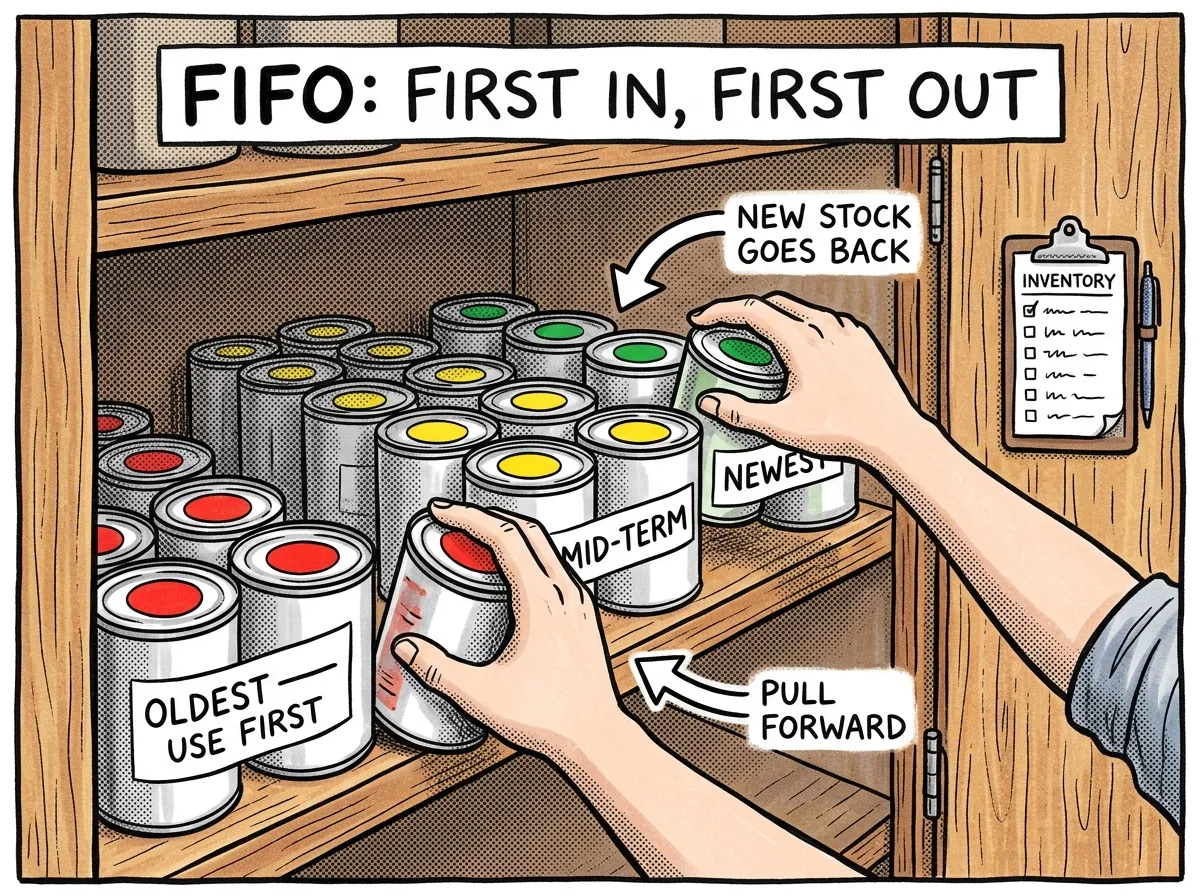 Rotating canned supplies using the first-in-first-out method with color-coded date labels
FIFO (First In, First Out) prevents waste — but only if you actually do it. Here’s the practical version: when you buy 4 new cans of tuna, pull the existing cans to the front of the shelf, place the new cans behind them, and verify the front cans haven’t passed their best-by date. If they’re close, move them to your regular kitchen pantry for immediate use.
Color-coded date labels speed up visual checks dramatically. I use blue tape for 2025, green for 2026, and red for 2027. One glance at a shelf tells me what needs attention without reading a single date. Dollar-store colored electrical tape works perfectly.
Review your full inventory every 3–6 months. Check for pests, moisture, seal integrity, and approaching expiration dates.
Grab-and-Go Zones
Prepare quick-access kits near your primary exit: first aid, flashlight, spare batteries, emergency radio, water pouches, basic tools, and copies of important documents. This is your evacuation layer — completely separate from your deeper reserves.
Urban vs. Rural: Tailoring Your Strategy
A studio apartment in Chicago and a farmhouse in Montana present fundamentally different challenges.
Urban preppers face limited square footage, lease restrictions on wall anchoring and heavy containers, and security concerns that make discreet storage essential. Lean on concealment, vertical efficiency, and distributing supplies across multiple micro-zones. A 600-square-foot apartment can hold a two-week food supply for two adults if you use wall-mounted shelving, closet optimization, and under-furniture bins.
Rural preppers have more room but more environmental exposure. Barns, sheds, and garages introduce temperature extremes, moisture, and rodent pressure. Invest in rodent-proof containers (steel or thick HDPE), climate monitoring in each zone, and redundant placement. Keep a minimum 72-hour supply inside the main house even if your primary cache is in an outbuilding — because a snow-blocked path to the barn means those supplies effectively don’t exist.
I spent two years storing bulk food in a detached shop building near my house in Oregon. Worked great until a November ice storm dropped a branch across the path and I couldn’t safely reach that building for three days. Now my rule is simple: anything I’d need in the first 72 hours lives inside the main house, period. The shop holds long-term reserves and backup gear — stuff I can afford to wait for. That one experience from my years of FEMA-trained field work changed how I advise everyone.
Budget Breakdown: Priority Order When Money Is Tight
 Three budget tiers of prepper storage gear from essentials to long-term upgrades
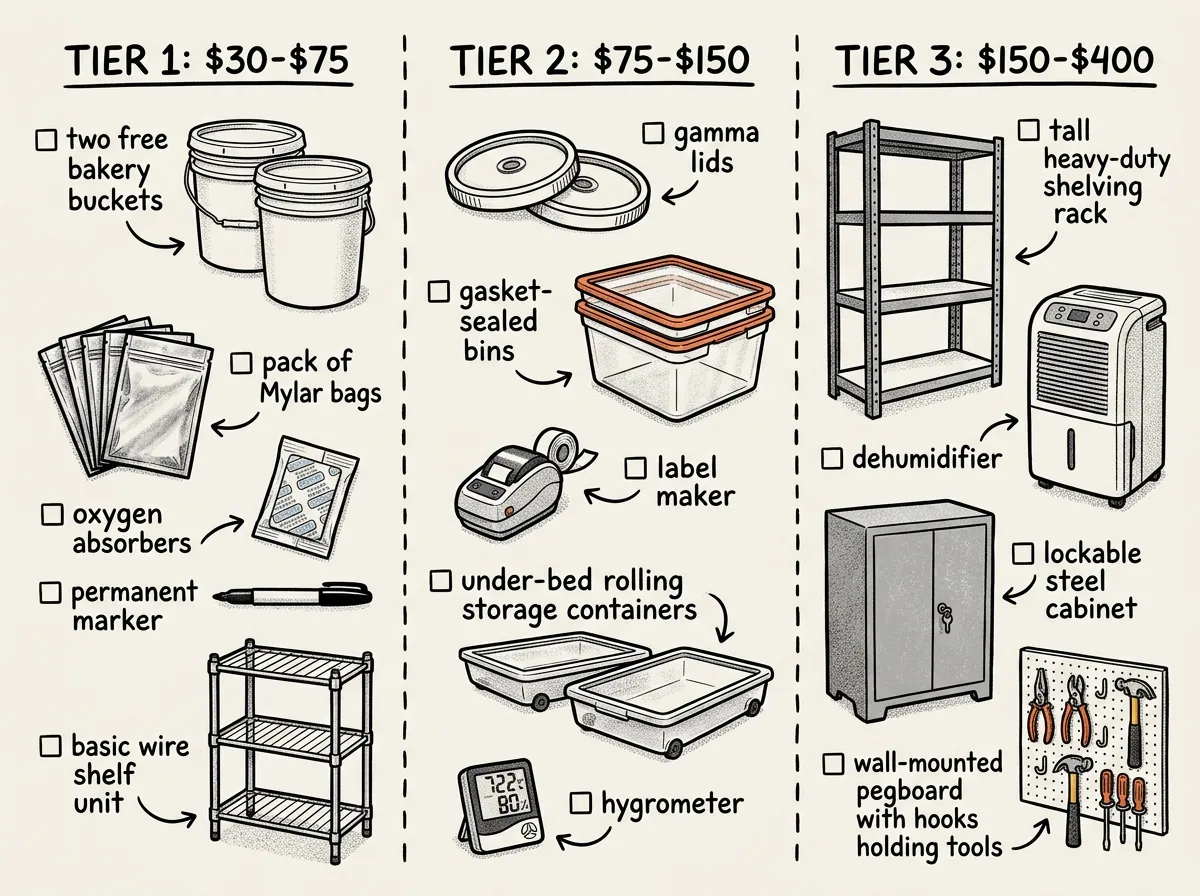
Tier 1: The Non-Negotiables ($30–$75)
- Four to six food-grade 5-gallon buckets with lids — around $3–$5 each new. I’ve picked up dozens of free food-grade buckets from bakeries in Portland and Tacoma. Call ahead, bring your own lids, and inspect for cracks.
- One pack of Mylar bags (1-gallon, 50-count) plus oxygen absorbers — around $18–$25.
- A permanent marker and packing tape — roughly $5.
- One basic 5-tier shelving unit — around $25–$40 at any big-box store.
Tier 2: Meaningful Upgrades ($75–$150)
- Gamma seal lids for frequently accessed buckets — around $7–$9 each
- Stackable clear-sided bins (64-quart) — around $10–$15 each
- Digital hygrometer/thermometer — around $10–$15
- Rechargeable desiccant packs — around $12–$18
Tier 3: Long-Term Infrastructure ($150–$400)
- Additional shelving to create a full storage wall — around $75–$120
- Lockable cabinet or small safe — around $50–$150
- Vacuum sealer — around $60–$90 (the Nesco VS-12, around $65, has outperformed every budget model I’ve tested — stronger seals, cheaper bag rolls, and it hasn’t burned out after three years of regular use. The FoodSaver VS3150 is solid too but costs more for proprietary bags.)
- Dedicated water containers: two 7-gallon Reliance Aqua-Tainer jugs — around $15–$20 each
The trap to avoid: Don’t buy Tier 3 gear before Tier 1 is solid. A $300 freeze-dryer means nothing if your rice is sitting in an open bag on a damp garage floor.
What to Avoid Buying
- Cheap vacuum sealers under $35. Weak seals, quick burnout, expensive proprietary bags. Spend $60+ or use Mylar bags instead.
- Non-food-grade hardware store buckets. That orange Home Depot bucket isn’t food-grade. Look for HDPE recycling symbol #2 and a food-safe rating. When in doubt, line it with Mylar.
- “Tactical” survival tins. Mostly packaging. Buy individual components and store them in containers you already own.
- Cardboard boxes for long-term storage. They absorb moisture, attract insects, and collapse under weight. Fine for temporary sorting — replace with plastic bins immediately.
- 55-gallon water drums without a plan. A full drum weighs over 450 lbs. Can your floor handle it? Can you move it? Do you have a siphon? Start with multiple smaller containers (5–7 gallons) you can carry and rotate.
- Dollar-store “airtight” containers. Test before you trust: close the lid, submerge a corner in water for 30 seconds. If it leaks, it’s not protecting your food from moisture or pests.
Planning Storage for 1–2 Weeks and Beyond
A 72-hour kit is the right starting point, but most real disruptions stretch longer. Ice storms, prolonged outages, and supply chain failures regularly push into the one- to two-week range.
What changes at the two-week mark? Almost everything scales up, and a few new categories appear.
- Water volume dominates. A family of four needs 56 gallons for two weeks. That’s eleven 5-gallon containers. Dedicate an entire zone to water storage.
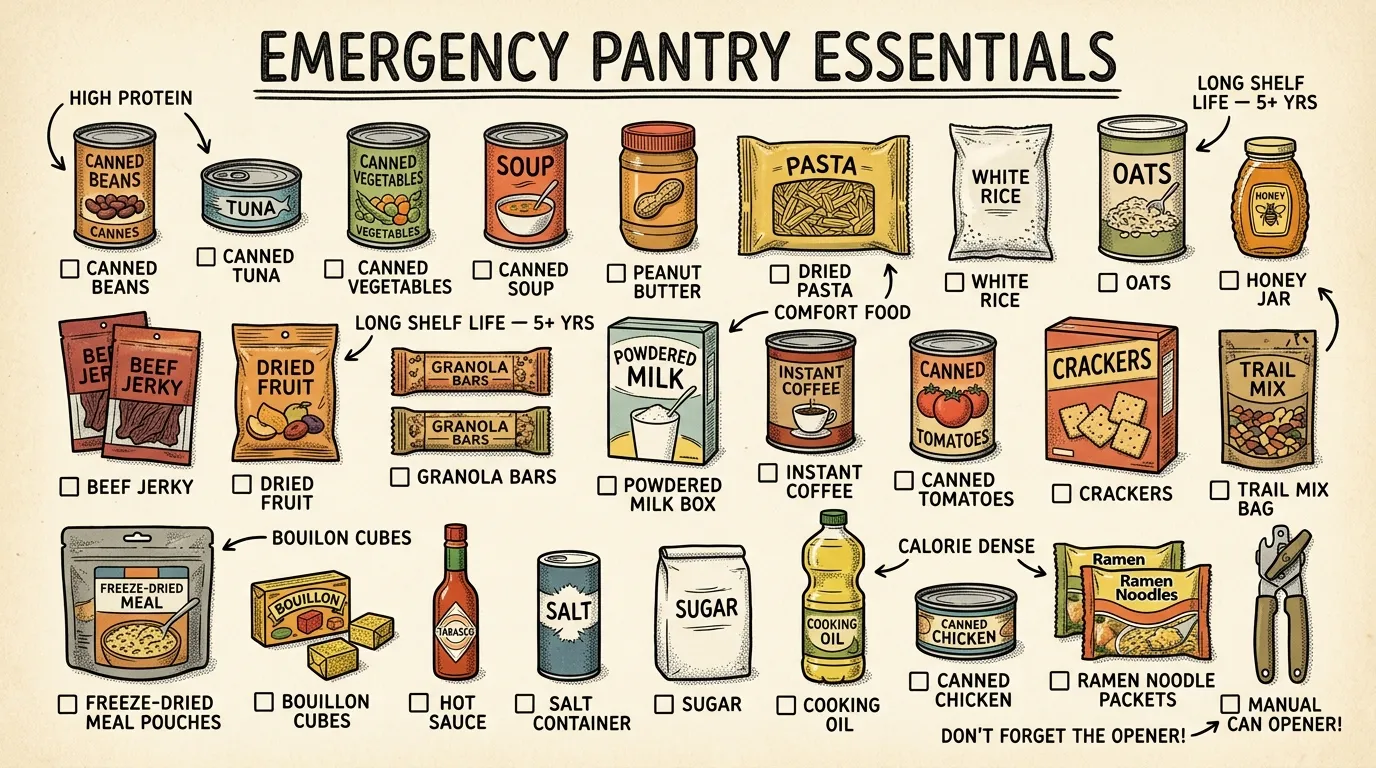
- Food variety matters for morale. Three days of rice and beans is tolerable. Fourteen isn’t. Build in canned proteins, peanut butter, instant coffee, and comfort foods.
- Sanitation needs its own bin. Heavy-duty contractor trash bags, a bucket toilet system, hand sanitizer, wet wipes, and cleaning supplies — labeled and stored together.
- Medication depth increases. Maintain a 14-day rolling buffer. Talk to your pharmacist about filling prescriptions a week early.
- Power consumables need math. A headlamp on medium burns through one set of AAAs every 5–7 days. Two weeks means three sets per headlamp.
Two-week storage footprint for two adults:
| Category | Approx. Volume | Container |
|---|---|---|
| Water (28 gal) | Four 7-gallon jugs | Reliance Aqua-Tainer |
| Food (dried + canned) | Two 5-gal buckets + one 64-qt bin | Gamma-lid buckets |
| Sanitation/hygiene | One 64-qt bin | Gasket-sealed tote |
| Medical/medications | One small lockable container | Waterproof ammo can |
| Lighting/power | One 32-qt bin | Standard stackable bin |
That’s roughly 15–20 square feet on shelving — about one closet.
Common Mistakes and How to Fix Them
Buying supplies before planning storage. I’ve seen this dozens of times. Someone drops $500 on food and gear, then realizes they have nowhere to put it. Measure and map first. Buy second.
Using attics or uninsulated garages for temperature-sensitive items. In my experience, a Pacific Northwest garage can swing 40 degrees in a single day during shoulder seasons. Those swings degrade food faster than consistent moderate heat. Move sensitive items to interior spaces or invest in insulation and a thermometer.
Storing everything in one place. During a 2020 windstorm, a tree took out a neighbor’s garage — their only storage location. Spread supplies across at least two zones in your home to eliminate single-point failure.
Neglecting rotation until everything expires at once. Schedule recurring calendar reminders. Use color-coded date labels. Make rotation a 15-minute habit, not a dreaded annual project.
Ignoring weight limits on floors and shelves. Water is 8.34 lbs per gallon. A shelf holding six full 5-gallon buckets supports 250+ lbs. Verify your shelving rating and consider your floor’s load capacity, especially on upper stories of apartments. Distribute weight across multiple locations.
Relying on a single digital inventory without a paper backup. Phone dies, laptop crashes, cloud service goes down during the exact emergency you’re preparing for. Print a copy of your inventory and keep it in your primary storage area.
- Measure one shelf or closet and clear it
- Place labeled bins for water, food, medical, and tools
- Add one grab-and-go kit near your primary exit
- Create a simple inventory in Google Sheets and print a paper backup
- Place a digital hygrometer in your main storage area
- Schedule your first inventory review for 3 months out
Build Your System This Weekend
The best prepper storage solutions aren’t expensive or complicated — they’re consistent and intentional. One shelf, a few food-grade buckets, clear labels, and a simple rotation schedule will put you ahead of 90% of households.
Don’t wait for the perfect setup. Start with Tier 1 this weekend: grab a few free buckets from a local bakery, buy a pack of Mylar bags, label everything with a marker, and set up one shelving unit. Build from there as budget allows.
The family I watched lose their supplies during that 2019 ice storm? They rebuilt their storage the right way — off the floor, in sealed containers, across two zones in their home. When a power outage hit the following winter, they didn’t lose a single can. That’s the difference a system makes.
Frequently Asked Questions
What are the best containers for long-term prepper food storage?
Food-grade buckets with gamma lids, Mylar bags with oxygen absorbers, and gasket-sealed airtight jars. If you’re storing in areas above 50% humidity, toss in desiccant packets too. Always label contents with pack date and expiration date on at least two sides of the container so you can read them without pulling bins off shelves.
How often should you rotate and inspect prepper supplies?
Every 3–6 months. You’re checking for pests, moisture damage, compromised seals, and approaching expiration dates. Use FIFO rotation: pull older items forward, place new purchases behind them. Color-coded year labels make visual checks fast — I can scan an entire shelf in under a minute.
How can I maximize storage space for emergency supplies in a small home?
Use vertical shelving anchored to walls, low-profile bins under beds with risers, over-the-door organizers, and dual-purpose furniture like storage ottomans. Wall-mounted pegboards keep tools visible without eating floor space. Think room by room: every closet, cabinet top, and under-furniture gap is potential storage you’re probably not using yet.
Does survival food really last 25 years?
Under ideal conditions — freeze-dried food in factory-sealed #10 cans or quality Mylar bags with oxygen absorbers, stored below 75°F with minimal temperature swings — yes, it can. But most home-stored canned goods realistically last 3–5 years, and MREs 5–7 years. Always inspect food before eating regardless of printed dates. If something smells off, looks discolored, or has a compromised seal, don’t risk it.
Where should you store emergency supplies in your house?
Food goes in cool, dry, dark locations. Water stays out of sunlight and away from chemicals. Medications need stable temperatures. Tools and grab-and-go kits belong near exits. Avoid uninsulated attics and garages for anything temperature-sensitive — interior closets are almost always your most stable environment.
How do I organize prepper supplies in a closet?
Use hanging fabric shelf organizers for categorized bins, over-the-door pocket organizers for small items, and reserve the top shelf for lightweight, rarely accessed gear. Label everything on at least two sides. A single well-organized closet can hold a two-week supply for one person without looking cluttered.
The Complete
Prepper's Reference.
149 articles synthesized into one comprehensive PDF — twelve chapters covering water, food, shelter, first aid, comms, and scenario-specific preparedness. Free with your email.
Unsubscribe anytime · We never share your email
You're in. Check your inbox.
Keep Reading
How to Start Stockpiling Food: Canned Goods & Beginner Guide
Learn how to start stockpiling food with canned goods, budget-friendly staples, and smart rotation. Step-by-step beginner guide from a FEMA-trained responder.
Beginner Food Prepping Essentials: Emergency Pantry Guide
Master beginner food prepping essentials — from shelf-stable staples and storage methods to simple emergency meals. Start your prep today.
Non-Perishable Food Items: Best Emergency Pantry Guide
Discover the best non-perishable food items for your emergency pantry. Storage tips, nutrition planning, and beginner mistakes to avoid. Start building today.