Beginners should start emergency food prep by storing water, stocking shelf-stable foods they already eat, and learning simple storage methods like airtight containers, vacuum sealing, and mylar bags with oxygen absorbers. Focus on easy, nutritious staples such as rice, beans, pasta, canned proteins, oats, and canned produce, then build simple meal plans that balance calories, protein, carbs, and fats.
Key Takeaways
- Store water first — one gallon per person per day for at least three days — before spending a single dollar on food.
- Build your emergency pantry around shelf-stable foods your household already eats so stock actually rotates instead of expiring in a closet.
- A functional 72-hour food supply for two adults costs under $50 when you focus on rice, beans, canned protein, peanut butter, and water.
- Use airtight containers for short-term storage and Mylar bags with oxygen absorbers inside food-grade buckets for anything you want to last years.
- Run a practice day — eat only from your emergency pantry for 24 hours — to expose every gap in supplies, recipes, and cooking methods before a real crisis does it for you.
Beginner Food Prepping Essentials: Your Complete Emergency Pantry Guide
After 12 years of field work in Pacific Northwest emergency response — wildfire evacuations, multi-day winter storm outages, the kind of events where grocery stores go dark for a week — I’ve seen which pantries actually sustain families and which fall apart by day two. The difference almost never comes down to money. It comes down to having the right beginner food prepping essentials in place before you need them.
I’m going to walk you through exactly what to stockpile, how to store it, simple emergency meals that don’t taste like punishment, a step-by-step startup plan, and the mistakes I watch beginners make over and over again. You’ll get actionable steps you can start this weekend — whether you’re building a 72-hour kit or working toward a full two-week prepper pantry.
Quick Summary
- Water comes first. Store one gallon per person per day for at least three days before buying any food at all.
- Stock what you actually eat. Build your emergency pantry around shelf-stable foods your household consumes regularly so rotation happens naturally.
- A 72-hour supply costs under $50. Rice, beans, canned protein, peanut butter, cooking oil, and water cover the basics for two adults.
- Storage method matters as much as what you buy. Airtight containers handle short-term needs; Mylar bags with oxygen absorbers give you decades.
- Practice before it counts. Eat exclusively from your emergency pantry for 24 hours to find every gap — missing can openers, not enough cooking water, meals your kids won’t touch.
- Expand gradually. Go from 3 days to 1 week to 2 weeks, adding variety and cooking fuel at each stage.
How to Start Meal Prepping for Emergencies
If you’ve never prepped before, the sheer volume of advice out there can freeze you in your tracks. Forget the 500-item spreadsheets. Here’s the exact seven-step process I walk people through during the community preparedness workshops I run in the Willamette Valley.
- Audit what you already have — open every cabinet and count what’s shelf-stable (you probably have more than you think)
- Calculate calorie needs for your household for 72 hours — use 2,000 calories per adult per day and 1,500 for children ages 4–8
- Store water first — one gallon per person per day, three-day minimum, before any food purchase
- Buy shelf-stable staples you already eat — if nobody eats lentils on a normal Tuesday, don’t buy 20 pounds of them
- Set up basic storage with a few airtight food-safe containers for dry goods
- Build three simple emergency meal plans — breakfast, lunch, dinner for three days using only pantry items
- Run a practice day — eat only from your emergency supplies for 24 hours and fix every gap you find
That’s it. You can knock out the first four this weekend. The practice day is what separates people who think they’re ready from people who actually are.
What to Stockpile First
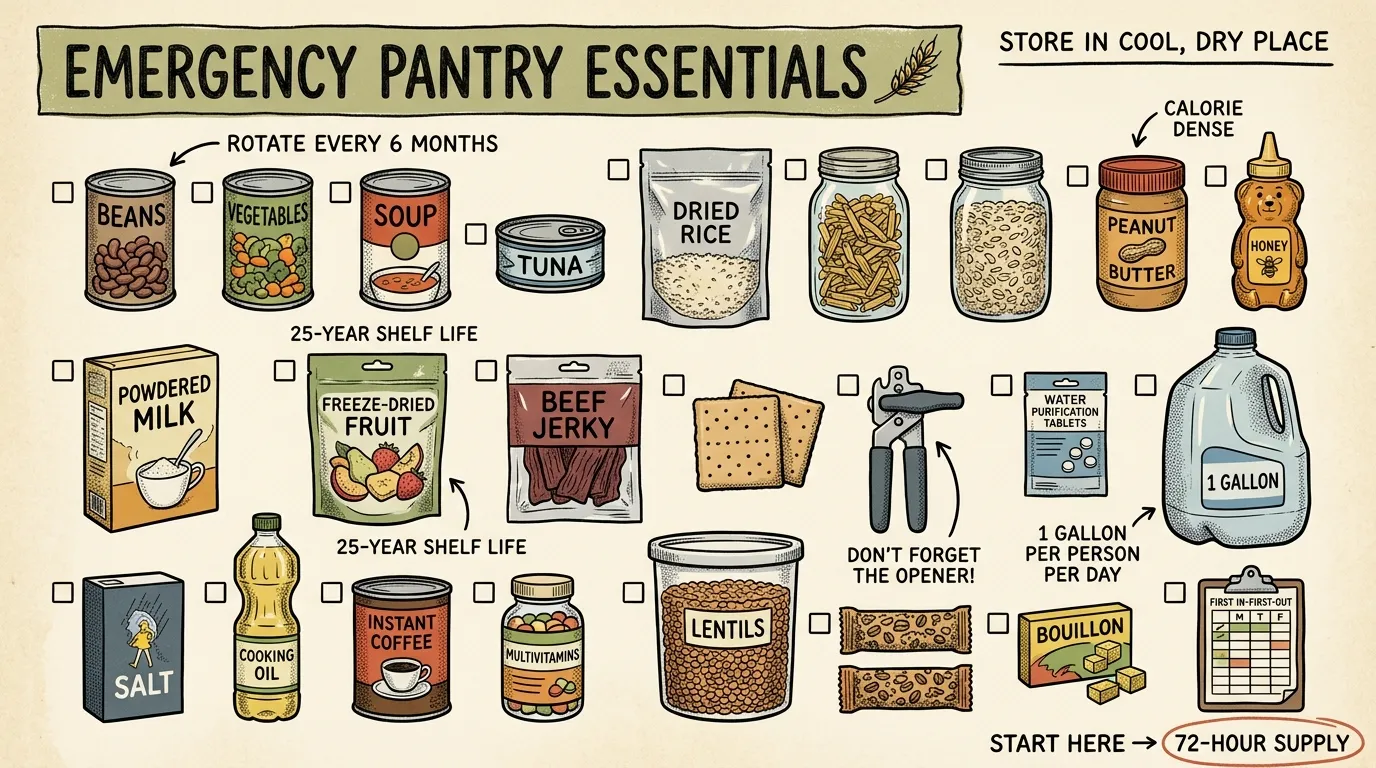
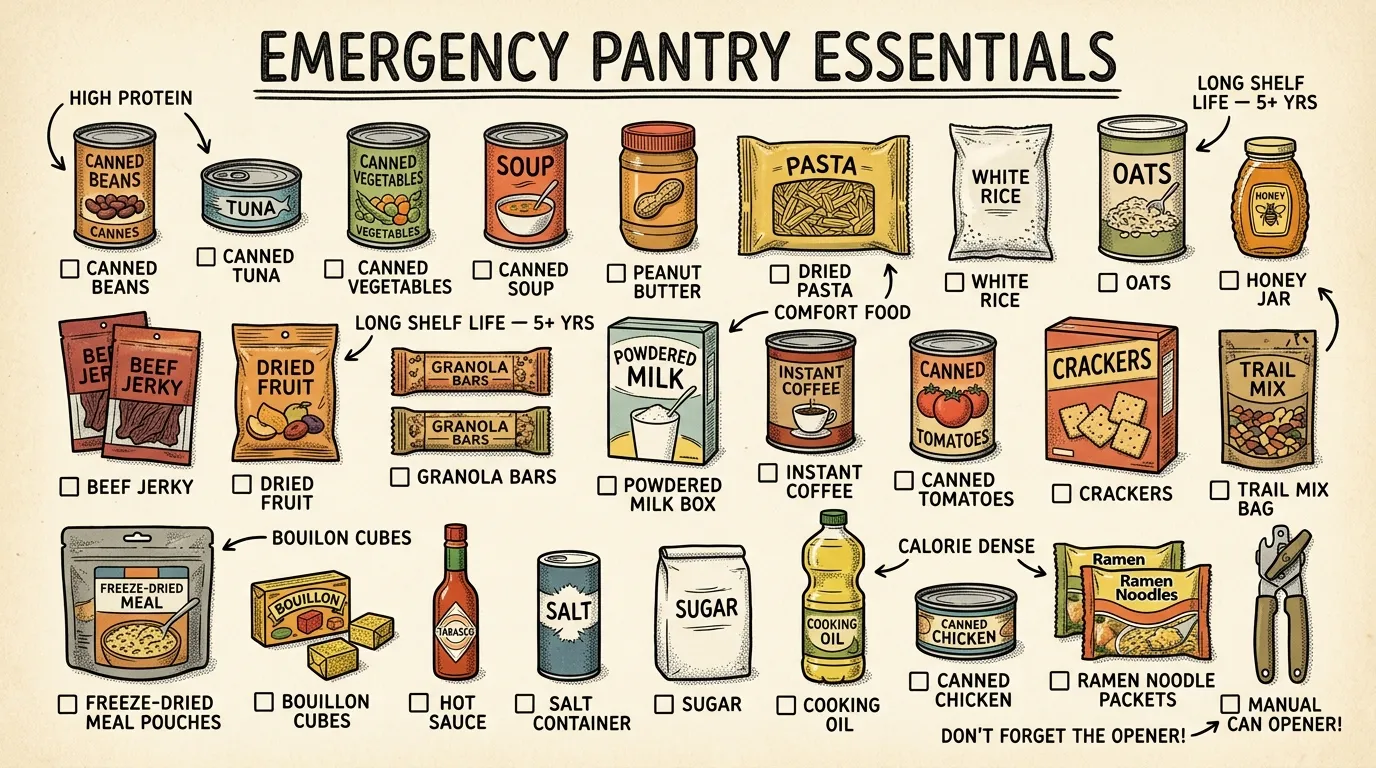
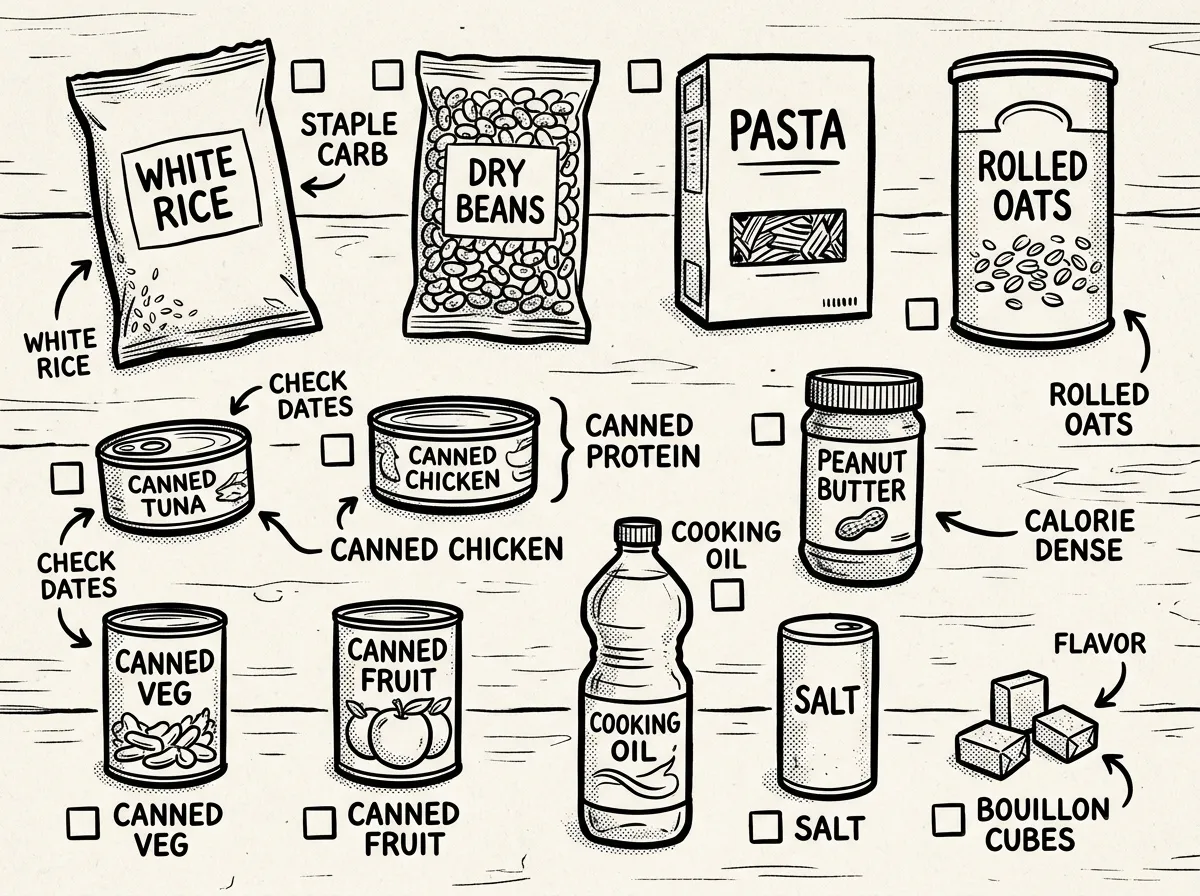 Core emergency pantry staples to stockpile first
Here’s where your money should go, in order of priority. These quantities target roughly one week for a family of four — adjust up or down based on your household size.
- White rice — 20 lbs per family of four per week (~675 calories per cup dry, stores 25–30 years in Mylar)
- Dry beans or lentils — 8 lbs per family of four per week (~670 calories per cup dry)
- Rolled or instant oats — 5 lbs (~375 calories per cup dry)
- Pasta — 5 lbs (~1,680 calories per pound)
- Canned proteins — 12–15 cans of tuna, chicken, salmon, or beans
- Peanut butter — 2 jars, 40 oz each (~190 calories per 2-tablespoon serving)
- Canned vegetables and fruit — 12–15 cans of mixed veggies, tomatoes, corn, fruit cups, applesauce
- Cooking oil — 1–2 bottles (calorie-dense fat source, ~120 calories per tablespoon)
- Powdered milk — 1 large container (~80 calories per reconstituted cup)
- Salt, spices, and bouillon cubes — flavor isn’t optional when morale matters
- Crackers, granola bars, and dried fruit — no-cook quick calories
- Emergency ration bars or MREs — grab-and-go backup
Where to buy affordably: Warehouse clubs like Costco and Sam’s Club offer the best per-unit prices on rice, beans, and canned goods. Restaurant supply stores sell institutional-sized cans at a fraction of grocery store cost. And if you’re near one, LDS Home Storage Centers sell basic staples at cost — you don’t need to be a member of the church to shop there.
For a deeper dive into shelf-stable options, check out best non-perishable foods for your emergency pantry.
Water — Your Actual First Priority
I can’t say this strongly enough: water comes before food. Every time. Store sealed bottles or food-grade jugs. Keep a water filter or purification tablets as backup. Label containers with the fill date and rotate every 6–12 months.
Fifty-six gallons is roughly 467 pounds of water. That’s a real space commitment. Plan accordingly, and consider a water storage and purification system for anything beyond a week.
Food Storage Methods That Actually Work
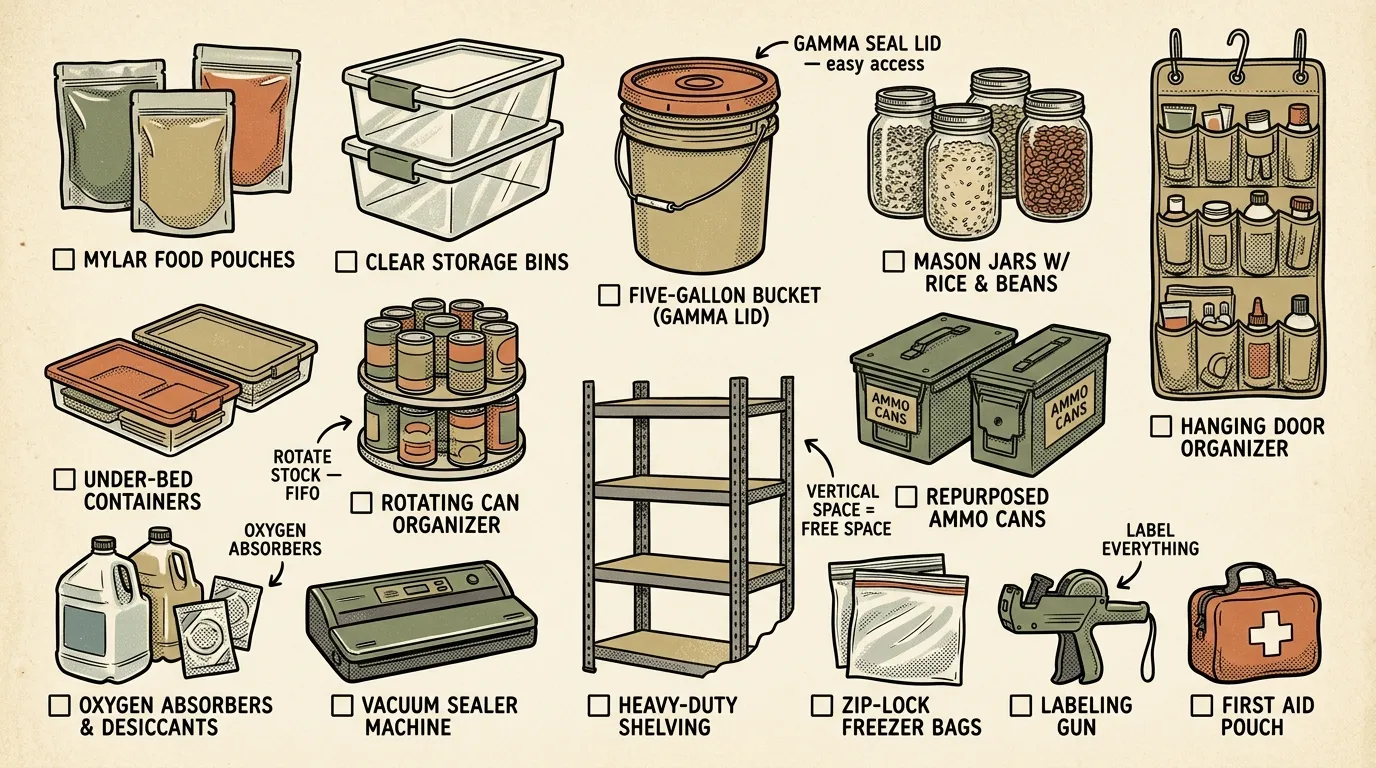
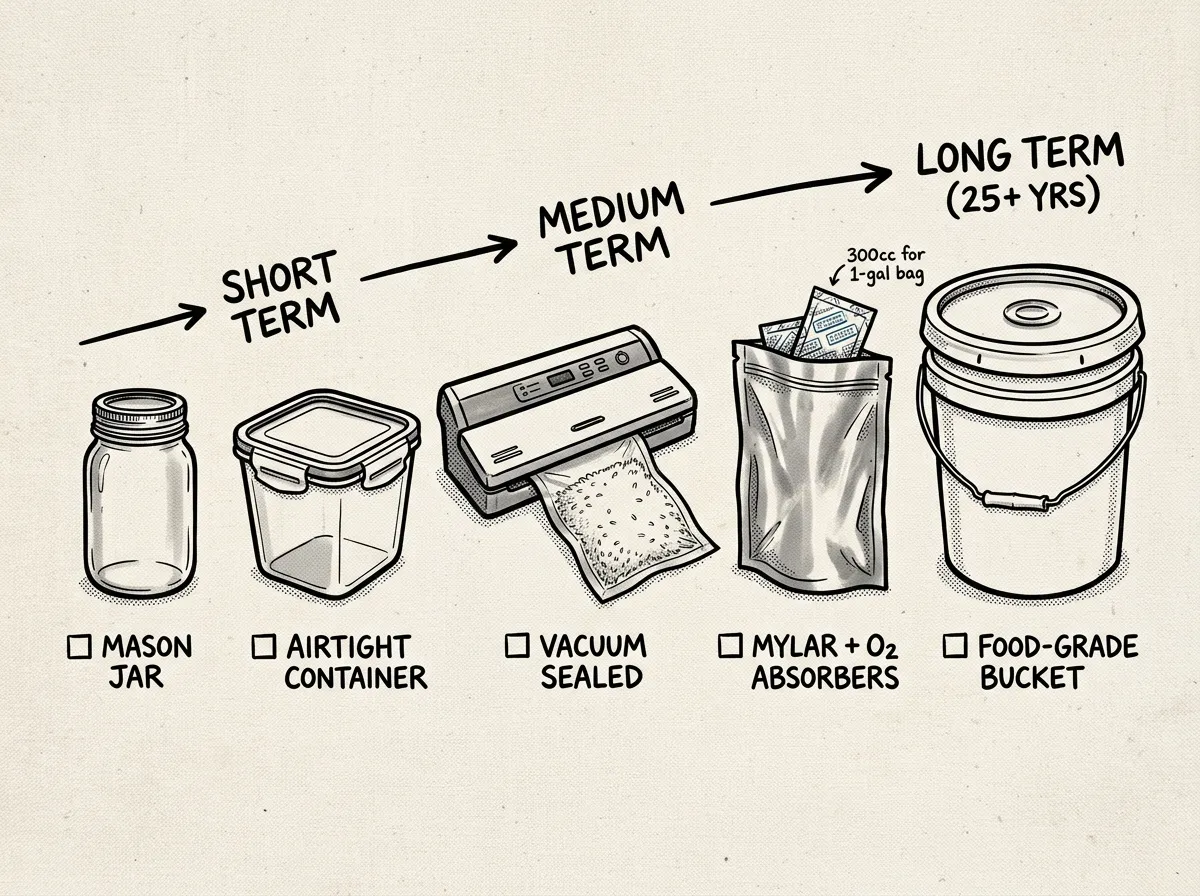 Storage methods from basic to long-term
Storage is where most beginners either overthink everything or ignore it entirely. Let me break down what genuinely matters.
Temperature, Light, and Humidity
The ideal storage range is 50–70°F. Every 10-degree increase above that cuts shelf life significantly. Garages hitting 100°F in summer? Attics that freeze in winter? Those environments will destroy your food faster than you’d expect.
I’ve personally opened Mylar-sealed white rice after 8 years in a cool basement — still perfect. Brown rice stored the exact same way went rancid in under a year. Store what science and experience confirm, not what marketing claims.
Keep humidity below 15% for dry goods. A cheap hygrometer — around $10 — in your storage area tells you where you stand. If you’re in a humid Gulf Coast climate, this becomes even more critical. You might need silica gel packets inside containers on top of your other precautions.
The Storage Method Ladder
- Short-term rotation stock: Keep items in original packaging on shelves or in bins. Use them and replace them. First in, first out.
- Medium-term dry goods: Transfer rice, oats, flour, and beans into airtight food-safe containers.
- Vacuum sealing: Great for portioning jerky, dried foods, and coffee. Extends shelf life by removing oxygen.
- Long-term storage: Pack dry goods in Mylar bags with oxygen absorbers inside 5-gallon food-grade buckets. This is how you get decades out of white rice, oats, and beans.
- Home canning: Follow USDA and NCHFP tested recipes for safe preservation. Use a pressure canner for low-acid foods like meats and vegetables.
What If You Live in a Tiny Apartment?
Living in a small space doesn’t disqualify you. I’ve helped people in 500-square-foot studios build solid two-week supplies. You’ve just got to get creative:
- Under beds — flat storage bins fit perfectly
- Back of closets — stack buckets or bins behind clothes
- Behind the couch — a row of 5-gallon buckets makes a surprisingly decent side table with a board on top
- Top shelves of closets — lighter items like dried fruit, granola bars, pasta
- Inside unused luggage — that suitcase you use once a year can hold 30 pounds of rice
Pest Prevention
Drop a few bay leaves in grain containers — it’s an old trick that actually works as a mild deterrent. Keep all food off the floor, even in bins. Check your storage area for mouse entry points around pipes and baseboards. Sealed Mylar inside hard-sided buckets is your best defense against both rodents and insects.
Shelf Life at a Glance
- Canned goods: 2–5 years depending on acidity and can condition
- White rice in Mylar with O2 absorbers: 25–30 years
- Brown rice: about 6 months (oils go rancid — don’t stockpile it)
- Dry beans and oats: several years when sealed and stored cool
- Powdered milk: 2–10 years depending on processing
- Freeze-dried meals: 15–25 years (manufacturer dependent)
Always check manufacturer dates. Use visual and smell checks before eating anything from long-term storage.
Nutrition and Calorie Targets for Emergency Planning
As a certified Wilderness First Responder, I can tell you that calorie and hydration management during a crisis isn’t academic — it directly affects your decision-making, physical capability, and emotional resilience. I’ve seen people make terrible judgment calls on day three of a power outage simply because they weren’t eating enough.
Daily targets:
- Adults: 2,000 calories minimum, with at least 50g of protein
- Children ages 4–8: 1,500 calories
- Heavy physical labor (clearing debris, hauling water, chopping wood): bump adult needs to 2,500–3,000 calories
Calorie density for your top staples:
- 1 cup dry white rice = ~675 calories
- 1 cup dry beans = ~670 calories
- 2 tablespoons peanut butter = ~190 calories
- 1 tablespoon cooking oil = ~120 calories
- 1 cup dry oats = ~375 calories
Balance your pantry across three macronutrient categories:
- Carbohydrates: rice, pasta, oats, instant potatoes, crackers
- Protein: canned tuna, chicken, salmon, beans, lentils, peanut butter, jerky
- Fats: cooking oil, nuts, peanut butter, ghee
Add canned or freeze-dried fruits and vegetables for fiber and micronutrients. If you’re relying on shelf-stable foods for more than a week, a daily multivitamin fills gaps that canned food alone won’t cover.
Simple Emergency Meal Plans and Recipes
So what do you actually cook with all this stuff? Here’s the approach I use and teach.
Rules of Thumb
- Use 3–6 shelf-stable ingredients per meal
- One-pot meals save time, water, and fuel
- Reuse core ingredients across meals to simplify your shopping list
Easy Pantry Recipes
- Rice and beans bowl: white rice, canned beans, canned tomatoes, salt, cumin
- Pantry chili: canned beans, canned tomatoes, canned corn, canned meat or lentils, chili powder
- Oatmeal power bowl: oats, powdered milk, dried fruit, peanut butter
- Tuna pasta: pasta, canned tuna, olive oil, canned peas or tomatoes
- Instant potato soup: instant mashed potatoes, bouillon, powdered milk, canned chicken
No-Cook Backups
When you can’t heat anything or need to conserve fuel:
- Protein or emergency bars
- Canned pull-tab meats and fish
- Peanut butter with crackers
- Trail mix and dried fruit
Sample 3-Day Plan for a Family of Four
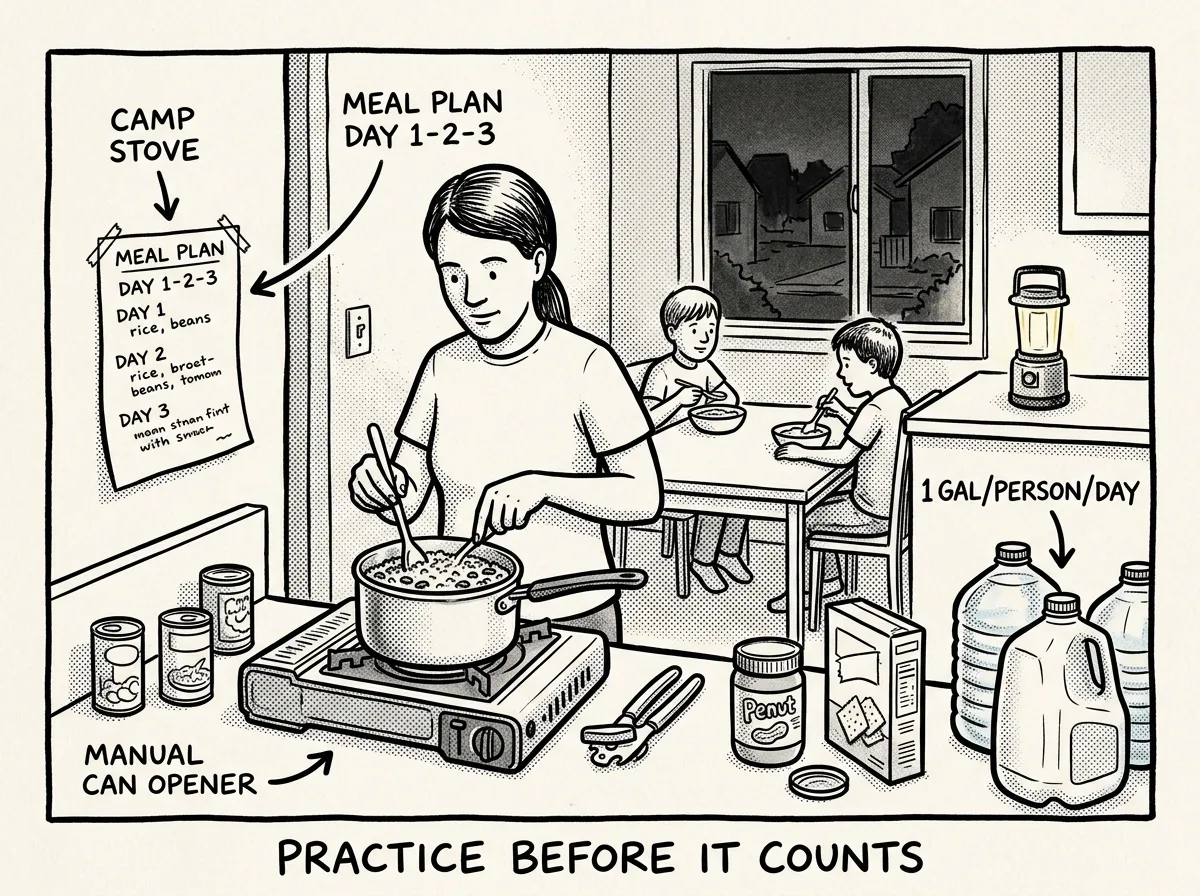 A family kitchen scene during a 72-hour emergency practice day
I’ve tested this plan during annual preparedness drills with community groups in the Willamette Valley. It works.
Day 1
- Breakfast: oatmeal with raisins and powdered milk
- Lunch: tuna on crackers, canned fruit cups
- Dinner: rice and beans with canned corn and hot sauce
Day 2
- Breakfast: granola with shelf-stable milk
- Lunch: canned soup, peanut butter on crackers
- Dinner: pasta with canned chicken and mixed vegetables
Day 3
- Breakfast: oatmeal with peanut butter and dried fruit
- Lunch: pantry chili (canned beans, tomatoes, corn, chili powder)
- Dinner: instant potato soup with canned meat and green beans
Every family I’ve worked with discovers at least two or three gaps during their first practice day. The most common one? Not having enough water for cooking. You’d be amazed how much water a pot of rice and a pot of pasta burn through in a single day. The second most common: kids flat-out refusing to eat unfamiliar food under stress. Stock what your household actually likes. This isn’t the time for culinary experiments.
A Decision Framework for Every Purchase
One of the biggest stalls in building your beginner food prepping essentials isn’t lack of motivation — it’s decision paralysis. Run every purchase through these five filters, in order:
- Calories per dollar. White rice, dry beans, oats, and peanut butter dominate here. A 20-pound bag of white rice runs about $10–$15 and delivers roughly 30,000 calories.
- Shelf life vs. your actual rotation habits. If you won’t eat freeze-dried beef stroganoff on a regular Tuesday, it’s going to sit until it expires. Buy what you’ll rotate. For a deeper comparison, check out canned vs. freeze-dried food for preppers.
- Preparation complexity. A can of chili you can eat cold beats a meal requiring two cups of boiling water and 15 minutes of cook time.
- Nutritional completeness. Calories keep you alive. After 72 hours, you need protein, fat, fiber, and micronutrients to actually function.
- Storage footprint. A case of canned beans takes up real space. Freeze-dried options are lighter and more compact but cost 3–5x more per serving.
If the power went out tonight and stayed out for a week, would you actually eat this? If the answer’s no, put it back on the shelf.
Common Beginner Food Prepping Mistakes
I’ve made some of these myself. I’ve watched hundreds of families make the rest. Here are the ones that hurt most.
Skipping water storage. This is mistake number one, every single time. People spend $200 on food and store zero water. You can survive weeks without food. Without water, you’ve got about three days.
Buying food nobody eats. That bucket of freeze-dried broccoli cheddar soup was on sale. Great. Nobody in your family touches broccoli cheddar soup. During a 2019 ice storm that knocked out power across rural Oregon for nine days, the families I worked with who had simple rotating pantries of foods they actually liked fared far better than those with expensive freeze-dried stockpiles they’d never opened.
Storing food in terrible conditions. Garages with 110°F summer temperatures. Damp basements. Attics that freeze. These environments destroy shelf life. Find a climate-stable interior space, even if it’s just a hallway closet.
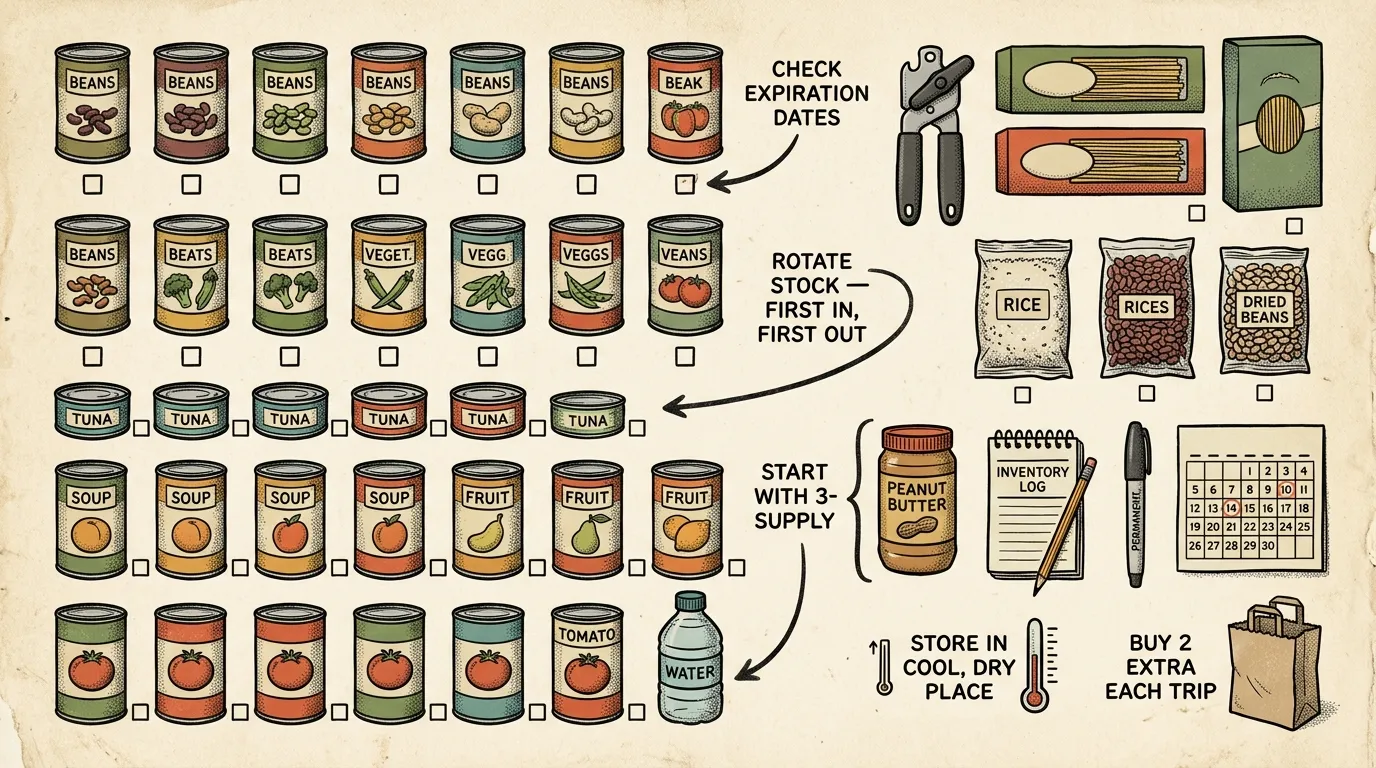
Never rotating stock. You buy 30 cans of beans, shove them in a closet, and forget about them for four years. Half are expired. Rotation means using your oldest stock in everyday cooking and replacing it during regular grocery trips. First in, first out.
Over-investing in premium products before covering basics. A $400 bucket of freeze-dried entrees is a fine supplement. It’s a terrible foundation. Cover water, rice, beans, canned proteins, and cooking oil before spending a dollar on premium anything.
Forgetting a manual can opener and cooking fuel. Your emergency pantry is 80% canned goods and you own one electric can opener. In my experience, this is the single most common gear failure during actual emergencies. Buy a quality manual can opener. Buy two. And stock fuel to actually cook — butane canisters, propane, sterno, or firewood. For options, read cooking without power during emergencies.
Not running a practice day. I keep hammering this because it matters. Eat only from your emergency supplies for one full day. Cook with your backup stove. Use only stored water. You’ll learn more in 24 hours than in months of shopping.
Budget Breakdown: Building a Stockpile When Money’s Tight
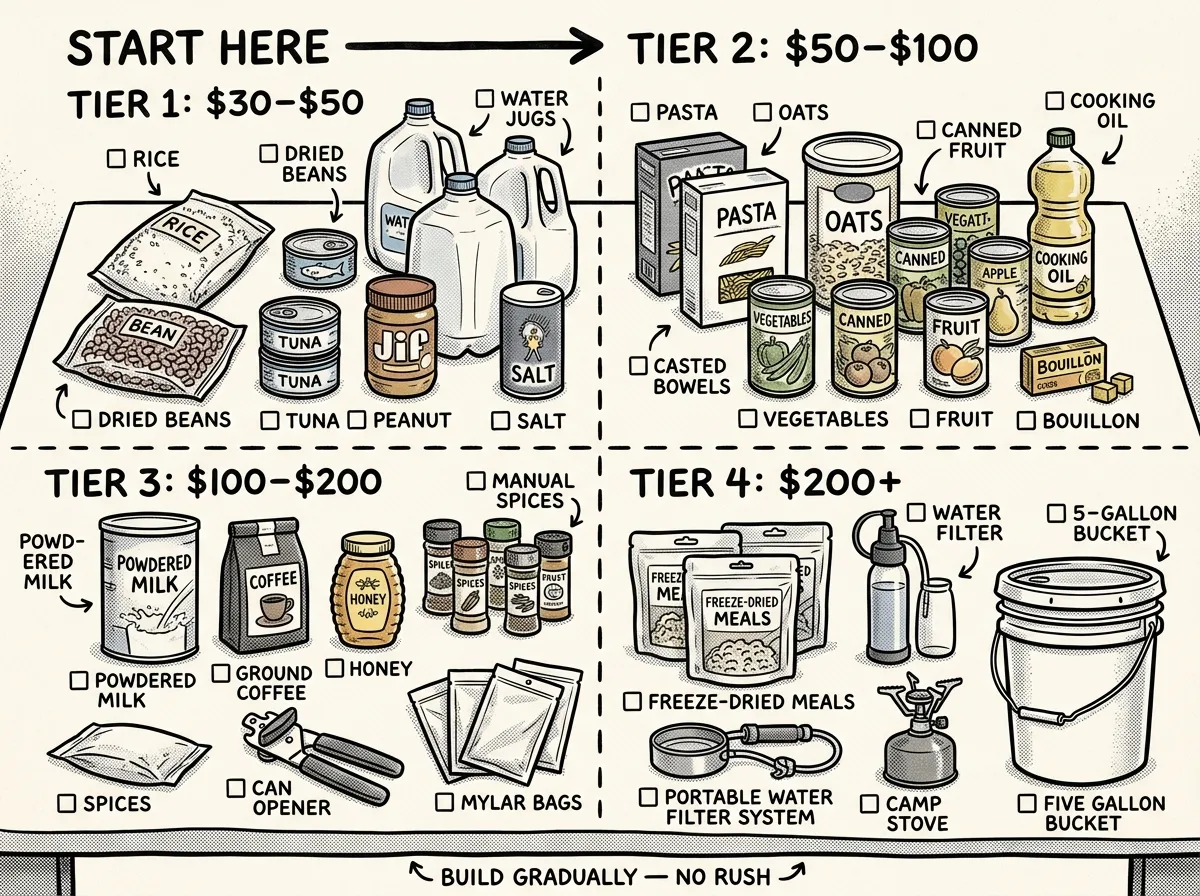 Tier-by-tier budget breakdown for building your emergency pantry
Most people searching for beginner food prepping essentials aren’t looking to drop $2,000 on a pallet of freeze-dried meals. Here’s how to build a functional supply in priority tiers.
Tier 1: The Non-Negotiable Foundation ($30–$50)
This covers 72 hours for two adults. Buy it before anything else.
- 2 cases of bottled water (about $8–$12)
- 20 lbs white rice (about $10–$15)
- 4 lbs dry pinto or black beans (about $4–$6)
- 6 cans of protein — tuna, chicken, or beans (about $6–$10)
- 1 jar peanut butter, 40 oz (about $5–$7)
- Salt and cooking oil (about $4–$5)
- Box of matches or lighter (about $1)
That’s a functional 72-hour emergency food supply for under $50.
Tier 2: Comfort and Variety ($50–$100 additional)
Add these over 2–4 weeks during regular grocery trips: rolled oats, canned tomatoes, vegetables, and fruit (12–15 cans), pasta, powdered milk, bouillon cubes, seasonings, crackers, dried fruit, granola bars, and a manual can opener.
Tier 3: Extended Capability ($100–$200 additional)
This gets you to a comfortable 1–2 week supply: Mylar bags and oxygen absorbers, 5-gallon food-grade buckets, additional bulk grains and legumes, freeze-dried fruits and vegetables, a water filter, and a camp stove with fuel.
The Sawyer Squeeze — around $30 — is what I reach for every time when it comes to water filtration. It’s lightweight, filters up to 100,000 gallons, and threads directly onto most water bottles. The LifeStraw is fine for a grab-and-go kit, but the Squeeze handles far more volume and gives you way more flexibility for group or family use. Don’t skip a water filter at this tier — it’s cheap insurance against your stored water running out.
Tier 4: Deep Pantry ($200+ over time)
Freeze-dried entrees, a pressure canner, larger water storage (55-gallon drum or WaterBOB), and supplemental alternative cooking methods for preppers.
The rule: Don’t skip a tier to buy something from a higher one. A $300 freeze-dried bucket is useless if you don’t have water to rehydrate it.
Urban vs. Rural: Same Goal, Different Playbook
Emergency food storage looks different depending on where you live.
Urban preppers should optimize for density and portability. Space is your constraint — use under-bed bins, closet tops, and compact calorie-dense foods like nut butters, energy bars, and vacuum-sealed dry goods. Water storage is harder in small spaces, so keep cases of bottled water plus a quality gravity filter and purification tablets. Cooking off-grid indoors requires caution — butane single-burner stoves with a cracked window are safer than propane. For more, read cooking without power during emergencies.
Rural preppers should optimize for depth and duration. Use your storage advantage — basements, outbuildings, dedicated pantry shelves. Buy in 25- and 50-pound bags. Plan for longer self-sufficiency (two weeks minimum) since resupply is further away. Supplement with gardening, hunting, and chest freezer backup. If you’re in the high desert Southwest, heat management for your storage areas becomes a year-round concern — interior closets beat outbuildings every time.
Both should have a 72-hour emergency kit packed and ready regardless of location.
Beyond 72 Hours: Planning for 1–2 Weeks
Once your three-day kit is solid, here’s how to expand for a 14-day window.
The math for a family of four over two weeks:
- Calories: 2,000 per person per day × 4 people × 14 days = 112,000 calories minimum
- Water: 1 gallon per person per day × 4 × 14 = 56 gallons
- Protein: at least 50g per person per day
Meal fatigue is real. At day four, rice and beans stops being “fine” and starts being demoralizing. Rotate between oatmeal breakfasts, rice-based lunches, and pasta dinners. Hot sauce and spices aren’t optional — they’re psychological infrastructure.
Cooking fuel becomes critical. A standard 8-oz butane canister gives you roughly 1.5–2 hours of burn time. For 28 cooking sessions over two weeks, you’ll need 8–12 canisters. Explore fuel-saving techniques like retained-heat cooking: bring food to a boil, wrap the pot in towels or a sleeping bag, and let it finish cooking off-heat. For more ideas, see alternative cooking methods for preppers.
Sanitation and food safety get harder. Without refrigeration, consume opened canned goods within 4–6 hours in warm weather. Cook only what you’ll eat in one sitting. A simple hand-washing station — jug, soap, and catch basin — prevents the gastrointestinal problems that turn a manageable situation into a medical emergency.
Printable Beginner Prepper Pantry Checklist
Use this to track your progress. Quantities target a family of four for 72 hours, with extended amounts for two weeks in parentheses.
Water
- Bottled or stored water: 12 gallons (56 gallons)
- Water filter or purification tablets: 1 system
Grains and Starches
- White rice: 5 lbs (20 lbs)
- Pasta: 3 lbs (10 lbs)
- Rolled or instant oats: 2 lbs (8 lbs)
- Instant mashed potatoes: 1 box (4 boxes)
- Crackers: 2 boxes (6 boxes)
Proteins
- Canned tuna/chicken/salmon: 6 cans (24 cans)
- Dry or canned beans: 4 lbs (16 lbs)
- Peanut butter: 1 jar, 40 oz (2 jars)
- Jerky: 4 oz (1 lb)
Canned Produce
- Canned tomatoes: 3 cans (12 cans)
- Canned vegetables: 4 cans (16 cans)
- Canned fruit/applesauce: 4 cans (12 cans)
Fats, Seasonings, and Bases
- Cooking oil: 1 bottle (2 bottles)
- Salt, pepper, chili powder, cumin: basic set
- Bouillon cubes: 1 box (3 boxes)
- Hot sauce and soy sauce: 1 bottle each
Baking Basics (for extended supply)
- All-purpose flour: (10 lbs)
- Sugar: (5 lbs)
- Baking powder: (1 can)
- Powdered milk: (1 large container)
Quick Calories and Snacks
- Granola bars: 1 box (4 boxes)
- Dried fruit and nuts: 1 lb (4 lbs)
- Emergency ration bars: 2 per person
Storage Supplies
- Airtight food-safe containers: 3–5
- Mylar bags with oxygen absorbers (for 2-week+ storage)
- 5-gallon food-grade buckets: 2–3
Cooking and Tools
- Manual can opener: 2
- Camp stove or butane burner: 1
- Fuel canisters: 4 (12 for two weeks)
- Matches/lighter: 2–3
- Basic pot and utensils
Print this list, tape it inside a cabinet door, and check items off as you go. Start with the 72-hour column and expand from there.
Essential Equipment Beyond Food
Your emergency food stockpile is only as good as your ability to access and prepare it. Don’t overlook these basics:
- Manual can openers (buy two — one is none)
- Camp stove or butane burner with adequate fuel
- Basic cookware — one pot, one pan, a stirring spoon
- Matches, lighters, or fire starters in waterproof storage
- Portable lighting — headlamp or battery-powered lantern (you’ll be cooking in the dark)
- Plates, cups, and utensils that don’t require washing (or a plan for washing with minimal water)
- Trash bags — sanitation matters more than you’d expect
Resources
- USDA Complete Guide to Home Canning — essential for safe home preservation
- FEMA Emergency Food and Water Guide — federal baseline recommendations
- CDC Emergency Water Supply Guidelines — water treatment and storage standards
Go Build Your Pantry
Here’s what I’ve learned across 12 years of emergency response and hundreds of community preparedness drills: the families who weather disruptions well aren’t the ones with the biggest stockpiles. They’re the ones who built simple, rotating pantries with foods they actually eat, stored water before anything else, and practiced at least once before it mattered.
You don’t need to prep for the apocalypse. You need to prep for the realistic stuff — a week without power, a supply chain hiccup, a storm that keeps you home. Start with Tier 1. Thirty to fifty bucks gets you a functional 72-hour supply. Run a practice day this month. Build from there.
The best emergency pantry is the one that exists when you need it. Go build yours.
The Complete
Prepper's Reference.
149 articles synthesized into one comprehensive PDF — twelve chapters covering water, food, shelter, first aid, comms, and scenario-specific preparedness. Free with your email.
Unsubscribe anytime · We never share your email
You're in. Check your inbox.
Keep Reading
How to Start Stockpiling Food: Canned Goods & Beginner Guide
Learn how to start stockpiling food with canned goods, budget-friendly staples, and smart rotation. Step-by-step beginner guide from a FEMA-trained responder.
Prepper Storage Solutions: Save Space & Stay Ready
Proven prepper storage solutions to maximize space, protect supplies, and stay organized. Budget tiers, room-by-room plans, and rotation tips. Start today.
Non-Perishable Food Items: Best Emergency Pantry Guide
Discover the best non-perishable food items for your emergency pantry. Storage tips, nutrition planning, and beginner mistakes to avoid. Start building today.