To build a DIY Faraday cage, place electronics inside insulating material and then enclose them in a conductive metal container or multiple layers of aluminum foil with no direct metal-to-device contact. DIY Faraday cages can provide useful EMP protection for small electronics, though professional options are usually more consistently tested and sealed.
Key Takeaways
- A galvanized metal trash can lined with cardboard and sealed with aluminum tape is the most reliable beginner DIY Faraday cage — under 30 minutes, around $30.
- Always test your completed cage at three frequencies minimum (AM, FM, cellular) before you trust it with critical gear.
- Three layers of heavy-duty aluminum foil with tightly folded seams is the bare minimum for foil-wrap builds — single-layer kitchen foil leaks at most frequencies.
- Insulate every device from the cage's metal walls using cardboard, foam, or anti-static bags — direct metal contact can fry your electronics during the event you're trying to survive.
- Store an emergency radio, USB document backups, and a portable power bank as your Tier 1 grid-down essentials.
DIY Faraday Cage: Build EMP Protection Step by Step
Quick answer
A DIY Faraday cage is a conductive enclosure that redirects electromagnetic energy around its contents, shielding the electronics inside. The most reliable beginner build uses a galvanized metal trash can lined with cardboard and sealed with aluminum tape — it takes under 30 minutes and costs about $30. For mission-critical protection, you’ll need professionally tested enclosures rated to military EMP standards.
I’ve built and tested over a dozen Faraday cages during my 12 years in Pacific Northwest emergency management — from ammo can setups in my workshop to galvanized trash can builds during CERT training exercises across Oregon and Washington. Here’s what actually works, what doesn’t, and exactly how to build your own.
Last tested and verified: January 2026.
Quick Summary
- Best beginner build: A galvanized metal trash can lined with cardboard and sealed with aluminum foil tape — around $30, under 30 minutes.
- Foil wraps work too, but you need at least three layers of heavy-duty foil with tightly folded seams. Single-layer kitchen foil leaks badly.
- Always insulate devices from metal walls using cardboard, foam, or anti-static bags — direct contact can damage electronics.
- Test at three frequencies minimum (AM, FM, cellular) before you trust any build with critical gear.
- Priority items to store: emergency radio, USB document backups, portable power bank, and a solar charger.
- DIY cages aren’t military-grade. They offer useful RF attenuation for basic preparedness, but mission-critical gear demands professionally tested enclosures.
What a Faraday Cage Does and Why It Matters
Think of a Faraday cage like an umbrella for electromagnetic waves. The conductive shell diverts energy around the contents the same way an umbrella diverts rain. Named after Michael Faraday, who demonstrated the principle in 1836, this concept is already part of your daily life. Ever lost your phone signal inside an elevator? That’s Faraday shielding at work.
Here’s what’s actually happening: a continuous conductive enclosure — solid metal, fine mesh, or layered wraps — redistributes incoming electromagnetic charge so the interior stays largely field-free. The cage works when openings and seams are much smaller than the wavelengths you’re trying to block.
Three types of electromagnetic threats matter for preparedness:
- EMP (Electromagnetic Pulse): Short, intense bursts of energy — like a nuclear HEMP — that can fry unprotected electronics instantly.
- CME (Coronal Mass Ejection): Solar storms that induce currents in long conductors like power grids. A small box won’t protect grid infrastructure, but it’ll protect what’s inside it.
- RF (Radio Frequency): AM, FM, cellular, and Wi-Fi signals you can use for practical shielding tests right at home.
For most of us focused on building a 72-hour emergency kit, a DIY Faraday cage adds an affordable layer of EMP protection for the electronics that could prove essential in a grid-down scenario.
When You Should (and Shouldn’t) Use a DIY Faraday Cage
A homemade cage makes sense for protecting small, portable devices you’d need after an EMP event or severe solar storm:
- Emergency and handheld radios
- USB flash drives with document backups
- Spare phones and battery banks
- Portable solar chargers
- Small sensors, medical device batteries, and microcontrollers
What about bigger stuff? Don’t rely on a DIY cage for mission-critical infrastructure, hospital devices, or whole-house protection. Those scenarios demand professionally tested electromagnetic shielding — full stop.
Faraday Cage Materials: What You Need
 Everything you need for a DIY Faraday cage build
| Material | Purpose | Approximate Cost |
|---|---|---|
| Galvanized metal trash can with snug lid | Primary enclosure | $25–$40 |
| .50 cal ammo can | Compact alternative enclosure | $15–$25 |
| Cardboard or foam sheets | Insulation barrier | $0–$5 |
| Heavy-duty aluminum foil | Wrap method or extra layers | $5–$8 |
| Aluminum foil tape | Seam sealing | $6–$10 |
| Anti-static bags | Device-level protection | $5–$10 |
| Silica gel packs | Moisture control | $5–$8 |
| Bubble wrap | Additional insulation | $0–$5 |
Total cost for Build A: Approximately $25–$50. Total cost for Build B (foil wrap): Under $20.
Grounding isn’t required for electromagnetic shielding. I’ll explain why in the myths section below.
Two Beginner-Friendly DIY Faraday Cage Builds
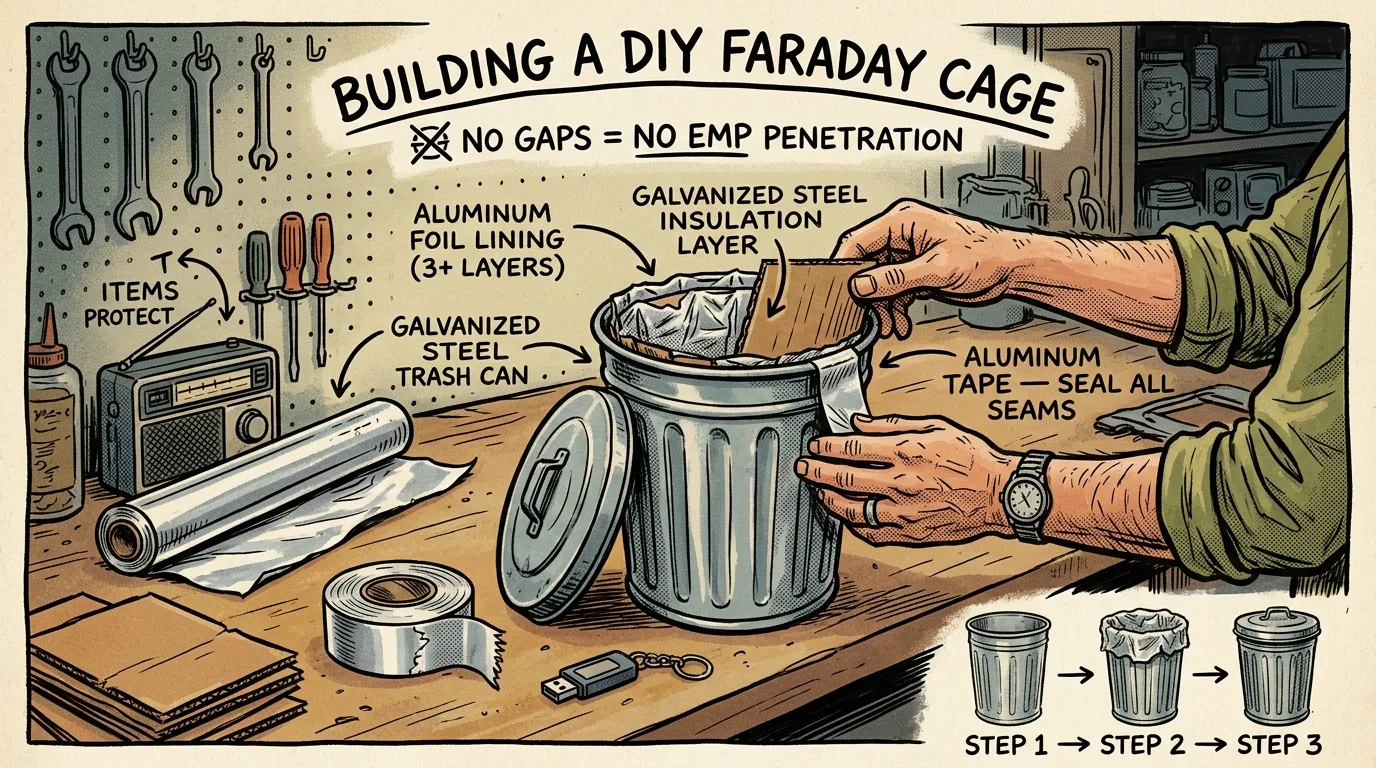
Build A: The Metal Container Method
 Lining a galvanized trash can with cardboard insulation
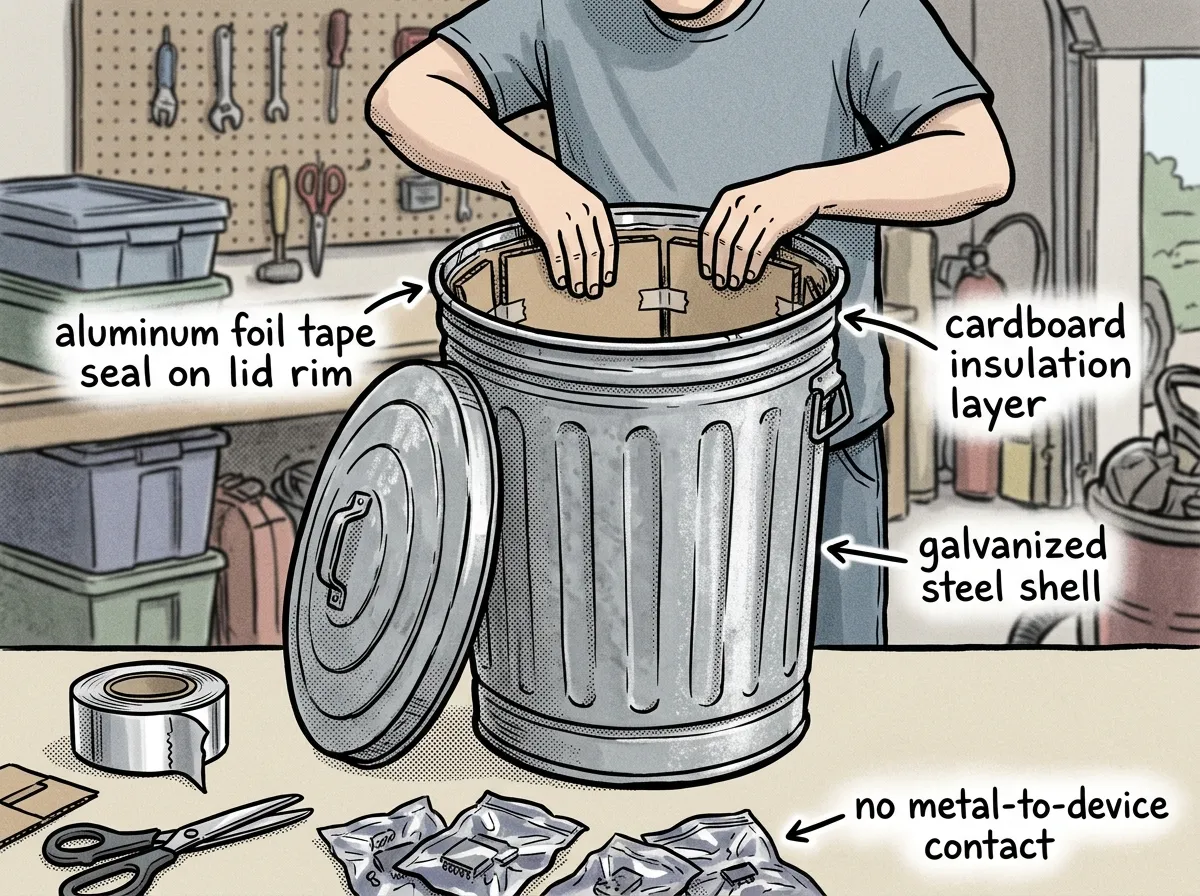
This is the build I recommend to everyone starting out. A galvanized metal trash can or ammo can gives you the best balance of durability, shielding effectiveness, and ease of testing.
- Select a galvanized trash can or ammo can with a tight-fitting lid — inspect it for holes, heavy corrosion, or large gaps
- Line all interior surfaces with cardboard or foam as insulation — every wall, the bottom, and the inside of the lid
- Wrap each device in anti-static bags or insulating pouches, then place them inside without touching any metal surface
- Close the lid firmly and seal the entire seam with aluminum foil tape — press it down hard, no gaps
- Add silica gel packs for moisture control and label the contents on the outside
Pros: Durable, stackable, easy to test and reseal. Excellent shielding effectiveness across a wide frequency range.
Cons: Lid-to-body contact must be tight — that’s where most failures happen. Items must never touch the metal walls directly.
Here’s something I see constantly with ammo can builds: people leave the rubber gasket in place. That gasket creates a conductivity gap that kills your shielding. I remove it and line the sealing edge with aluminum tape, then test. That single change took my ammo can from leaking FM signals to blocking them completely. It’s a two-minute fix that makes or breaks the whole build.
Build B: The Aluminum Foil Wrap Method
This approach works well when you need portability or you’re on a tight budget. But it demands more care during construction — and honestly, more patience than most people expect.
- Wrap each device in a non-conductive layer — cloth, paper, or bubble wrap. The device must not contact foil at any point.
- Apply the first foil layer. Use heavy-duty aluminum foil (standard kitchen foil is thinner and requires more layers). Wrap completely with at least one inch of folded overlap at every seam. Press firmly to eliminate air gaps.
- Add an insulating layer — another wrap of paper or bubble wrap over the first foil layer.
- Apply a second foil layer with the same tight folding technique. Use aluminum tape at every fold point.
- Add a third foil layer with another insulating barrier beneath it. Three complete heavy-duty foil layers is the minimum I trust for broadband attenuation.
- Handle corners carefully. Gather and fold — never bunch loosely. Loose bunching creates gaps that leak RF energy right through.
- Label the outside with a marker so you know what’s inside without unwrapping everything.
Pros: Costs under $20, highly portable, no special tools needed.
Cons: Foil tears easily, seams are the weak point, and you’ve got to rebuild the wrap after every access. The first time I tried this method with standard kitchen foil, I was confident one layer would work. It didn’t — my phone rang right through it like the foil wasn’t even there. That’s when I learned the three-layer minimum isn’t optional.
If your phone rings inside your Faraday cage, your Faraday cage isn’t a Faraday cage.
What to Store Inside Your Faraday Cage
Knowing how to make a DIY Faraday cage only matters if you’ve thought about what goes inside. Here’s the priority framework I use when teaching EMP preparedness workshops:
Tier 1 — Critical (Store These First)
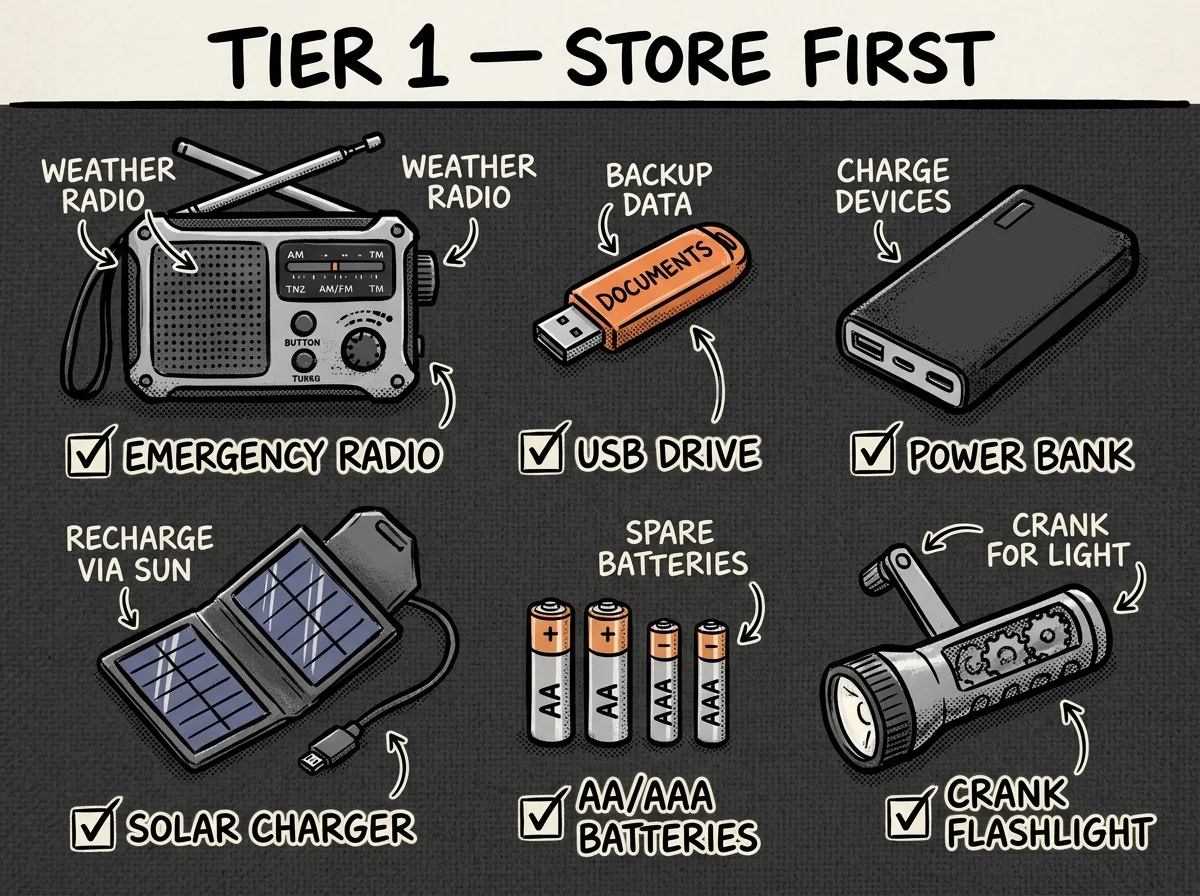 Priority electronics for your Faraday cage
- AM/FM/NOAA emergency radio — Your primary link to information after a grid-down event. See our emergency radio buying guide for recommendations.
- USB drives with important documents — Copies of IDs, insurance policies, medical records, family contacts, and offline reference guides.
- LED flashlight with spare batteries — Light is safety. Rotate stored batteries every 6–12 months.
- Portable power bank — Charges your radio or phone when wall power is gone.
Tier 2 — High Value
- Portable solar charger — Renewable power for indefinite grid-down scenarios.
- Spare cell phone with offline maps — Pre-load topo maps and survival references before storing.
- Handheld ham radio (Baofeng or similar) — Two-way communication when cell towers are down. The Baofeng UV-5R — around $25–$30 — is what I recommend for beginners. It’s cheap enough to buy two: one to use and one to store.
Tier 3 — Nice to Have
- Small laptop or tablet — Loaded with reference materials, manuals, and entertainment for morale.
- Spare medical device batteries — Critical for anyone dependent on CPAP, hearing aids, or glucose monitors.
- Walkie-talkies — Short-range family communication.
Store everything in anti-static bags inside the cage. Set a calendar reminder to rotate batteries every 6–12 months and verify devices still power on during your rotation check.
How to Test a Homemade Faraday Cage
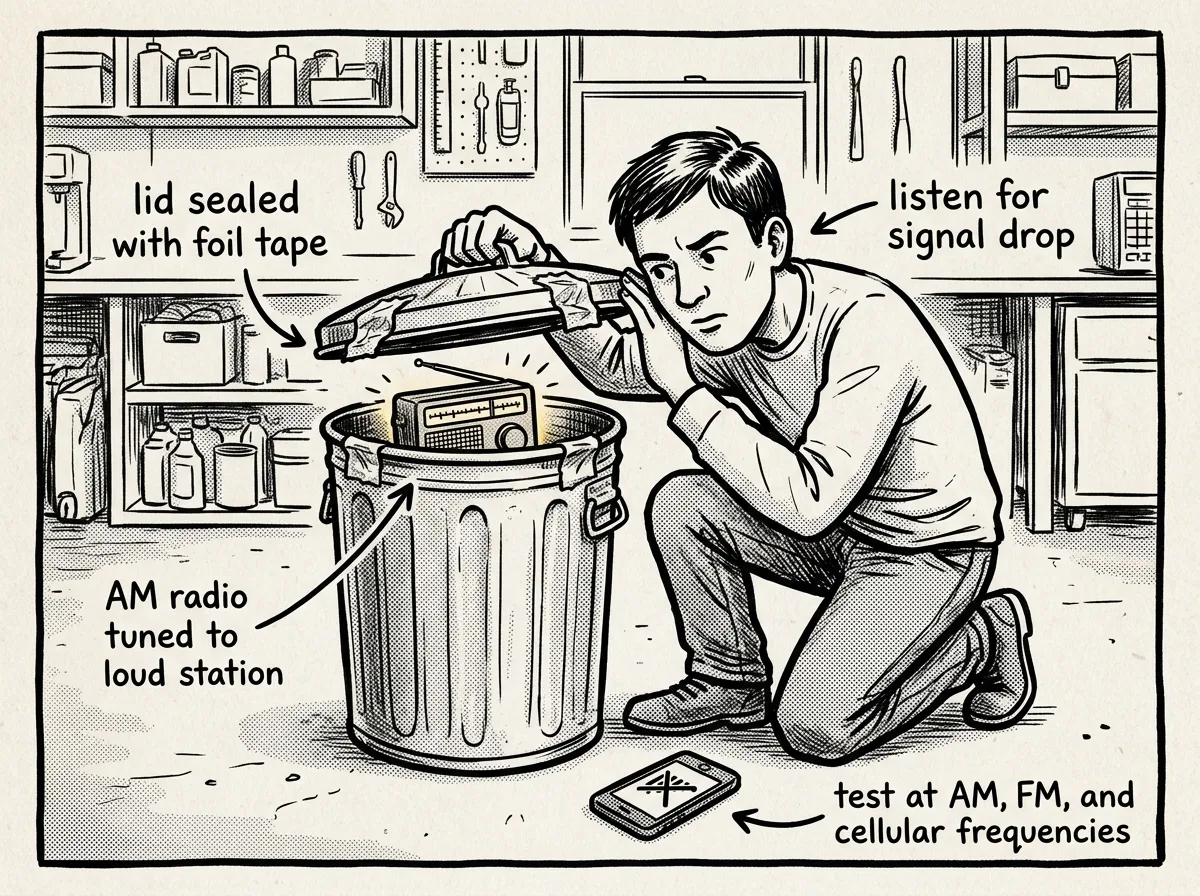 Testing Faraday cage shielding with an AM radio
So you’ve built your cage — how do you know it actually works? Home tests measure RF attenuation, not high-energy EMP survival. But passing these tests at multiple frequencies gives you meaningful confidence in your build.
The Three-Frequency Testing Protocol
I test every cage I build at three frequencies minimum before I trust it:
- AM radio test: Tune a battery-powered AM radio to a strong local station. Place it inside the cage, close the lid. The signal should drop to silence or near-silence.
- FM radio test: Repeat with an FM station. FM operates at higher frequencies and is sometimes harder to block.
- Cell phone test: Place your phone inside, close the cage, and call it from another phone. If the call fails and the phone shows no signal, cellular bands are being attenuated.
Wi-Fi Test (Bonus Round)
Place your phone inside the cage near your Wi-Fi router. Close the cage, wait 30 seconds, then open it and check whether the phone maintained a Wi-Fi connection or loaded a webpage. If it disconnected or failed to load, your cage is blocking 2.4 GHz and/or 5 GHz signals.
What Do the Results Mean?
Partial signal reduction — say your phone drops from 4 bars to 1 — still indicates meaningful attenuation, but it’s not full protection. For preparedness purposes, I want to see complete signal loss at all three test frequencies before I store critical gear inside.
Want more precise measurements? Professionals use spectrum analyzers. If you’re a hobbyist, free SDR (software-defined radio) tools can give you rough dB readings across a wider frequency range.
During a 2019 community preparedness drill in rural Washington, I demonstrated a galvanized trash can cage that dropped an FM signal from full strength to inaudible. The same test failed on a loosely wrapped foil setup until we added a third layer and taped every seam. That experience is exactly why I insist on the three-layer minimum for foil builds.
Scaling Up: Large Faraday Cages for Bigger Gear
What if you need to protect something larger than a radio? Scaling beyond small containers introduces real engineering challenges.
For medium-sized gear (inverters, larger radios, battery systems), a 30- or 55-gallon galvanized steel drum works. Same principles apply — line the interior with cardboard, seal seams with aluminum tape, and make sure the lid seats tightly.
For generator-sized equipment:
- Use a galvanized steel garbage can rated for 55+ gallons, or build a welded metal enclosure from sheet steel.
- The biggest challenge is maintaining continuous conductivity at seams. Use conductive gasket tape along the lid contact surface — regular weatherstripping won’t work because it’s non-conductive.
- A generator must be fully cooled and fuel-drained before storage. Storing a hot or fueled generator in a sealed metal container is a fire and fume hazard. Don’t skip this.
- Weight becomes a real factor. A 55-gallon steel drum with a generator inside isn’t something you’re moving alone.
My honest recommendation: for anything larger than a 55-gallon drum, consult a professional EMC (electromagnetic compatibility) engineer. The cost of a consultation is far less than the cost of a failed build that gives you false confidence.
Hardening Your Home Against EMP Beyond a Faraday Cage
A Faraday cage protects what’s inside it. But EMP hardening your home means protecting the systems that keep your household running. Think about it in layers, building on your power grid failure preparation:
Entry Point Protection
- Install whole-house surge protectors on your main electrical panel.
- Add point-of-use surge protectors on every entry point: power, coax cable, phone lines, and ethernet.
- During solar storm warnings from NOAA, unplug critical electronics entirely. No surge protector is foolproof against a severe geomagnetic event.
Analog Backup Systems
The most EMP-proof technology is technology that doesn’t need electricity:
- Paper maps of your region and evacuation routes
- Manual water filtration (gravity-fed ceramic filters)
- Hand tools, manual can openers, and non-electric fire starters
- Physical copies of important documents
Advanced: Faraday Room Concepts
It’s technically possible to shield an entire room using conductive paint or copper mesh on walls, ceiling, and floor, with conductive gaskets on doors and windows. Military and government facilities use this approach.
However, it’s expensive ($5,000+), requires meticulous installation to avoid gaps, and should involve a qualified electrician and EMC specialist. For most households, the combination of surge protectors, analog backups, and a DIY Faraday cage for critical electronics is the practical sweet spot.
Faraday Cage Myths That Won’t Die
The internet is full of bad Faraday cage advice. I’ve been correcting these myths in workshops for years, and they keep coming back.
Myth: A Microwave Oven Works as a Faraday Cage
Nope. A microwave is designed to block its operating frequency (~2.45 GHz), but the mesh holes in the door are far too large to block many other frequencies — especially lower ones used by AM radio, FM, and some EMP components. I’ve tested this directly. A phone inside a microwave oven still receives calls. Don’t trust your emergency gear to your kitchen appliance.
Myth: A Single Layer of Aluminum Foil Is Enough
Also nope. One layer of standard kitchen foil is thin and full of micro-tears. In my testing, single-layer wraps consistently leak at FM and cellular frequencies. You need at least three complete layers of heavy-duty foil with tightly folded seams for broadband protection.
Myth: If Your Phone Loses Signal Inside, It’s EMP-Proof
Misleading. A phone losing its cell signal tells you that specific cellular frequency is attenuated. It tells you nothing about the cage’s performance against the broadband, high-energy pulse of an actual EMP. Always test AM, FM, cellular, and Wi-Fi. Even then, passing all four doesn’t certify your cage against military-grade threats.
Myth: You Must Ground a Faraday Cage
False. Grounding isn’t required for electromagnetic shielding. The cage works by redistributing charge across its conductive surface — grounding has nothing to do with that mechanism. People confuse Faraday shielding with lightning protection, which does require grounding. If you want to ground a structure for lightning safety, hire a licensed electrician.
DIY Versus Professional Shielding: An Honest Comparison
Here’s the decision framework I give people at every workshop I run:
| Budget | Recommendation | Expected Performance |
|---|---|---|
| Under $20 | DIY aluminum foil wrap (3+ layers) | Moderate RF attenuation; useful for basic preparedness |
| $20–$50 | DIY metal container build (trash can or ammo can) | Good RF attenuation; most reliable DIY option |
| $50–$80 | Commercial Faraday bags (Mission Darkness, Faraday Defense) | 80–100+ dB claimed attenuation; tested seams |
| $200–$500 | Professional EMP-rated enclosures | Engineered for broadband EMP; documented test results |
| Mission-critical | Certified EMC consultant | Tested to MIL-STD-188-125-1; verified dB figures |
As a FEMA-trained emergency management professional, I’ll tell you straight: MIL-STD-188-125-1 is the benchmark that actually matters. If a manufacturer can’t cite a tested dB attenuation figure against this standard, treat their marketing claims skeptically. For your personal preparedness kit, though, a well-built trash can cage is genuinely useful — it doesn’t have to be military-grade to be worth building.
The bottom line: DIY methods are excellent for basic preparedness and protecting small electronics. If lives or critical operations depend on the shielding, invest in professional solutions.
Common Problems and How to Fix Them
| Problem | Cause | Fix |
|---|---|---|
| Signal still gets through | Seam gaps, loose lid, foil punctures | Seal with aluminum tape, add foil layers, use a tighter container |
| Foil tears during wrapping | Thin foil, rough handling | Switch to heavy-duty foil, wrap over a flat surface, reinforce with tape |
| Lid won’t seal tightly | Poor container fit, bent rim | Add conductive gasket tape to the lid edge, or use a different container |
| Moisture inside cage | Humidity, temperature changes | Add silica gel packs, seal devices in plastic bags first |
| Devices damaged when retrieved | Metal-to-device contact | Add thicker cardboard or foam insulation on all interior surfaces |
If you’re in a humid Gulf Coast climate or anywhere in the Pacific Northwest where I work, moisture is your silent enemy. I’ve opened cages after six months of garage storage and found condensation on everything inside. Silica gel packs aren’t optional — they’re essential. Replace or recharge them every time you open the cage.
Frequently Asked Questions
What is the best DIY Faraday cage?
A galvanized metal trash can with a tight-fitting lid, lined with cardboard and sealed at the seam with aluminum foil tape. It’s the most reliable and affordable option — solid shielding effectiveness, holds multiple devices, and you can build it in under 30 minutes for around $30.
Do DIY Faraday cages actually work?
Yes, but with limits. A well-built DIY Faraday cage blocks many RF signals and provides useful attenuation against low-to-moderate electromagnetic pulses. No homemade cage is certified to military EMP standards, though. Test yours at multiple frequencies before trusting it, and use professionally tested enclosures for mission-critical gear.
How to harden your home against EMP?
Start with whole-house surge protectors on every entry point, unplug critical electronics during solar storm warnings, and store backup devices in a Faraday cage. Advanced hardening includes conductive paint or copper mesh on walls, but that’s expensive and should involve a qualified electrician. Keep analog backups — paper maps, manual tools, non-electric water filtration — as your baseline.
Does a Faraday cage need to be grounded to work?
No. Grounding isn’t required for electromagnetic shielding. The cage redistributes incoming energy around its conductive surface regardless of whether it’s grounded. Grounding is for static discharge and lightning protection — a separate concern entirely.
Can aluminum foil really block an EMP?
Properly layered heavy-duty aluminum foil can attenuate RF energy at many frequencies. For meaningful EMP protection, you need at least three complete layers with tightly folded seams and no punctures. Single-layer kitchen foil isn’t sufficient — I’ve verified this through direct testing multiple times.
How do mesh size and wavelength relate?
A mesh blocks electromagnetic waves only if its openings are much smaller than the wavelength being blocked. For GHz-range signals like Wi-Fi, a fine mesh works. For lower kHz to MHz frequencies, you need much finer continuity or solid metal to maintain shielding effectiveness.
Your Pre-Storage Checklist
Before you close that lid and walk away, verify every item here:
- All devices insulated from metal surfaces with cardboard, foam, or anti-static bags
- Container free of large gaps, holes, or heavy corrosion
- Lid sealed tightly with aluminum tape on all seams
- At least 3 heavy-duty foil layers used (for foil wrap builds)
- Silica gel packs added for moisture control
- Contents labeled on the outside for easy identification
- AM radio test passed — signal drops to silence
- FM radio test passed — signal drops to silence
- Cell phone test passed — call fails, no signal displayed
- Wi-Fi test passed — phone disconnects from network
- Battery rotation scheduled every 6–12 months
Build It This Weekend
A DIY Faraday cage isn’t theoretical — it’s a practical preparedness tool you can build today with materials from a hardware store. Start with a galvanized trash can, line it with cardboard, seal the seams, test it at three frequencies, and fill it with the electronics that matter most. You’ll have meaningful EMP protection in under an hour for the cost of a pizza dinner.
I’ve seen firsthand during field exercises and community drills how this simple build outperforms expectations when it’s done right — and how quickly it fails when corners get cut. Take the time to seal your seams. Test your results. Store the gear that’ll actually matter when the grid goes dark.
Build it. Test it. Trust what you’ve verified.
The Complete
Prepper's Reference.
149 articles synthesized into one comprehensive PDF — twelve chapters covering water, food, shelter, first aid, comms, and scenario-specific preparedness. Free with your email.
Unsubscribe anytime · We never share your email
You're in. Check your inbox.
Keep Reading
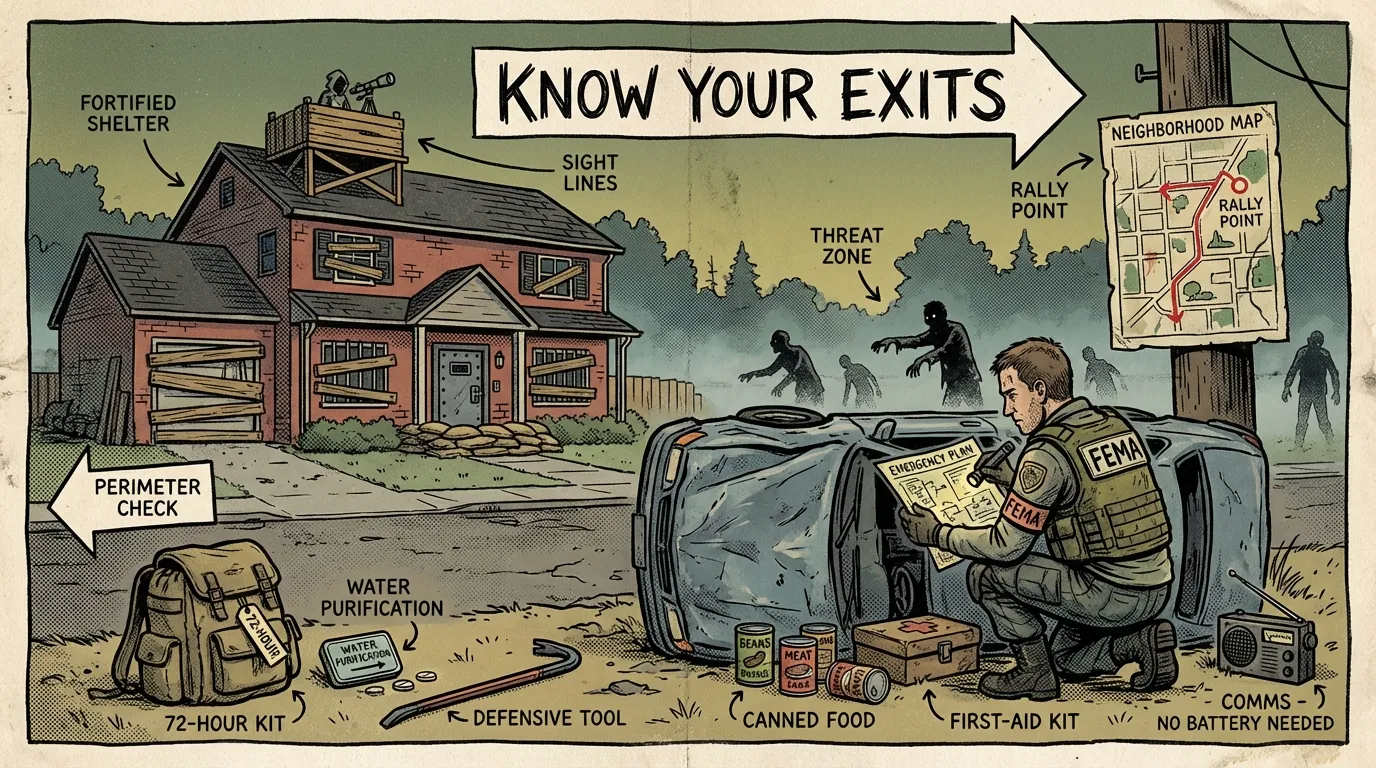
Zombie Apocalypse Survival Preparedness: FEMA Pro's Guide
Zombie apocalypse survival preparedness teaches real disaster skills. A FEMA-trained Wilderness First Responder breaks down the exact steps. Start today.
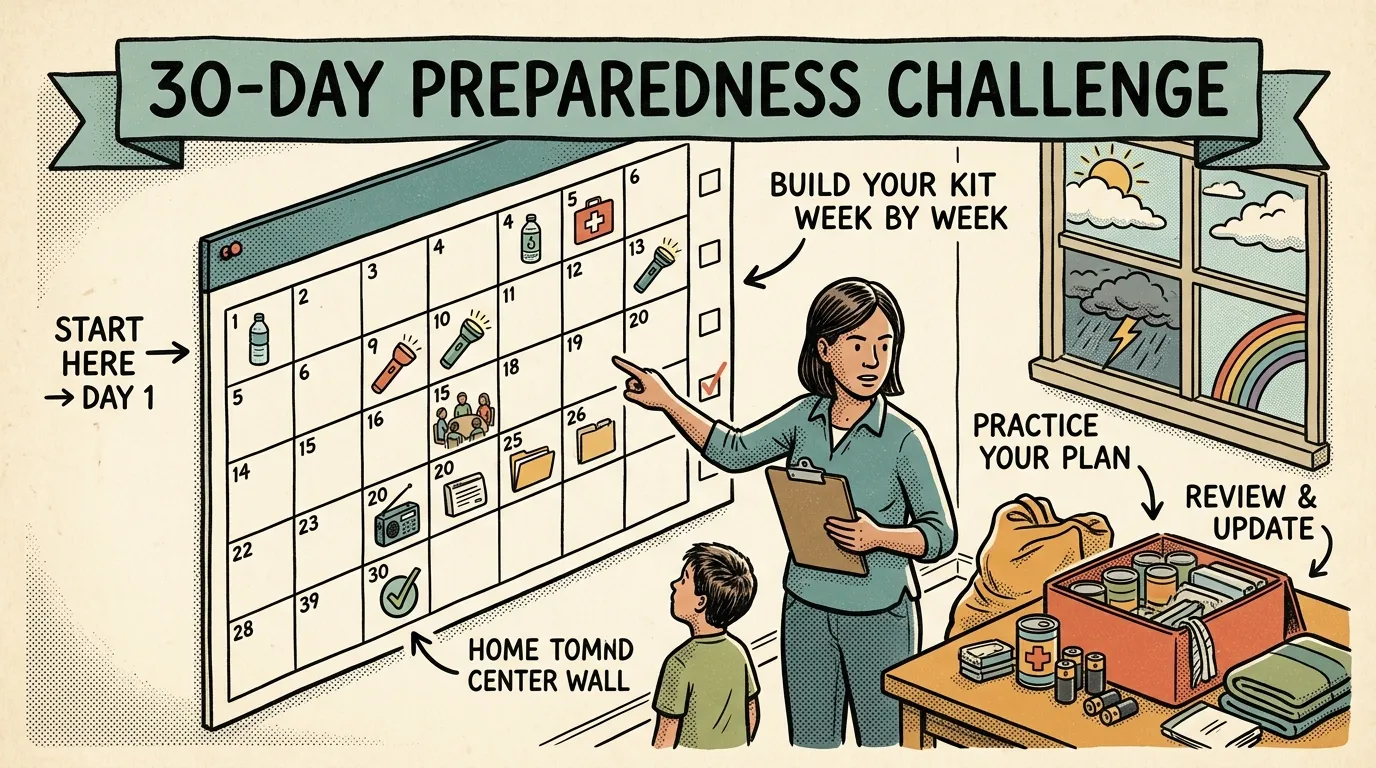
National Emergency Preparedness Month: 30-Day Plan
Use this 30-day National Emergency Preparedness Month challenge to go from unprepared to fully ready. One simple 15-minute task per day. Start now.
Emergency Preparedness Merit Badge: A Parent's Guide
Use the Emergency Preparedness merit badge framework to teach your kids real survival skills at home. Step-by-step activities for each requirement.